
1. Produktas baigtasview
The KUIDAMOS DSO FNIRSI PRO is a portable digital oscilloscope designed for various measurement tasks. It features a 2.4-inch LCD display, a real-time sampling rate of up to 20MS/s, and an analog bandwidth of 5MHz. This device is equipped with a built-in 1200mAh rechargeable lithium battery, offering approximately 3 hours of continuous operation. It supports waveform storage and management, making it suitable for both maintenance and research and development applications.
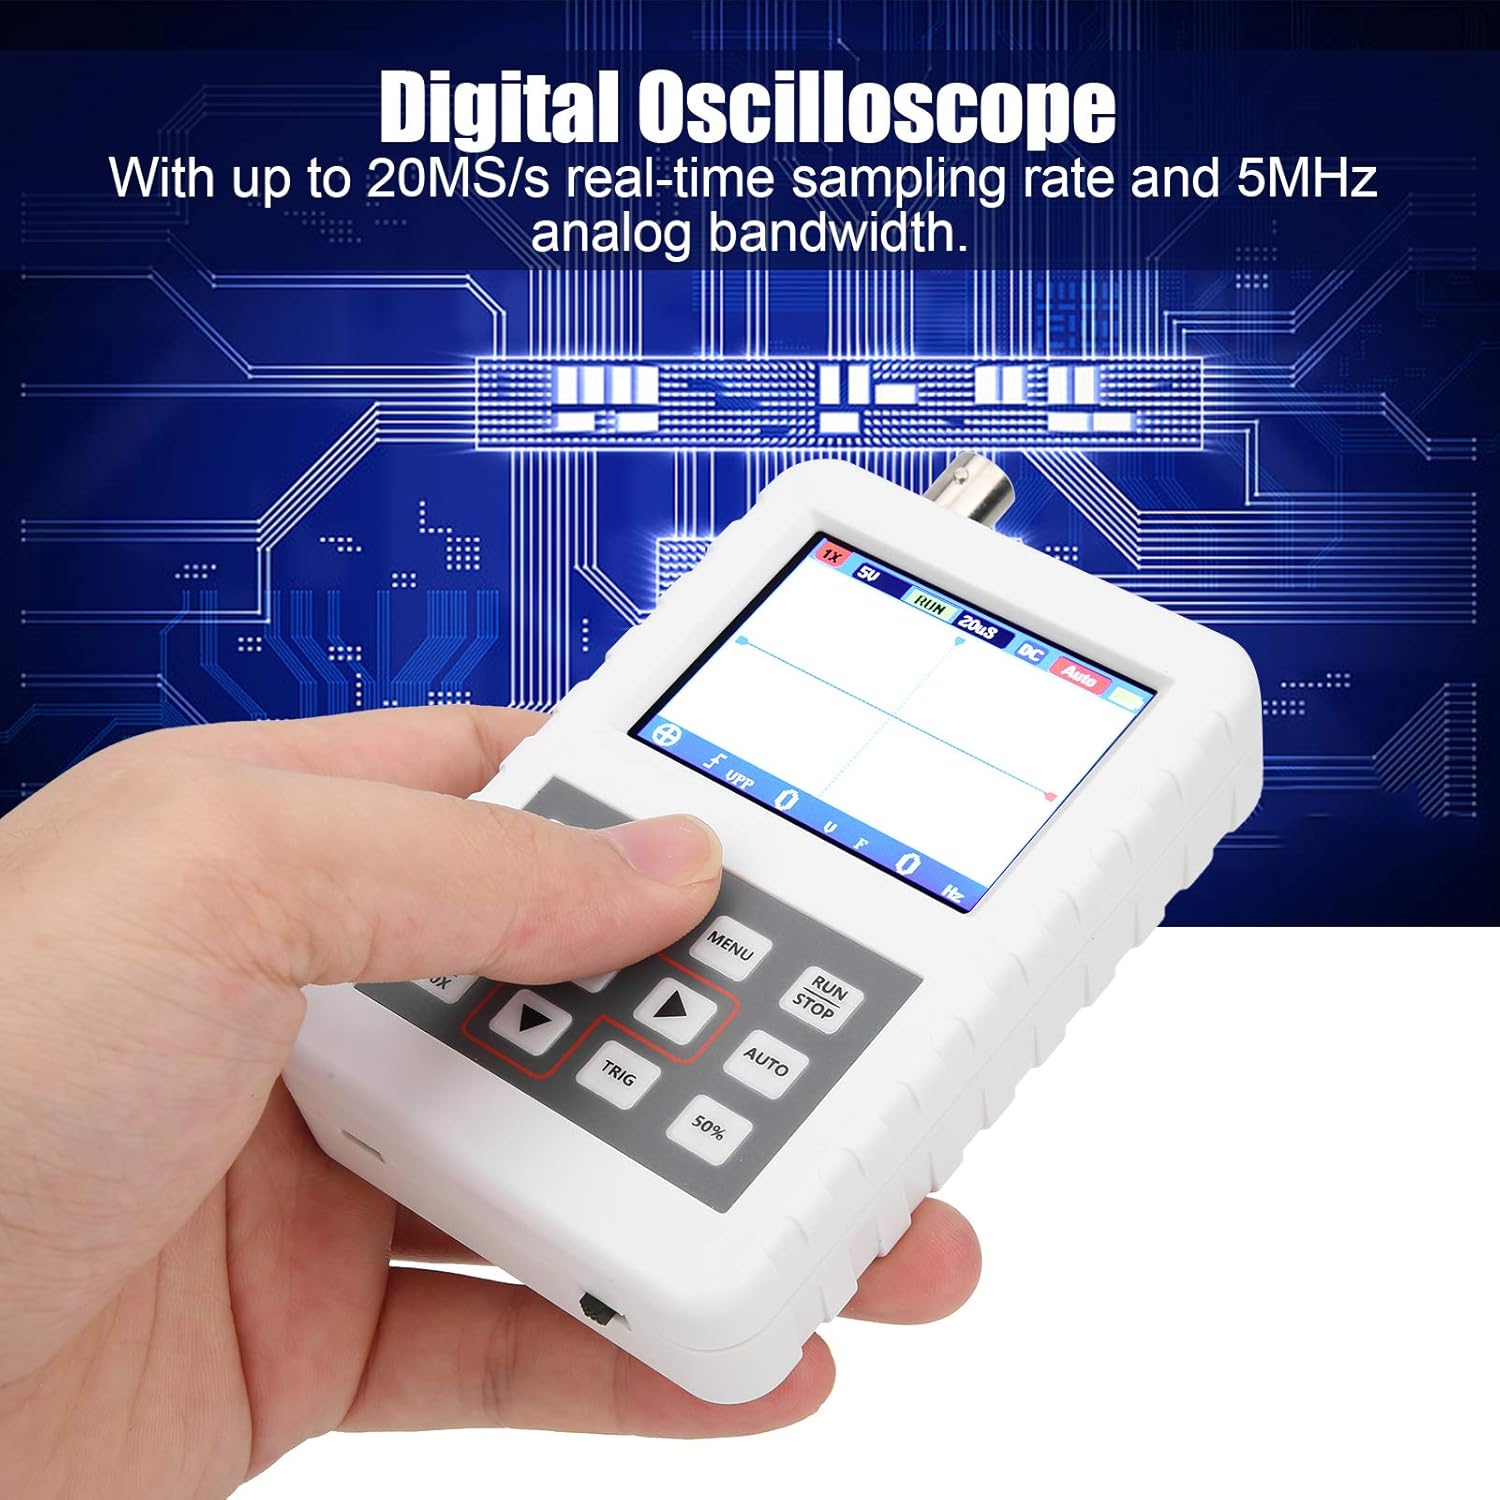
Image 1.1: The DSO FNIRSI PRO Digital Oscilloscope, highlighting its 20MS/s sampling rate and 5MHz analog bandwidth.

Image 1.2: The oscilloscope's 2.4-inch HD LCD screen with 320 x 240 resolution for clear waveform display.

1.3 paveikslas: Priekis ir galas views of the DSO FNIRSI PRO, illustrating its physical layout.
2. Pakuotės turinys
Patikrinkite, ar pakuotėje yra visi toliau išvardyti daiktai:
- 1 x DSO FNIRSI PRO Digital Oscilloscope
- 1 x Matching Probe
- 1 x USB duomenų linija
- 1 x Naudotojo vadovas (šis dokumentas)
3. Pradinė sąranka
3.1 Įrenginio įkrovimas
Before first use, fully charge the oscilloscope. Connect the provided USB data line to the device's charging port and to a 5V/1A, 2A, 3A, or 4A USB power adapter. The built-in 1200mAh lithium battery can be charged continuously for approximately 3 hours.
3.2 Zondo prijungimas
Connect the matching probe to the BNC connector on the top of the oscilloscope. Ensure a secure connection by twisting the probe connector clockwise until it locks into place.
3.3 Įjungimas / išjungimas
To power on the device, press and hold the power button (usually located on the side or bottom) for a few seconds until the screen illuminates. To power off, press and hold the power button again until the device shuts down.
4. Naudojimo instrukcijos
4.1 Valdikliai ir sąsaja
The oscilloscope features a user-friendly interface with several buttons for navigation and function control.

Image 4.1: Operating the DSO FNIRSI PRO, showing the placement of control buttons.
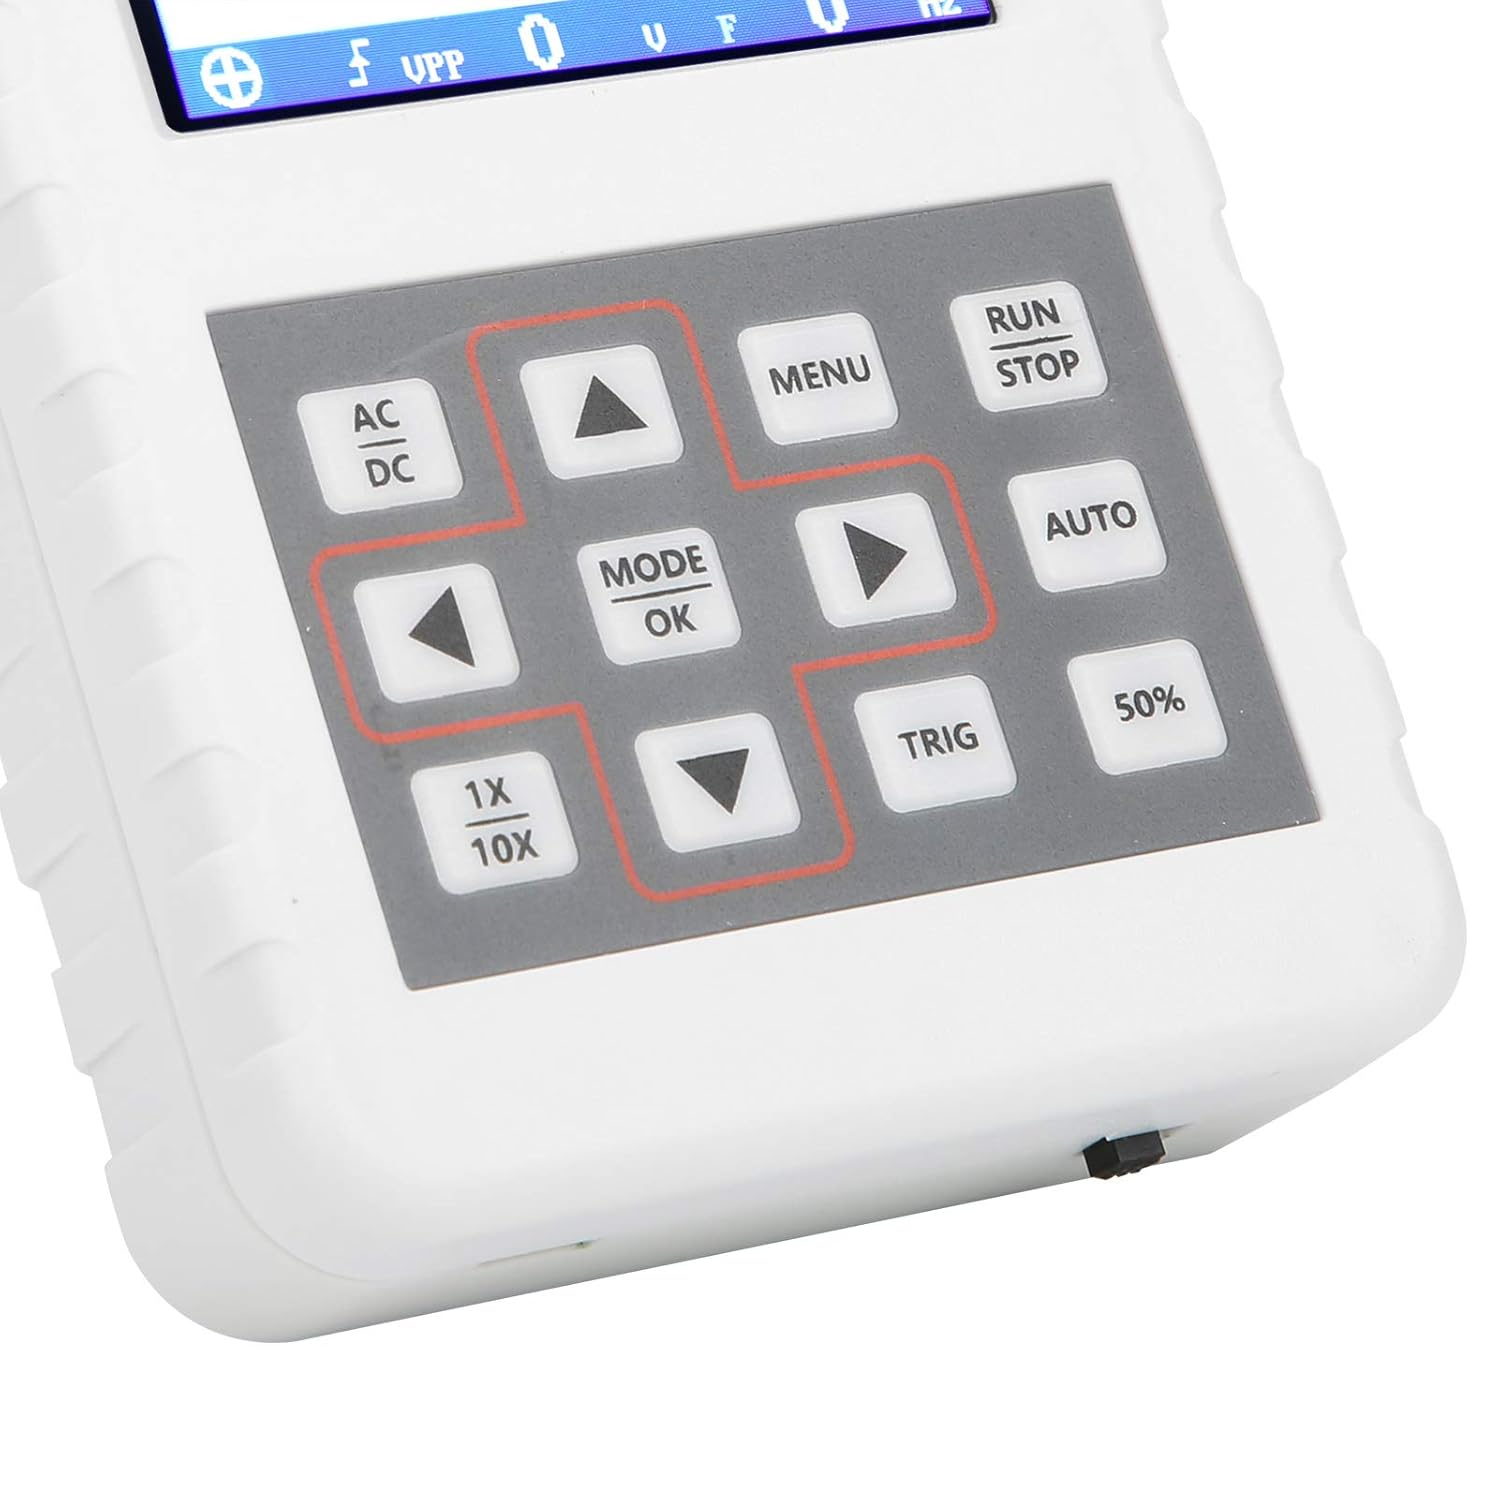
4.2 pav.: Išsamus view of the oscilloscope's control panel.
- MENIU: Pasiekia pagrindinį meniu, kuriame yra nustatymų ir funkcijų.
- RUN/STOP: Starts or pauses waveform acquisition.
- AUTOMATINIS: Automatiškai pakoreguoja nustatymus, kad bangos forma būtų rodoma optimaliai.
- TRIG: Reguliuoja trigerio lygį.
- 50 %: Sets the trigger level to 50% of the waveform ampplatuma.
- AC DC: Toggles between AC and DC coupling modes.
- 1X/10X: Sets the oscilloscope's input attenuation to match the probe's setting.
- MODE/OK: Confirms selections or changes modes.
- Rodyklių mygtukai (aukštyn, žemyn, kairėn, dešinėn): Naršyti meniu ir koreguoti parametrus.
4.2 Probe Attenuation Settings
It is critical to match the probe's attenuation setting with the oscilloscope's input setting to ensure accurate measurements.
- Už 1X measurement (0-40V): Set both the physical switch on the probe and the 1X/10X button on the oscilloscope to the 1X padėtis.
- Už 10X measurement (40-800V): Set both the physical switch on the probe and the 1X/10X button on the oscilloscope to the 10X padėtis.
4.3 Measurement Modes and Triggering
The oscilloscope supports various trigger modes to stabilize waveform display:
- Vienvietis: Captures a single waveform event and then stops.
- Normalus: Captures a waveform only when a trigger condition is met.
- Auto: Continuously acquires waveforms, even without a trigger, but will trigger if a signal is present.
Naudokite TRIG button and arrow keys to adjust the trigger level, which determines the voltage point at which the oscilloscope begins to acquire data.
4.4 Bangų formų saugojimas ir valdymas
The device includes 16MB of built-in storage, capable of storing up to 500 waveform images. Use the file manager function to browse, view, and manage saved waveforms. This includes viewing detailed information, flipping through images, and deleting unwanted files.

4.3 pav.: pvz.amples of sine wave measurements at various frequencies.

4.4 pav.: pvz.amples of square, triangular, and sawtooth wave measurements.
5. Priežiūra ir priežiūra
5.1 Valymas
Nuvalykite įrenginį minkštu, sausu skudurėliu. Nenaudokite abrazyvinių valiklių ar tirpiklių, nes jie gali pažeisti įrenginį.asing arba ekraną. Prieš valydami įsitikinkite, kad įrenginys yra išjungtas ir atjungtas nuo bet kokio maitinimo šaltinio.
5.2 Akumuliatoriaus priežiūra
To prolong battery life, avoid fully discharging the battery frequently. If storing the device for an extended period, charge it to approximately 50% and recharge every few months.
5.3 Saugykla
Store the oscilloscope in a cool, dry place, away from direct sunlight, extreme temperatures, and high humidity. Keep it protected from dust and physical impact.
6. Problemų sprendimas
- Issue: Abnormal measured data.
Sprendimas: Check the probe's attenuation switch (1X or 10X) and ensure it matches the setting on the oscilloscope (using the 1X/10X button). If the probe is set to 10X and the oscilloscope is set to 1X, the device will not be damaged, but the data displayed will be incorrect. - Issue: Device does not power on.
Sprendimas: Ensure the battery is sufficiently charged. Connect the device to a power source using the USB data line and allow it to charge for at least 30 minutes before attempting to power it on again. - Issue: Screen is blank or frozen.
Sprendimas: Try performing a soft reset by pressing and holding the power button for an extended period (e.g., 10-15 seconds) until the device powers off, then power it back on. If the issue persists, ensure the battery is charged.
7. Techninės specifikacijos
| Funkcija | Specifikacija |
|---|---|
| Produkto modelis | DSO FNIRSI PRO |
| Gaminio medžiaga | ABS |
| Kanalų skaičius | 1 |
| Ekrano dydis | apytiksliai 6.1 cm / 2.4 colio |
| Ekrano raiška | 320 x 240 |
| Ekrano tipas | LCD ekranas |
| Analoginis dažnių juostos plotis | 5 MHz |
| Maksimalus S.amplingo norma | 20 MSps |
| Trigerio režimas | Vienas / Normalus / Automatinis |
| Bangos formos saugojimas | 16MB (up to 500 waveform pictures) |
| Integruota baterija | Ličio baterija 1200 mAh |
| Budėjimo laikas | 3 valandos |
| Įkrovimo įvestis | 5V/1A/2A/3A/4A |
| Gamintojas | KUIDAMOS |
| Kilmės šalis | JAV |
| Prekės dalies numeris | KUIDAMOStgaix9hwck |
8. Garantija ir klientų aptarnavimas
For warranty information, technical support, or service inquiries, please refer to the documentation provided with your purchase or contact the seller directly. Keep your purchase receipt as proof of purchase for any warranty claims.