
1. Įvadas
This manual provides detailed instructions for the installation, configuration, and operation of your Evertech H.265 8 Channel Hybrid DVR Security Recorder. This system is designed to provide a comprehensive security solution for homes and offices, supporting up to eight cameras with H.265 video compression technology for efficient storage and high-quality video.
The DVR is compatible with various camera types, including 720P, 1080P AHD, TVI, CVI, and traditional analog cameras. It includes a pre-installed 2TB hard drive for recording and offers remote viewing capabilities via smartphones, tablets, or PCs.

Image 1.1: Evertech H.265 8 Channel Hybrid DVR with a 2TB hard drive and a smartphone displaying the remote viewparaiška.
2. Pakuotės turinys
Patikrinkite, ar pakuotėje yra visi toliau išvardyti daiktai. Jei kurių nors daiktų trūksta arba jie pažeisti, susisiekite su klientų aptarnavimo tarnyba.
- Evertech 8 Channel Hybrid DVR with 2TB Hard Drive installed
- Maitinimo šaltinio adapteris
- USB pelė
- CD for PC Software and Video Instructions (may vary by region/model)

Image 2.1: Visual representation of the Evertech DVR package contents.
3. Produktas baigtasview
3.1 Priekinis skydelis
The front panel of the DVR provides essential controls and indicators for local operation.
- REC Indicator: Illuminates when recording is active.
- SIGNALIZACIJOS indikatorius: Illuminates when an alarm event (e.g., motion detection) is triggered.
- MAITINIMO indikatorius: Illuminates when the DVR is powered on.
- ESC mygtukas: Naudojamas norint išeiti iš meniu arba atšaukti operacijas.
- MENIU mygtukas: Accesses the main menu for system configuration.
- Krypties mygtukai (aukštyn / žemyn / kairėn / dešinėn): Naršo meniu parinktis.
- Gerai mygtukas: Patvirtina pasirinkimus arba įeina į submeniu.
- USB prievadas: Connects the USB mouse or a USB flash drive for backup.
3.2 Galinis skydelis
The rear panel contains all necessary ports for connecting cameras, monitors, network, and power.

3.1 pav.: Išsamus view of the DVR's rear panel connections.
- VIDEO IN (BNC): Connect up to 8 security cameras.
- GARSO ĮVESTIS (RCA): Connect an external microphone for audio recording.
- AUDIO OUT (RCA): Connect external speakers for audio playback.
- HDMI prievadas: Connect to an HDMI-compatible monitor or TV.
- VGA prievadas: Connect to a VGA-compatible monitor.
- LAN prievadas (RJ45): Prisijunkite prie tinklo maršrutizatoriaus, kad galėtumėte nuotoliniu būdu pasiekti įrenginį.
- USB prievadai: Connect the USB mouse and/or a USB flash drive.
- DC 12V maitinimo įvestis: Prijunkite pridedamą maitinimo adapterį.
3.3 DVR Dimensions
The physical dimensions of the DVR are provided for installation planning.
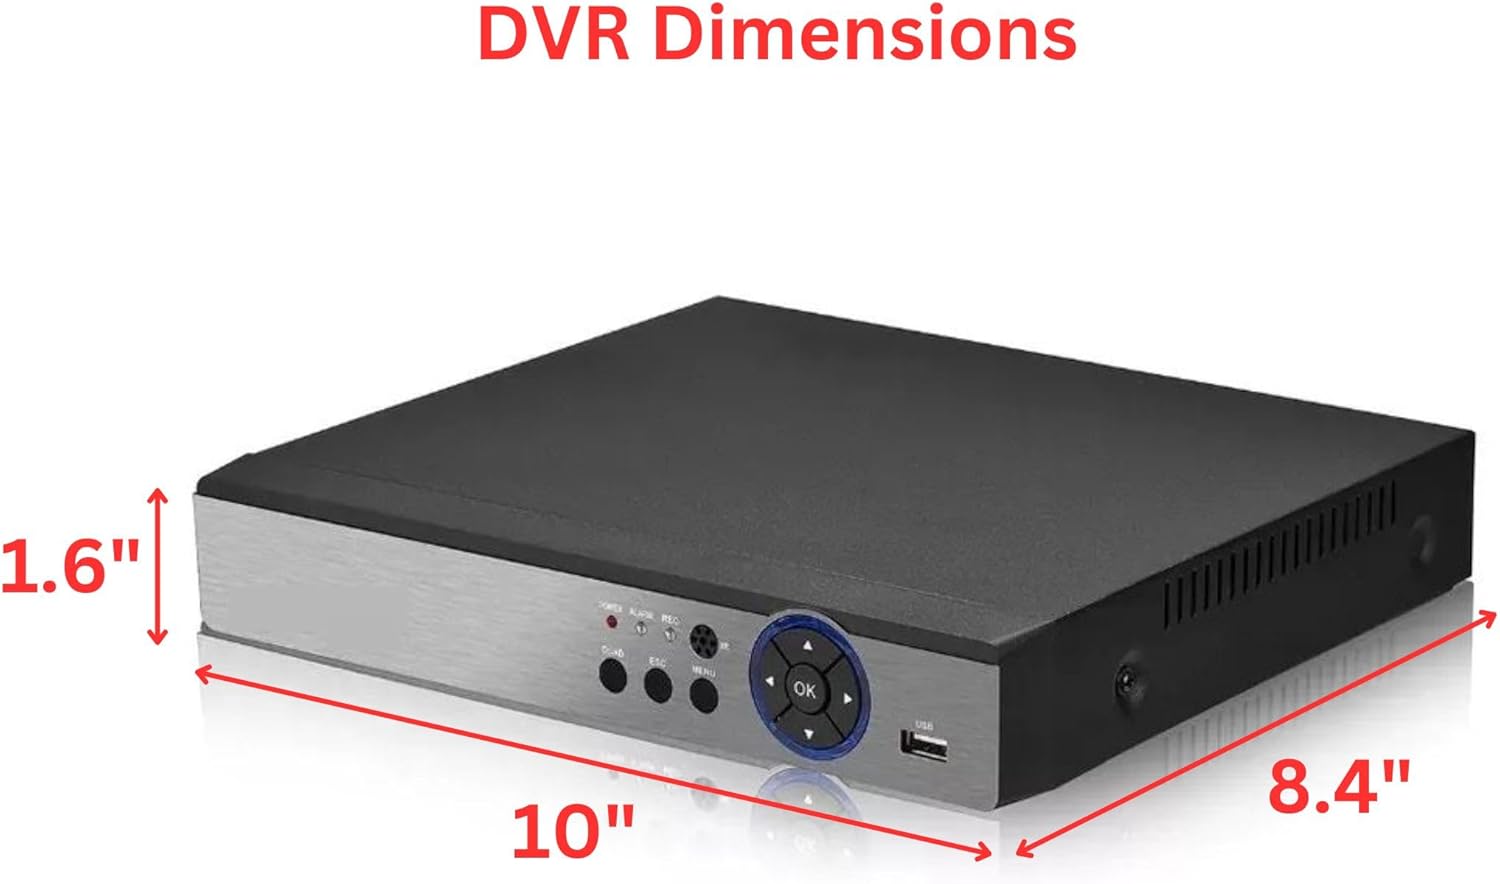
Image 3.2: DVR dimensions (Width: 10", Depth: 8.4", Height: 1.6").
4. Suderinamumas
The Evertech Hybrid DVR is designed for broad compatibility with various security camera technologies.
- Suderinamas: 1080P, 960P, 720P TVI, AHD, CVI, and Traditional Analog Cameras.
- Netinkamas: HD-SDI cameras and security cameras exceeding 2.4MP resolution.

Image 4.1: DVR camera compatibility overview.
5. Sąrankos vadovas
5.1 Aparatinės įrangos jungtys
- Prijungti kameras: Attach your compatible security cameras to the BNC VIDEO IN ports on the DVR's rear panel.
- Prijungti monitorių: Connect a monitor to either the HDMI or VGA port on the DVR.
- Prijungti pelę: Prijunkite USB pelę prie vieno iš DVR USB prievadų.
- Prijungti tinklą (neprivaloma): Nuotoliniam viewNorėdami naudotis tinklo funkcijomis, prijunkite maršrutizatorių eterneto kabeliu prie vaizdo registratoriaus LAN prievado.
- Prijunkite maitinimą: Connect the provided power adapter to the DC 12V input on the DVR, then plug the adapter into a power outlet. The DVR will power on automatically.
5.2 Pradinė konfigūracija
Upon first power-on, the DVR will guide you through an initial setup wizard. Follow the on-screen prompts to configure basic settings such as language, date/time, network settings, and hard drive initialization. It is recommended to change the default password for security purposes.
6. Naudojimo instrukcijos
6.1 Įrašymo režimai
The DVR supports the following recording modes:
- Nepertraukiamas įrašymas: Nuolat įrašinėja vaizdo įrašą.
- Rankinis įrašymas: Initiates recording manually.
- Judesio aptikimo įrašymas: Įrašo tik tada, kai kameroje aptinkamas judesys view.
- Įrašymo tvarkaraštis: Records according to a pre-defined schedule.
These modes can be configured in the DVR's main menu under the 'Record' settings.
6.2 Nuotolinis Viewing
Access live and recorded video remotely using a smartphone, tablet, or PC.
- Išmanusis telefonas / planšetinis kompiuteris: Download the free application (e.g., Xmeye or similar, as indicated by the product's software) from your device's app store (iOS/Android). Follow the app's instructions to add your DVR using its unique ID or QR code.
- Kompiuteris: Pasiekite savo vaizdo registratorių per web browser or by installing the provided CMS Client Software. Refer to the software CD or manufacturer's websvetainę, kurioje rasite atsisiuntimo ir diegimo instrukcijas.

6.1 pav.: Nuotolinis valdymas viewing options for the DVR system.
6.3 Motion Detection & Email Alerts
Configure motion detection zones and sensitivity for each camera through the DVR's menu. When motion is detected, the DVR can trigger recording and send push notifications to the mobile application or email alerts to a configured address.

6.2 pav.: pvz.ampjudesio aptikimo įspėjimo, gauto išmaniajame telefone, pavyzdys.
6.4 Atkūrimas
Norėdami iš naujoview įrašytas footage, navigate to the 'Playback' section in the DVR's main menu. You can search for recordings by date, time, and event type (e.g., motion detection). The multi-channel playback function allows simultaneous viewing of multiple camera feeds.
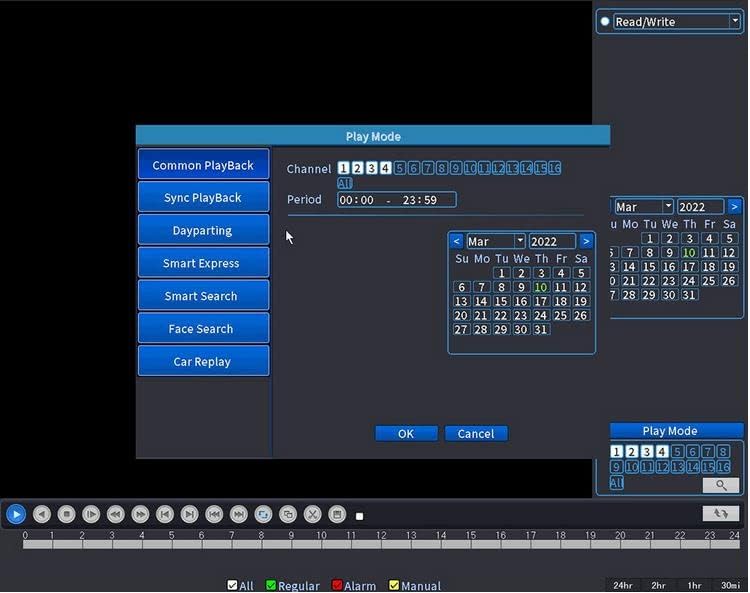
Image 6.3: DVR playback interface.
6.5 USB Backup
Vaizdo įrašas files can be transferred to a USB flash drive for backup. Insert a USB drive into the DVR's USB port and follow the on-screen instructions in the 'Backup' menu to select and export desired footage.
7. Priežiūra
- Valymas: Regularly clean the DVR's exterior with a soft, dry cloth. Do not use liquid cleaners or aerosols. Ensure ventilation openings are free from dust and obstructions.
- Firmware atnaujinimai: Periodically check the Evertech website for firmware updates to ensure optimal performance and access to new features. Follow the provided instructions carefully when performing updates.
- Kietojo disko sveikata: The 2TB hard drive is pre-installed. Monitor its health through the DVR's system information menu. Regular backups of critical footage yra rekomenduojami.
8. Problemų sprendimas
- Nėra vaizdo išvesties:
Patikrinkite: Ensure the monitor is correctly connected to the HDMI or VGA port and is powered on. Verify the correct input source is selected on the monitor. - Nėra kameros ekrano:
Patikrinkite: Ensure cameras are properly connected to the DVR's BNC inputs and are receiving power. Verify camera compatibility (refer to Section 4). - Nuotolinis Viewneveikia:
Patikrinkite: Ensure the DVR is connected to the internet via the LAN port. Verify network settings in the DVR menu. Confirm the mobile app or CMS software is correctly configured with the DVR's ID. - Nėra įrašo:
Patikrinkite: Verify the 2TB hard drive is installed and initialized. Check recording schedules and motion detection settings. Ensure the hard drive is not full. - Pamiršote slaptažodį:
Veiksmas: Refer to the DVR's on-screen options for password recovery or contact Evertech technical support.
9. Specifikacijos
| Funkcija | Specifikacija |
|---|---|
| Prekės ženklas | Evertech |
| Modelis | H.265 8 Channel Hybrid DVR |
| Kanalų skaičius | 8 |
| Kietojo disko dydis | 2 TB (2000 GB) |
| Vaizdo įrašų suspaudimas | H.265 |
| Compatible Camera Types | 720P, 1080P AHD/TVI/CVI/Analog |
| Ryšio technologija | USB-Ethernet |
| Vaizdo išvestis | HDMI, VGA |
| Įrašymo režimai | Continuous, Manual, Motion, Schedule |
10. Garantija ir palaikymas
This Evertech DVR comes with a Vienerių metų garantija. For any technical assistance or warranty claims, please contact Evertech customer support. Free technical support is available to assist you with setup, troubleshooting, and general inquiries.
Dėl papildomos pagalbos apsilankykite Evertech Store on Amazon or refer to the contact information provided with your product.