
1. Produktas baigtasview
Thank you for choosing the Arlux Lighting Onyx R2 Round Recessed LED Spot Light. This product is designed for indoor use, providing efficient and modern illumination. This manual provides essential information for the safe installation, operation, and maintenance of your new LED spot light.
Saugos informacija
- Prieš montuodami ir naudodami atidžiai perskaitykite visas instrukcijas.
- Montavimą turi atlikti kvalifikuotas elektrikas, laikydamasis vietinių elektros kodeksų ir taisyklių.
- Ensure the power supply is disconnected at the main circuit breaker before installation, maintenance, or cleaning.
- Jokiu būdu nemodifikuokite gaminio. Neleistini pakeitimai gali panaikinti garantiją ir kelti pavojų saugumui.
- Šis gaminys skirtas naudoti tik patalpose. Saugokite nuo drėgmės ar ekstremalių temperatūrų.
- Nežiūrėkite tiesiai į šviečiantį LED šviesos šaltinį, nes tai gali sukelti akių nuovargį ar pažeidimus.
- Pakavimo medžiagas laikykite vaikams nepasiekiamoje vietoje.
2. Pakuotės turinys
Prieš tęsdami montavimą, patikrinkite, ar visi komponentai yra ir nepažeisti.
- 1 x Arlux Lighting Onyx R2 Round Recessed LED Spot Light
- 1 x LED Driver (Power Supply)
- Montavimo įranga

Image 2.1: The Arlux Lighting Onyx R2 Recessed LED Spot Light shown with its separate LED driver (power supply) and connecting cable.
3. Specifikacijos
| Prekės ženklas | Arlux apšvietimas |
| Modelis | Onyx R2 |
| Tipas | Recessed LED Spot Light |
| Forma | Apvalus |
| Energijos suvartojimas | 18 vatų |
| Šviesos srautas | 1550 liumenų |
| Spalvos temperatūra | 4000 kelvinų (neutrali balta) |
| Medžiaga | Aliuminis |
| Spalva | Baltas |
| Prekės svoris | 390 gramų |
| Diegimo tipas | Lubinis tvirtinimas (įleidžiamas) |
| Maitinimo šaltinis | Su laidu elektra |
| Specifiniai naudojimo būdai | Ceiling illumination for indoor spaces |
4. Sąranka ir diegimas
4.1 Kontrolinis sąrašas prieš diegimą
- Reikalingi įrankiai: Drill, hole saw (appropriate diameter for recess), wire strippers, screwdriver, voltage testeris.
- Maitinimas: Ensure the electrical circuit is compatible with the spot light's power requirements (18W).
- Ceiling Space: Verify sufficient clearance above the ceiling for the fixture and driver.
- Pirmiausia sauga: Always turn off the main power supply at the circuit breaker before starting any electrical work.
4.2 diegimo žingsniai
- Paruoškite lubas: Using an appropriate hole saw, cut a circular opening in the ceiling at the desired installation location. Refer to the product specifications for the exact cutout diameter (typically around Ø200-210mm for a Ø225mm fixture).
- Connect the Driver: Connect the AC input wires from your household electrical supply to the input terminals of the LED driver. Ensure correct polarity (Live, Neutral, Earth) as indicated on the driver. Secure connections firmly.
- Connect the Spot Light: Plug the DC output cable from the LED driver into the corresponding input port on the back of the Onyx R2 spot light. This connection is typically a simple plug-and-play connector.
- Insert the Spot Light: Gently push the spring clips on the sides of the spot light upwards and insert the fixture into the prepared ceiling opening. The spring clips will hold the light securely in place.
- Galutinis patikrinimas: Ensure the spot light is flush with the ceiling surface and securely mounted.
- Atkurti maitinimą: Įjunkite pagrindinį maitinimo šaltinį grandinės pertraukikliu.
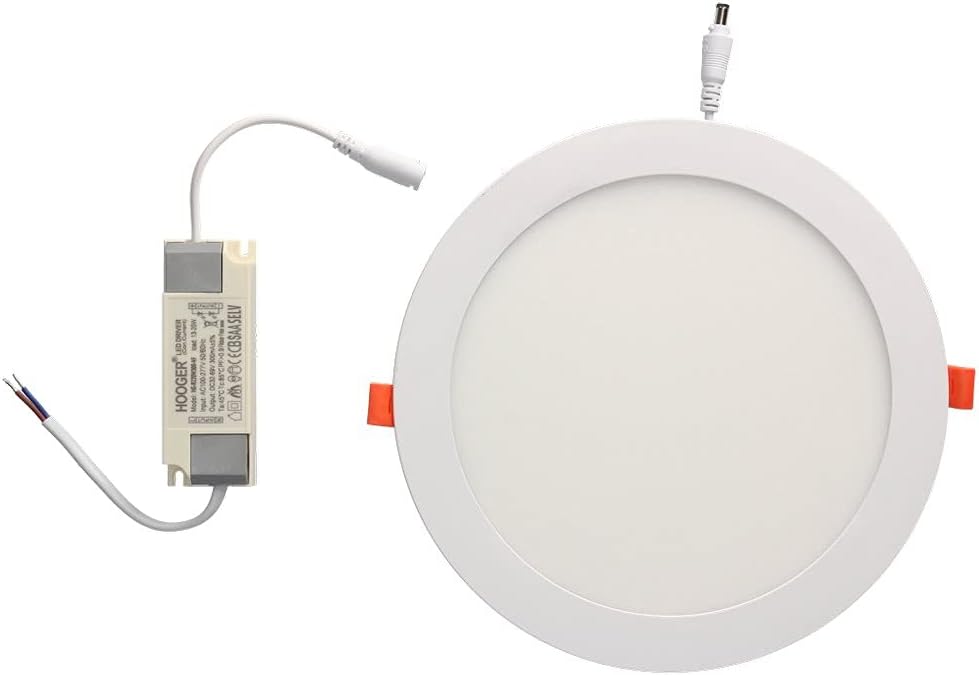
Image 4.1: The Arlux Lighting Onyx R2 Recessed LED Spot Light shown installed flush within a ceiling, providing ambient lighting.
5. Naudojimo instrukcijos
The Arlux Lighting Onyx R2 Recessed LED Spot Light operates immediately upon receiving power. It is typically controlled by a standard wall switch connected to the electrical circuit.
- Įjungimas / išjungimas: Norėdami įjungti arba išjungti šviesą, naudokite prie šviestuvo prijungtą sieninį jungiklį.
- Pritemdymas: This model is not specified as dimmable. Attempting to use it with a non-compatible dimmer switch may cause damage or malfunction.
6. Priežiūra
The Arlux Lighting Onyx R2 LED Spot Light requires minimal maintenance.
- Valymas: Ensure the power is off before cleaning. Wipe the surface of the light with a soft, dry, or slightly damp šluoste. Nenaudokite abrazyvinių valiklių, tirpiklių ar stiprių cheminių medžiagų, nes jos gali pažeisti apdailą ar elektrinius komponentus.
- Šviesos diodų ilgaamžiškumas: LED lights have a long lifespan and do not require bulb replacement. If the light stops functioning, refer to the troubleshooting section.
7. Problemų sprendimas
If you encounter issues with your Arlux Lighting Onyx R2 LED Spot Light, please consult the following table before contacting support.
| Problema | Galima priežastis | Sprendimas |
|---|---|---|
| Šviesa neįsijungia | Nėra maitinimo Atsipalaidavusi laidų jungtis Sugedusi LED tvarkyklė Faulty light fixture | Patikrinkite grandinės pertraukiklį ir sieninį jungiklį. Verify all wiring connections are secure (power off first). Test the driver if possible, or replace it. If driver is functional, the fixture may be faulty; contact support. |
| Šviesos mirgėjimas | Nestabilus maitinimo šaltinis Atsilaisvinę laidai Incompatible dimmer switch (if used) | Ensure stable power. Check for loose connections. Remove dimmer switch if not compatible, or replace with a compatible LED dimmer. |
| Šviesa blanki | Netinkamas maitinimas ttage lašas | Ensure the correct LED driver is used. Consult an electrician to check for voltage issues in your electrical system. |
8. Garantija ir palaikymas
Information regarding specific warranty terms for the Arlux Lighting Onyx R2 Round Recessed LED Spot Light is not available in the provided product details. For warranty inquiries or technical support, please contact your retailer or the manufacturer directly.
Spare parts availability information is also not available. Please contact your point of purchase for assistance with replacement components.