Įvadas
The Keychron Q2 is a fully customizable wired mechanical keyboard featuring a compact 65% layout. Constructed with a solid full aluminum frame, the Q2 is designed for easy assembly and offers a premium typing experience. It supports full QMK and VIA programming for extensive customization and features hot-swappable switches for personalized tactile feedback.

Image: The Keychron Q2 Wired Custom Mechanical Keyboard, showcasing its compact 65% layout and blue color scheme.
Sąrankos vadovas
1. Pakuotės turinys
Prieš pradėdami, įsitikinkite, kad yra visi komponentai:
- Keychron Q2 Keyboard Kit (Aluminum Case, PCB, Steel Plate, Sound Absorbing Foam, Case Foam, Gaskets)
- USB tipo C – C tipo laidas
- USB tipo A–C tipo adapteris
- Jungiklio traukiklis
- Klaviatūros traukiklis
- Atsuktuvas
- „Hex Key“
- Stabilizers (4 sets)
Note: All tools are typically located at the bottom of the packaging.

Image: Diagram illustrating the contents of the Keychron Q2 package, including the keyboard, cables, and tools.
2. Klaviatūros prijungimas
- Locate the USB Type-C port on the back of the Keychron Q2 keyboard.
- Connect one end of the provided USB Type-C to Type-C cable to the keyboard.
- Connect the other end of the cable to your computer's USB Type-C port. If your computer only has USB Type-A ports, use the included USB Type-A to Type-C adapter.
- Ensure the operating system switch (located on the back edge of the keyboard) is set to the correct position for your system (Mac or Windows).
- Jūsų operacinė sistema automatiškai atpažins klaviatūrą.

Vaizdas: Stambus planas view of the Keychron Q2 keyboard with a USB-C cable connected, showing the Mac/Win switch.
Naudojimo instrukcijos
1. QMK/VIA pritaikymas
The Keychron Q2 supports full QMK and VIA programming, allowing you to remap keys, create macros, and customize lighting effects. To use VIA software:
- Atsisiųskite VIA programinę įrangą iš oficialios „Keychron“ svetainės websvetainė (keychron.com/pages/qmk-via).
- Connect your Q2 keyboard to your computer via the USB cable.
- Launch the VIA software. The software should automatically detect your Q2 keyboard. If not, you may need to import the Q2 keymap JSON file, also available on the Keychron websvetainę.
- Use the graphical interface to drag and drop functions, assign macros, and configure lighting for each key. Changes are applied in real-time.

Image: Screenshot of the VIA software interface, demonstrating how to remap keys on the Keychron Q2 keyboard.
2. Karšto keitimo jungikliai
The Q2's PCB supports both 3-pin and 5-pin MX style mechanical switches, allowing for easy switch replacement without soldering.
- Naudodami pateiktą klavišo dangtelio ištraukiklį, atsargiai nuimkite klavišo dangtelį nuo jungiklio, kurį norite pakeisti.
- Use the provided switch puller to gently grip the top and bottom clips of the switch. Pull the switch straight up to remove it from the PCB.
- Suderinkite naujo jungiklio kaiščius su spausdintinės plokštės skylėmis. Įsitikinkite, kad kaiščiai yra tiesūs, kad jie nesilenktų.
- Tvirtai paspauskite naują jungiklį į vietą, kol jis spragtelės.
- Vėl uždėkite klaviatūros dangtelį.

Vaizdas: Stambus planas view of the Keychron Q2's PCB with several switches removed, demonstrating the hot-swappable feature.
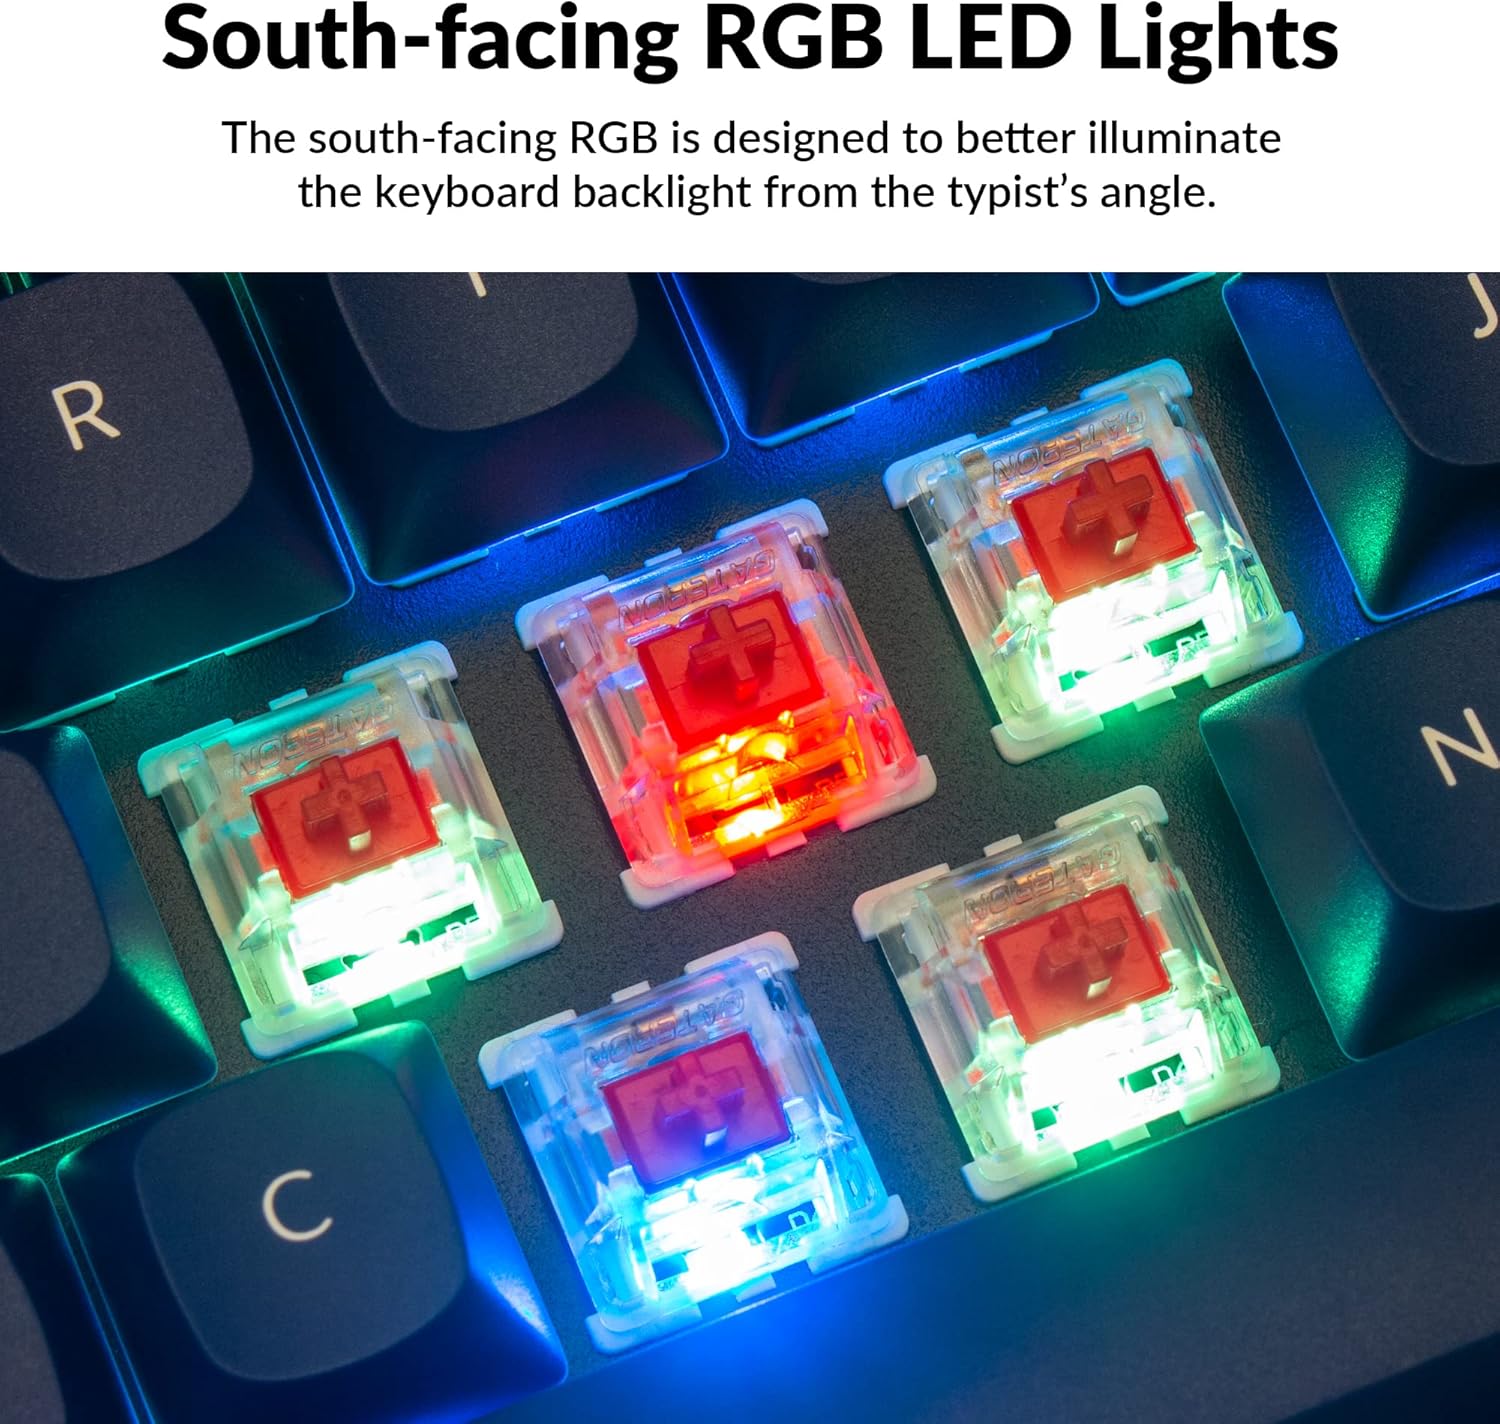
3. Keycaps and RGB Lighting
The Q2 comes with premium non-shine-through PBT keycaps, known for their durability and oil resistance. The keyboard features south-facing RGB LEDs, designed to provide better illumination of the backlight from the typist's perspective.
Paveikslėlis: detalus view of the Keychron Q2's double-shot PBT keycaps, highlighting their texture and legends.

Image: A close-up of the Keychron Q2's south-facing RGB LEDs illuminating the switches from below.
Priežiūra
1. Klaviatūros valymas
Reguliarus valymas padeda išlaikyti klaviatūros veikimą ir išvaizdą.
- Dulkių šalinimas: Dulkėms ir šiukšlėms tarp klaviatūros dangtelių nupūsti naudokite suslėgto oro balionėlį.
- Klaviatūros dangtelių valymas: For deeper cleaning, remove the keycaps using the provided keycap puller. Wash them with mild soap and water, then ensure they are completely dry before reattaching.
- Korpuso valymas: Wipe the aluminum case with a soft, damp audinys. Venkite stiprių cheminių medžiagų, kurios gali sugadinti apdailą.
2. Switch and Stabilizer Maintenance
The hot-swappable design allows for easy maintenance of switches and stabilizers.
- Jungiklio keitimas: If a switch becomes faulty, replace it using the hot-swapping procedure described in the Operating Instructions.
- Stabilizer Lubrication: For optimal performance and reduced wobbliness on larger keys (space bar, shift, enter), the PCB-mounted screw-in stabilizers can be lubricated. This typically involves disassembling the keyboard to access the stabilizers.

Image: An exploded diagram of the Keychron Q2, showing its various components like keycaps, switches, top case, gaskets, plate, PCB, sound absorbing foam, case foam, bottom case, and silicone gaskets, illustrating ease of disassembly.
Trikčių šalinimas
Dažnos problemos ir sprendimai:
- Klaviatūra nereaguoja:
- Įsitikinkite, kad USB laidas yra tvirtai prijungtas prie klaviatūros ir kompiuterio.
- Verify the Mac/Windows switch on the back of the keyboard is set to the correct operating system.
- Try connecting the keyboard to a different USB port or a different computer to rule out port issues.
- Iš naujo paleiskite kompiuterį.
- Neveikia tam tikri klavišai:
- Remove the keycap and switch for the non-functional key. Inspect the switch pins for bends or damage. Straighten bent pins carefully or replace the switch if damaged.
- Įsitikinkite, kad jungiklis yra visiškai įstatytas į spausdintinę plokštę.
- Check VIA software to ensure the key has not been accidentally remapped or disabled.
- RGB apšvietimo problemos:
- Įsitikinkite, kad klaviatūra tinkamai prijungta.
- Use the VIA software to check and adjust lighting settings.
- Perform a factory reset if lighting issues persist (refer to Keychron's official support for specific reset procedures).
- Atsitiktinis klaviatūros atjungimas:
- Išbandykite kitą USB kabelį.
- Ensure the USB port on your computer is stable and providing sufficient power.
- Atnaujinkite savo kompiuterio USB tvarkykles.
If you encounter issues not covered here, please refer to the official Keychron support resources.
Specifikacijos
| Funkcija | Detalė |
|---|---|
| Prekės ženklas | Keychron |
| Modelio pavadinimas | Q2 |
| Modelio numeris | Q2-J1 |
| Klaviatūros išdėstymas | 65% (68 Keys), QWERTY |
| Ryšio technologija | Wired (USB-A, USB-C) |
| Suderinami įrenginiai | PC (Linux, MacOS, Windows) |
| Jungiklio tipas | Gateron G Pro Red (Linear), Hot-swappable |
| Foninis apšvietimas | RGB (nukreiptas į pietus) |
| Medžiaga | Full Aluminum Frame, PBT Keycaps |
| Gaminio matmenys | 12.89 colio ilgio x 4.76 colių pločio x 1.33 colio aukščio |
| Ypatingos savybės | QMK/VIA Programmable, Double Gasket Design |
Informacija apie garantiją
Keychron products typically come with a standard manufacturer's warranty. For detailed information regarding the warranty period, coverage, and terms and conditions for your Keychron Q2 keyboard, please refer to the official Keychron websvetainėje arba garantijos kortelėje, pridėtoje prie jūsų gaminio. Išsaugokite pirkimo įrodymą, jei prireiktų pateikti garantijos pretenzijas.
Pagalba ir ištekliai
For further assistance, software downloads (VIA), firmware updates, and frequently asked questions, please visit the official Keychron support page:
- Keychron Official Websvetainė: www.keychron.com
- QMK/VIA Software & Firmware: www.keychron.com/pages/qmk-via
- Keychron Store: Visit the Keychron Store on Amazon
You can also find community forums and additional user guides online for advanced customization and troubleshooting tips.