
1. Įvadas
The NVX XMICROLOC2 is a compact 2-channel line output converter designed to integrate aftermarket amplifiers with factory (OEM) car audio systems. It converts high-level speaker outputs from a factory head unit into low-level RCA signals, allowing for the addition of an amplifier. This device features an input circuit that corrects crossover distortion, individual adjustable outputs, and an auto turn-on function via DC offset, simplifying installation and ensuring optimal audio quality.
2. Saugos informacija
Please read all instructions carefully before installation. Failure to follow these guidelines may result in damage to the product, vehicle, or personal injury.
- Prieš pradėdami bet kokius elektros instaliacijos darbus, visada atjunkite neigiamą automobilio akumuliatoriaus gnybtą.
- Ensure all wiring is properly routed and secured to prevent pinching, cutting, or short circuits.
- Visoms jungtims naudokite tinkamo skersmens laidus.
- Jei nesate tikri dėl kurios nors montavimo proceso dalies, kreipkitės į profesionalų automobilių garso sistemų montuotoją.
- Do not operate the product in wet conditions or expose it to excessive moisture.
3. Pakuotės turinys
Patikrinkite, ar pakuotėje yra visi reikalingi daiktai:
- NVX XMICROLOC2 2 kanalų linijinės išvesties keitiklis
- Instrukcijų vadovas (šis dokumentas)
4. Savybės
- 2-Channel Micro Line Output Converter
- Input Circuit corrects crossover distortion
- Individual adjustable outputs
- Auto turn-on via DC offset
- Compact design allows for easy installation
5. Sąranka ir diegimas
The NVX XMICROLOC2 is designed for straightforward integration into existing car audio systems. Follow these steps for proper installation.
5.1 Laidų jungtys
The XMICROLOC2 connects to your factory speaker wires and provides RCA outputs for your amplifier, along with a remote turn-on signal.

Figure 1: NVX XMICROLOC2 showing the wiring harness for input connections.
- Įvesties laidai: Connect the high-level speaker outputs from your factory head unit or amplifier to the corresponding input wires on the XMICROLOC2.
- Identify the positive (+) and negative (-) wires for the left and right speaker channels.
- Connect these to the XMICROLOC2's input wires. Refer to the wire color code (if provided on the device or packaging) for correct connections. Typically, these are twisted pairs.
- RCA išvestis: Connect standard RCA cables from the XMICROLOC2's RCA outputs to the input of your aftermarket ampgyvesnis.
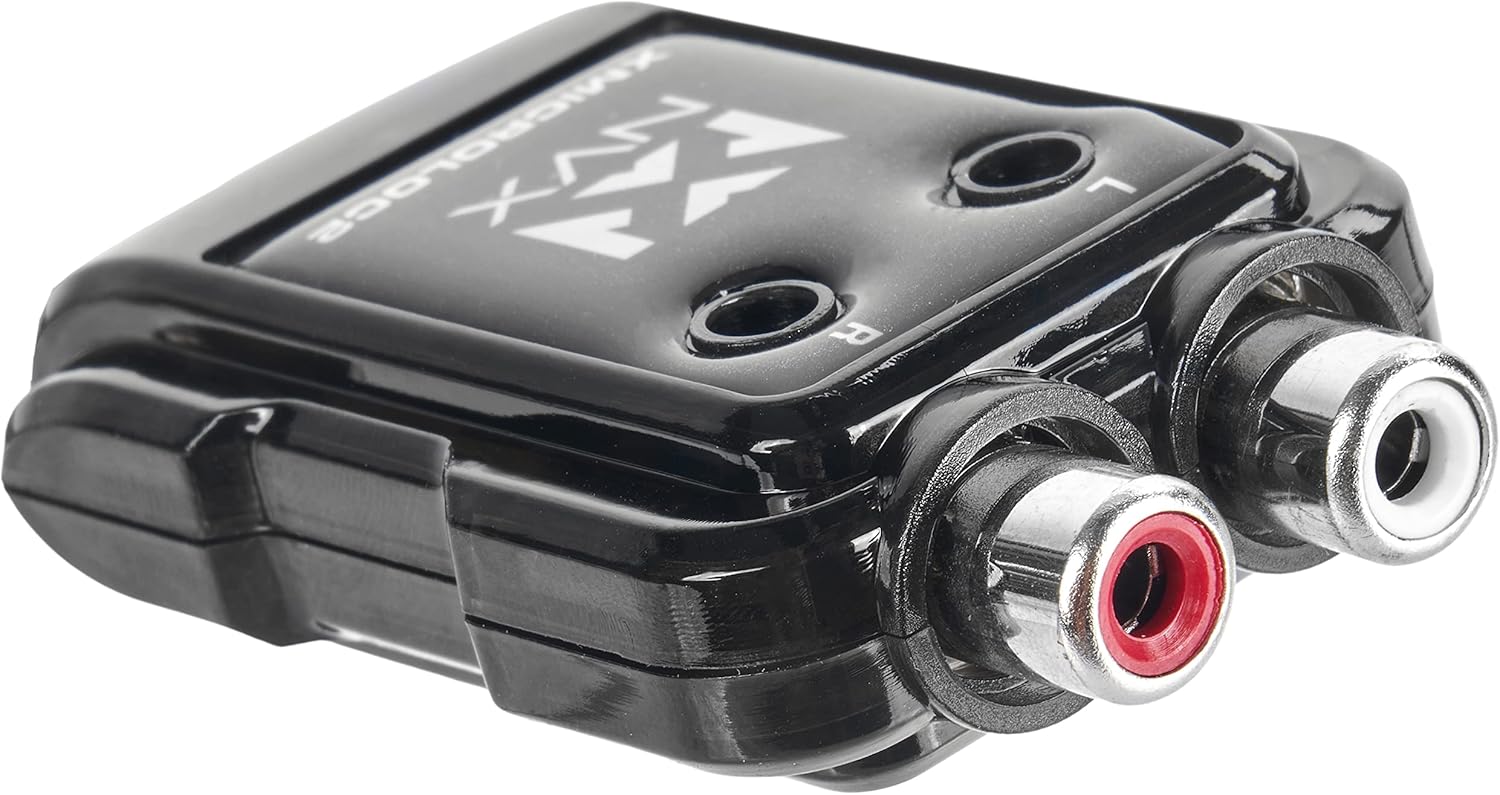
Figure 2: NVX XMICROLOC2 displaying the Left and Right RCA output jacks.
- Nuotolinis įjungimas: The XMICROLOC2 features an auto turn-on function via DC offset. This means it detects when the factory head unit is on and provides a 12-volt remote turn-on signal to your ampgyvesnis.
- Connect the remote output wire from the XMICROLOC2 (usually a blue wire) to the remote turn-on input of your ampgyvesnis.
- No separate remote wire from the head unit is typically needed for this feature to work.
- Maitinimas ir įžeminimas: The XMICROLOC2 typically draws power directly from the speaker input signals and does not require a separate 12V power and ground connection for its operation, relying on the DC offset for turn-on. However, always verify the specific wiring instructions provided with the unit.
5.2 Output Level Adjustment
The XMICROLOC2 has individual adjustable outputs for the left and right channels. These adjustments are typically small potentiometers (screws) located on the unit, often labeled 'L' and 'R'.

3 paveikslas: viršuje view of the NVX XMICROLOC2, showing the Left (L) and Right (R) adjustment screws.
- Before making adjustments, set your amplifier's gain controls to their minimum (lowest) setting.
- Play a familiar audio track at a moderate volume level on your factory head unit.
- Using a small screwdriver, slowly turn the 'L' and 'R' adjustment screws clockwise on the XMICROLOC2 until you hear a clean, undistorted signal from your amplifier. Avoid turning them too high, as this can introduce distortion.
- Once the XMICROLOC2 outputs are set, you can fine-tune the amplifier's gain controls to achieve the desired overall volume and balance.
5.3 Montavimas
The compact design of the XMICROLOC2 allows for flexible mounting options. Choose a location that is dry, away from excessive heat, and easily accessible for adjustments if needed. Secure the unit using screws or double-sided tape (not included) to prevent movement.
6. Naudojimo instrukcijos
Once installed and adjusted, the NVX XMICROLOC2 operates automatically. When your factory head unit is turned on, the XMICROLOC2 will detect the DC offset from the speaker signals and activate the remote turn-on output for your amplifier. When the head unit is turned off, the remote turn-on signal will cease, and your amplifier will power down.
The primary operational aspect is the initial setting of the output levels. After the initial setup, no further user interaction is typically required unless you change your amplifier or head unit, or if you wish to re-balance the audio levels.
7. Priežiūra
The NVX XMICROLOC2 requires minimal maintenance. Follow these guidelines to ensure longevity:
- Laikykite įrenginį švarų, be dulkių ir šiukšlių. Valymui naudokite minkštą, sausą šluostę.
- Venkite ilgą laiką laikyti įrenginį tiesioginiuose saulės spinduliuose arba itin aukštose temperatūrose.
- Ensure all wiring connections remain secure. Periodically check for any loose connections.
8. Problemų sprendimas
If you encounter issues with your NVX XMICROLOC2, refer to the following common problems and solutions:
- Nėra garso iš Ampgyvybingesnis:
- Check all wiring connections, especially the input speaker wires and RCA outputs.
- Verify that the factory head unit is producing sound to the speaker inputs.
- Užtikrinti, amplifier is receiving a remote turn-on signal from the XMICROLOC2. Check the amplifier's power indicator.
- Patvirtinkite amplifier's gain settings are not at minimum.
- Iškraipytas garsas:
- Reduce the output level adjustments on the XMICROLOC2.
- Reduce the gain settings on your ampgyvesnis.
- Ensure the input signal from the factory head unit is not already distorted.
- Amplifier Does Not Turn On:
- Verify that the factory head unit is powered on and playing audio. The XMICROLOC2 uses DC offset for turn-on.
- Check the remote turn-on wire connection between the XMICROLOC2 and the ampgyvesnis.
- Some factory head units may not produce sufficient DC offset on their speaker outputs. In rare cases, a separate remote turn-on wire from the vehicle's ignition might be required, bypassing the XMICROLOC2's auto turn-on feature.
- Dūzgimas arba triukšmas:
- Ensure all ground connections are secure and free from paint or corrosion.
- Check for proper routing of RCA cables away from power wires to prevent interference.
- Verify that the XMICROLOC2's output levels are not set too high, causing the amplifier to clip.
9. Specifikacijos

Figure 4: NVX XMICROLOC2 dimensions and key specifications.
| Specifikacija | Vertė |
|---|---|
| Modelis | NVX XMICROLOC2 |
| Kanalų skaičius | 2 |
| Maksimalus valdymas | 300 W (150 W vienam kanalui) |
| Įvesties grandinė | Corrects crossover distortion |
| Išvesties reguliavimas | Individual adjustable outputs (6:1 Step Down) |
| Turn-On Method | Auto turn-on via DC offset |
| Nuotolinio įjungimo išvestis | 12-volt output for amplifier remote turn-on |
| Maximum RCA Output Voltage | 2 voltų |
| Veiklos ttage | 12 Volts (from vehicle electrical system) |
| Matmenys (I x P x A) | 2.5 x 1.5 x 0.04 colio |
| Prekės svoris | 2.11 uncijos |
| UPC | 810021844732 |
10. Garantija ir palaikymas
For warranty information and technical support, please refer to the official NVX website or contact NVX customer service directly. Keep your purchase receipt as proof of purchase for any warranty claims.
Norėdami gauti daugiau pagalbos, apsilankykite NVX Store on Amazon arba jų oficialus prekės ženklas websvetainę.