
OFANTOP 52YFT-7068
OFANTOP 52-Inch Smart Ceiling Fan with Lights and Remote Control (Model: 52YFT-7068)
Instrukcijų vadovas
1. Saugos informacija
Read and understand all instructions before beginning installation. This product must be installed in accordance with the applicable installation code by a person familiar with the construction and operation of the product and the hazards involved. Failure to follow these instructions may result in electric shock, fire, or serious personal injury.
- Prieš montuodami ar atlikdami techninę priežiūrą, visada atjunkite maitinimą nuo pagrindinio jungiklio.
- Ensure all electrical connections are in accordance with local codes, ordinances, and the National Electric Code.
- Ventiliatorius turi būti sumontuotas taip, kad atstumas nuo grindų iki menčių galinio krašto būtų ne mažesnis kaip 2.1 metro (7 pėdų).
- The fan must be mounted to a ceiling outlet box marked "Acceptable for Fan Support of 35 lbs (15.9 kg) or less."
- Nenaudokite ventiliatoriaus su pažeistomis mentėmis. Jei viena iš jų pažeista, pakeiskite visas mentes.
- Venkite dėti daiktus ventiliatoriaus menčių kelyje.
- This fan is ETL Listed for indoor and outdoor use. Ensure proper sealing for outdoor installations to prevent water damage.
2. Pakuotės turinys
Prieš pradėdami montavimą, patikrinkite, ar yra visi komponentai.
- Variklio surinkimas
- Ventiliatoriaus mentės (3)
- Downrod (5" and 10" included for Downrod Mount)
- Mounting Bracket
- Baldakimas
- Nuotolinio valdymo pultas su laikikliu prie sienos
- Šviesos komplekto surinkimas
- Aparatūros paketas (varžtai, vielinės veržlės, poveržlės)
- Instrukcijų vadovas

Image: Main components of the OFANTOP 52-Inch Smart Ceiling Fan.
3. Gaminio specifikacijos
| Prekės ženklas | OFANTOPAS |
| Modelio pavadinimas | 52YFT-7068 |
| Dydis | 52 colių |
| Ašmenų skaičius | 3 |
| Variklio tipas | DC variklis be šepetėlių |
| Oro srauto talpa | 6031 kubinių pėdų per minutę (CFM) |
| Maitinimo šaltinis | AC/DC (120 Volts AC) |
| Vattage | 35 vatų |
| Kontrolės metodas | Remote, App (Smart Life), Voice (Alexa, Google Assistant) |
| Šviesos savybės | Dimmable, 3 Color Temperature Options (3000K, 4500K, 6000K), Memory Function |
| Naudojimas viduje / lauke | Yes (ETL Listed, IP44 for outdoor) |
| Montavimo tipas | Downrod Mount (5" and 10" downrods included) |
| Triukšmo lygis | 35 dB (tylus veikimas) |
| Energijos efektyvumas | 75% Less Energy than AC Fan |

Image: Energy Efficiency label for the ceiling fan.
4. Montavimo instrukcijos
4.1 Kontrolinis sąrašas prieš įdiegiant
- Įsitikinkite, kad maitinimas atjungtas nuo grandinės pertraukiklio.
- Confirm you have all necessary tools (screwdriver, wire strippers, ladder, etc.).
- Verify the mounting location can support the fan's weight (16.42 lbs).
- Choose the appropriate downrod length (5" or 10") for your ceiling height.
4.2 Montavimo parinktys
This fan supports both standard downrod mount and angled mount (up to 20 degrees).
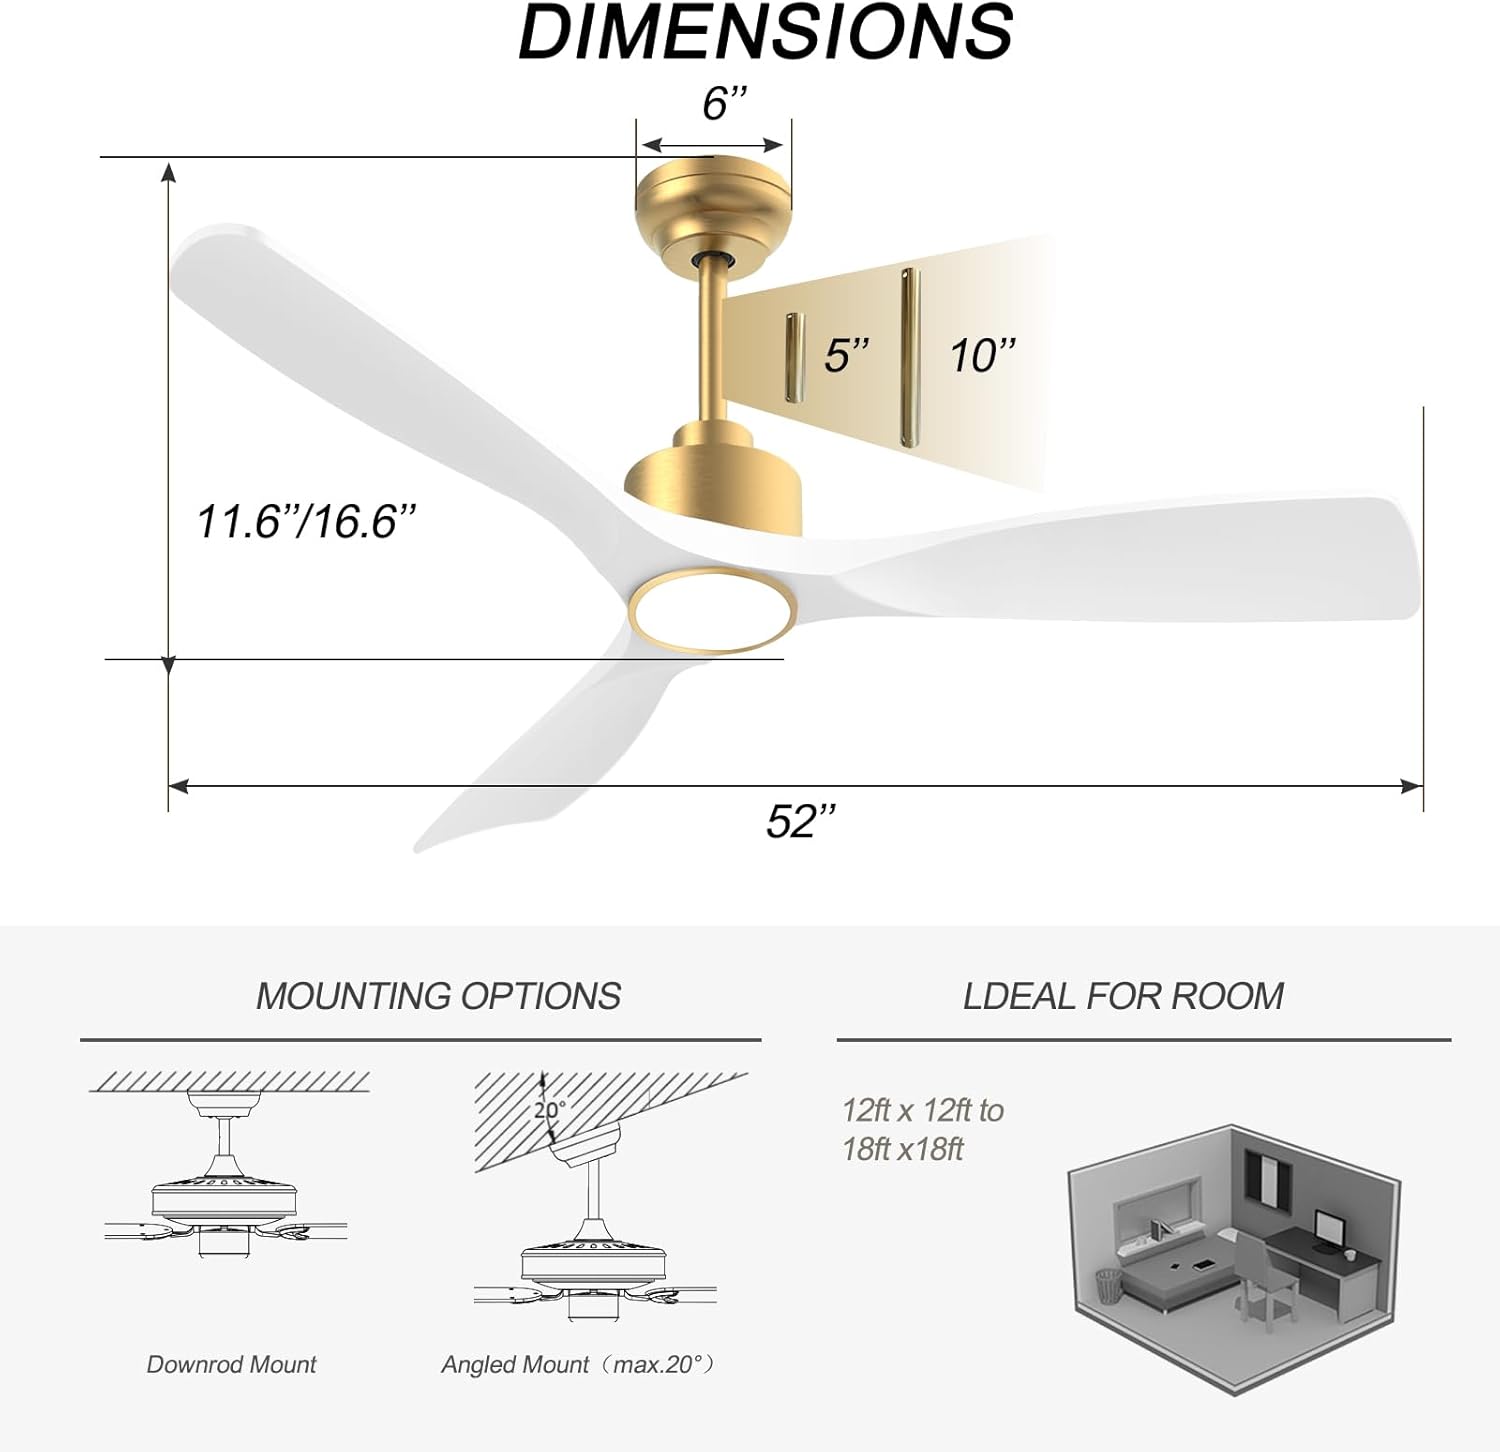
Image: Diagram showing fan dimensions and available downrod and angled mounting options.
- Attach the mounting bracket to the ceiling outlet box using the provided screws.
- Feed the electrical wires from the ceiling through the center hole of the mounting bracket.
- Assemble the downrod to the motor assembly, ensuring all screws are tightened securely.
- Atsargiai pakelkite ventiliatoriaus mazgą ir pakabinkite jį nuo tvirtinimo laikiklio.
4.3 Laidai
The fan features quick connectors for simplified wiring.
- Connect the fan's wires to the household wiring according to the color codes (typically black to black, white to white, green/bare copper to ground).
- Įsitikinkite, kad visos jungtys yra tvirtos, naudodami vielinius varžtus.
- Tvarkingai įkiškite visus laidus į lizdo dėžutę.
Video: A short demonstration of the fan's appearance and operation. This video is a 7-second preview and shows the fan spinning with its light on.
4.4 Peilio tvirtinimas
- Carefully attach each of the three fan blades to the motor housing using the provided screws.
- Ensure all screws are tightened evenly to prevent wobbling.
Vaizdo įrašas: Viršijimasview of the BOOSANT White and Gold Ceiling Fan, demonstrating its features and design. This video provides a general look at the fan's aesthetics and functionality.
4.5 Apšvietimo komplekto montavimas
- Connect the light kit wires to the corresponding wires from the fan motor.
- Secure the light kit assembly to the bottom of the fan motor housing.
5. Naudojimo instrukcijos
5.1 Nuotolinio valdymo pulto funkcijos
The included remote control allows for convenient operation of all fan and light functions.
- Maitinimo įjungimas/išjungimas: Įjungia arba išjungia ventiliatorių ir šviesą.
- Ventiliatoriaus greitis: Pasirinkite iš 6 skirtingų ventiliatoriaus greičių.
- Šviesos įjungimas / išjungimas: Šviesą reguliuoja nepriklausomai.
- Spalvos temperatūra: Cycle through 3 color temperature options (3000K Warm White, 4500K Natural White, 6000K Cool White).
- Sumažinti: Sureguliuokite šviesos ryškumą.
- Reversinis variklis: Switch between summer (downward airflow) and winter (upward airflow) modes.
- Laikmatis: Set the fan to turn off automatically after a set period (e.g., 1H, 2H, 4H, 8H).
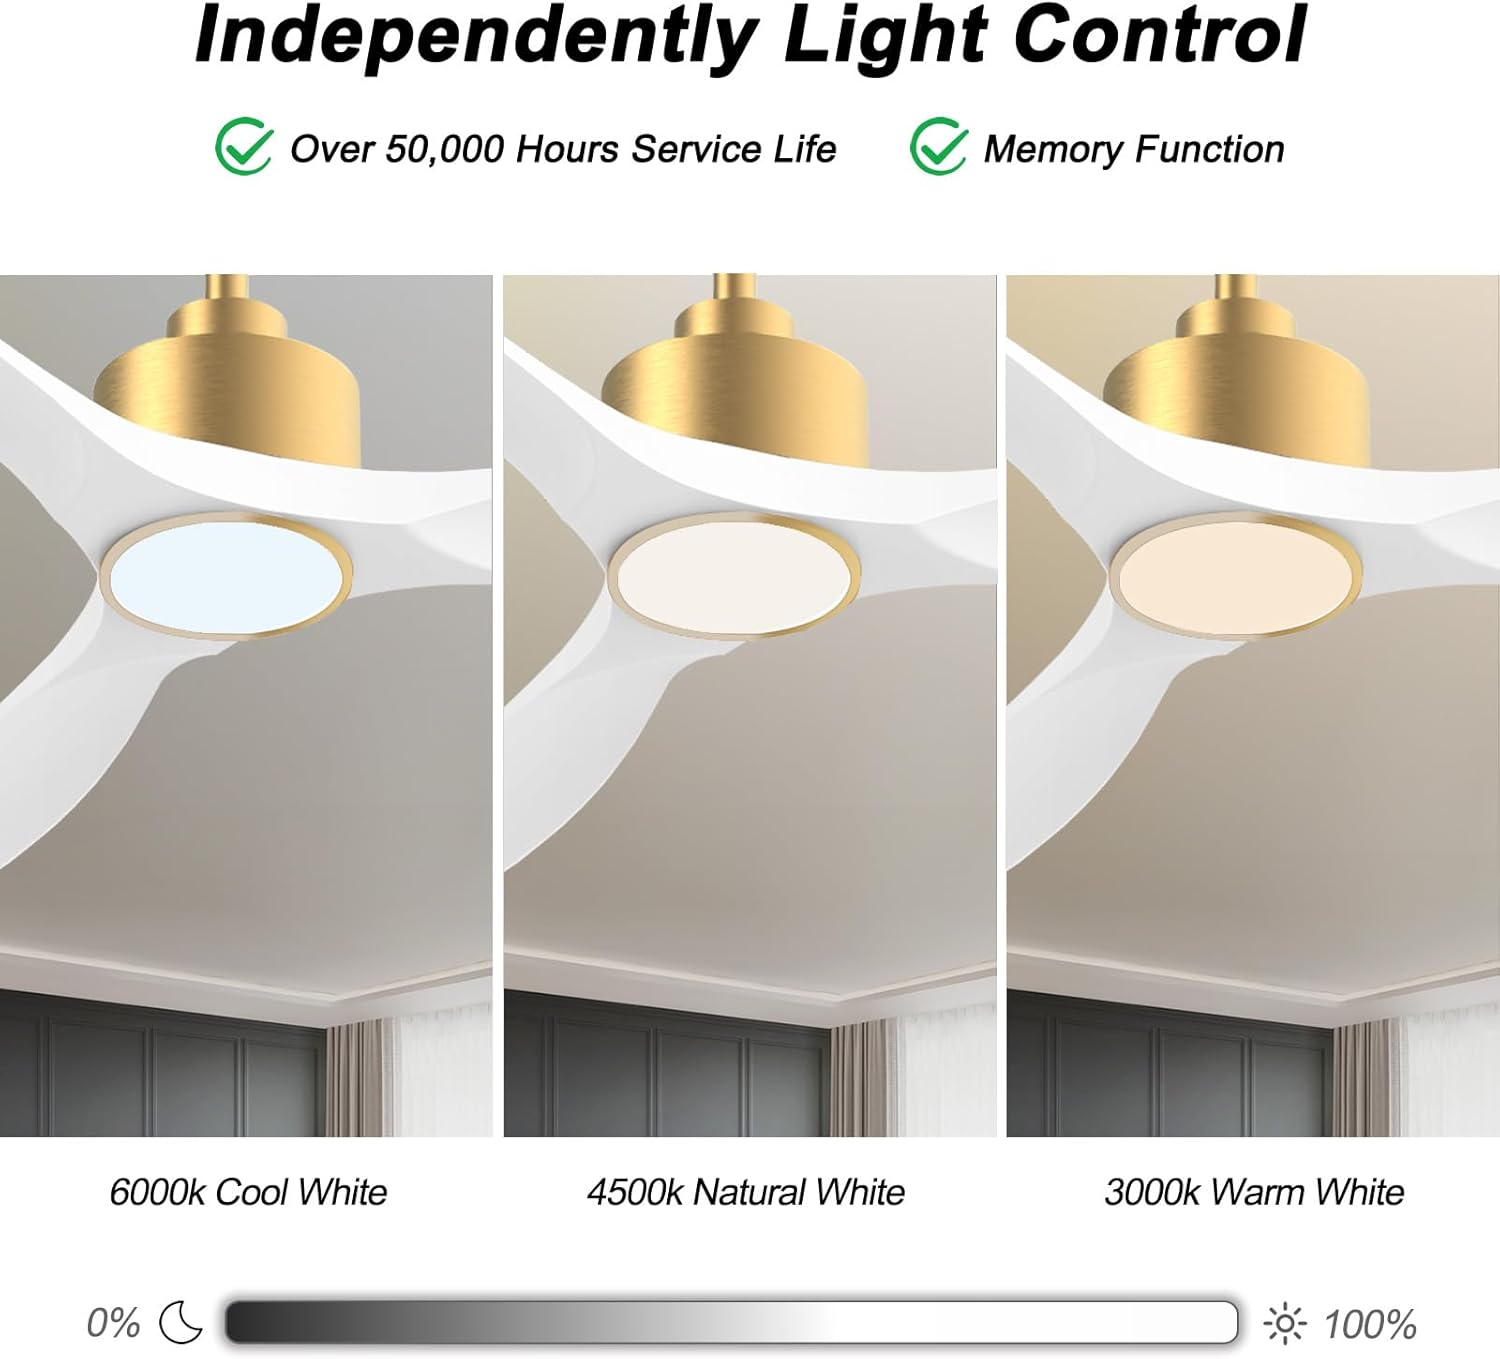
Image: Visual representation of the three adjustable light color temperatures (Warm, Natural, Cool White).

Image: Illustration of the reversible motor function for summer cooling and winter warm air circulation.
5.2 Smart Control (App/Voice)
The OFANTOP Smart Ceiling Fan can be controlled via the Smart Life app or voice assistants like Amazon Alexa and Google Assistant.
- Programos atsisiuntimas: Atsisiųskite programėlę „Smart Life“ iš savo įrenginio programėlių parduotuvės.
- „Wi-Fi“ poravimas:
- Įsitikinkite, kad jūsų „Wi-Fi“ tinklas yra 2.4 GHz dažnio.
- Turn the fan power off and back on at the switch.
- Within 10 seconds, press the "8H Fan Timer & Wi-Fi Pairing" button on the remote for 3 seconds to enter pairing mode.
- Open the Smart Life app, select "Add Device" or click the "+" in the upper right corner.
- Find the fan device and click "ADD".
- Fill in your 2.4GHz Wi-Fi name and password.
- Wait for the connection to complete. A beep from the fan indicates successful pairing.
- Valdymas balsu: Once paired with the Smart Life app, enable the Smart Life skill/action in your Amazon Alexa or Google Assistant app to control the fan with voice commands.

Image: Depiction of smart control features, including compatibility with Google Assistant and Amazon Alexa.
Video: Instructions on how to connect the BOOSANT 102 Series Smart Ceiling Fan to the Smart Life app for mobile control. This video details the Wi-Fi pairing process.
6. Priežiūra
- Valymas: Norėdami išvalyti ventiliatorių, nuvalykite jį minkšta šluoste,amp audinys. Nenaudokite abrazyvinių valiklių ar tirpiklių.
- Ašmenų priežiūra: Reguliariai tikrinkite peilių varžtų tvirtumą. Atsilaisvinę peiliai gali sukelti vibraciją ir triukšmą.
- Šviesos šaltinis: The integrated LED light source is designed for long life (over 50,000 hours) and is not user-replaceable.
- Variklis: Nuolatinės srovės variklis nereikalauja priežiūros ir tepimo.
7. Problemų sprendimas
| Problema | Galima priežastis | Sprendimas |
|---|---|---|
| Ventiliatorius neįsijungia | Ventiliatorius negauna maitinimo; Atsilaisvinusios laidų jungtys; Išsikrovusi nuotolinio valdymo pulto baterija. | Patikrinkite grandinės pertraukiklį; Patikrinkite visus laidų sujungimus; Pakeiskite nuotolinio valdymo pulto bateriją. |
| Ventiliatoriaus virpėjimas | Atsilaisvinę peilių varžtai; netinkamai subalansuoti peiliai; atsilaisvinęs tvirtinimo laikiklis. | Priveržkite visus peilio varžtus; Jei reikia, naudokite balansavimo rinkinį (nepridedamas); Įsitikinkite, kad tvirtinimo laikiklis yra tvirtai pritvirtintas. |
| Šviesa neveikia | Loose wire connection to light kit; LED driver failure; Remote control issue. | Check light kit wiring; Contact customer support if LED driver is suspected; Check remote battery/functionality. |
| Nuotolinio valdymo pultas neveikia | Battery depleted; Remote not paired with fan; Obstruction between remote and receiver. | Replace battery (23A 12V); Re-pair remote with fan (refer to pairing instructions); Ensure clear line of sight. |
| Wi-Fi ryšio problemos | Incorrect Wi-Fi password; 5GHz Wi-Fi network; Fan not in pairing mode. | Verify password; Ensure 2.4GHz network is used; Follow app pairing instructions carefully. |
8. Garantija ir palaikymas
OFANTOP products are manufactured to the highest quality standards. For specific warranty details and customer support, please refer to the warranty card included with your purchase or contact OFANTOP customer service directly. Keep your proof of purchase for warranty claims.
Kontaktinė informacija: Refer to your product packaging or the official OFANTOP websvetainę, kurioje rasite naujausią kontaktinę informaciją.
Ask a question about this manual
Ask about setup, troubleshooting, compatibility, parts, safety, or missing instructions. Manuals+ will review the question and use this page’s manual context to help answer it.