
Įvadas
Thank you for choosing the Optex 990047 Indoor/Outdoor Wireless Digital Thermometer. This device provides accurate temperature readings for both your indoor environment and an outdoor location via a wireless sensor. Please read this manual carefully before use to ensure proper operation and to maximize the lifespan of your thermometer.
Pakuotės turinys
- 1 x Optex 990047 Main Display Unit
- 1 x belaidis lauko jutiklis
- 1 x Vartotojo vadovas
- (Batteries not included, typically requires AAA or AA batteries for both units)
Produktas baigtasview
Familiarize yourself with the components of your Optex thermometer.
Main Display Unit (Front)

Vaizdas: Priekyje view of the Optex 990047 main display unit. The digital screen shows indoor and outdoor temperatures, along with high/low records and trend indicators. Below the screen are three buttons: 'CH', '°C/°F', and 'CLEAR'.
- Skaitmeninis ekranas: Shows indoor temperature (top) and outdoor temperature (bottom), along with HI/LO records and temperature trend arrows.
- CH mygtukas: Selects the wireless channel (if multiple sensors are used) or initiates sensor search.
- °C/°F mygtukas: Perjungia temperatūros matavimo vienetus pagal Celsijų ir Farenheitą.
- CLEAR mygtukas: Clears the recorded HI/LO temperatures.
Main Display Unit (Back)

Vaizdas: Atgal view of the Optex 990047 main display unit. It features a battery compartment cover and an integrated kickstand for tabletop placement, as well as a hanging hole.
- Baterijų skyrius: Houses the batteries for the main unit.
- Stovas: Allows the unit to stand upright on a flat surface.
- Sieninio tvirtinimo anga: For hanging the unit on a wall.
Belaidis lauko jutiklis
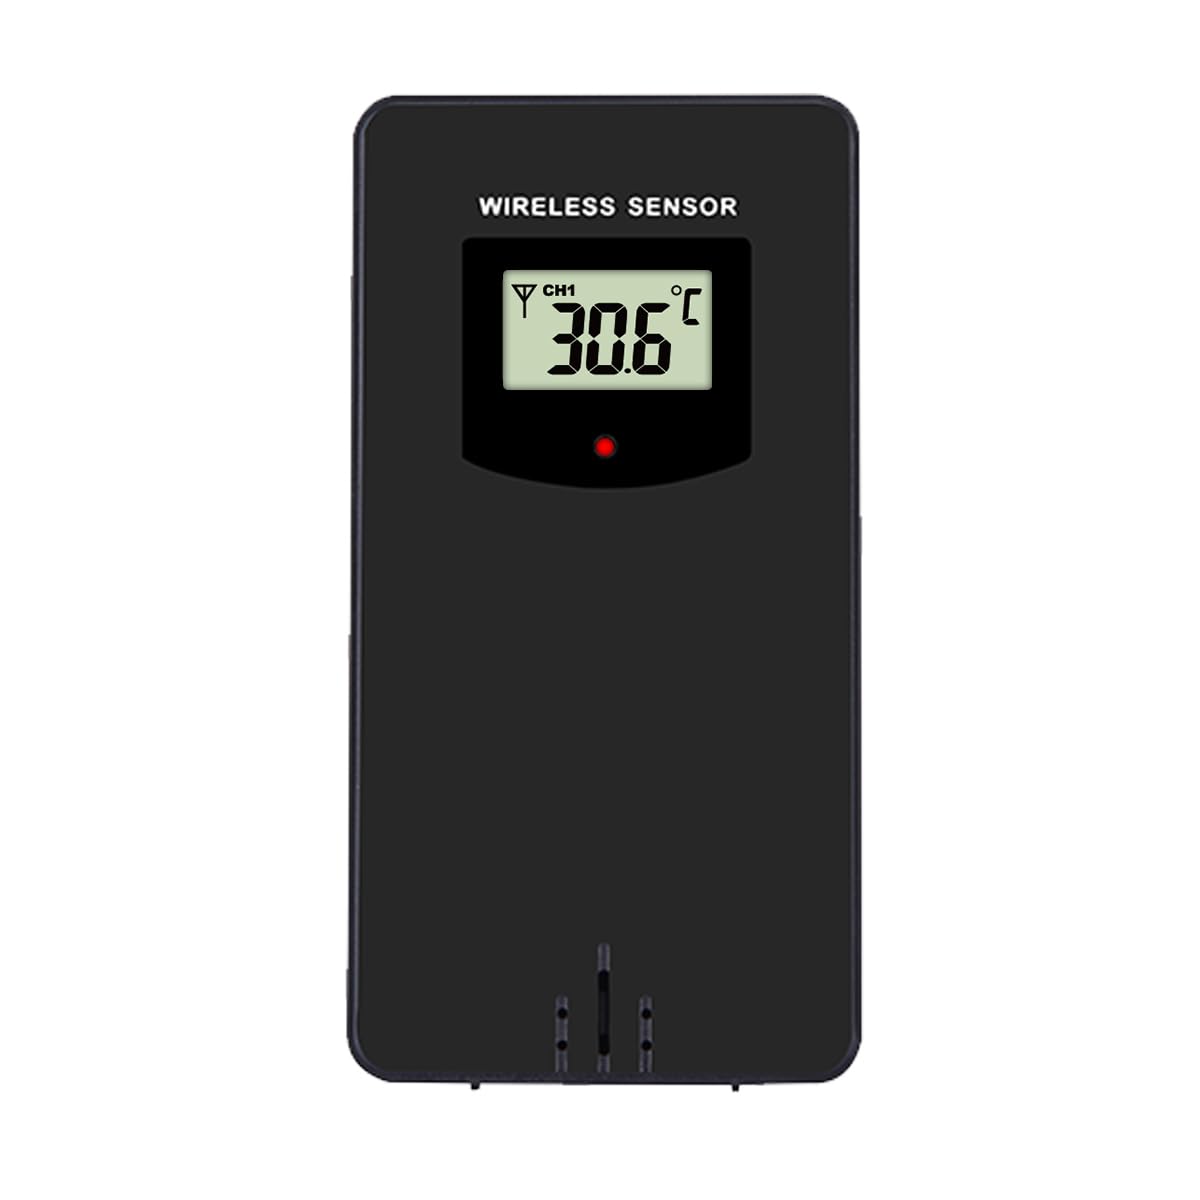
Vaizdas: Priekyje view of the Optex wireless outdoor temperature sensor. It has a small digital display showing the current temperature and channel, along with a red indicator light and a battery compartment on the back.
- Temperatūros jutiklis: Measures the outdoor temperature.
- Perdavimo indikatorius: A small LED light that flashes when data is transmitted.
- Baterijų skyrius: Houses the batteries for the outdoor sensor.
- Kanalo jungiklis: (Typically inside the battery compartment) Allows selection of a specific channel (1, 2, or 3) if using multiple sensors.
Sąranka
- Install Batteries in the Outdoor Sensor:
- Atidarykite baterijos skyrių belaidžio jutiklio gale.
- Insert 2 x AAA batteries (not included) according to the polarity markings (+/-).
- Uždarykite akumuliatoriaus skyrių.
- Note: If there is a channel switch inside the compartment, ensure it is set to Channel 1 for initial setup.
- Install Batteries in the Main Display Unit:
- Open the battery compartment on the back of the main display unit.
- Insert 2 x AAA batteries (not included) according to the polarity markings (+/-).
- Uždarykite akumuliatoriaus skyrių.
- The display will light up and begin searching for the outdoor sensor.
- Jutiklio susiejimas:
- Place the outdoor sensor and the main display unit close to each other during the initial setup.
- The main unit should automatically detect and connect to the outdoor sensor within a few minutes. The outdoor temperature will appear on the display.
- If the outdoor temperature does not appear, press and hold the "CH" button on the main unit for 3 seconds to initiate a manual search for the sensor.
- Lauko jutiklio vieta:
- Choose a shaded location for the outdoor sensor, away from direct sunlight and rain, to ensure accurate readings.
- Avoid placing it near heat sources (e.g., vents, appliances) or metal objects that could interfere with the wireless signal.
- The maximum wireless range is approximately 30 meters (100 feet) in open air. Walls and obstacles will reduce this range.
Operacija
Skaitymo temperatūra
The main display unit shows the indoor temperature at the top and the outdoor temperature (from the wireless sensor) at the bottom. Both displays show the current temperature, along with the recorded high (HI) and low (LO) temperatures for the day, and a trend indicator.
Temperatūros vienetų perjungimas (°C/°F)
Paspauskite ° C / ° F button once to switch between Celsius and Fahrenheit temperature units.
Clearing HI/LO Records
The thermometer automatically records the highest and lowest temperatures since the last reset. To clear these records and start new ones, press the IŠVALYTI button once. The HI/LO values will reset to the current temperature.
Channel Selection (for multiple sensors)
If you are using multiple outdoor sensors (sold separately), you can switch between their readings by pressing the CH button. Each press will cycle through the available channels (e.g., CH1, CH2, CH3). Ensure each sensor is set to a unique channel via its internal switch.
Priežiūra
- Valymas: Nuvalykite įrenginius minkšta, d šluosteamp audinys. Nenaudokite abrazyvinių valiklių ar tirpiklių.
- Baterijos keitimas: Kai ekrane pasirodo išsikrovusių baterijų indikatorius, pakeiskite baterijas ir pagrindiniame įrenginyje, ir lauko jutiklyje. Visada keiskite visas baterijas vienu metu naujomis to paties tipo baterijomis.
- Saugykla: If storing the thermometer for an extended period, remove all batteries to prevent leakage. Store in a cool, dry place.
Trikčių šalinimas
| Problema | Sprendimas |
|---|---|
| No outdoor temperature reading / "---" displayed. |
|
| Netikslūs temperatūros rodmenys. |
|
| Ekranas blankus arba tuščias. |
|
Specifikacijos
- Modelis: Optex 990047
- Ekrano tipas: Skaitmeninis LCD
- Vidaus temperatūros diapazonas: -10°C iki 50°C (14°F iki 122°F) (Estimated, based on typical indoor thermometers)
- Lauko temperatūros diapazonas: -40°C iki 60°C (nuo -40°F iki 140°F) (Estimated, based on typical outdoor sensors)
- Temperatūros tikslumas: +/- 1°C (+/- 2°F) (Numatytasis)
- Belaidis diapazonas: Iki 30 metrų (100 pėdų) atviroje erdvėje (Numatytasis)
- Maitinimo šaltinis (pagrindinis įrenginys): 2 x AAA 1.5 V baterijos (nepridedamos)
- Maitinimo šaltinis (lauko jutiklis): 2 x AAA 1.5 V baterijos (nepridedamos)
- Medžiaga: Plastikiniai
- Spalva: Juoda
Saugos informacija
- Do not expose the main unit or sensor to extreme temperatures, direct sunlight, or excessive moisture.
- Do not immerse the units in water. The outdoor sensor is weather-resistant but not waterproof.
- Do not attempt to disassemble or repair the units. This will void the warranty.
- Senas baterijas išmeskite atsakingai laikydamiesi vietinių taisyklių.
- Baterijas laikykite vaikams nepasiekiamoje vietoje.
Garantija ir palaikymas
Optex products are designed for reliability and performance. For warranty information or technical support, please refer to the contact details provided with your purchase or visit the official Optex websvetainę. Kreipdamiesi į palaikymo tarnybą, turėkite po ranka savo modelio numerį (990047).