
Xtorm XP300U
Xtorm XP300U Portable Power Station 300W - User Manual
Model: XP300U
Įvadas
Thank you for choosing the Xtorm XP300U Portable Power Station. This device is designed to provide reliable and portable power for various applications, from home use to outdoor camping. With a 300W output and multiple charging options, it ensures your devices stay powered wherever you are. This manual provides essential information on the safe operation, setup, maintenance, and troubleshooting of your power station.
Saugos informacija
Prieš naudodami šį gaminį, perskaitykite visus saugos įspėjimus ir instrukcijas, kad užtikrintumėte saugų naudojimą ir išvengtumėte pažeidimų. Išsaugokite šį vadovą ateičiai.
- Neardykite, neremontuokite ir nemodifikuokite įrenginio. Neteisingas surinkimas gali sukelti gaisrą arba susižaloti.
- Saugokite įrenginį nuo ugnies ar aukštos temperatūros (virš 60 °C / 140 °F).
- Nenaudokite ir nelaikykite įrenginio tiesioginiuose saulės spinduliuose arba karštoje aplinkoje.
- Nenaudokite ir nelaikykite įrenginio vonios kambaryje arba vietose, kuriose yra vandens ar drėgmės.
- Nenumeskite, nedaužykite ir nelaikykite įrenginio stiprių smūgių veikiamo.
- Laikyti vaikams nepasiekiamoje vietoje.
- Naudokite tik originalius arba sertifikuotus įkrovimo laidus ir adapterius.
- Naudojimo ir įkrovimo metu užtikrinkite tinkamą vėdinimą. Neuždenkite įrenginio.
- In case of leakage from the battery, do not allow the liquid to come into contact with skin or eyes. If contact occurs, wash with plenty of water and seek medical advice.

Image: Safety features of the Xtorm XP300U, highlighting Pure Sine Wave, Short Circuit Protection, Temperature Control, Overcharge Protection, APM Chip, A-Class Batteries, and High Efficiency.
Pakuotės turinys
Atidarę pakuotę, patikrinkite jos turinį. Jei trūksta kokių nors daiktų arba jie pažeisti, susisiekite su pardavėju.
- Xtorm XP300U Portable Power Station
- AC sieninis įkroviklis
- Automobilio įkroviklio laidas
- MC4 to DC Cable (for solar panel connection, solar panel not included)
- Vartotojo vadovas

Image: The Xtorm XP300U Portable Power Station displayed with its included accessories: AC wall charger, car charger cable, and MC4 to DC cable.
Produktas baigtasview
Familiarize yourself with the different parts of your Xtorm XP300U Power Station.
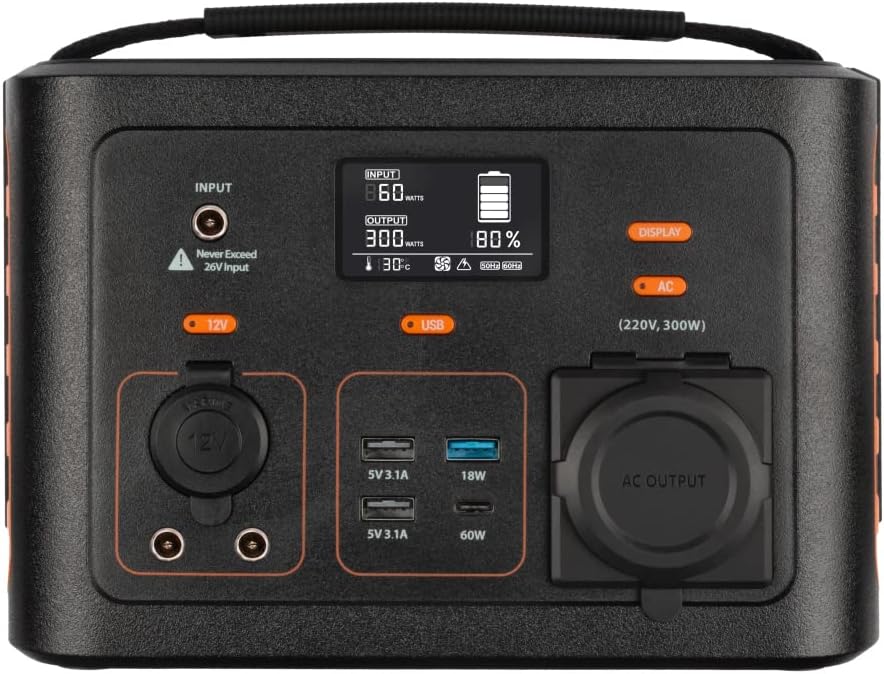
Vaizdas: Stambus planas view of the Xtorm XP300U's front panel, showing the digital display, input port, 12V DC output, USB-A and USB-C ports, and AC output socket.
Priekinio skydelio ypatybės:
- LCD ekranas: Rodo akumuliatoriaus lygį, įvesties / išvesties galią ir būsenos indikatorius.
- Įvesties prievadas: Skirta įkrauti elektros stotelę naudojant kintamosios srovės adapterį, automobilinį įkroviklį arba saulės bateriją.
- 12V DC išėjimas: Skirta 12 V įrenginiams maitinti.
- USB-A prievadai: Multiple USB-A outputs for charging various devices (e.g., 5V 3.1A, 18W Quick Charge).
- USB-C PD prievadas: High-speed USB-C Power Delivery output (up to 60W).
- Kintamosios srovės išvesties lizdas: Standard AC outlet for powering household appliances (220V, 300W).
- Valdymo mygtukai: Buttons for turning on/off specific outputs (e.g., AC, DC, USB).

Vaizdas: Viršus view of the Xtorm XP300U, highlighting its integrated carrying handle for portability.

Vaizdas: Galinis view of the Xtorm XP300U, featuring the Xtorm brand logo and "Portable Power Station 300" text.
Sąranka
Before first use, it is recommended to fully charge your Xtorm XP300U Power Station.
- Išpakuoti: Atsargiai išimkite maitinimo stotelę ir visus priedus iš pakuotės.
- Initial Charge (AC Wall Charger):
- Connect the AC wall charger to the input port on the power station.
- Prijunkite kintamosios srovės sieninį įkroviklį į standartinį sieninį lizdą.
- LCD ekrane bus rodoma įkrovimo būsena. Kraukite, kol akumuliatoriaus indikatorius rodys 100 %.
- Vieta: Place the power station on a stable, flat surface in a well-ventilated area, away from direct sunlight or heat sources.
Naudojimo instrukcijos
The Xtorm XP300U offers multiple ways to charge and power your devices.
Elektrinės įkrovimas:
The XP300U can be recharged using four different methods:
Image: Visual representation of the four charging methods for the Xtorm XP300U: via wall socket, USB-C PD, solar panel (not included), and 12V car charger.
- Via Wall Socket (AC Charger): Connect the included AC wall charger to the input port and a wall outlet.
- Via USB-C PD: Use a compatible USB-C Power Delivery charger (not included) to charge the unit via its USB-C port.
- Per saulės kolektorių: Connect a compatible solar panel (not included) to the input port using the provided MC4 to DC cable. Ensure the solar panel is placed in direct sunlight for optimal charging.
- Via 12V Car Charger: Connect the included car charger cable to the input port and your vehicle's 12V cigarette lighter socket.
The LCD display will show the input wattage and battery charge status during charging. You can use the outputs even while the power station is charging (pass-through charging).
Using the Outputs:
The XP300U provides various output ports to power different types of devices.

Image: The Xtorm XP300U demonstrating its universal compatibility with icons representing various devices and output types: 1x AC 300W/220V, 1x USB-C PD 60W, 2x DC 5.5mm 60W, 2x USB QC3.0 18W, 1x USB 18W, and 1x 12V Car 120W.
- AC Output (220V, 300W):
- Press the "AC" button to activate the AC output. The AC indicator on the display will light up.
- Prijunkite įrenginio maitinimo laidą į kintamosios srovės lizdą.
- Įsitikinkite, kad jūsų įrenginio energijos suvartojimas neviršija 300 W.
- Press the "AC" button again to turn off the AC output when not in use.
- DC išvestis (12V):
- Press the "12V" button to activate the DC output. The DC indicator will light up.
- Connect your 12V device to the DC port.
- Press the "12V" button again to turn off the DC output.
- USB Outputs (USB-A, USB-C PD):
- The USB outputs are typically always active when the unit is on.
- Connect your USB-powered devices to the appropriate USB-A or USB-C PD ports.
- Ekrane bus rodoma išvesties galiatage for connected devices.
The power station can provide power for extended periods, depending on the connected devices' power consumption.

Vaizdas: pvzamples of device runtimes with the Xtorm XP300U: 17.5 hours for a 10W LED light, 5.5 hours for a 30W small TV, 4 hours for a 40W small coolbox, and 6 hours for a 40W small coolbox (via 12V carplug output).
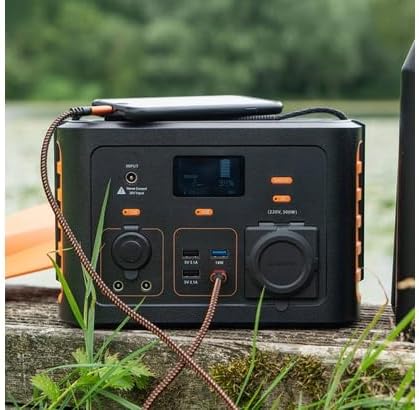
Image: The Xtorm XP300U Portable Power Station being used outdoors on a wooden surface, charging a smartphone, demonstrating its portability and utility in various environments.
Priežiūra
Tinkama elektrinės priežiūra užtikrina jos ilgaamžiškumą ir optimalų veikimą.
- Valymas: Išorinį įrenginio paviršių valykite minkštu, sausu skudurėliu. Nenaudokite abrazyvinių valiklių ar tirpiklių.
- Saugykla:
- Jėgos stotelę laikykite vėsioje, sausoje vietoje, toliau nuo tiesioginių saulės spindulių ir ekstremalių temperatūrų.
- Ilgalaikio sandėliavimo metu įkraukite įrenginį maždaug iki 50–80 % kas 3–6 mėnesius, kad palaikytumėte akumuliatoriaus veikimo laiką.
- Venkite laikyti aplinkoje, kurioje yra didelė drėgmė.
- Akumuliatoriaus priežiūra: Do not fully discharge the battery frequently, as this can reduce its lifespan. Recharge promptly when the battery level is low.
Trikčių šalinimas
If you encounter issues with your Xtorm XP300U, refer to the following common problems and solutions.
| Problema | Galima priežastis | Sprendimas |
|---|---|---|
| Įrenginys neįsijungia. | Baterija visiškai išsikrovusi. | Connect the power station to an AC wall outlet and charge it for at least 30 minutes. |
| Kintamosios srovės išvestis neveikia. | Kintamosios srovės išvestis neaktyvuota; įrenginys viršija 300 W; perkaitimas. | Paspauskite mygtuką „AC“, kad suaktyvintumėte. Patikrinkite įrenginio watą.tage. Allow unit to cool down if overheated. |
| USB prievadai neįkraunami. | Device not compatible; cable faulty. | Ensure device is compatible. Try a different USB cable. |
| Lėtas įkrovimas. | Using a low-power charger; environmental factors (e.g., cloudy for solar). | Use the original AC charger or a higher wattage USB-C PD charger. Optimize solar panel placement. |
If the problem persists, please contact Xtorm customer support.
Specifikacijos
Detailed technical specifications for the Xtorm XP300U Portable Power Station.
| Funkcija | Detalė |
|---|---|
| Modelio pavadinimas | XP300U |
| Prekės ženklas | Xtorm |
| Išėjimo galia | 300 Watts (AC) |
| Įvesties tomastage | 12 volto (DC) |
| Maitinimo šaltinis | AC Wall, USB-C PD, Solar, Car Charger |
| Rekomenduojami naudojimo būdai | Home, Camping |
| Svoris | 3300 gramų (3.3 kg) |
| Spalva | Oranžinė |
| Įtraukti komponentai | 1 package (Power Station, AC Charger, Car Charger, MC4 to DC Cable) |

Image: Dimensions of the Xtorm XP300U Portable Power Station (240mm x 154mm x 142mm) and its weight (3.3 kg), highlighting its convenient travel size.
Garantija ir palaikymas
Xtorm products come with a standard warranty. Please refer to the warranty card included in your package or visit the official Xtorm websvetainėje, kurioje pateikiamos išsamios garantijos sąlygos.
For technical support, troubleshooting assistance, or warranty claims, please contact Xtorm customer service:
- Websvetainė: www.xtorm.eu (Patikrinkite palaikymo komandos kontaktinę informaciją)
- El. paštas: Refer to the Xtorm webkonkrečių palaikymo el. pašto adresų svetainėje.
- Telefonas: Refer to the Xtorm webregioninės pagalbos telefono numerių svetainė.
When contacting support, please have your product model (XP300U) and purchase details ready.
Ask a question about this manual
Ask about setup, troubleshooting, compatibility, parts, safety, or missing instructions. Manuals+ will review the question and use this page’s manual context to help answer it.