
1. Įvadas
This manual provides detailed instructions for the installation, setup, and operation of your OHMAX Smart Light Switch with Remote Control, Model SWS10-1. Please read this manual thoroughly before installation and use to ensure proper functionality and safety.

Image 1.1: OHMAX Smart Light Switch and Remote Control packaging. The image shows the product box containing the smart light switch and a separate wireless remote control.
2. Saugos informacija
- Elektros sauga: Installation must be performed by a qualified electrician or a person with a thorough understanding of electrical wiring. Always turn off power at the circuit breaker before installation.
- Reikalingas neutralus laidas: This device requires a neutral wire for operation. If your electrical box does not have a neutral wire, consult a qualified electrician.
- Tik 2.4 GHz „Wi-Fi“: This device operates on a 2.4GHz Wi-Fi network. It is not compatible with 5GHz Wi-Fi networks.
- Single Pole Only: This switch is designed for single-pole applications only. It is not compatible with 3-way or multi-way switch configurations unless used with the included remote as a virtual 3-way.
- Didžiausia apkrova: Do not exceed the maximum power rating of 1800W or current rating of 15A.
3. Pakuotės turinys
The OHMAX Smart Light Switch kit includes:
- OHMAX Smart Light Switch (Model SWS10-1)
- SM04 RF Wireless Remote Control
- Sieninis laikiklis nuotolinio valdymo pultui
- Veido plokštė
- Varžtai
- 3M lipni juosta
- Vartotojo vadovas (šis dokumentas)
4. Sąranka ir diegimas
4.1 Elektros instaliacija
- Išjungti maitinimą: Suraskite grandinės pertraukiklį ir išjunkite keičiamo šviesos jungiklio maitinimą. Patikrinkite, ar maitinimas išjungtas, naudodami įtampos matuoklį.tage testeris.
- Seno jungiklio pašalinimas: Carefully remove the existing wall plate and unscrew the old switch from the electrical box. Disconnect the wires.
- Identifikuokite laidus: Elektros dėžutėje atpažinkite šiuos laidus:
- Neutralus laidas: Often white and capped together. This is essential for the smart switch.
- Linijos laidas: Often black, providing constant power. Use an electric pen to confirm it's live when power is on (before turning off for installation).
- Įkrovimo laidas: Connects to the light fixture. May be red or black.
- Žemės viela: Always green or bare copper.
- Prijunkite naują jungiklį: Connect the wires from your electrical box to the corresponding terminals on the OHMAX Smart Light Switch. Ensure connections are secure.
- Connect the Neutral wire to the 'Neutral' terminal.
- Connect the Line wire to the 'Line' terminal.
- Connect the Load wire to the 'Load' terminal.
- Connect the Ground wire to the 'Ground' terminal.
Note: If the switch does not function after installation, try reversing the Line and Load connections.
- Jungiklio tvirtinimas: Gently push the wired switch into the electrical box and secure it with screws. Attach the face plate.
- Atkurti maitinimą: Prie grandinės pertraukiklio vėl įjunkite maitinimą.

Image 4.1: Step-by-step wiring diagram. This image illustrates how to replace an old switch, identify neutral, line, load, and ground wires, and connect them to the new smart switch.
4.2 Programėlės sąranka ir „Wi-Fi“ ryšys
The OHMAX Smart Light Switch uses the Smart Life app for smart control. Ensure your Wi-Fi network is 2.4GHz.
- Atsisiųsti programą: Atsisiųskite programėlę „Smart Life“ iš „App Store“ („iOS“) arba „Google Play Store“ („Android“).
- Registruotis / Prisijungti: Atidarykite programėlę ir užregistruokite naują paskyrą arba prisijunkite naudodami esamą.
- Pridėti įrenginį: Tap "Add Device" or the "+" icon in the app.
- Pasirinkite įrenginio tipą: Choose "Light Switch" or the appropriate category.
- Prisijunkite prie 2.4 GHz Wi-Fi: Pasirinkite savo 2.4 GHz Wi-Fi tinklą ir įveskite slaptažodį.
- Iš naujo nustatyti įrenginį: On the smart switch, press and hold the main switch button for approximately 5 seconds until the indicator light blinks rapidly. This puts the switch into pairing mode.
- Patvirtinkite mirksėjimą: In the app, confirm that the indicator light on the switch is blinking rapidly.
- Prisijunkite: The app will begin searching for and connecting to the device. Once connected, you can rename the switch.
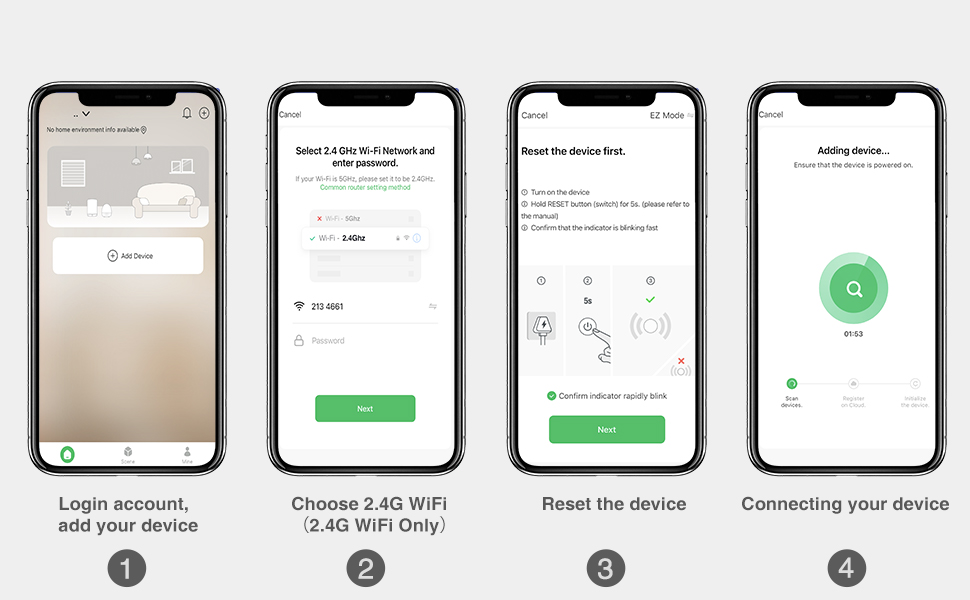
Image 4.2: Smart Life app setup steps. This image shows the four main steps: logging in and adding a device, selecting the 2.4G Wi-Fi network, resetting the device, and connecting the device.
4.3 Nuotolinio valdymo pora
The included SM04 RF remote control needs to be paired with the smart light switch.
- Enter Pairing Mode on Switch: Quickly press the main smart switch button 3 times. The indicator light on the switch will flash green.
- Suporuoti nuotolinio valdymo pultą: While the switch indicator is flashing, press the "ON" button on the wireless remote control.
- Patvirtinimas: The remote will blink green, and the switch indicator light will slow down its flashing, indicating successful pairing.
Note: The remote control can be mounted to a wall using the provided wall holder, screws, or 3M adhesive tape. It uses a replaceable CR2032 coin cell battery.
5. Naudojimo instrukcijos
5.1 Keli valdymo metodai
The OHMAX Smart Light Switch offers several ways to control your lights:
- Rankinis įjungimas/išjungimas: Press the physical button on the smart light switch.
- Belaidis nuotolinio valdymo pultas: Use the included SM04 RF remote control to turn lights ON or OFF from anywhere within range (up to 260ft).
- Programos valdymas: Use the Smart Life app on your smartphone to control lights remotely, set schedules, and manage settings.
- Valdymas balsu: Integruokite su „Amazon Alexa“ arba „Google Home“, kad galėtumėte valdyti laisvų rankų įranga.

Image 5.1: Control Your Lights in Multiple Ways. This image visually demonstrates control via the remote, manual switch, voice commands through smart speakers, and the Smart Life mobile application.
5.2 Balso valdymo integravimas
To enable voice control, link your Smart Life account to Amazon Alexa or Google Home through their respective apps.
- „Amazon Alexa“:
- Atidarykite „Alexa“ programą.
- Eikite į „Įgūdžiai ir žaidimai“.
- Ieškokite „Išmanus gyvenimas“ ir įgalinkite šį įgūdį.
- Link your Smart Life account.
- Atraskite įrenginius.
- „Google Home“:
- Atidarykite „Google Home“ programą.
- Tap "Add" > "Set up device" > "Works with Google".
- Ieškokite „Išmanusis gyvenimas“ ir susiekite savo paskyrą.
Once linked, you can use commands such as: "Alexa, turn on Kitchen Light" or "Hey Google, turn off Bedroom Light."

Image 5.2: Hands-free Voice Control. A person is shown interacting with a smart speaker to control lights, demonstrating the convenience of voice commands.
5.3 Laikmačio ir tvarkaraščio funkcijos
Utilize the Smart Life app to set up schedules and timers for automated lighting control.
- Laikmatis: Set a countdown timer for the light to turn ON or OFF after a specified duration.
- Tvarkaraštis: Create daily or weekly schedules for lights to turn ON or OFF at specific times. This can simulate occupancy when you are away from home.

Image 5.3: Light Scheduling. This image illustrates the timer and scheduling capabilities, showing a countdown for turning off and a scheduled time for turning on.
6. Priežiūra
- Valymas: To clean the switch and face plate, gently wipe with a soft, dry cloth. Do not use abrasive cleaners or solvents.
- Nuotolinis baterijos keitimas: The wireless remote control is powered by a CR2032 coin cell battery. Replace the battery when the remote's indicator light no longer illuminates or its range decreases significantly.
- Firmware atnaujinimai: Periodically check the Smart Life app for available firmware updates for your smart switch to ensure optimal performance and security.
7. Problemų sprendimas
7.1 Bendrosios problemos ir sprendimai
- Switch Not Turning On/Off Manually:
- Įsitikinkite, kad elektros tiekimas atkurtas per grandinės pertraukiklį.
- Verify all wires are securely connected.
- Check if the Line and Load wires are correctly identified and connected. If unsure, try reversing them.
- Nuotolinio valdymo pultas neveikia:
- Ensure the remote is paired with the switch (refer to Section 4.3).
- Check the remote's battery (CR2032). Replace if necessary.
- Ensure the remote is within range of the smart switch.
- Unable to Connect to Wi-Fi / App Control Not Working:
- Confirm your Wi-Fi network is 2.4GHz. The switch is not compatible with 5GHz networks.
- Ensure your Wi-Fi signal is strong at the switch's location.
- Verify the Wi-Fi password entered in the Smart Life app is correct.
- Try resetting the smart switch to pairing mode (press and hold the main button for 5 seconds until it blinks rapidly) and attempt to connect again via the app.
- Paleiskite iš naujo „Wi-Fi“ maršrutizatorių.
- Balso valdymas nereaguoja:
- Ensure your Smart Life account is correctly linked to Alexa or Google Home (refer to Section 5.2).
- Check if the smart speaker is online and functioning correctly.
- Verify the device name in the Smart Life app matches the name you are using in voice commands.
8. Specifikacijos
| Modelio numeris | SWS10-1 |
| Prekės ženklas | OHMAXX |
| Gaminio matmenys | 2.3 x 1.5 x 2.1 colio |
| Prekės svoris | 8.64 uncijos |
| Veikimo režimas | ON-OFF-ON |
| Dabartinis reitingas | 15 Amps |
| Veiklos ttage | 120 voltų |
| Kontakto tipas | Paprastai atidarytas |
| Jungties tipas | Prijunkite |
| Terminalas | Varžtas |
| Grandinės tipas | 1 krypties (vienpolis) |
| Kontaktinė medžiaga | Varis |
| „Wi-Fi“ suderinamumas | Tik 2.4 GHz |
| Maksimali galia | 1800W |
9. Garantija ir palaikymas
9.1 Informacija apie garantiją
OHMAX products typically come with a 12-month warranty from the date of purchase. Please refer to the product packaging or contact customer support for specific warranty terms and conditions.
9.2 Pagalba klientams
If you encounter any difficulties during installation or operation, or have questions about your OHMAX Smart Light Switch, please do not hesitate to contact our customer support team. We are available to assist you.
For support, please refer to the contact information provided on the product packaging or the OHMAXX brand store on Amazon: OHMAXX Store