
1. Įvadas
Welcome to the user manual for your new Cheerlux C50 Projector. This guide provides essential information on setting up, operating, maintaining, and troubleshooting your device. Please read this manual thoroughly before using the projector to ensure optimal performance and safety. Keep this manual for future reference.
2. Saugos instrukcijos
Kad išvengtumėte gaisro, elektros smūgio ar sužalojimų, laikykitės šių saugos priemonių:
- Neužblokuokite ventiliacijos angų. Užtikrinkite pakankamai vietos aplink projektorių tinkamam oro cirkuliavimui.
- Saugokite projektorių nuo lietaus ar drėgmės. Nestatykite ant projektoriaus daiktų, pripildytų skysčių, pavyzdžiui, vazų.
- Neatidarykite projektoriaus casing. Visus techninės priežiūros darbus patikėkite kvalifikuotiems techninės priežiūros darbuotojams.
- Naudokite tik prie projektorijaus pridėtą maitinimo adapterį.
- Venkite žiūrėti tiesiai į projektoriaus objektyvą, kai lamp įjungtas, nes ryški šviesa gali pažeisti akis.
- Padėkite projektorių ant stabilaus, lygaus paviršiaus, kad jis nenukristų.
- Atjunkite projektorių nuo maitinimo lizdo žaibuojant arba kai jis ilgą laiką nenaudojamas.
3. Pakuotės turinys
Prašome patikrinti, ar visi daiktai yra ir yra geros būklės:
- Cheerlux C50 projektorius
- Nuotolinio valdymo pultas
- Maitinimo kabelis
- HDMI kabelis
- AV kabelis
- Vartotojo vadovas
4. Produktas baigtasview
Familiarize yourself with the components and ports of your Cheerlux C50 Projector.

This image displays the Cheerlux C50 Projector from a front-top angle, highlighting its lens, focus ring, and control panel buttons on the top surface. The projector features a white and grey casing.
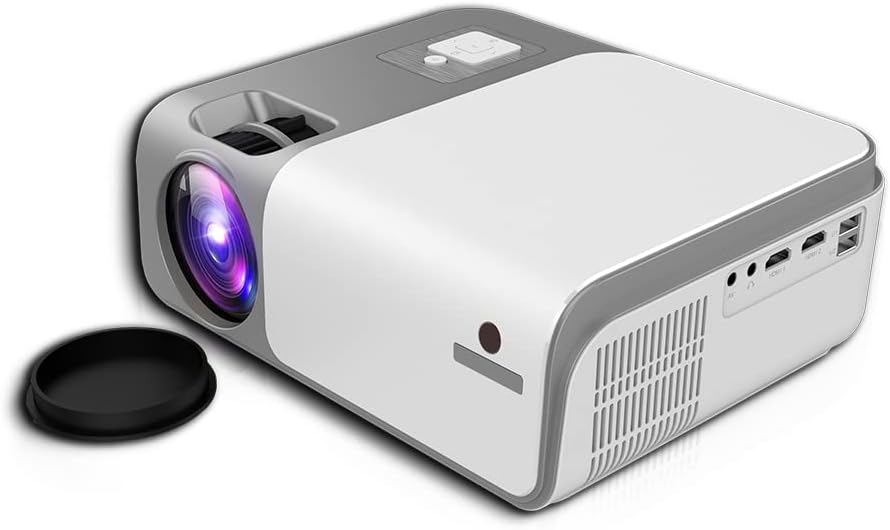
This image shows the rear and side of the Cheerlux C50 Projector, revealing various input/output ports such as HDMI, USB, and AV, along with ventilation grilles. A lens cap is visible next to the lens.
4.1. Priekinis skydelis
- Projekcinis objektyvas: Išleidžia vaizdą.
- Fokusavimo žiedas: Reguliuoja vaizdo ryškumą.
4.2. Viršutinis skydelis
- Valdymo mygtukai: Power, Menu, Source, Navigation (Up/Down/Left/Right), OK.
4.3. Galinis skydelis
- Maitinimo įvestis: Jungiamas prie maitinimo kabelio.
- HDMI prievadai (x2): Connect to HDMI-enabled devices (laptops, gaming consoles, Blu-ray players).
- USB prievadai (x2): Prijunkite USB atmintines, kad galėtumėte atkurti medijos failus.
- AV prievadas: Prijunkite prie senesnių įrenginių naudodami AV kabelį.
- Garso išvestis (3.5 mm): Prijunkite išorinius garsiakalbius arba ausines.
- IR imtuvas: Nuotolinio valdymo signalams.
5. Sąranka
5.1. Maitinimo prijungimas
- Prijunkite maitinimo laidą prie projektoriaus maitinimo įvesties prievado.
- Kitą maitinimo laido galą prijunkite prie sieninio lizdo.
- Užsidegs projektoriaus maitinimo indikatoriaus lemputė.
5.2. Įdėjimas
Position the projector on a stable, flat surface. The ideal projection distance for the Cheerlux C50 is between 1.5 to 6 meters, depending on the desired screen size. Ensure the projector is centered with your projection screen or wall.
5.3. Fokusavimas ir trapecijos korekcija
- Fokuso reguliavimas: Turn the focus ring on the front of the projector until the projected image appears sharp and clear.
- Keystone Correction (4P): If the projected image appears trapezoidal (wider at the top or bottom), use the 4P keystone correction function. This can typically be accessed via the projector's menu or dedicated buttons on the remote control. Adjust each of the four corners independently to achieve a perfectly rectangular image.
6. Operacinis
6.1. Maitinimo įjungimas/išjungimas
- Maitinimas: Paspauskite projektoriaus arba nuotolinio valdymo pulto maitinimo mygtuką. Projektorius įsijungs iramp apšvies.
- Išjungti: Dar kartą paspauskite maitinimo mygtuką. Jei būsite paraginti, patvirtinkite išjungimą. Prieš atjungdami projektorių nuo elektros tinklo, leiskite jam atvėsti.
6.2. Įvesties šaltiniai
Connect your desired device to the projector using the appropriate cable (HDMI, AV, USB). Then, press the 'Source' button on the projector or remote control to select the corresponding input source.
- HDMI: For high-definition video and audio from laptops, game consoles, etc.
- USB: Skirtas leisti mediją files (photos, videos, music) directly from a USB flash drive.
- APIE: For standard definition video and audio from older devices like DVD players.
6.3. Belaidis ryšys („Wi-Fi“ ir „Bluetooth“)
The Cheerlux C50 Projector features built-in WiFi and Bluetooth for enhanced connectivity.
- „WiFi“ ryšys: Navigate to the 'Settings' menu, select 'Network' or 'WiFi Settings'. Choose your desired WiFi network from the list and enter the password.
- „Bluetooth“ ryšys: In the 'Settings' menu, select 'Bluetooth'. Turn on Bluetooth and pair with your Bluetooth-enabled speakers or headphones.
6.4. Ekrano atspindėjimas
The projector supports wireless screen mirroring from compatible smartphones and tablets.

This image illustrates the Cheerlux C50 Projector wirelessly connected to a smartphone. The phone's screen, displaying a movie scene, is being mirrored to the projector, indicated by a Wi-Fi signal icon between the devices.
- Ensure both your projector and mobile device are connected to the same WiFi network.
- On the projector, select the 'Screen Mirroring' or 'Wireless Display' option from the main menu.
- On your mobile device, activate its screen mirroring feature (e.g., 'Smart View' for Samsung, 'Screen Mirroring' for Android, 'AirPlay' for iOS).
- Select the projector's name from the list of available devices on your phone.
- The mobile device's screen content will now be projected.
6.5. Meniu naršymas
Use the navigation buttons (Up, Down, Left, Right) and 'OK' button on the projector or remote control to browse through the on-screen menu. The 'Menu' button typically opens the main settings, and the 'Return' or 'Exit' button closes menus.
7. Priežiūra
7.1. Valymas
- Objektyvas: Naudokite minkštą, nepūkuotą šluostę, specialiai skirtą optiniams lęšiams. Nenaudokite abrazyvinių valiklių.
- Casing: Projektoriaus išorę nuvalykite minkšta, sausa šluoste. Jei nešvarumai sunkiai įveikiami, šiek tiek nuvalykite.amplt audinį supilkite vandeniu.
- Ventiliacijos angos: Periodically clean the vents with a soft brush or compressed air to prevent dust buildup, which can affect cooling.
7.2. Sandėliavimas
When not in use for extended periods, store the projector in a cool, dry place, away from direct sunlight and extreme temperatures. Cover the lens with its cap to protect it from dust and scratches.
8. Problemų sprendimas
Jei kyla problemų dėl projektoriaus, žr. šias dažniausiai pasitaikančias problemas ir sprendimus:
| Problema | Galima priežastis | Sprendimas |
|---|---|---|
| Neprojektuojamas vaizdas | Power cable loose, incorrect input source, device not connected. | Check power connection, select correct input source, ensure source device is on and connected. |
| Vaizdas neryškus | Focus not adjusted, projector too close/far. | Adjust the focus ring. Reposition the projector within the recommended distance. |
| Vaizdas yra trapecijos formos | Projektorius nėra statmenas ekranui. | Use the 4P keystone correction function in the menu. |
| Nėra garso | Volume too low, external speakers not connected, source device muted. | Increase projector volume, check external speaker connection, unmute source device. |
| Nuotolinio valdymo pultas neveikia | Batteries dead, obstruction, not pointing at IR receiver. | Replace batteries, remove obstructions, point remote directly at the projector's IR receiver. |
9. Specifikacijos
Technical specifications for the Cheerlux C50 Projector:
| Funkcija | Specifikacija |
|---|---|
| Prekės ženklo pavadinimas | Generic (Cheerlux C50) |
| Ryšio technologija | Wi-Fi, Bluetooth |
| Gimtoji raiška | 1920 x 1080 |
| Ryškumas | 4000 liumenų |
| Formos faktorius | Nešiojami |
| Montavimo tipas | Stalviršio laikiklis |
| Valdiklio tipas | Nuotolinio valdymo pultas |
| Maksimalus metimo atstumas | 6 metrai |
| Vattage | 3 vatų |
| Ypatingos savybės | Built In Wi Fi, Portable, Wireless, 4P Keystone Correction |
10. Garantija ir palaikymas
The Cheerlux C50 Projector comes with a standard manufacturer's warranty. Please refer to the warranty card included in your package for specific terms and conditions, including warranty period and coverage details. For technical support, service, or further inquiries, please contact your retailer or the manufacturer's customer service department.
Išsaugokite pirkimo kvitą kaip pirkimo įrodymą garantiniams reikalavimams.