
1. Įvadas
The JONSBO N1 Mini-ITX NAS Chassis is a compact and versatile computer case designed for Network Attached Storage (NAS) systems. It supports Mini-ITX motherboards and offers extensive storage capabilities with 5+1 disk bays. Constructed from aluminum and steel, it provides a robust and efficient solution for home office, network storage, or enterprise storage applications.
2. Pagrindinės savybės
- 5+1 Disk Bays: Features five 3.5-inch HDD hot-swap bays and one 2.5-inch SSD bay for flexible storage configurations.
- Kompaktiškas dizainas: Mini-ITX form factor with dimensions of W170 x D354 x H217mm (6.69 x 13.94 x 8.54 inches), allowing for vertical or horizontal placement.
- Efektyvus aušinimas: Includes a built-in 14cm fan designed for large air volume and low noise, ensuring optimal drive and component temperatures.
- Patvari konstrukcija: Made from 2.5mm aluminum alloy and 1mm steel plate for enhanced durability and stability.
- Lengva prieiga: Compact drawer-type structure with 270-degree open assembly for convenient installation and maintenance. Multi-disk bay pull structure with a standard server-grade hot-swappable backplane facilitates quick hard disk replacement.
- Priekinio skydelio jungtys: Equipped with Type-C (20PIN), 1x USB 3.0, and 1x Audio+Mic (2-in-1) port for easy peripheral access.
- Aparatūros suderinamumas: Supports ITX motherboards, SFX power supplies (<=150mm), CPU coolers (<=70mm height), and single low-profile GPUs (<=180mm length).

2.1 pav.: sprogo view illustrating the internal structure and component layout of the JONSBO N1 chassis, including the 5+1 drive bays, fan, and motherboard area.

2.2 pav. Vidinis view of the JONSBO N1 chassis, showcasing the large 14cm cooling fan positioned to optimize airflow over the hard drives.

Figure 2.3: Detailed diagram illustrating the placement of the 14cm fan, SSD bay, HDD hot-swap bays, SFX power supply area, Mini-ITX motherboard, and PCI Expansion Slot within the JONSBO N1 chassis.
3. Specifikacijos
| Funkcija | Detalė |
|---|---|
| Gaminio matmenys (IxPxH) | 170mm (W) x 354mm (D) x 217mm (H) / 6.69 x 13.94 x 8.54 inches |
| Medžiaga | 2.5mm Aluminum Alloy / 1mm Steel Plate |
| Hard Disk Bays | 5 x 3.5" HDD (Hot-Swap), 1 x 2.5" SSD |
| Suderinama pagrindinė plokštė | Mini-ITX |
| PCI išplėtimo lizdas | 1 (Supports Low Profile, <180mm Length) |
| Priekinė sąsaja | Type-C (20PIN), 1x USB 3.0, 1x Audio+Mic (2-in-1) |
| Maitinimo palaikymas | SFX (<=150mm) |
| CPU aušintuvo aukščio riba | <=70 mm |
| Aušinimo sistema | 1x 140mm Fan (Standard Configuration) |
| Grynasis svoris | 3.8 KGS / 8.38 lbs |
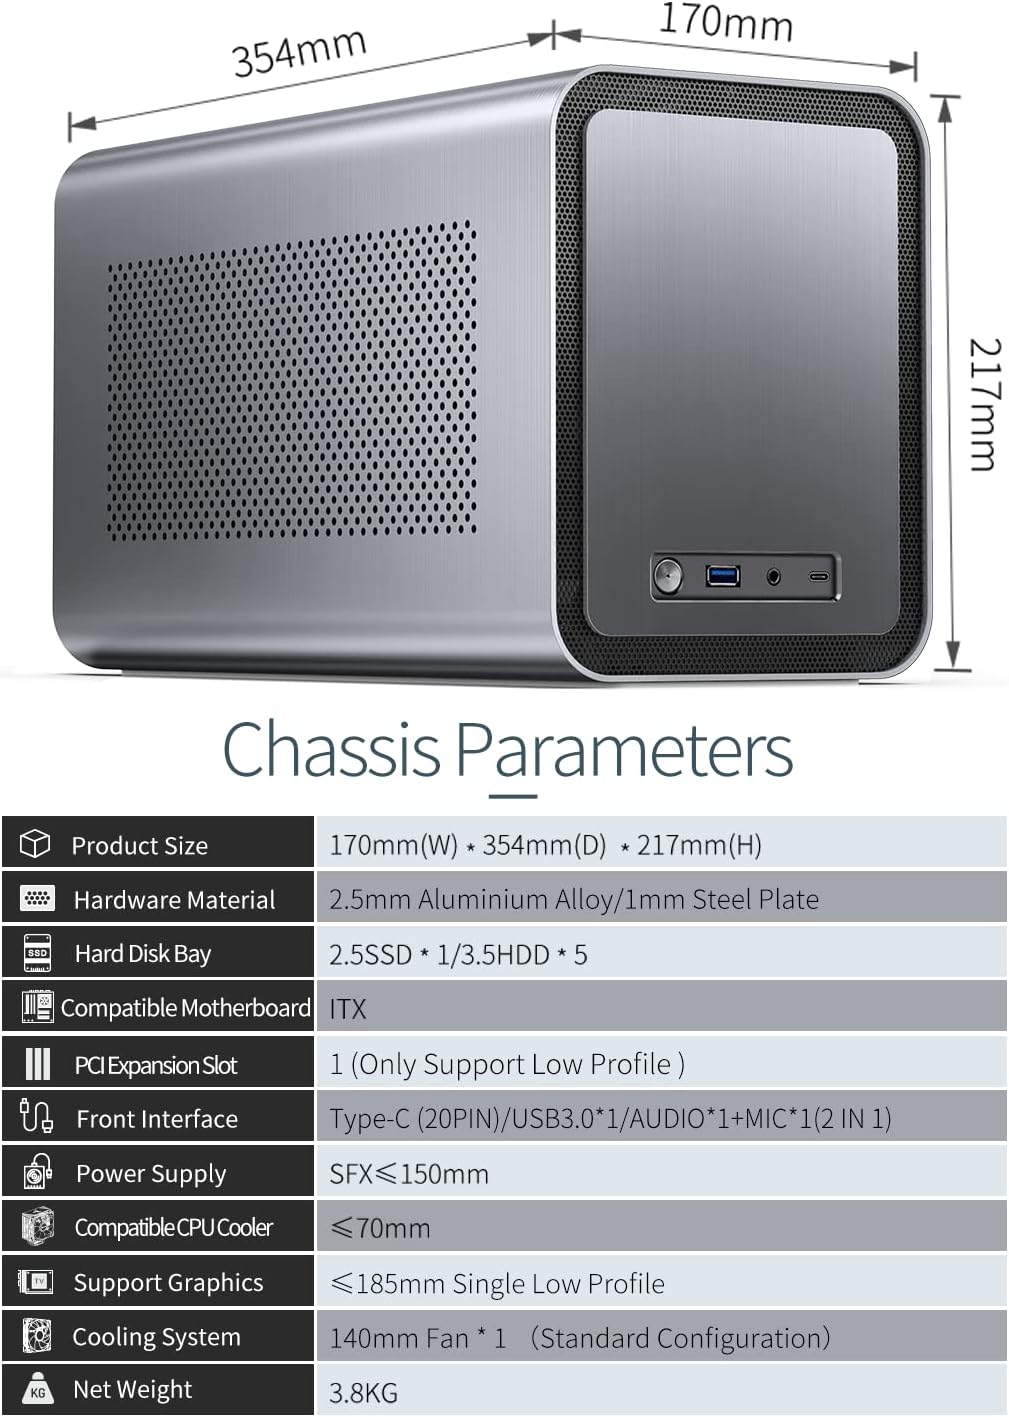
Figure 3.1: Visual representation of the JONSBO N1 chassis dimensions and a summary of its key specifications.
4. Sąranka ir diegimas
Follow these steps to assemble your JONSBO N1 NAS Chassis:
- Paruoškite važiuoklę:
Unscrew the thumb screws on the rear panel and slide the outer aluminum shell backward to remove it. The internal frame will then be accessible.
Video 4.1: This video demonstrates the compact drawer-type structure of the JONSBO N1, showing how the outer shell slides off to reveal the internal components for easy assembly and maintenance.
- Įdiekite pagrindinę plokštę:
Mount your Mini-ITX motherboard onto the designated standoffs within the chassis. Secure it with screws. Ensure all necessary cables (front panel connectors, USB, audio) are routed appropriately.
- Install SFX Power Supply:
Install the SFX power supply into its dedicated compartment. Connect the necessary power cables to the motherboard and other components.
- Įdiekite atminties diskus:
For 3.5-inch HDDs, attach them to the hot-swap trays and slide them into the five designated bays. For the 2.5-inch SSD, mount it in its dedicated bay. Ensure all SATA data and power cables are securely connected. Using right-angle SATA connectors is recommended for easier cable management.

Figure 4.1: Illustration of installing 3.5-inch hard drives into the hot-swap bays. The design allows for quick and tool-less drive insertion.
- Install CPU Cooler and Optional GPU:
Install your CPU cooler, ensuring it adheres to the maximum height of 70mm. If using a low-profile GPU, install it into the PCI expansion slot, ensuring its length is within 180mm.
- Kabelių valdymas:
Carefully route and secure all internal cables to ensure proper airflow and prevent interference with components. Due to the compact nature of the case, efficient cable management is crucial.
- Reassemble Chassis:
Once all components are installed and cables managed, slide the outer aluminum shell back onto the internal frame and secure it with the thumb screws.
- Pritvirtinkite kojas:
Attach the standard profile all-aluminum column support feet to the bottom of the chassis. These feet allow for both vertical and horizontal orientation.

4.2 pav.: Dugnas view of the JONSBO N1 chassis with its four support feet attached, providing stability for both vertical and horizontal orientations.
5. Naudojimo instrukcijos
After successful assembly, connect your JONSBO N1 NAS Chassis to a power source and your network. Power on the system using the front panel power button. The operating system installed on your motherboard will then boot. Access your NAS functionality through your network, typically via a web interface or network shares, depending on your chosen NAS software.
- Maitinimo įjungimas/išjungimas: Press the power button on the front panel to turn the system on or off.
- Hot-Swap Drives: The 3.5-inch HDD bays support hot-swapping. Refer to your NAS software documentation for the correct procedure to safely remove and insert drives while the system is running.
- Priekinio skydelio prievadai: Use the front USB 3.0 and Type-C ports for connecting external devices. The audio/mic combo jack allows for headset connectivity.

Figure 5.1: The JONSBO N1 NAS Chassis in a typical horizontal desktop setup, demonstrating its compact footprint and front panel access.
6. Priežiūra
Regular maintenance ensures the longevity and optimal performance of your JONSBO N1 chassis and its components.
- Dulkių valymas: Periodically clean the chassis, especially the ventilation holes and the 14cm fan, to prevent dust buildup. Dust can impede airflow and lead to overheating. Use compressed air or a soft brush.
- Oro srauto patikrinimas: Ensure that the chassis's ventilation areas are not obstructed. Maintain adequate space around the unit for proper airflow.
- Komponentų patikrinimas: Occasionally inspect internal components for loose connections or signs of wear.

Figure 6.1: The side panel of the JONSBO N1 chassis, featuring a perforated design to facilitate airflow and heat dissipation. Regular cleaning of these vents is recommended.
7. Problemų sprendimas
This section addresses common issues you might encounter with your JONSBO N1 chassis.
- Sistema neįsijungia:
Check all power connections, including the power supply unit (PSU) to the wall outlet, the PSU to the motherboard, and the front panel power switch connection to the motherboard. Ensure the PSU switch is in the 'ON' position.
- Kietieji diskai neaptikti:
Verify that all SATA data and power cables are securely connected to both the drives and the motherboard/backplane. Ensure the drives are fully seated in their hot-swap bays. Check your motherboard's BIOS/UEFI settings to confirm SATA ports are enabled.
- Perkaitimo problemos:
Ensure the 14cm fan is operating correctly and its blades are free from obstructions. Clean any dust buildup from the fan and ventilation areas. Verify that the CPU cooler is properly installed and making good contact with the CPU. Improve cable management to enhance internal airflow.
- Loose or Stripped Feet Installation:
If a support foot cannot be securely attached due to stripped threads, it may indicate a manufacturing defect. Contact JONSBO customer support for assistance or replacement parts. Attempting to force a stripped screw can cause further damage.
8. Garantija ir palaikymas
JONSBO products are designed for quality and reliability. For warranty information, technical support, or to inquire about replacement parts, please refer to the official JONSBO websvetainėje arba susisiekite tiesiogiai su jų klientų aptarnavimo tarnyba. Išsaugokite pirkimo įrodymą garantiniams reikalavimams.
Norėdami gauti daugiau informacijos, apsilankykite „Jonsbo“ parduotuvė „Amazon“ platformoje.


