1. Įvadas
Thank you for choosing the PRIXTON Cinema Mini Projector. This compact and versatile projector is designed to provide an immersive viewing experience for movies, games, and presentations. Its multiple connectivity options and portable design make it ideal for various environments. Please read this manual carefully before using the projector to ensure proper operation and to maximize its lifespan.
2. Saugos informacija
- Maitinimas: Naudokite tik nurodytą maitinimo adapterį. Įsitikinkite, kad įtampatage yra suderinamas su jūsų regionu.
- Vėdinimas: Neužblokuokite ventiliacijos angų. Užtikrinkite pakankamai vietos aplink projektorių tinkamam oro cirkuliavimui ir neperkaitimui.
- Akių sauga: Nežiūrėkite tiesiai į projektoriaus objektyvą, kai lamp įjungtas. Ryški šviesa gali pažeisti akis.
- Vanduo ir drėgmė: Projektorių saugokite nuo vandens, lietaus ir per didelės drėgmės. Nenaudokite šlapiomis rankomis.
- Valymas: Prieš valydami atjunkite maitinimą. Naudokite minkštą, sausą šluostę. Venkite skystų valiklių.
- Vieta: Projektorių pastatykite ant stabilaus, lygaus paviršiaus. Venkite jo tiesioginiuose saulės spinduliuose arba šalia šilumos šaltinių.
- Vaikai: Keep the projector and its accessories out of reach of children.
3. Pakuotės turinys
Prašome patikrinti, ar pakuotėje yra visi reikalingi daiktai:
- „PRIXTON Cinema Mini“ projektorius
- Nuotolinio valdymo pultas
- Maitinimo adapteris
- Vartotojo vadovas
4. Produktas baigtasview
Familiarize yourself with the various parts of your PRIXTON Cinema Mini Projector.
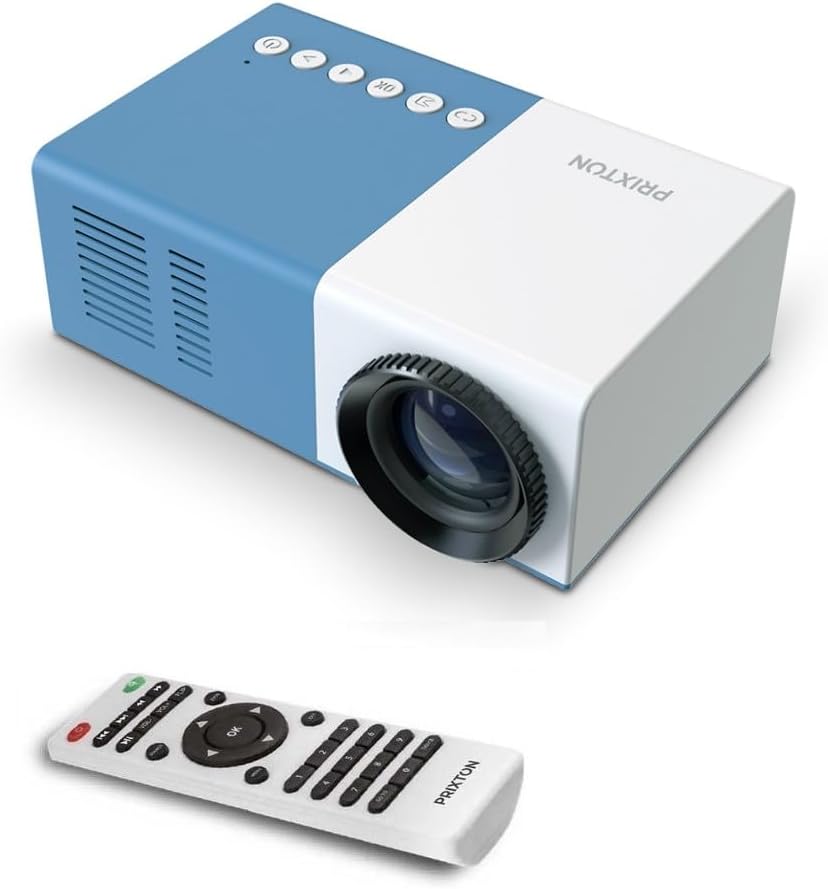
4.1 paveikslas: Priekyje ir viršuje View of the PRIXTON Cinema Mini Projector with its remote control. The projector is blue and white, showing the lens, control buttons, and the included remote.
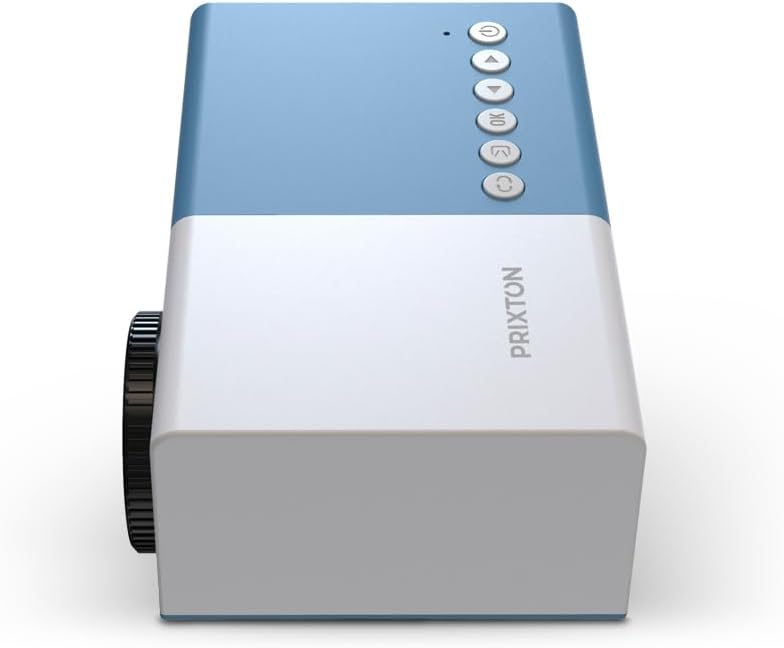
4.2 paveikslas: Į viršų view of the projector, highlighting the control buttons (Power, Menu, OK, Navigation) and the focus wheel on the side.
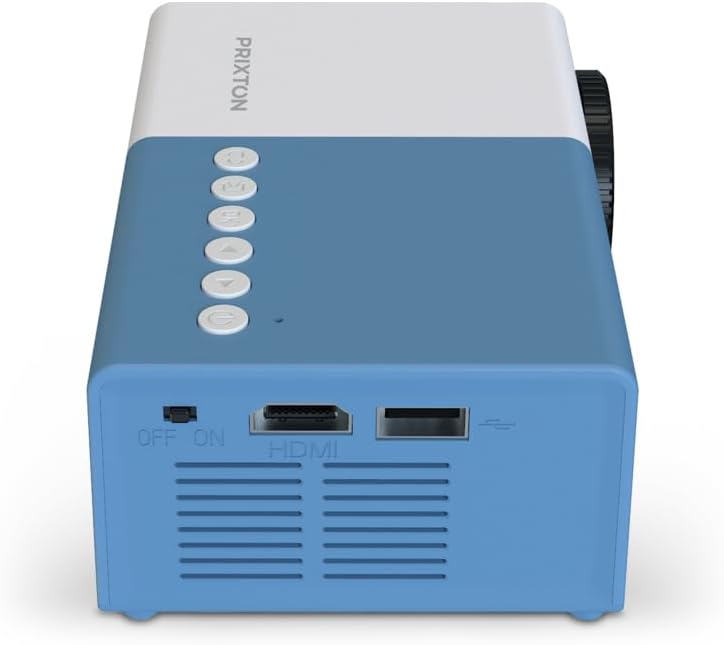
4.3 paveikslas: Galinis view of the projector, showing the power switch, HDMI port, USB port, and ventilation grilles.

4.4 paveikslas: Šoninė view of the projector, displaying the MicroSD card slot, AV In port, and additional ventilation.
Komponentai:
- Objektyvas: Projektuoja vaizdą ekrane.
- Fokusavimo ratas: Reguliuoja vaizdo aiškumą.
- Valdymo mygtukai: Power, Menu, OK, and navigation buttons for on-device control.
- Maitinimo jungiklis: Įjungia arba išjungia projektorių.
- HDMI prievadas: Connects to devices like laptops, streaming sticks, and game consoles.
- USB prievadas: Skirta medijos atkūrimui iš USB atmintinių.
- „MicroSD“ lizdas: For media playback from MicroSD cards.
- AV įvestis: Prijungiama prie senesnių įrenginių naudojant AV kabelį.
- Integruotas garsiakalbis: Suteikia garso išvestį.
5. Sąranka
5.1 Maitinimo jungtis
- Prijunkite maitinimo adapterį prie projektoriaus maitinimo įvesties prievado.
- Įkiškite maitinimo adapterį į sieninį lizdą.
- Flip the power switch on the projector to the 'ON' position. The power indicator light should illuminate.
5.2 Išdėstymas ir projekcija
Place the projector on a stable surface, ensuring the lens is facing the projection surface (wall or screen).

5.1 paveikslas: Illustration of projection distance and screen size. The projector can project images between 24 and 60 inches, with a maximum distance of 2 meters from the surface.
- For optimal image quality, ensure the room is dark.
- The projector can display images from 24 inches to 60 inches.
- The optimal projection distance is up to 2 meters (approximately 6.5 feet). Adjust the distance to achieve your desired screen size.
6. Operacinis
6.1 Maitinimo įjungimas/išjungimas
- Norėdami įjungti: After connecting power, press the Power button on the projector or the remote control.
- Norėdami išjungti: Dar kartą paspauskite maitinimo mygtuką. Jei būsite paraginti, patvirtinkite išjungimą.
6.2 Fokuso reguliavimas
After powering on, the image may appear blurry. Use the focus wheel located on the side of the projector to sharpen the image until it is clear.
6.3 Šaltinio pasirinkimas
To select an input source (HDMI, USB, MicroSD, AV):
- Press the 'Source' or 'Input' button on the remote control or the projector.
- Use the navigation buttons to highlight your desired input source.
- Paspauskite „Gerai“, kad patvirtintumėte savo pasirinkimą.
7. Ryšys
The PRIXTON Cinema Mini Projector offers multiple ways to connect your devices.
7.1 HDMI jungtis
Connect devices such as laptops, streaming sticks (e.g., Chromecast, Fire TV Stick), game consoles, or Blu-ray players using an HDMI cable.
- Connect one end of the HDMI cable to your device and the other end to the HDMI port on the projector.
- Select 'HDMI' as the input source (refer to Section 6.3).
7.2 USB and MicroSD Playback
The projector supports direct media playback from USB drives and MicroSD cards.
- Insert your USB drive into the USB port or your MicroSD card into the MicroSD slot.
- Select 'USB' or 'MicroSD' as the input source.
- Naršykite per files using the remote control and select the media you wish to play.
7.3 AV In Connection
For older devices that use composite video and stereo audio (RCA), connect them via the AV In port.
- Connect the AV cable from your device to the AV In port on the projector.
- Select 'AV' as the input source.
8. Garso išvestis
The projector features an integrated stereo speaker, providing audio for your content. Volume can be adjusted using the remote control.

8.1 paveikslas: The PRIXTON Cinema Mini Projector in use, projecting content in a living room environment, demonstrating its portability and ease of setup for home entertainment.
9. Priežiūra
9.1 Objektyvo valymas
Use a soft, lint-free cloth specifically designed for optical lenses. Do not use abrasive cleaners or excessive force, as this can scratch the lens.
9.2 Projektoriaus korpuso valymas
Wipe the exterior of the projector with a soft, dry cloth. Avoid using chemical cleaners that may damage the finish.
9.3 Vėdinimas
Regularly check that the ventilation grilles are free from dust and debris to ensure proper heat dissipation and prevent overheating.
9.4 Saugykla
Kai nenaudojate, laikykite projektorių vėsioje, sausoje vietoje, toliau nuo tiesioginių saulės spindulių ir ekstremalių temperatūrų. Jei įmanoma, naudokite originalią pakuotę arba apsauginį dėklą.
10. Problemų sprendimas
Jei kyla problemų dėl projektoriaus, žr. toliau pateiktas dažniausiai pasitaikančias problemas ir sprendimus.
| Problema | Galima priežastis | Sprendimas |
|---|---|---|
| Ekrane nėra vaizdo | No power; Incorrect input source; Cable not connected. | Check power connection and switch; Select correct input source; Ensure HDMI/AV/USB cable is securely connected. |
| Vaizdas neryškus | Nenustatytas fokusavimas; projektorius per arti/per toli. | Adjust the focus wheel; Adjust projection distance. |
| Nėra garso | Volume too low; Muted; Source device audio issue. | Increase volume; Unmute projector; Check audio settings on source device. |
| Nuotolinio valdymo pultas neveikia | Batteries low/dead; Obstruction; Remote not aimed at sensor. | Replace batteries; Remove obstructions; Aim remote directly at the projector's IR sensor. |
| Projektorius perkaito ir išsijungia | Užblokuota ventiliacija; Ilgalaikis naudojimas. | Įsitikinkite, kad ventiliacijos angos yra švarios; leiskite projektoriui atvėsti; naudokite gerai vėdinamoje patalpoje. |
11. Specifikacijos
Technical specifications for the PRIXTON Cinema Mini Projector.
| Funkcija | Specifikacija |
|---|---|
| Prekės ženklas | Prikstonas |
| Modelio numeris | Cinema Mini |
| Spalva | Mėlyna |
| Projekcijų technologija | LED |
| Gimtoji raiška | QVGA 320 x 240 |
| Palaikoma rezoliucija | Up to Full HD (1920 x 1080) |
| Ryškumas | 900 liumenų (15 ANSI liumenų) |
| Projekcijos dydis | 24 colio – 60 colio |
| Projekcijos atstumas | Iki 2 metrų |
| Ryšys | HDMI, USB, MicroSD, AV In |
| Garso išvestis | Integruotas stereo garsiakalbis |
| Ypatingos savybės | Lengvas, nešiojamas |
| Įtraukti komponentai | Nuotolinio valdymo pultas |
12. Garantija ir palaikymas
For warranty information, please refer to the documentation provided at the time of purchase or contact your retailer. Information regarding spare parts availability and software updates is not available in this manual. For further assistance or technical support, please visit the official PRIXTON websvetainėje arba susisiekite su jų klientų aptarnavimo tarnyba.