
1. Įvadas
Thank you for choosing the Smartwares FSM-12601 Wi-Fi Smoke Detector. This device is designed to provide early warning of smoke and fire, enhancing the safety of your home. Featuring a photoelectric sensor, it offers high sensitivity to detect slow-smoldering fires while minimizing false alarms. With Wi-Fi connectivity, you can receive real-time alerts on your smartphone via the Connected at Home or Smartlife app.

Image: The Smartwares FSM-12601 Wi-Fi Smoke Detector in a home setting.
2. Svarbi saugos informacija
- Prieš montuodami ir naudodami atidžiai perskaitykite visas instrukcijas.
- This smoke detector is designed for residential use.
- Do not paint the smoke detector. Paint can clog the sensing chambers and prevent the alarm from functioning correctly.
- Do not install in areas with high humidity, excessive dust, or near cooking fumes.
- Regularly test the smoke detector as described in this manual.
- Įsijungus signalizacijai, nedelsiant evakuokitės iš patalpų ir iškvieskite greitąją pagalbą.
3. Pakuotės turinys
Įsitikinkite, kad pakuotėje yra visi daiktai:
- Smartwares FSM-12601 Wi-Fi Smoke Detector
- Mounting bracket
- CR123A baterija
- Tvirtinimo varžtai ir sieniniai kaiščiai
- Vartotojo vadovas
4. Produktas baigtasview
The Smartwares FSM-12601 features a compact design with a central test/mute button and an integrated LED indicator.

Vaizdas: priekis view of the smoke detector highlighting the Test/Mute button.
- Testavimo / nutildymo mygtukas: Press to test the alarm or silence a false alarm.
- LED indikatorius: Provides visual status of the device (e.g., normal operation, alarm, low battery, pairing mode).
- Pranešėjas: Emits the 85 dB alarm sound.

Image: Dimensions and key features of the smoke detector.
5. Sąranka ir diegimas
5.1 Akumuliatoriaus įdėjimas
- Gently twist the back cover of the smoke detector counter-clockwise to open it.
- Insert the provided CR123A battery, ensuring correct polarity (+/-).
- Close the back cover by twisting it clockwise until it clicks into place.
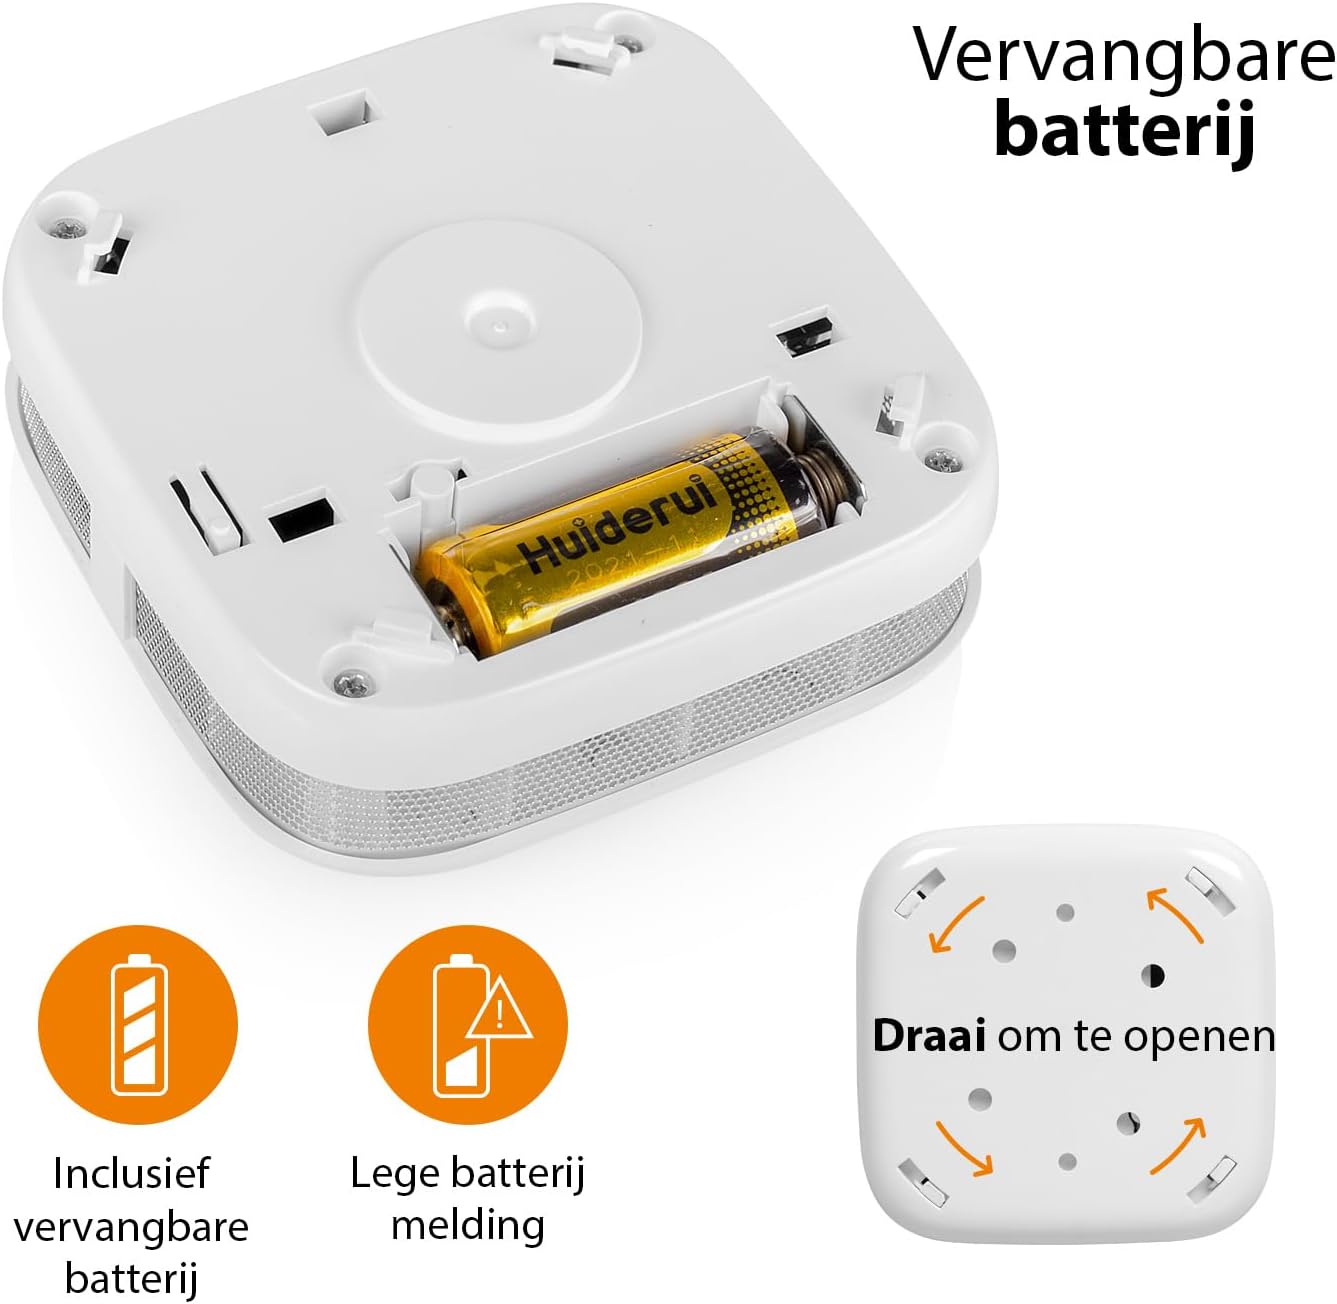
Image: Battery compartment and instructions to open the device.
5.2 Montavimo vieta
For optimal performance, install the smoke detector on the ceiling in the center of a room or hallway. If ceiling mounting is not possible, install it on a wall, at least 10-30 cm (4-12 inches) from the ceiling. Avoid corners. Install at least one smoke detector on each floor of your home, including basements and attics.
- Avoid installing near windows, doors, or ventilation openings where drafts might interfere with smoke detection.
- Keep away from cooking appliances, fireplaces, and areas with high humidity like bathrooms.
5.3 Fizinis įrengimas
- Pasirinkite tinkamą montavimo vietą.
- Use the mounting bracket as a template to mark the drill holes on the ceiling or wall.
- Išgręžkite skylutes ir įkiškite sieninius kaiščius.
- Pritvirtinkite tvirtinimo laikiklį pateiktais varžtais.
- Align the smoke detector with the mounting bracket and twist it clockwise until it locks securely into place.
5.4 App Connection (Wi-Fi Pairing)
To enable Wi-Fi features and receive smartphone notifications, connect your smoke detector to the Smartwares "Connected at Home" or "Smartlife" app.
- Download the "Connected at Home" or "Smartlife" app from your smartphone's app store (available for iOS and Android).
- Prisiregistruokite arba prisijunkite prie savo paskyros.
- Long press the Test/Mute button on the smoke detector until the red LED indicator starts flashing. This indicates pairing mode.
- Follow the on-screen instructions within the app to add the smoke detector to your Wi-Fi network.
- Once successfully paired, the LED indicator will stop flashing and remain off, or indicate normal operation as per app instructions.

Image: Steps for connecting the smoke detector to the app.

Image: Benefits of connecting the smoke detector to the app.
6. Naudojimo instrukcijos
6.1 Normalus veikimas
Once installed and connected, the smoke detector is in normal operating mode. The LED indicator will flash briefly every 40-60 seconds to confirm it is functioning correctly.
6.2 Dūmų detektoriaus bandymas
It is recommended to test your smoke detector weekly to ensure proper functionality.
- Press and hold the Test/Mute button for a few seconds.
- The alarm will sound loudly (85 dB), and the LED indicator will flash rapidly.
- Atleiskite mygtuką. Signalizacija turėtų išsijungti.
- Jei žadintuvas neskamba, žr. skyrių „Trikčių šalinimas“.
6.3 Mute Function (Hush Mode)
In case of a non-emergency alarm (e.g., cooking fumes), you can temporarily silence the alarm.
- Press the Test/Mute button briefly during an alarm.
- The alarm will silence for approximately 10 minutes. The LED will continue to flash every few seconds to indicate it is in hush mode.
- Jei po 10 minučių vis dar bus dūmų, signalizacija vėl įsijungs.
- If the smoke has cleared, the detector will return to normal operation.
6.4 LED indikatoriaus būsena
- Flashes every 40-60 seconds: Normalus veikimas.
- Flashes rapidly with alarm sound: Aptikta dūmų.
- Flashes every few seconds (no alarm): Hush mode active.
- Flashes every 32 seconds (with chirp): Įspėjimas apie išsikrovusį akumuliatorių. Nedelsdami pakeiskite akumuliatorių.
- Flashes rapidly (during setup): Poravimo režimas.
7. Priežiūra
7.1 Akumuliatoriaus keitimas
The smoke detector operates on a CR123A battery with an approximate lifespan of one year. When the battery is low, the device will chirp every 32 seconds, and the LED will flash.
- Pasukite dūmų detektorių prieš laikrodžio rodyklę, kad jį nuimtumėte nuo tvirtinimo laikiklio.
- Open the back cover by twisting it counter-clockwise.
- Išimkite seną CR123A bateriją ir išmeskite ją pagal vietinius reikalavimus.
- Įdėkite naują CR123A bateriją, laikydamiesi teisingo poliškumo.
- Close the back cover and reattach the detector to its mounting bracket.
- Test the smoke detector immediately after replacing the battery.
7.2 Cleaning the Smoke Detector
Dulkės ir šiukšlės gali turėti įtakos dūmų detektoriaus veikimui. Valykite jį bent kartą per mėnesį.
- Remove the smoke detector from its mounting bracket.
- Use a soft brush or a vacuum cleaner with a soft brush attachment to gently clean the exterior casing and the openings around the sensor.
- Do not use water, cleaning solvents, or harsh chemicals.
- Reattach the detector and test it.
8. Problemų sprendimas
| Problema | Galima priežastis | Sprendimas |
|---|---|---|
| Bandymo metu aliarmas neskamba. | Išsikrovusi arba išsikrovusi baterija; neteisingas baterijos įdėjimas; sugedęs įrenginys. | Replace battery; check battery polarity; if problem persists, contact support. |
| Dažni klaidingi aliarmai. | Detector is too close to cooking fumes, steam, or high humidity; excessive dust. | Relocate detector further from sources of false alarms; clean the detector. |
| Čirškimo garsas kas 32 sekundžių. | Įspėjimas apie išsikrovusią bateriją. | Nedelsdami pakeiskite CR123A bateriją. |
| Cannot connect to Wi-Fi app. | Incorrect Wi-Fi password; detector too far from router; incorrect pairing procedure; app issues. | Ensure correct Wi-Fi password; move detector closer to router; repeat pairing steps carefully; check app for updates or known issues. |
| Išmaniajame telefone nėra pranešimų. | App notifications disabled; detector disconnected from Wi-Fi; app not running in background. | Check app notification settings; verify detector's Wi-Fi connection; ensure app is allowed to run in background. |
9. Techninės specifikacijos
| Modelio numeris | MFV-12601 |
| Jutiklio tipas | Fotoelektrinis |
| Signalizacijos garsumas | 85 dB 3 metrų atstumu |
| Maitinimo šaltinis | 1x CR123A Lithium battery (included) |
| Baterijos veikimo laikas | Maždaug 1 metai |
| Ryšys | „Wi-Fi“ (2.4 GHz) |
| Darbinė drėgmė | Iki 95% nekondensuojantis |
| Matmenys (I x P x A) | 7.6 x 7.6 x 2.8 cm |
| Svoris | 84 gramų |
| Medžiaga | ABS plastikas |
10. Informacija apie šalinimą
Do not dispose of the device or batteries with household waste. Electronic waste and batteries should be collected separately for environmentally sound disposal. Use the return and collection systems available in your country.
11. Garantija ir palaikymas
Smartwares products come with a standard manufacturer's warranty. For detailed warranty terms, technical support, or service inquiries, please refer to the contact information provided on the Smartwares website or the original purchase documentation.