1. Įvadas
This manual provides detailed instructions for the assembly, operation, and maintenance of your Pokitter Projector Floor Stand. Designed for versatility and stability, this stand is suitable for projectors, small cameras, webcams, microphones, and GoPro devices. Please read this manual thoroughly before use to ensure proper functionality and longevity of the product.

Figure 1.1: The Pokitter Projector Floor Stand, showcasindėl savo elegantiško dizaino ir stabilaus pagrindo.
2. Produkto ypatybės
- Reguliuojamas aukštis: The stand offers a versatile height range from 4.1 inches to 40.2 inches, allowing for optimal positioning of your device.
- 360-Degree Swivel Ball Head: Equipped with a pivot ball head that allows for full 360-degree rotation, enabling precise angle adjustments for your mounted device.
- Integruotas kabelių valdymas: Designed with internal channels to neatly route cables, maintaining a clean and organized setup.
- Stable Floor Base: Features a weighted, circular base for enhanced stability, preventing accidental tipping.
- Kelių įrenginių suderinamumas: Ideal for use with projectors, small cameras, webcams, microphones, and GoPro devices.

Figure 2.1: Illustration of the stand's adjustable height capabilities, showing various height configurations.
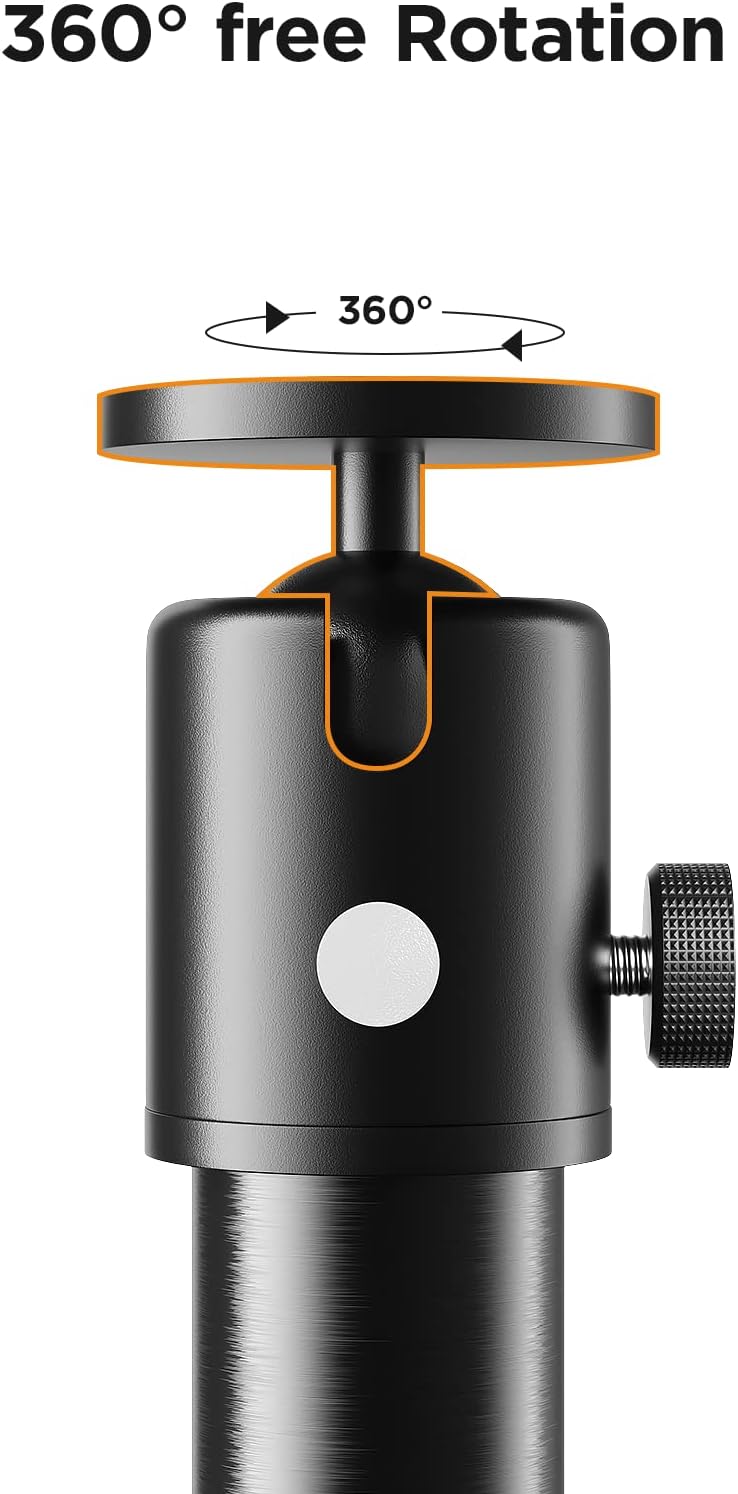
2.2 pav. Iš arti view of the 360-degree swivel ball head, demonstrating its rotational freedom.

Figure 2.3: The stand in use, highlighting the integrated cable management system and the stable circular base.
3. Sąrankos instrukcijos
Follow these steps to assemble your Pokitter Projector Floor Stand:
- Išpakuokite komponentus: Carefully remove all parts from the packaging. Verify that all components shown in Figure 3.1 are present.
- Surinkite stulpų sekcijas: Screw the individual pole sections together clockwise until they are securely fastened. The number of sections used will determine the initial height.
- Pritvirtinkite pagrindą: Screw the assembled pole onto the circular base, ensuring it is tightened firmly to provide stability.
- Pritvirtinkite rutulinę galvutę: Screw the 360-degree swivel ball head onto the top of the assembled pole.
- Montavimo įrenginys: Attach your projector, camera, or other compatible device to the ball head's mounting screw. Ensure it is securely fastened.
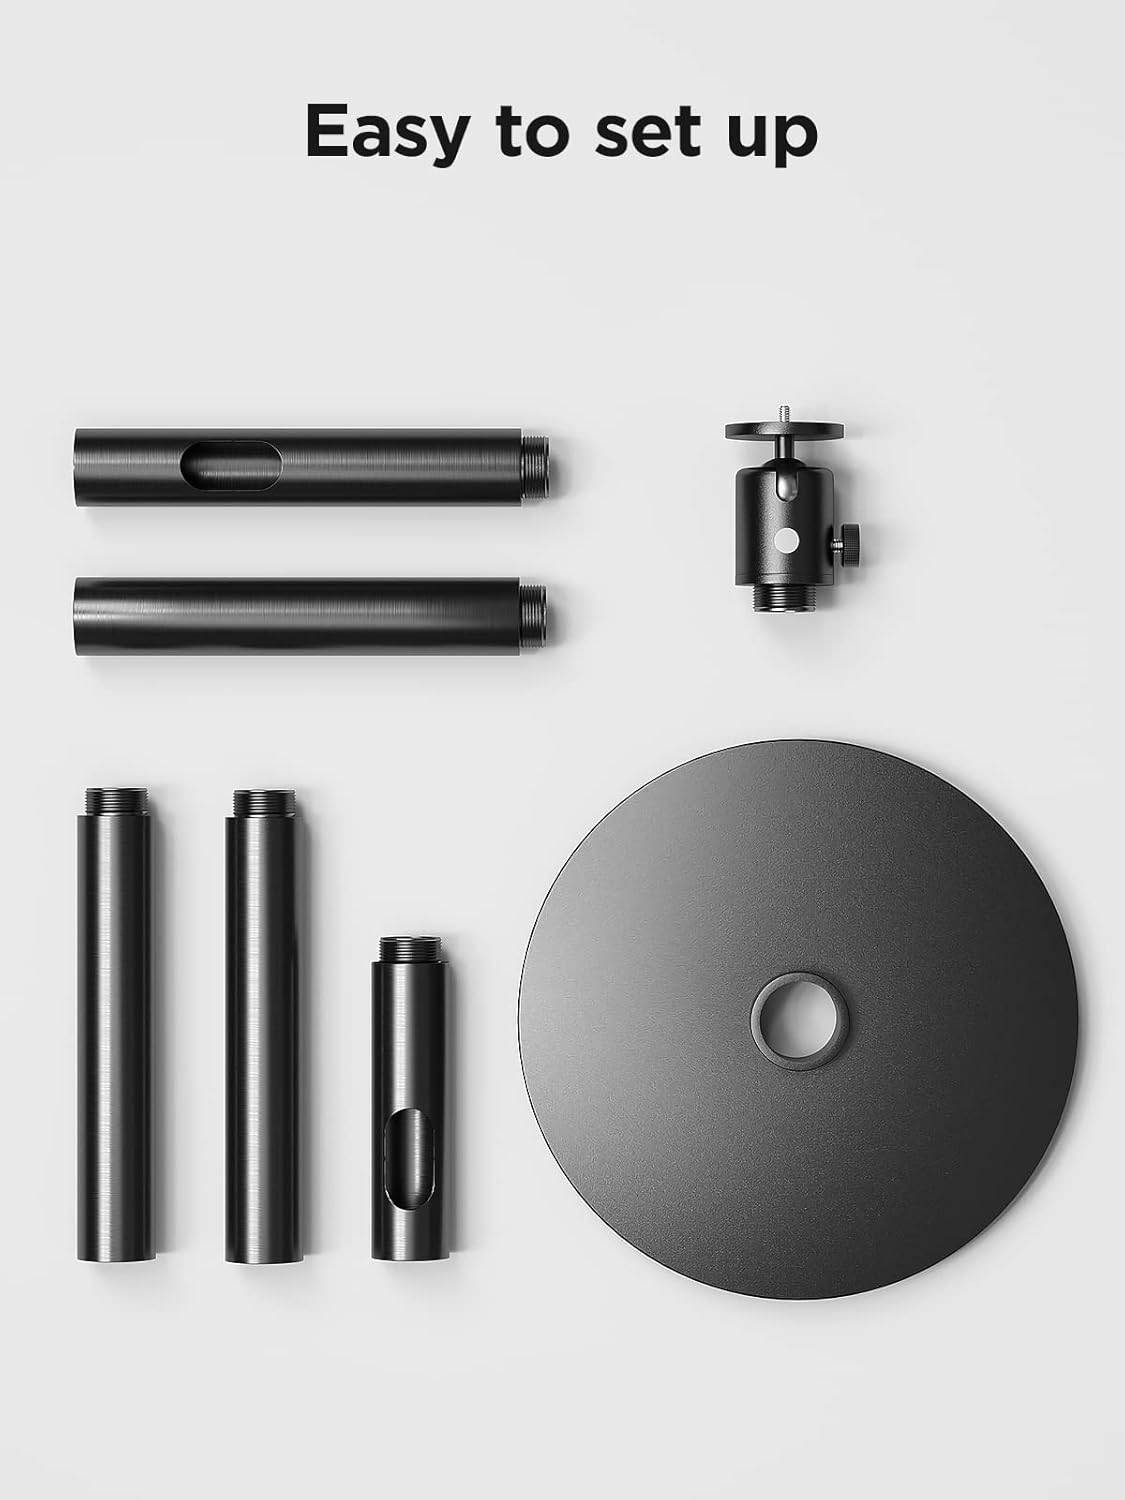
Figure 3.1: All components of the Pokitter Projector Floor Stand laid out for easy assembly.
4. Naudojimo instrukcijos
- Aukščio reguliavimas: To adjust the height, loosen the locking collars on the pole sections, extend or retract the sections to the desired height, and then tighten the collars securely.
- Reguliavimo kampas: Loosen the knob on the side of the ball head to adjust the angle of your mounted device. Once the desired angle is achieved, tighten the knob firmly to lock it in place. The ball head allows for full 360-degree rotation.
- Kabelių valdymas: Route your device's power and data cables through the internal channels of the stand's pole for a tidy setup.

Figure 4.1: The Pokitter Projector Stand in a typical usage scenario, demonstrating its practical application.
5. Priežiūra
- Valymas: Wipe the stand with a soft, dry cloth to remove dust and dirt. Avoid using abrasive cleaners or solvents.
- Reguliarūs patikrinimai: Periodiškai patikrinkite visus varžtus ir jungtis, kad jie būtų tvirtai priveržti ir užtikrinti jų tvirtumą.
- Saugykla: When not in use for extended periods, store the stand in a cool, dry place, ideally in its original packaging or a protective cover.
6. Problemų sprendimas
| Problema | Galima priežastis | Sprendimas |
|---|---|---|
| Stovas jaučiasi nestabilus. | Atsilaisvinusios jungtys arba nelygus paviršius. | Ensure all pole sections and the base are tightly screwed. Place the stand on a flat, stable surface. |
| Device angle slips. | Ball head knob not tightened sufficiently. | Tighten the ball head adjustment knob firmly after setting the desired angle. Ensure the device weight does not exceed the stand's capacity. |
| Sunku reguliuoti aukštį. | Locking collars are too tight or dirty. | Loosen locking collars sufficiently before adjusting. Clean any debris from the pole sections. |
7. Specifikacijos
| Funkcija | Detalė |
|---|---|
| Modelio numeris | 2 |
| Prekės ženklas | Pokitter |
| Reguliuojamas aukščio diapazonas | 4.1–40.2 colio |
| Prekės svoris | 8.72 svaro |
| Medžiaga | Silicone (as per product specifications) |
| Galvos tipas | 360 Degree Swivel Pivot Ball Head |
8. Garantija ir palaikymas
Pokitter stands behind the quality of its products. For specific warranty information, please refer to the documentation included with your purchase or visit the official Pokitter website. For technical support, troubleshooting assistance, or any inquiries regarding your product, please contact Pokitter customer service through their official channels.
Daugiau informacijos ir kontaktinius duomenis galite rasti apsilankę Pokitter Store on Amazon.