
1. Produktas baigtasview
The Hikity 9 Inch Quad Split Screen Backup Camera Monitor is designed to provide enhanced visibility for various vehicles, including cars, SUVs, vans, trucks, and pickups. This monitor features a 9-inch TFT LCD display with 4-channel video input, allowing for multiple viewing modes. It supports a wide power input range of 9-36V, making it versatile for different vehicle types. The monitor can display up to four camera feeds simultaneously, aiding in driving and parking maneuvers.

Image 1.1: The Hikity 9 Inch Quad Split Screen Backup Camera Monitor.
1.1 vaizdo įrašas: metimas per sekundęview of the Hikity 9-inch 4-channel backup camera monitor, highlighting its features and capabilities.
2. Pakuotės turinys
Patikrinkite, ar pakuotėje yra visi toliau išvardyti daiktai. Jei kurių nors daiktų trūksta arba jie pažeisti, susisiekite su klientų aptarnavimo tarnyba.
- 1 x 9-inch Quad Split Monitor
- 1 x Headrest Shell
- 1 x Bracket Mount
- 1 x IR nuotolinio valdymo pultelis
- 1 x Video & Power Cable

Image 2.1: All components included in the Hikity 9 Inch Backup Camera Monitor package.
Video 2.1: A detailed unboxing and display of the Hikity 9 Inch Backup Camera Monitor package contents.
3. Specifikacijos
| Ekrano dydis | 9 colių |
| Rezoliucija | HD (800x480 native) |
| Krašto santykis | 16:9 |
| Ekrano tipas | TFT LCD |
| Viewing kampas | 170 laipsnių |
| ttage Įvestis | 9-36 voltų |
| Ryšys | RCA (4 Channels) |
| Papildomos funkcijos | Anti-Glare Screen, Quad Split Screen Display |
| Suderinami įrenginiai | CCTV Camera, Car Camera, DVD/VCD, TV BOX |
4. Sąranka ir diegimas
The monitor offers two primary installation methods: stereoscopic (dashboard mount) and embedded (headrest shell). Choose the method that best suits your vehicle and preferences.
4.1 Diegimo metodai

Image 4.1: Visual representation of stereoscopic (dashboard) and embedded (headrest) installation options.
4.2 Sujungimo schema
Connect the power and video cables as shown in the diagram. Ensure correct polarity for power connections (+12-24V and GND). The camera control lines (Brown, Blue, Green, Gray) should be connected to the positive of the reverse gear or other trigger sources for automatic switching.
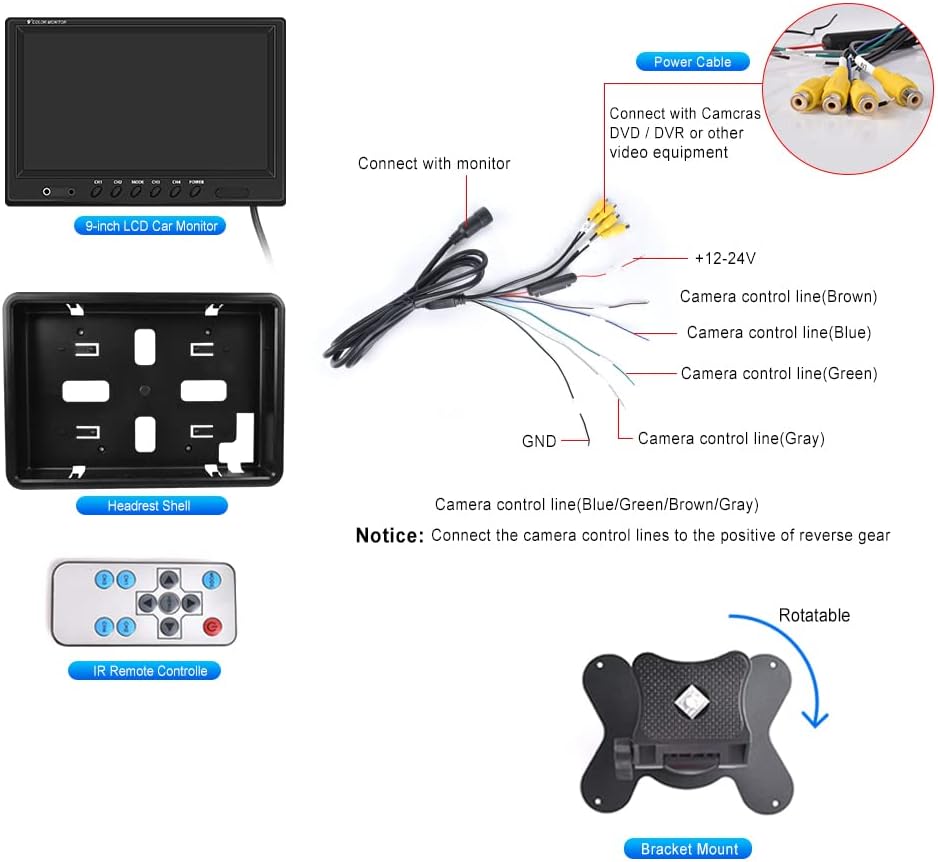
Image 4.2: Detailed wiring connections for the monitor, including power and four RCA video inputs.
4.1 vaizdo įrašas: trumpas įžanginis aprašymasview demonstrating an installation method for the monitor, focusing on placement and initial setup.
5. Naudojimo instrukcijos
The Hikity monitor offers various viewing modes and adjustable settings for optimal use.
5.1 Viewrežimai
The monitor supports 6 selectable viewing modes: Single Full View, Split Dual Video View, Split Tri Video View, and Quad Four View. These modes allow you to customize how camera feeds are displayed on the screen.

Image 5.1: Illustration of the quad split screen functionality, showing four camera feeds simultaneously.
5.2 Koregavimai
Use the included IR remote controller or the buttons on the monitor to adjust settings such as brightness, contrast, and color. The monitor also supports rotating or mirroring the screen display for each channel.
5.3 Driving Assistance
Each of the four video input channels (CH1/CH2/CH3/CH4) has a dedicated signal wire for backup or turning triggers. Connecting these wires allows the monitor to automatically switch to the corresponding camera view when a trigger is activated (e.g., shifting into reverse).

Image 5.2: The 9-inch monitor displaying a quad-split view, showing multiple perspectives for driving assistance.
6. Priežiūra
To ensure the longevity and optimal performance of your Hikity monitor, follow these maintenance guidelines:
- Valymas: Monitoriaus ekraną ir jo korpusą valykite minkštu, sausu skudurėliu.asing. For stubborn smudges, lightly dampNuvalykite šluostę vandeniu arba ekranui saugiu valikliu. Venkite abrazyvinių medžiagų ar stiprių cheminių medžiagų.
- Aplinkos sąlygos: Avoid exposing the monitor to extreme temperatures, direct sunlight for prolonged periods, or excessive moisture.
- Kabelių valdymas: Ensure all cables are securely connected and not pinched or strained, which can lead to damage or intermittent signal loss.
- Saugykla: Jei monitorių ilgesnį laiką nenaudosite, atjunkite jį nuo maitinimo šaltinio ir laikykite vėsioje, sausoje vietoje.
7. Problemų sprendimas
If you encounter issues with your Hikity monitor, refer to the following common problems and solutions:
- Nėra galios:
- Patikrinkite visas maitinimo jungtis, kad įsitikintumėte, jog jos tvirtai pritvirtintos.
- Verify that the power source (9-36V) is functioning correctly.
- Patikrinkite, ar maitinimo laidas nepažeistas.
- Nėra vaizdo signalo:
- Ensure all RCA video cables are firmly connected to both the cameras and the monitor.
- Confirm that the cameras are powered on and functioning.
- Check the selected input channel on the monitor matches the connected camera.
- If using trigger wires, ensure they are correctly connected and receiving a signal.
- Prasta vaizdo kokybė:
- Adjust the brightness, contrast, and color settings using the remote control or monitor buttons.
- Įsitikinkite, kad kameros objektyvai yra švarūs ir be jokių kliūčių.
- Verify that the video cables are not damaged or experiencing interference.
- Nuotolinio valdymo pultas neveikia:
- Check and replace the battery in the remote control.
- Ensure there are no obstructions between the remote and the monitor's IR receiver.
If these steps do not resolve the issue, please contact Hikity customer support for further assistance.
8. Garantija ir palaikymas
Hikity provides comprehensive support for its products:
- Pinigų grąžinimo garantija: 30-Days Money-Back policy.
- Pakeitimo garantija: 2-Years Replacement warranty.
- Techninė pagalba: Life-Time Technical Support is available.
For installation or usage issues, please contact Hikity Flagship Store via the product page on Amazon. Support inquiries are typically responded to within 24 hours.