
Įvadas
This manual provides detailed instructions for the installation, operation, and maintenance of your UNITOPSCI Android 13 Car Stereo Radio. Designed specifically for Honda Odyssey models from 2005 to 2010, this 10.1-inch touch screen unit integrates advanced features such as Bluetooth, GPS navigation, Mirror Link, and backup camera support to enhance your driving experience. Please read this manual thoroughly before use to ensure proper functionality and safety.

Figure 1: UNITOPSCI Android 13 Car Stereo Radio with accessories.
Saugos informacija
- Profesionalus montavimas rekomenduojamas: Dėl transporto priemonių elektros sistemų sudėtingumo labai rekomenduojama, kad jas sumontuotų profesionalai, kad būtų išvengta įrenginio ar jūsų transporto priemonės pažeidimų.
- Maitinimas: Ensure the unit is connected to a 12V DC power supply with a negative ground. Incorrect voltage gali sukelti žalą.
- Laidai: Do not modify or cut the wiring harness. Refer to the wiring diagram for correct connections.
- Darbinė temperatūra: Įrenginys skirtas veikti nuo -40 ℃ iki 80 ℃ temperatūros diapazone.
- Vairavimo sauga: Nenaudokite įrenginio arba view vaizdo įrašus, kurie gali blaškyti jūsų dėmesį vairuojant. Visada pirmenybę teikite eismo saugumui.
- Vėdinimas: Užtikrinkite tinkamą vėdinimą aplink įrenginį, kad jis neperkaistų.
Pakuotės turinys
Patikrinkite, ar pakuotėje yra visi toliau išvardyti daiktai:
- 1 x Android Car Stereo (pre-installed with trim)
- 1 x atsarginė kamera
- 1x maitinimo laidas
- 1x GPS antena
- 1 x Kameros įvesties kabelis
- 1 x RCA Input and Output Cable
- 2 x USB kabeliai
- 1 x naudojimo instrukcija
- 1 x montavimo įrankių rinkinys
- 1 x išorinis mikrofonas
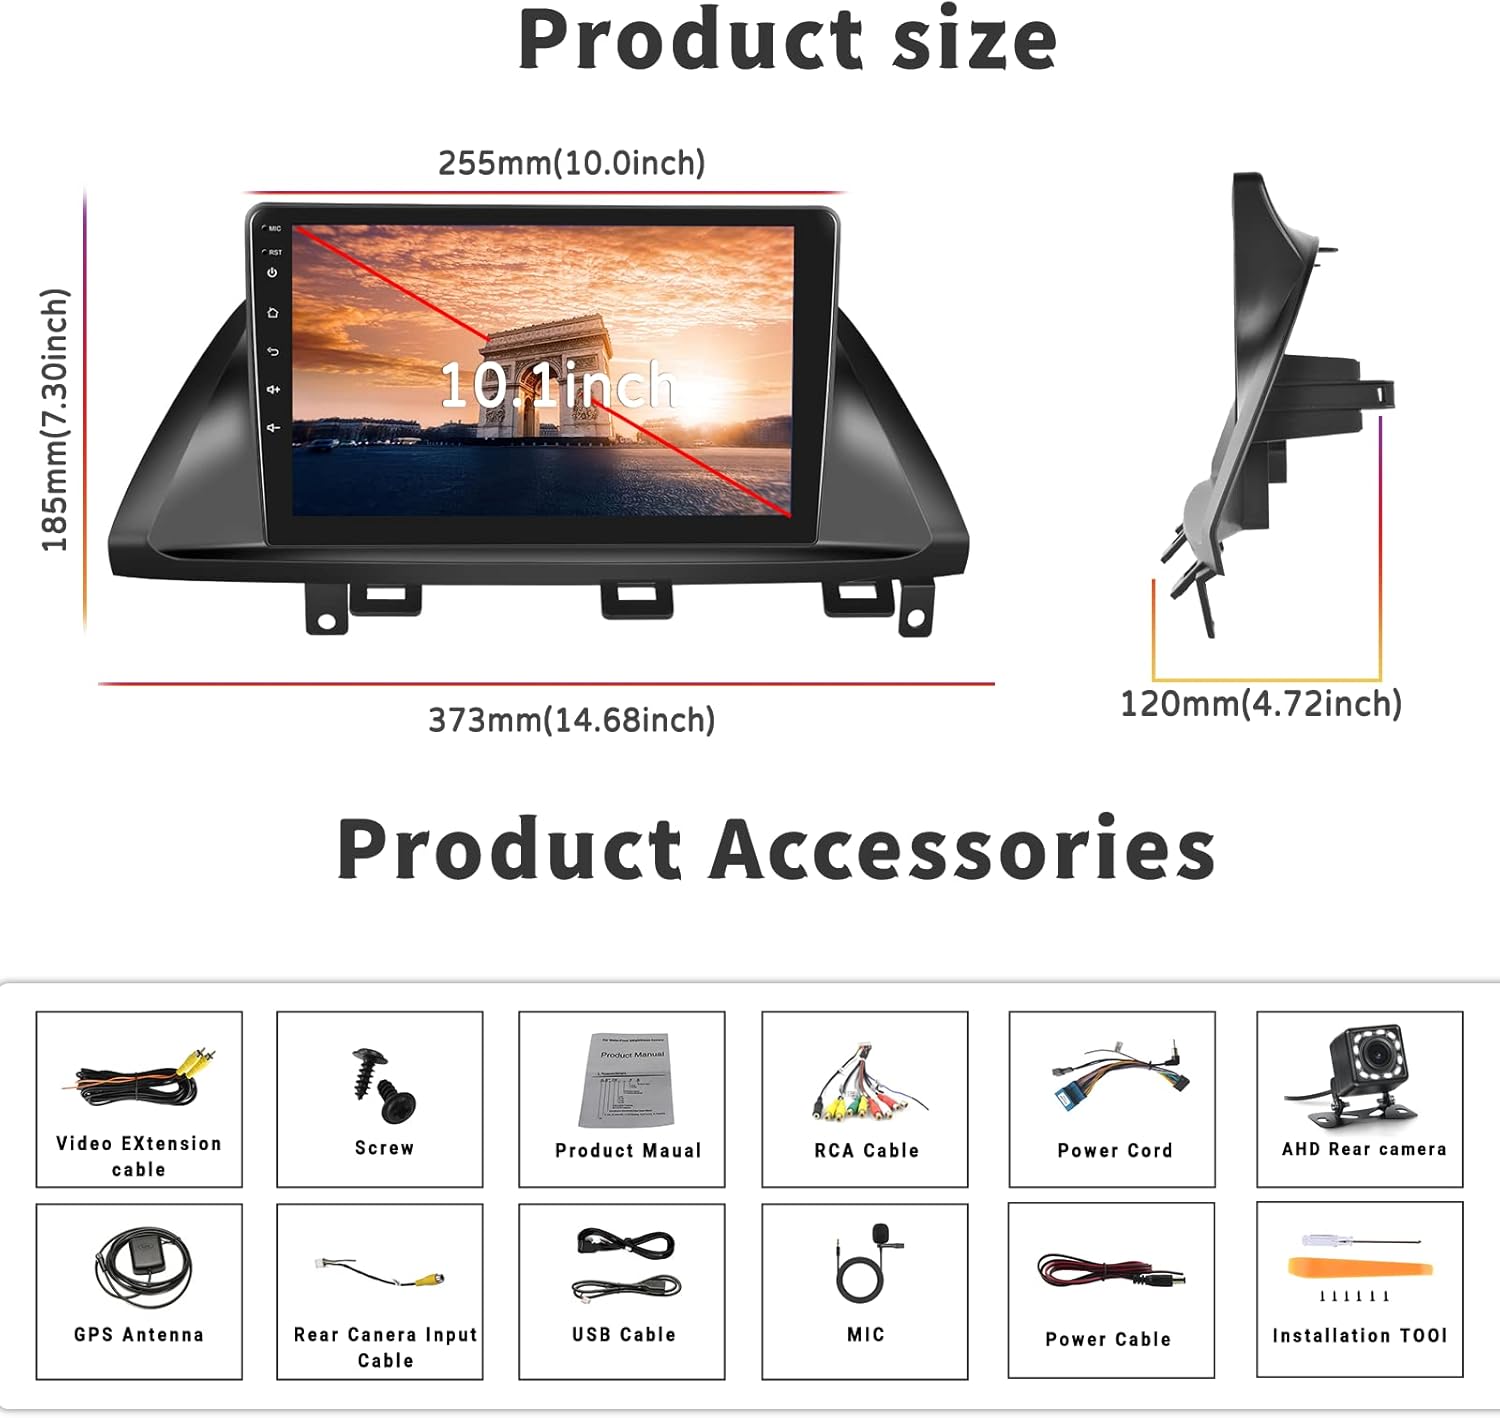
2 pav.: Gaminio matmenys ir pridedami priedai.
Sąranka ir diegimas
Suderinamumas
This car stereo is designed for Honda Odyssey models from 2005 to 2010. It is compatible with vehicles that have an original car radio with a DVD player. It is nesuderinamas with original car radios that have a factory screen or GPS. In such cases, an additional wire harness may be required. Please verify your car's center console size and wire harness details before installation.

Figure 3: Car compatibility and wiring harness details.
Wiring Diagram for Backup Camera
Proper connection of the backup camera is crucial for its automatic activation. Follow these steps:
- Maitinimo kabelio jungtis: Connect the red wire of the backup camera's power cable to the positive reversing light, and the black wire to the negative reversing light.
- RCA Cable Connection: Insert the yellow RCA cable from the camera into the 'CAM-IN' (yellow) port on the back of the radio unit.
- Reverse Trigger Wire: Ensure the 'reverse (+)' wire connection (typically a pink wire on the power wire harness labeled 'back') is securely connected to the positive wire of the reversing light. This enables the unit to automatically display the rear view image when the vehicle is in reverse.
1 pastaba: The short red wires next to the RCA port do not require connection in this wiring setup.
2 pastaba: When the device is in parking mode (displaying the rear view), other functions will temporarily pause.

4 pav.: galinis view kameros laidų schema.
Bendrieji diegimo žingsniai
While specific steps may vary by vehicle, the general installation process involves:
- Atjunkite akumuliatorių: Prieš užvesdami variklį, atjunkite neigiamą automobilio akumuliatoriaus gnybtą, kad išvengtumėte trumpojo jungimo.
- Pašalinti seną įrenginį: Carefully remove the existing car stereo and trim.
- Prijunkite laidus: Connect the new stereo's power harness, speaker wires, antenna, and other necessary cables according to the provided wiring diagram.
- GPS antenos įrengimas: GPS anteną montuokite vietoje, kur nėra šviesos. view dangaus, paprastai ant prietaisų skydelio arba po priekiniu stiklu.
- Įdiekite galinio vaizdo kamerą: Route the backup camera cable from the rear of the vehicle to the head unit, connecting it as described in the wiring section.
- Bandymo jungtys: Before fully securing the unit, reconnect the battery and perform a quick test of all functions (power, audio, radio, GPS, camera, etc.).
- Saugus vienetas: Once tested, carefully slide the new stereo into the dash opening and secure it with screws. Reinstall the trim.
- Galutinis patikrinimas: Perform a comprehensive test of all features to ensure proper operation.
Naudojimo instrukcijos
Bluetooth & FM/RDS Radio Function
The unit features built-in Bluetooth 4.2 and an FM/RDS radio. The integrated microphone supports hands-free calling, Bluetooth music streaming, and automatic phone book download. The FM radio includes 18 preset stations for news, music, and weather broadcasts. You can also adjust sound settings with the EQ balance function and connect to a subwoofer.

Figure 5: Bluetooth and FM Radio interface.
GPS navigacija ir belaidis internetas
The head unit comes with preloaded offline maps and supports both online and offline navigation. With a WiFi connection, you can access online maps and download additional maps as needed. To download maps, connect to WiFi, open the 'Here We Go' app, click the 'folder' icon, select 'download maps', and choose the appropriate region. WiFi connectivity also allows you to surf the internet and download various applications.

Figure 6: GPS Navigation and WiFi features.
Mirror Link for Android and iOS Phones
The unit supports mirror link functionality for both Android and iOS mobile phones. For iOS devices, it supports one-way projection via WiFi. For Android phones, it supports two-way connection via WiFi or the original USB phone cable, allowing you to control your phone's apps directly from the 10.1-inch screen. This feature is convenient for displaying videos or navigation maps from your phone. Note: Not compatible with Samsung phones for two-way control.

7 pav.: Veidrodinio ryšio funkcionalumas.
Atsarginės kameros įvestis
A backup camera is included with the unit. When the vehicle is shifted into reverse gear, the screen will automatically switch to display the reversing image, providing a clear view of the area behind your car. The camera features waterproof design, night vision, and a 170° wide-angle view didesniam saugumui.

Figure 8: Backup Camera Input display.
Video Output & Split Screen
The unit supports video output, allowing you to share entertainment with a backseat monitor. Additionally, the split-screen function enables you to display two applications side-by-side simultaneously, such as navigation and music playback, for improved multitasking.

Figure 9: Video Output and Split Screen functionality.
Vairo valdymas (SWC)
The unit supports steering wheel control functions, allowing you to manage various features directly from your vehicle's steering wheel buttons. Please note that a steering wheel controller may need to be ordered separately if your vehicle does not have compatible controls or if the existing system works with a CANbus (this unit does not support CANbus). Refer to the unit's settings to map your steering wheel buttons.
Priežiūra
- Ekrano valymas: Jutiklinį ekraną švelniai nuvalykite minkšta, nepūkuota šluoste. Įsisenėjusias dėmes šiek tiek nuvalykiteampNuvalykite šluostę vandeniu arba elektronikos ekranams skirtu valikliu. Venkite stiprių cheminių medžiagų ar abrazyvinių medžiagų.
- Bendras valymas: Keep the unit and surrounding area free from dust and debris. Use a soft brush or compressed air to clean vents and ports.
- Programinės įrangos atnaujinimai: Periodically check for software updates from the manufacturer's official channels to ensure optimal performance and access to new features.
- Venkite ekstremalių temperatūrų: While the unit is designed for a wide temperature range, prolonged exposure to extreme heat or cold can affect its lifespan.
Trikčių šalinimas
Šiame skyriuje aptariamos dažniausiai pasitaikančios problemos. Jei problema išlieka, susisiekite su klientų aptarnavimo tarnyba.
| Problema | Galima priežastis | Sprendimas |
|---|---|---|
| Įrenginys neįsijungia. | Neteisingas laidų pajungimas; Perdegęs saugiklis; Atsilaisvinusi jungtis. | Check power cable connections (red and yellow wires); Inspect vehicle's fuse box; Ensure all harnesses are securely plugged in. |
| Nėra garso iš garsiakalbių. | Garsiakalbių laidai prijungti neteisingai; per mažas garsumas; įjungta nutildymo funkcija. | Verify speaker wire connections; Increase volume; Check if unit is muted. |
| GPS signalas silpnas arba nepasiekiamas. | GPS antena netinkamai sumontuota arba uždengta. | Ensure GPS antenna is mounted in a clear, unobstructed location; Check antenna connection to the unit. |
| Galinio vaizdo kamera nerodoma. | Incorrect camera wiring; 'Reverse' trigger wire not connected. | Review the 'Wiring Diagram for Backup Camera' section; Ensure the camera's power and RCA cables are correctly connected, and the 'reverse' trigger wire is properly linked to the vehicle's reversing light positive. If the camera has an LED light, check if it illuminates when reverse is engaged. |
| Veidrodinė jungtis neprisijungia. | Incorrect connection method; Incompatible phone model; App issues. | For iOS, use WiFi only. For Android, try both WiFi and USB (original phone cable). Ensure your phone is not a Samsung model (known compatibility issue). Restart both phone and head unit. |
| Unit lags or freezes. | Too many apps running; Low memory. | Close unnecessary applications; Restart the unit. |
Specifikacijos
| Funkcija | Specifikacija |
|---|---|
| Sistema | Android 13.0 |
| Lustų rinkinys | 8227L-DEMO |
| Ekrano dydis | 10.1 colių |
| Ekrano raiška | 1024 x 600 |
| Atmintis (RAM+ROM) | 1 GB RAM + 32 GB ROM |
| Veidrodinė nuoroda | Android/iOS (Android two-way, iOS one-way) |
| Video Output/WiFi | Palaikoma |
| Radijo grupė | FM |
| Radijo lustas | NXP6851 |
| Galia Ampkeltuvas Chip | AC7315 |
| Maitinimo išvestis | 4*45W |
| Darbo temperatūra | -40 ℃ iki 80 ℃ |
| Vairo valdymas | Supported (controller may be separate) |
| Bluetooth versija | 4.2 |
| Žemėlapiai | Integruoti žemėlapiai neprisijungus |
| USB sąsaja | Dvigubas USB |
| Garso formato palaikymas | APE/FLAC/WAV/MP3/WMA ir kt. |
| Vaizdo įrašo formato palaikymas | MKV / RMVB / AVI / MP4 / MDV ir kt. |
| Vaizdo formato palaikymas | PNG / JPEG / JPG / GIF / WBMP / BNP ir kt. |
| Gaminio matmenys | 0.39 x 0.39 x 0.39 colio |
| Prekės svoris | 3.27 svaro |
Garantija ir palaikymas
UNITOPSCI is committed to providing high-quality products and satisfactory services. We offer the following support:
- Replacement Availability: Pakeitimai galimi per 24 mėnesių nuo įsigijimo datos.
- Greitas atsakymas: Atsakymo į užklausas tikėkitės per 16 valandas.
- Visą gyvenimą trunkantis palaikymas po pardavimo: We provide lifetime after-sales consultation and technical support.
- Grąžinimo politika: Mėgaukitės 60 dienų grąžinimo laikotarpiu be jokių rūpesčių.
For any questions, technical assistance, or warranty claims, please contact us directly via email:
El. paštas: UNITOPSCI@126.com

Figure 10: UNITOPSCI Customer Support Information.