
FILTA 85a29cbe-3f12-4058-8cbc-233936e4c5c7
Filta Smart Lock Instruction Manual
Model: 85a29cbe-3f12-4058-8cbc-233936e4c5c7
Įvadas
The Filta Smart Lock offers advanced security and convenience for your home or business. This keyless entry deadbolt provides multiple intuitive unlocking options, including password, traditional key, and IC card capabilities. Designed for ease of use and robust security, it ensures reliable access control without the need for Wi-Fi or application connections, storing all data locally for enhanced privacy and stability.

Figure 1: Filta Smart Lock, a keyless entry deadbolt with a sleek black finish, installed on a white door.
Kas įtraukta
Prieš pradėdami montavimą, patikrinkite, ar yra visi komponentai.

Figure 2: All components of the Filta Smart Lock laid out, including the smart lock unit, interior assembly, deadbolt latch, strike plate, keys, and various screws.
- Exterior Smart Lock Unit with Keypad and Fingerprint Sensor
- Interior Assembly (Back Panel)
- Deadbolt Skląstis
- Sprogstamoji plokštė ir spragtukų dėžutė
- Montavimo plokštė
- Installation Screws (various sizes)
- Fiziniai raktai (2)
- IC Cards (if applicable, not explicitly mentioned but implied by "IC card unlocking")
- User Manual / Installation Template
Specifikacijos
| Funkcija | Detalė |
|---|---|
| Prekės ženklas | FILTA |
| Modelio numeris | 85a29cbe-3f12-4058-8cbc-233936e4c5c7 |
| Užrakto tipas | Biometrinė, Klaviatūra |
| Medžiaga | Cinkas |
| Spalva | Juoda |
| Maitinimo šaltinis | 4 AA baterijos (į komplektą neįeina) |
| Ryšys | No Wi-Fi or App connection required (local data storage) |
| Durų storio suderinamumas | 1 5/16" ~ 2" (33mm - 50mm) |
| Gręžtinės skylės skersmuo | 2 1/8 colio (54 mm) |
| Gręžtinės skylės įduba | 2 3/8" or 2 3/4" (60mm or 70mm) |
| Atsparumo oro sąlygoms įvertinimas | IP54 (operates well from -22°F to 158°F) |
| Vartotojo kodo talpa | Iki 250 vartotojo kodų |
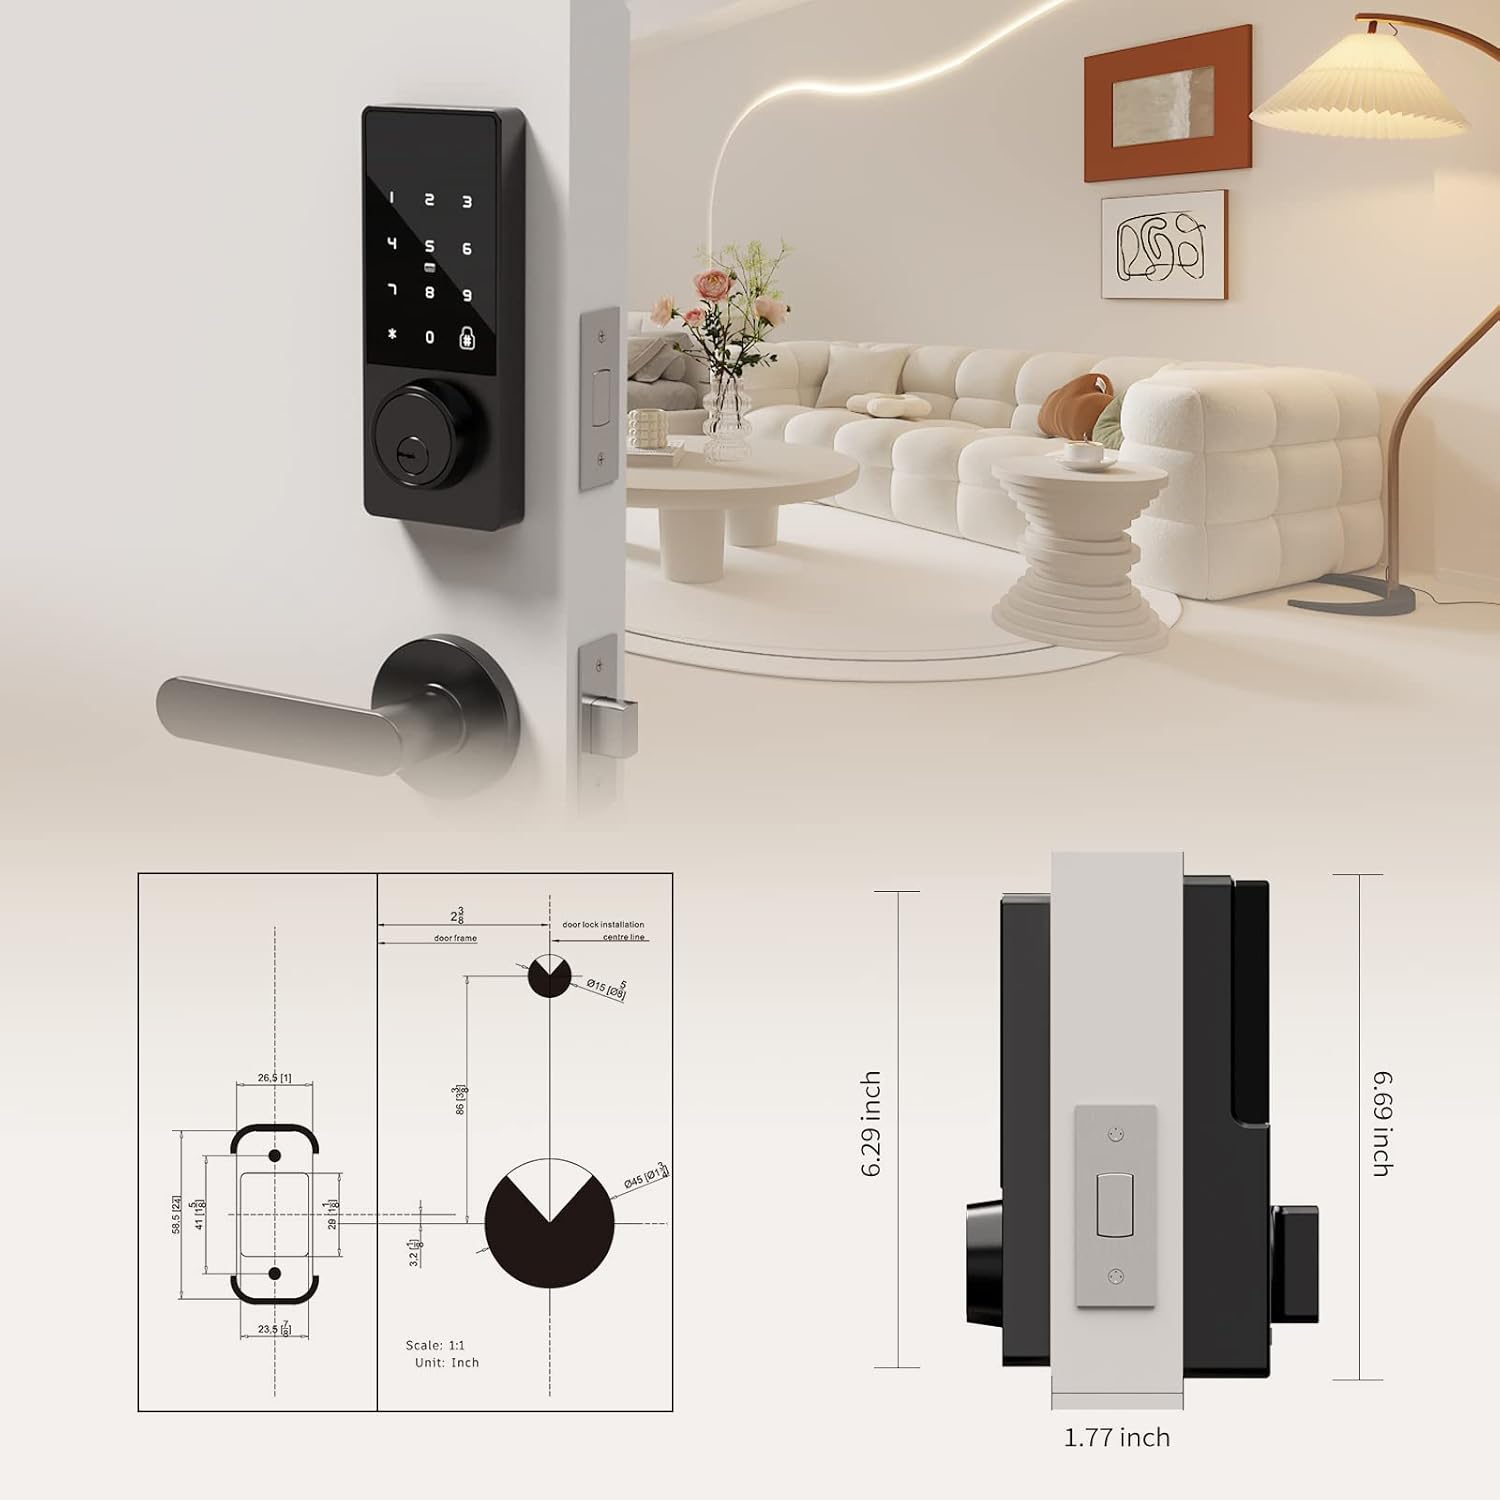
Figure 3: Detailed diagram illustrating the compatible door thickness, bore hole diameter, and backset measurements for proper installation.

Figure 4: Infographic highlighting the lock's durability, including keypad life test, face plate impact test, screw pull test, salt spray test, appearance pressure resistance, humidity resistance, and IP54 weatherproof rating.
Sąranka ir diegimas
Installation is straightforward and typically requires only a screwdriver. Ensure your door meets the specifications listed above.
Diegimo žingsniai:
- Paruoškite duris: Ensure the door's bore hole and backset measurements are compatible with the lock. The deadbolt latch is adjustable for both 2 3/8" (60mm) and 2 3/4" (70mm) backsets.
- Įdiekite spynos skląstį: Slide the deadbolt latch into the door edge. Secure it with the provided screws. Ensure the latch is centered and operates smoothly.
- Install the Exterior Unit: Slide the lock spindle and wire connector from the exterior unit through the deadbolt mechanism and the door hole.
- Sumontuokite montavimo plokštę: Thread the wire connector through the mounting plate. Secure the mounting plate to the door using the provided screws.
- Connect Wiring and Install Interior Unit: Connect the wire connector from the exterior unit to the wire connector port on the interior assembly. Carefully tuck excess wire into the door.
- Secure the Interior Unit: Align the interior unit with the mounting plate and secure it with the remaining screws.
- Įdėkite baterijas: Open the battery compartment on the interior unit. Insert 4 AA alkaline batteries (not included), ensuring correct polarity. Secure the battery box cover.
- Patikrinkite užraktą: Before closing the door, test the lock's functionality using a physical key and by entering a default or test code (refer to operating instructions for initial setup). Ensure the deadbolt extends and retracts smoothly.

Figure 5: Illustration of the simple installation process, highlighting that only a screwdriver is needed.
Diegimo vaizdo įrašo vadovas:
Video 1: A comprehensive guide demonstrating the installation process and function display of the Filta Smart Lock. This video covers checking components, adjusting the deadbolt, securing the bolt and mounting plate, connecting wires, installing the interior unit, and inserting batteries.
Naudojimo instrukcijos
The Filta Smart Lock offers multiple ways to unlock your door.
1. Atrakinimas naudojant slaptažodį:
- Palieskite klaviatūrą, kad ją suaktyvintumėte.
- Enter your 6-10 digit user passcode.
- Patvirtinimui paspauskite klavišą „#“.
- Užraktas bus atrakintas.
Apsaugos nuo pypsėjimo funkcija: You can enter random digits before or after your actual passcode to prevent others from guessing your code. For example, XXX + Passcode + XXX + #.
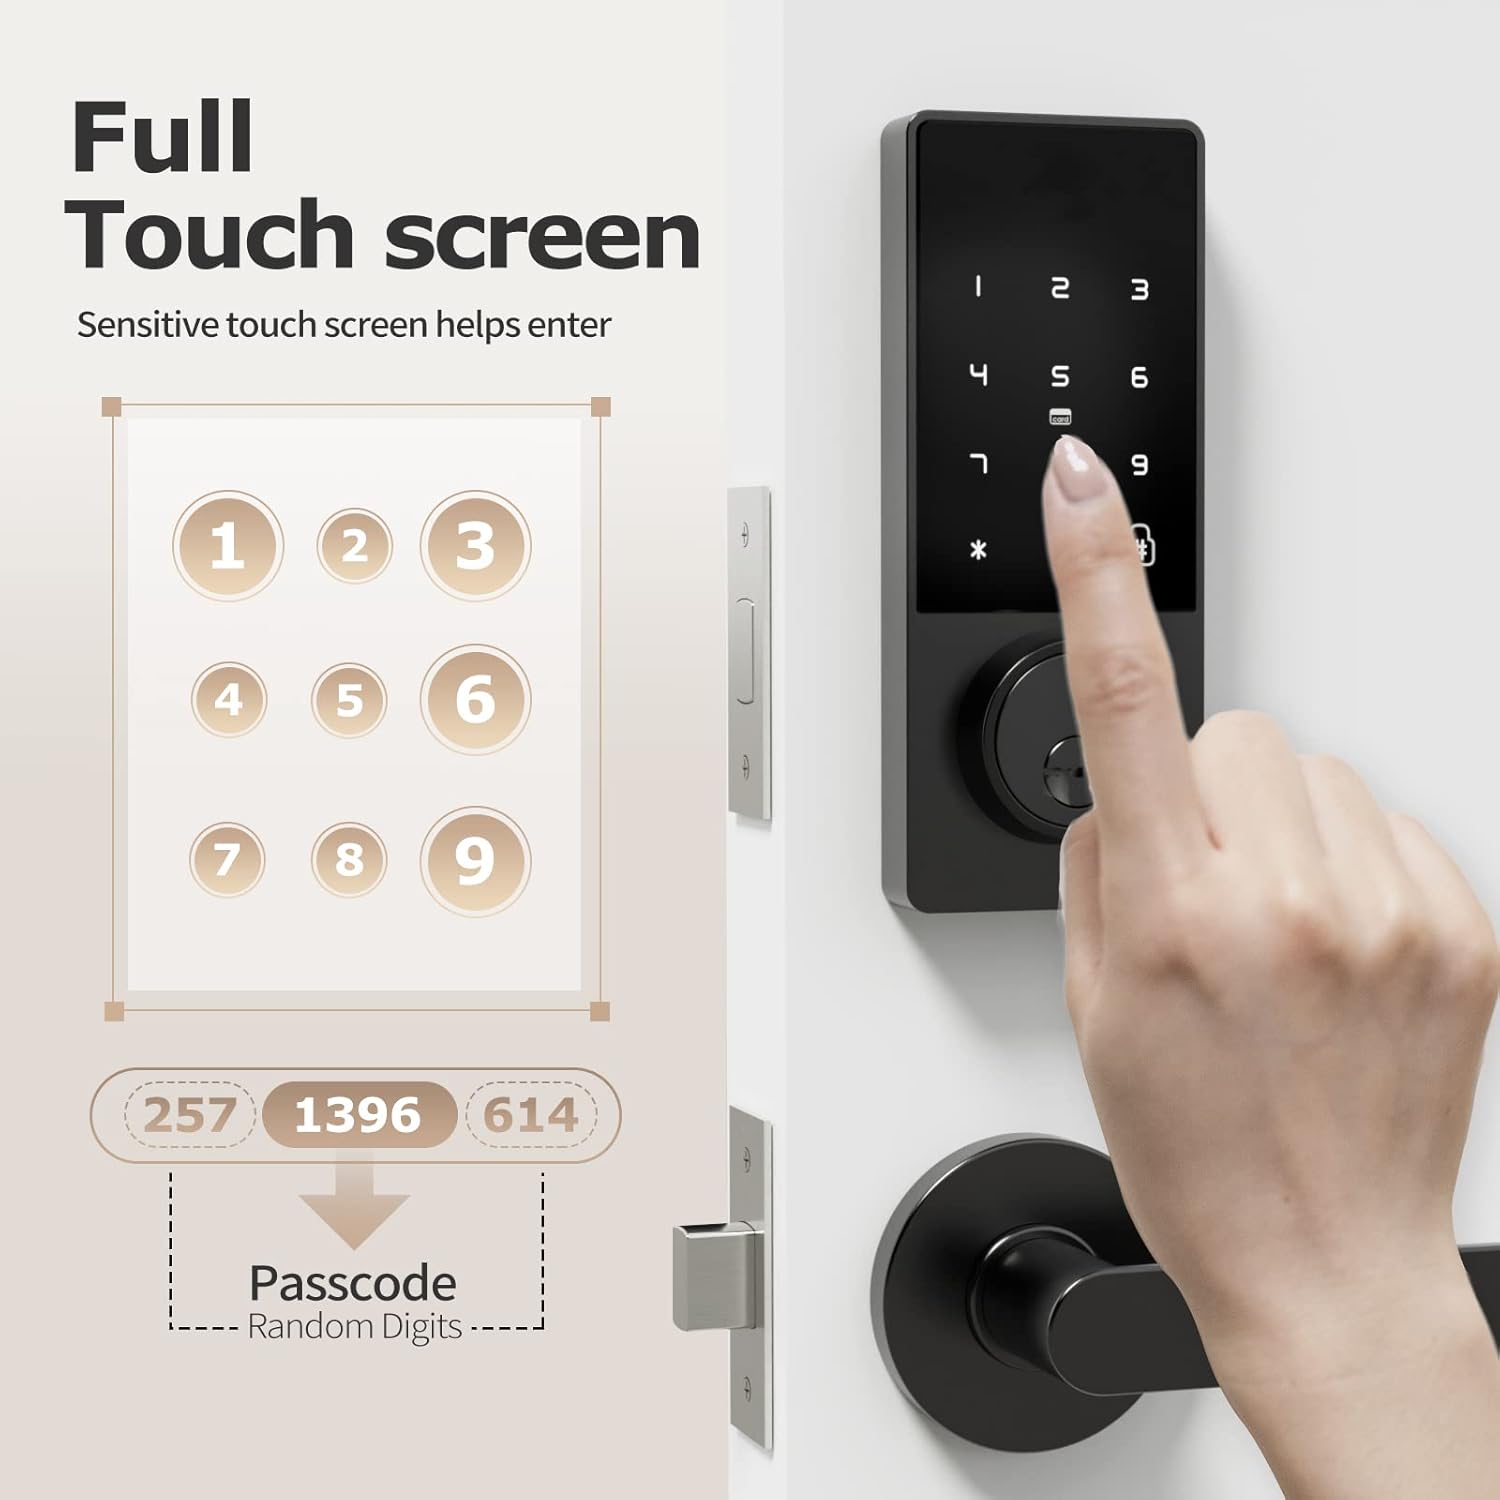
Figure 6: A hand interacting with the full touchscreen keypad, demonstrating the entry of a passcode with random digits for enhanced security.
2. Atrakinimas IC kortele:
- Present the registered IC card to the card reader area on the lock.
- The lock will unlock automatically.

Figure 7: A hand holding an IC card near the smart lock, illustrating the NFC unlocking method.
3. Unlocking with Physical Key:
- Insert the physical key into the keyhole located at the bottom of the exterior unit.
- Pasukite raktą, kad atrakintumėte skląstį.
4. Unlocking with Fingerprint (if applicable):
While the product title mentions "Biometric Door Locks," the feature bullets and images do not explicitly detail a fingerprint sensor or its operation. If your model includes a fingerprint sensor, please refer to the specific instructions provided with your product for fingerprint registration and usage.

Figure 8: A person interacting with the top part of the smart lock, which may contain a fingerprint sensor for quick and efficient unlocking.
Adding Fingerprints and Passwords:
Refer to the video guide (Video 1) for detailed instructions on how to add fingerprints and passwords to the lock. The video demonstrates pressing '2' then '#' to initiate the process for adding new credentials.
Changing Normally Open Mode:
Refer to the video guide (Video 1) for detailed instructions on how to change the normally open mode. The video demonstrates pressing '3' then '#' to adjust this setting.
Kalbos keitimas:
Refer to the video guide (Video 1) for detailed instructions on how to change the language settings. The video demonstrates pressing '4' then '#' to access language options.
Priežiūra
- Baterijos keitimas: The lock requires 4 AA batteries. Replace them when the low battery reminder activates. Use high-quality alkaline batteries for optimal performance and longevity.
- Valymas: Nuvalykite spynos išorę minkštu, sausu skudurėliu. Nenaudokite abrazyvinių valiklių ar tirpiklių, kurie gali pažeisti apdailą ar elektroninius komponentus.
- Reguliarūs patikrinimai: Periodically check all screws and connections to ensure they are secure. Ensure the deadbolt operates smoothly without obstruction.

Figure 9: The battery compartment of the smart lock, indicating the use of 4 AA alkaline batteries for approximately 6 months of battery life.
Trikčių šalinimas
| Problema | Sprendimas |
|---|---|
| Užraktas nereaguoja. | Check battery levels and replace if necessary. Ensure the wire connector is securely plugged in. |
| Slaptažodis neveikia. | Ensure you are entering the correct passcode. Try re-registering the passcode. Check if the lock is in "normally open" mode. |
| Deadbolt not extending/retracting. | Check for obstructions in the door frame or strike plate. Ensure the deadbolt latch is properly aligned and installed. Verify the lock core is properly installed (refer to installation video). |
| IC card not recognized. | Ensure the IC card is properly registered. Try presenting the card directly to the reader area. |
| Priminimas apie žemą akumuliatoriaus įkrovą. | Nedelsdami pakeiskite visas 4 AA baterijas. |
Garantija ir palaikymas
FILTA offers a comprehensive guarantee for your peace of mind:
- Nemokamas keitimas: Per 60 dienų nuo įsigijimo datos.
- Gaminio garantija: 1 year product warranty from the date of purchase.
- Klientų aptarnavimas: Klientų aptarnavimas visą gyvenimą.
For any questions, technical assistance, or warranty claims, please contact FILTA customer support through the retailer's platform or visit the official FILTA store on Amazon: FILTA Store.
Ask a question about this manual
Ask about setup, troubleshooting, compatibility, parts, safety, or missing instructions. Manuals+ will review the question and use this page’s manual context to help answer it.