
Singer 6335M
Singer Heavy Duty HD6335M Sewing Machine
Vartotojo vadovas
Įvadas
Welcome to the user manual for your new Singer Heavy Duty HD6335M Sewing Machine. This machine is engineered for durability and performance, especially designed to handle heavy fabrics like denim, canvas, and multiple layers with ease. Please read this manual thoroughly before operating your machine to ensure safe and efficient use and to maximize its lifespan.
For optimal performance and safety, always follow the instructions provided. Keep this manual for future reference.
Svarbios saugos instrukcijos
Naudojant elektrinį prietaisą, visada reikia laikytis pagrindinių saugos priemonių, įskaitant:
- Visada atjunkite siuvimo mašiną nuo elektros lizdo iškart po naudojimo ir prieš valydami, nuimdami dangčius, tepdami ar atlikdami bet kokius kitus naudotojo aptarnavimo pakeitimus.
- Neleisti naudoti kaip žaislo. Būtinas ypatingas dėmesys, kai šiuo prietaisu naudojasi vaikai arba jį naudoja šalia vaikų.
- Šį prietaisą naudokite tik pagal paskirtį, kaip aprašyta šiame vadove. Naudokite tik gamintojo rekomenduojamus priedus, nurodytus šiame vadove.
- Niekada nenaudokite šio prietaiso, jei jo laidas ar kištukas pažeistas, jei jis tinkamai neveikia, buvo numestas, pažeistas arba įkritęs į vandenį.
- Niekada nemeskite ir neįkiškite jokio daikto į jokią angą.
- Nenaudoti lauke.
- Nedirbkite ten, kur naudojami aerozoliniai (purškiami) produktai arba kur įvedamas deguonis.
- Norėdami atjungti, pasukite visus valdiklius į išjungimo padėtį, tada ištraukite kištuką iš lizdo.
- Pirštus laikykite toliau nuo visų judančių dalių. Siuvimo mašinos adata turi būti ypač atsargi.
- Visada naudokite tinkamą adatos plokštelę. Dėl netinkamos plokštelės adata gali nulūžti.
- Siuvimo metu netraukite ir nestumkite audinio. Tai gali iškreipti adatą ir ji gali nulūžti.
- Išjunkite siuvimo mašiną, kai atliekate bet kokius pakeitimus adatos srityje, pavyzdžiui, įveriate siūlo siūlą, keičiate adatą, įveriate ritinėlį arba keičiate prispaudimo pėdelę.
Produktas baigtasview
The Singer Heavy Duty HD6335M is a robust sewing machine designed for demanding projects. Its internal metal frame provides stability and durability, ensuring consistent performance even with thick materials.

1 pav.: priekis view of the Singer Heavy Duty HD6335M Sewing Machine, showcasing its grey exterior and control dials.

2 pav. Vidinis view of the sewing machine, highlighting the heavy-duty metal frame for enhanced stability and longevity.
Key components include the stitch selector dial, tension dial, reverse lever, needle plate, and various presser feet.
Sąranka
1. Išpakavimas ir įdėjimas
- Atsargiai išimkite mašiną iš pakuotės.
- Pastatykite mašiną ant stabilaus, lygaus paviršiaus.
- Ensure there is adequate space around the machine for comfortable operation.
2. Maitinimo prijungimas
- Prijunkite maitinimo laidą prie aparato, o tada – prie tinkamo elektros lizdo.
- Connect the foot controller to the machine.
3. Ritės vyniojimas
- Uždėkite siūlų ritę ant ritės kaiščio.
- Follow the winding path indicated on the machine.
- Uždėkite tuščią ritę ant ritės vyniotuvo veleno ir pastumkite ją į dešinę.
- Press the foot controller to wind the bobbin. Stop when the bobbin is full.
4. Ritės įdėjimas

Figure 3: Demonstrates the process of inserting the bobbin into the bobbin case located under the needle plate.
- Atidarykite ritės dangtelio plokštelę.
- Įkiškite suvyniotą ritę į ritės dėklą, užtikrindami, kad siūlas išsivyniotų teisinga kryptimi (paprastai prieš laikrodžio rodyklę).
- Prakiškite siūlą per įtempimo spyruoklę ir įkiškite jį į siūlo kreiptuvą.
- Uždarykite ritės dangtelio plokštę.
5. Viršutinio siūlo įvėrimas
- Pakelkite pėdutės keltuvą.
- Uždėkite siūlų ritę ant ritės kaiščio.
- Follow the numbered threading path on the machine, ensuring the thread passes through all guides and the take-up lever.
- Įverkite adatą iš priekio į galą.
- Patraukite ritės siūlą per adatos plokštelės angą, sukdami smagratį į save, kad nuleistumėte ir pakeltumėte adatą.
Naudojimo instrukcijos
1. Dygsnio pasirinkimas
- Turn the stitch selector dial to choose your desired stitch pattern.
- Adjust the stitch length and width dials as needed for your project.
2. Adjusting Thread Tension
- The tension dial controls the balance between the upper and bobbin threads.
- Adjust the tension based on your fabric and thread type. A balanced stitch will have both threads meeting evenly between the fabric layers.
3. Siuvimo pagrindai
- Padėkite audinį po pėdele.
- Nuleiskite prispaudimo pėdelę.
- Lower the needle into the fabric using the handwheel.
- Press the foot controller to begin sewing.
- Use the reverse lever to backstitch and secure your seams.
4. Using the One-Step Buttonhole Foot
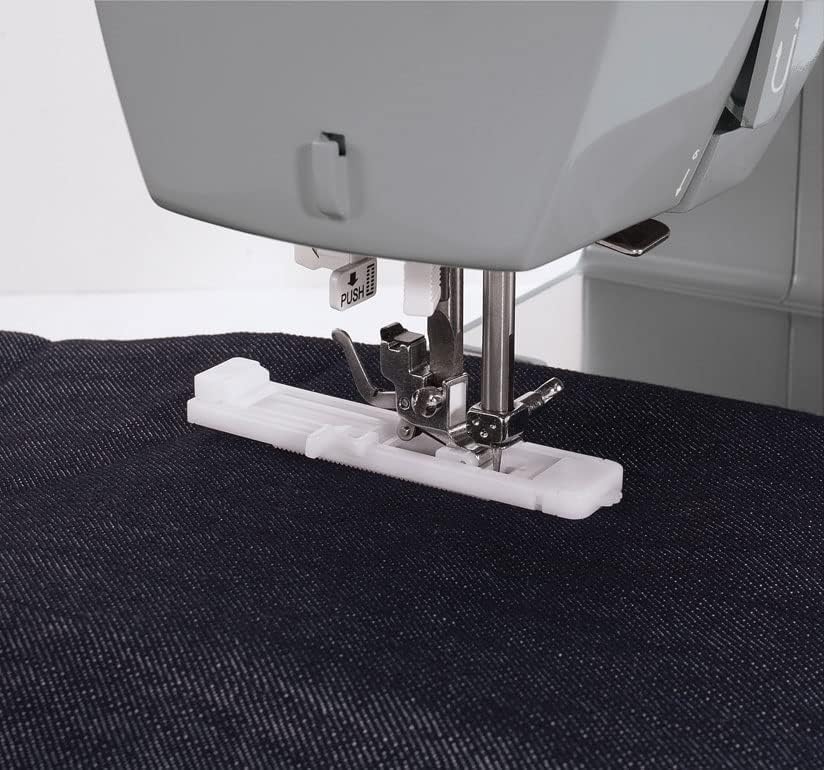
Figure 4: The one-step buttonhole foot attached to the machine, ready for automatic buttonhole creation.
- Attach the one-step buttonhole foot.
- Insert the button you wish to use into the back of the buttonhole foot.
- Select the buttonhole stitch on the stitch selector dial.
- The machine will automatically sew a buttonhole to the size of your button.
5. Using the Overlock Foot

Figure 5: The overlock foot in use, demonstrating its ability to finish fabric edges and prevent fraying.
- Attach the overlock foot.
- Select an overlock or zigzag stitch.
- This foot helps to create neat, finished edges on your fabric, preventing fraying.
6. Sewing Heavy Fabrics

Figure 6: The machine effortlessly sewing through multiple layers of denim, showcasing its heavy-duty capability.
- For heavy fabrics like denim or canvas, use a strong, sharp needle (e.g., a denim needle) appropriate for the fabric thickness.
- Adjust the stitch length to be slightly longer for thicker materials.
- Ensure proper thread tension to avoid skipped stitches or thread breakage.
Priežiūra
1. Mašinos valymas
- Prieš valydami mašiną visada ištraukite iš elektros tinklo.
- Regularly remove the needle plate and bobbin case to clean out lint and dust with a small brush.
- Mašinos išorę nuvalykite minkštu, sausu skudurėliu.
2. Tepimas
- Refer to the specific lubrication points indicated in your machine's detailed diagram (if available).
- Naudokite tik aukštos kokybės siuvimo mašinų alyvą.
- Apply a small drop of oil to designated moving parts as recommended.
3. Adatos keitimas
- Change the needle frequently, especially when sewing different fabric types or if the needle becomes dull or bent.
- Use only genuine Singer needles or high-quality universal needles appropriate for your machine.
Trikčių šalinimas
| Problema | Galima priežastis | Sprendimas |
|---|---|---|
| Praleistos siūlės | Netinkama adata, sulenkta adata, netinkamas siūlų įvėrimas, netinkamas adatos dydis audiniui. | Change needle, re-thread machine, use correct needle type/size. |
| Siūlo trūkimas | Incorrect threading, too high tension, poor quality thread, bent needle, burr on needle plate. | Re-thread machine, adjust tension, use good quality thread, change needle, check needle plate for damage. |
| Bobbin Thread Looping/Tangling | Improper bobbin insertion, incorrect upper thread tension, lint in bobbin case. | Re-insert bobbin correctly, adjust upper tension, clean bobbin case. |
| Mašina nemaitina audinio | Feed dogs lowered, presser foot not lowered, stitch length set to zero. | Raise feed dogs, lower presser foot, adjust stitch length. |
Specifikacijos
| Funkcija | Detalė |
|---|---|
| Prekės ženklas | Dainininkė |
| Modelio numeris | 6335 mln |
| Spalva | Pilka |
| Medžiaga | Plastic, Metal (Heavy Duty Metal Frame) |
| Matmenys (I x P x A) | 15 x 30 x 30 cm (approx. 20P x 30l x 25H cm) |
| Prekės svoris | 7 kilogramo |
| Maitinimo šaltinis | Elektrinis |
| Ypatingos savybės | Heavy Duty Motor, One-Step Buttonhole, Overlock Foot included, Extension Table |
Garantija ir palaikymas
Informacija apie garantiją
The Singer Heavy Duty HD6335M sewing machine typically comes with a manufacturer's warranty. Based on available information, spare parts availability is indicated for 2 years. Please refer to your purchase documentation or contact the retailer for specific warranty terms and conditions applicable to your region.
Pagalba klientams
For technical assistance, troubleshooting beyond this manual, or warranty claims, please contact Singer customer support or your authorized dealer. Have your machine's model number (HD6335M) and serial number ready when contacting support.
You may also find additional resources and FAQs on the official Singer websvetainę.
Ask a question about this manual
Ask about setup, troubleshooting, compatibility, parts, safety, or missing instructions. Manuals+ will review the question and use this page’s manual context to help answer it.