1. Įvadas
This manual provides detailed instructions for the installation, operation, and maintenance of your darkFlash Aquarius Mesh Computer Case. Please read this manual thoroughly before beginning installation to ensure proper setup and safe use of your new computer chassis.
2. Saugos informacija
Visada laikykitės šių saugos priemonių:
- Disconnect all power sources before installing or removing any components.
- Kad išvengtumėte elektrostatinės iškrovos (ESD) sukeltos žalos komponentams, dėvėkite antistatinį riešo dirželį.
- Handle components carefully to avoid physical damage.
- Smulkias dalis ir įrankius laikykite vaikams nepasiekiamoje vietoje.
- Ensure proper ventilation around the computer case.
3. Pakuotės turinys
Patikrinkite, ar pakuotėje yra visi reikalingi daiktai:
- darkFlash Aquarius Mesh Computer Case
- Priedų dėžutė (varžtai, tarpikliai, kabelių laikikliai ir kt.)
- Vartotojo vadovas (šis dokumentas)
4. Sąranka ir diegimas
Follow these steps for proper component installation.
4.1. Bylos rengimas
Before installing components, remove the side panels. The Aquarius Mesh case typically features a tempered glass side panel and a solid metal panel.
- Locate the thumbscrews on the rear of the case securing the side panels.
- Unscrew the thumbscrews and carefully slide the panels backward, then lift them off.

1 pav.: Priekinė ir šoninė dalys view of the darkFlash Aquarius Mesh case. Note the mesh front panel and tempered glass side panel.

2 pav.: galinis view of the darkFlash Aquarius Mesh case, showing expansion slots and rear fan mount.
4.2. Pagrindinės plokštės montavimas
The Aquarius Mesh supports ATX, Micro-ATX, and Mini-ITX motherboards.
- Įstatykite įvesties/išvesties skydą į išpjovą korpuso gale.
- Align your motherboard with the pre-installed standoffs. Ensure the I/O ports align with the I/O shield.
- Pritvirtinkite pagrindinę plokštę atitinkamais varžtais iš priedų dėžutės.
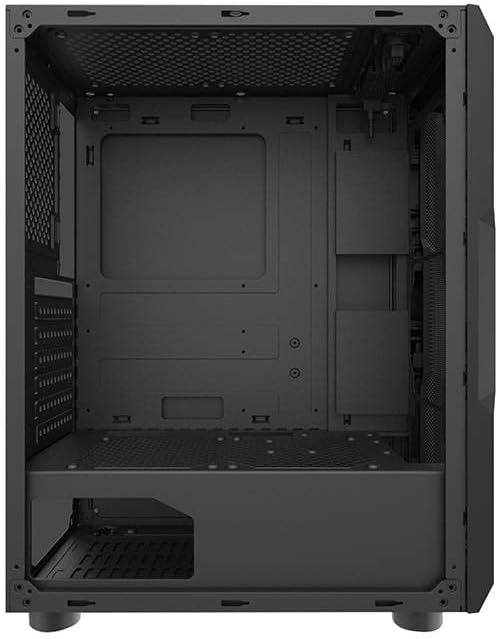
3 pav. Vidus view of the darkFlash Aquarius Mesh case, highlighting the motherboard tray and cable routing options.
4.3. Maitinimo šaltinio (PSU) įrengimas
Maitinimo blokas tvirtinamas korpuso apačioje gale.
- Slide the PSU into its designated compartment from the rear of the case.
- Align the screw holes and secure the PSU with screws.
4.4. Atminties disko diegimas
The case provides mounting options for 3.5-inch HDDs and 2.5-inch SSDs.
- 3.5 colio kietieji diskai: Locate the drive cage usually beneath the PSU shroud or behind the motherboard tray. Slide the HDD into the bay and secure it with screws.
- 2.5 colio SSD diskai: Mount SSDs to dedicated brackets behind the motherboard tray or on the PSU shroud. Secure with screws.

4 pav.: Galinis salonas view of the darkFlash Aquarius Mesh case, showing the motherboard cutout and potential SSD mounting points.
4.5. Išplėtimo plokštės (pvz., GPU) diegimas
- Nuimkite reikiamus išplėtimo lizdų dangtelius nuo korpuso galo.
- Insert the expansion card into the appropriate PCIe slot on the motherboard.
- Secure the card with the provided screws or retention clips.
4.6. Kabelių valdymas
Kabelių išdėstymui naudokite laidų išpjovas ir tvirtinimo taškus už pagrindinės plokštės dėklo. Tai pagerina oro srautą ir vizualiai pagerina vaizdą.
4.7. Reassembling the Case
Once all components are installed and cables are managed:
- Carefully reattach the side panels, ensuring they slide into place correctly.
- Secure the side panels with the thumbscrews.
5. Naudojimo instrukcijos
After assembly, connect your peripherals and power cable.
- Connect your monitor, keyboard, mouse, and other peripherals to the motherboard's I/O ports.
- Prijunkite maitinimo laidą prie maitinimo bloko ir sieninio lizdo.
- Press the power button located on the top panel of the case to start your computer.

5 paveikslas: viršuje view of the darkFlash Aquarius Mesh case, showing the front I/O panel with power button, reset button, USB ports, and audio jacks.
6. Priežiūra
Reguliarus kompiuterio komponentų aptarnavimas padeda užtikrinti optimalų našumą ir ilgaamžiškumą.
- Dulkių filtrai: The Aquarius Mesh case features removable dust filters (e.g., on the front, top, and bottom). Regularly remove and clean these filters with water and mild soap, or by vacuuming, to maintain good airflow. Ensure they are completely dry before reinstallation.
- Vidaus valymas: Periodically open the case and use compressed air to remove dust buildup from fans, heatsinks, and other components.
- Išorinis valymas: Išorinius paviršius nuvalykite minkšta, damp audinys. Venkite stiprių cheminių medžiagų.
7. Problemų sprendimas
Jei kyla problemų, apsvarstykite šiuos įprastus sprendimus:
- Nėra galios:
- Įsitikinkite, kad maitinimo šaltinio jungiklis yra „ĮJUNGTA“ padėtyje.
- Patikrinkite visas pagrindinės plokštės ir komponentų maitinimo jungtis.
- Verify the power cable is securely plugged into the wall outlet and PSU.
- Nesisukantys ventiliatoriai:
- Check fan connections to the motherboard or fan controller.
- Ensure fans are not obstructed by cables or dust.
- Priekinio skydelio įvestis/išvestis neveikia:
- Verify that the front panel connectors (USB, audio, power/reset switches) are correctly connected to the motherboard headers. Refer to your motherboard manual for header locations.
8. Specifikacijos
| Funkcija | Detalė |
|---|---|
| Prekės ženklas | darkFlash |
| Modelio numeris | Aquarius Mesh |
| Atvejo tipas | Vidurio bokštas |
| Medžiaga | Legiruotasis plienas |
| Spalva | Juoda |
| Aušinimo būdas | Oras |
| Rekomenduojamas naudojimas | Kompiuteris |
| Kietojo disko formos faktorius | 3.5 colių |
9. Garantija ir palaikymas
For warranty information or technical support, please refer to the official darkFlash websvetainėje arba susisiekite su jų klientų aptarnavimo tarnyba. Išsaugokite pirkimo įrodymą garantiniams reikalavimams.
Dėl papildomos pagalbos galite apsilankyti darkFlash official websvetainę.