
AVARRO 0E-HDMIMX4
AVARRO 0E-HDMIMX4 HDMI komutatoriaus naudotojo vadovas
Model: 0E-HDMIMX4
1. Įvadas
The AVARRO 0E-HDMIMX4 is a high-performance 4x4 HDMI matrix switcher designed to route any of four HDMI input sources to any of four HDMI output displays. It supports 4K Ultra HD resolutions, HDCP 2.2, and advanced features like Smart EDID Management and a built-in 4K-1080P downscaler. This manual provides detailed instructions for installation, operation, and troubleshooting to ensure optimal performance of your device.
2. Saugos informacija
- Prieš naudodami įrenginį, atidžiai perskaitykite visas instrukcijas.
- Do not expose this unit to rain, moisture, or excessive humidity.
- Do not place any objects filled with liquids on the unit.
- Neuždenkite vėdinimo angų.
- Naudokite tik pateiktą maitinimo adapterį.
- Nebandykite patys atlikti įrenginio techninės priežiūros. Visus techninės priežiūros darbus patikėkite kvalifikuotiems specialistams.
- Užtikrinkite tinkamą visos prijungtos įrangos įžeminimą.
3. Pakuotės turinys
Prieš montuodami patikrinkite, ar yra visi elementai:
- AVARRO 0E-HDMIMX4 HDMI Switcher Unit
- IR nuotolinio valdymo pultas
- DC 12V maitinimo adapteris
- Vartotojo vadovas (šis dokumentas)
- Mounting Brackets (if applicable, not explicitly mentioned but common for such devices)
4. Produktas baigtasview
4.1 Priekinis skydelis

Vaizdas: priekis view of the AVARRO 0E-HDMIMX4 HDMI Switcher, showing the IR receiver and output selector buttons.
- IR imtuvas: Priima signalus iš IR nuotolinio valdymo pulto.
- Output Selectors (1-4): Buttons to select the input source for each corresponding HDMI output. Each output has its own set of source selection buttons (1, 2, 3, 4).
- LED indikatoriai: Indicate the currently selected input for each output.
4.2 Galinis skydelis
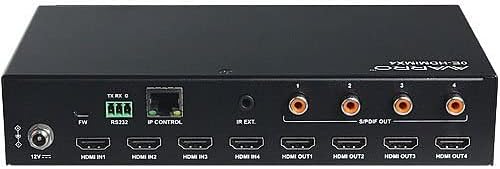
Vaizdas: Galinis view of the AVARRO 0E-HDMIMX4 HDMI Switcher, displaying all input/output ports and control interfaces.
- DC 12 V IN: Maitinimo įvesties prievadas.
- FW (Micro USB): Micro-USB port for firmware upgrades.
- RS232: Serial port for control via RS232 commands.
- IP CONTROL (RJ45): Ethernet port for network control and Web UI prieiga.
- IR EXT: Port for connecting an external IR receiver.
- HDMI IN (1-4): HDMI input ports for connecting source devices (e.g., Blu-ray player, game console).
- HDMI OUT (1-4): HDMI output ports for connecting display devices (e.g., TV, projector).
- S/PDIF OUT (1-4): Digital audio output ports for each HDMI output, supporting PCM 2.0/5.1, Dolby Digital, and DTS up to 5.1 Channel.
5. Sąranka ir prijungimas
- Išjunkite visus įrenginius: Before making any connections, ensure all source devices, displays, and the switcher are powered off.
- Prijunkite HDMI šaltinius: Connect your HDMI source devices (e.g., media players, gaming consoles) to the HDMI IN 1-4 ports on the switcher using high-quality HDMI cables.
- Prijunkite HDMI ekranus: Connect your HDMI display devices (e.g., TVs, projectors) to the HDMI OUT 1-4 ports on the switcher using high-quality HDMI cables.
- Prijunkite garso išvestis (neprivaloma): If desired, connect external audio systems to the S/PDIF OUT ports for digital audio extraction.
- Prijungti tinklą (neprivaloma): For IP control and Web UI access, connect an Ethernet cable from your network router/switch to the IP CONTROL (RJ45) port.
- Prijunkite maitinimą: Connect the provided DC 12V power adapter to the DC 12V IN port on the switcher, then plug the adapter into a power outlet.
- Įjungiami įrenginiai: Power on the switcher, then your display devices, and finally your source devices.
Pastaba: For optimal performance with 4K content, use certified High-Speed HDMI cables.
6. Naudojimo instrukcijos
6.1 Front Panel Control
To switch an input source for a specific output:
- Locate the "SELECTOR" buttons for the desired OUTPUT (1-4).
- Press the corresponding "SOURCE" button (1, 2, 3, or 4) below the "SELECTOR" button to route the desired input to that output. The LED indicator will illuminate to show the active input.
6.2 IR nuotolinio valdymo pultas
The included IR remote control allows for convenient switching from a distance. Point the remote towards the IR receiver on the front panel of the switcher.
- Input Buttons (1-4): Pasirenkamas įvesties šaltinis.
- Output Buttons (A-D or 1-4): Selects the output to control.
- Matricos perjungimas: Typically, you would press an Output button, then an Input button to route that input to the selected output. Refer to the remote's specific layout for exact button functions.
6.3 Web UI valdymas
The Web UI provides a graphical interface for advanced control and configuration.
- Ensure the switcher is connected to your network via the IP CONTROL port.
- Obtain the IP address of the switcher (refer to network settings or device documentation for default IP or discovery method).
- Atidarykite a web naršyklę kompiuteryje, prijungtame prie to paties tinklo.
- Enter the switcher's IP address into the browser's address bar.
- Log in using the default credentials (if prompted, refer to device documentation for default username/password).
- Naudokite Web UI to manage input/output routing, EDID settings, and other advanced features.
6.4 RS232 valdymas
The RS232 port allows for integration with control systems using serial commands. Refer to the detailed RS232 command set documentation (usually available from the manufacturer's website) for specific protocols and commands.
7. Smart EDID Management
The 0E-HDMIMX4 features Smart EDID Management to ensure compatibility between source devices and displays. EDID (Extended Display Identification Data) communicates display capabilities to the source. The switcher can automatically manage EDID or allow manual configuration via the Web UI to optimize video and audio formats for connected devices.
8. Programinės įrangos atnaujinimas
Firmware updates can improve performance, add new features, or resolve issues. The 0E-HDMIMX4 supports firmware upgrading via both the Micro-USB port and the Web Vartotojo sąsaja
- Mikro USB: Connect a computer to the FW (Micro USB) port and use the manufacturer's provided upgrade tool.
- Web NS: Prisijunkite prie Web UI and navigate to the firmware upgrade section.
Always download the latest firmware and instructions from the official AVARRO website before attempting an upgrade.
9. Specifikacijos
| Funkcija | Detalė |
|---|---|
| Modelis | 0E-HDMIMX4 |
| Įėjimai | 4 x HDMI IN |
| Išėjimai | 4 x HDMI OUT, 4 x S/PDIF OUT (Digital) |
| Valdymo prievadai | 1 x RS232, 1 x IP CONTROL (RJ45), 1 x FW (Micro USB) |
| HDMI atitiktis | 4K Ultra HD, HDCP 2.2 compliant |
| Vaizdo įrašų raiškos palaikymas | VESA: 800x600 to 1920x1200; SMPTE: 720x576P to 4096x2160 |
| HDR palaikymas | HDR 10, HLG, DOLBY VISION up to 4K60 444 |
| Sumažinti | Built-in 4K-1080P downscaler |
| Didžiausia duomenų perdavimo sparta | 18 Gbps |
| Maksimalus pikselių laikrodis | 600 MHz |
| Garso formatai (HDMI) | PCM 2.0/5.1/7.1, Dolby TrueHD, Dolby Atmos, DTS HD Master Audio, DTS:X |
| Audio Formats (S/PDIF) | PCM 2.0/5.1, Dolby Digital, DTS up to 5.1 Channel |
| ESD apsauga | ±8 kV (oro tarpo išlydis) / ±4 kV (kontaktinis išlydis) |
| Apsauga nuo viršįtampių | ttage: ±1 Kv |
| Maitinimo šaltinis | DC 12V 2A |
| Energijos suvartojimas (maks.) | 10.8W |
| Įrenginio matmenys (I x P x A) | 8.46 x 4.73 x 1.65 colio (21.49 cm x 12.01 cm x 4.19 cm) |
| Produkto svoris | 1.19 svarai (0.54 kg) |
10. Problemų sprendimas
Jei kyla problemų, žr. toliau pateiktas dažniausiai pasitaikančias problemas ir sprendimus:
- Nėra vaizdo / garso išvesties:
- Įsitikinkite, kad visi HDMI kabeliai yra tvirtai prijungti.
- Verify the power adapter is correctly connected and the unit is powered on.
- Check that the correct input source is selected for the desired output.
- Test with different HDMI cables.
- Bypass the switcher to confirm source and display functionality.
- Check EDID settings, especially with mixed resolution displays.
- Pertraukiamas signalas / mirgėjimas:
- Use high-quality, certified HDMI cables, especially for longer runs or 4K content.
- Ensure cables are not excessively bent or damaged.
- Check for potential electromagnetic interference from other devices.
- Nuotolinio valdymo pultas neveikia:
- Įsitikinkite, kad tarp nuotolinio valdymo pulto ir komutatoriaus IR imtuvo nėra jokių kliūčių.
- Pakeiskite nuotolinio valdymo pulto baterijas.
- Verify the remote is pointed directly at the IR receiver.
- Web UI/IP Control Issues:
- Confirm the Ethernet cable is properly connected.
- Verify the switcher's IP address and ensure your computer is on the same network subnet.
- Patikrinkite užkardos nustatymus savo kompiuteryje arba tinkle.
11. Priežiūra
- Valymas: Įrenginio išorę valykite minkštu, sausu skudurėliu. Nenaudokite skystų valiklių ar aerozolių.
- Vėdinimas: Įsitikinkite, kad ventiliacijos angos yra švarios ir neužblokuotos, kad išvengtumėte perkaitimo.
- Saugykla: If storing the unit for an extended period, disconnect power and store in a cool, dry place.
12. Garantija ir palaikymas
AVARRO products are designed for reliability and performance. For specific warranty information, please refer to the warranty card included with your product or visit the official AVARRO websvetainę. Dėl techninės pagalbos, produkto registracijos arba naujausių tvarkyklių ir programinės įrangos atsisiuntimo apsilankykite www.avarrus.com or contact AVARRO customer service.
Ask a question about this manual
Ask about setup, troubleshooting, compatibility, parts, safety, or missing instructions. Manuals+ will review the question and use this page’s manual context to help answer it.