
1. Produktas baigtasview
The Spigen OneTap 3 (MagFit) is a magnetic car mount designed for secure phone placement in Tesla vehicles. It features OneTap Technology for easy attachment and a robust magnetic hold.
Suderinamumas
This car mount is compatible with:
- Tesla Model 3, Model Y, Model S (2021+), and Model X (2021+).
- iPhone 16, 15, 14, 13, and 12 series.
- MagSafe compatible cases are required for optimal magnetic attachment.

1 paveikslas: Suderinamumas baigtasview for Tesla models and iPhone series.
The mount's sleek design integrates seamlessly with your Tesla's interior, providing a discreet and functional phone holder.

2 paveikslas: Spigen OneTap 3 mount installed in a Tesla, showcasing its subtle design and integrated cable organizer.
2. Diegimo vadovas
Follow these steps for a secure and lasting installation of your Spigen OneTap 3 car mount.
Paruošimas:
- Identify the desired mounting location behind the corner of your Tesla's display screen.
- Clean the surface thoroughly with isopropyl alcohol and ensure it is completely dry before proceeding. This removes any dust or oils that could compromise adhesion.
- Ensure the car interior is not excessively hot during installation to allow for proper adhesive curing.
Montavimo žingsniai:
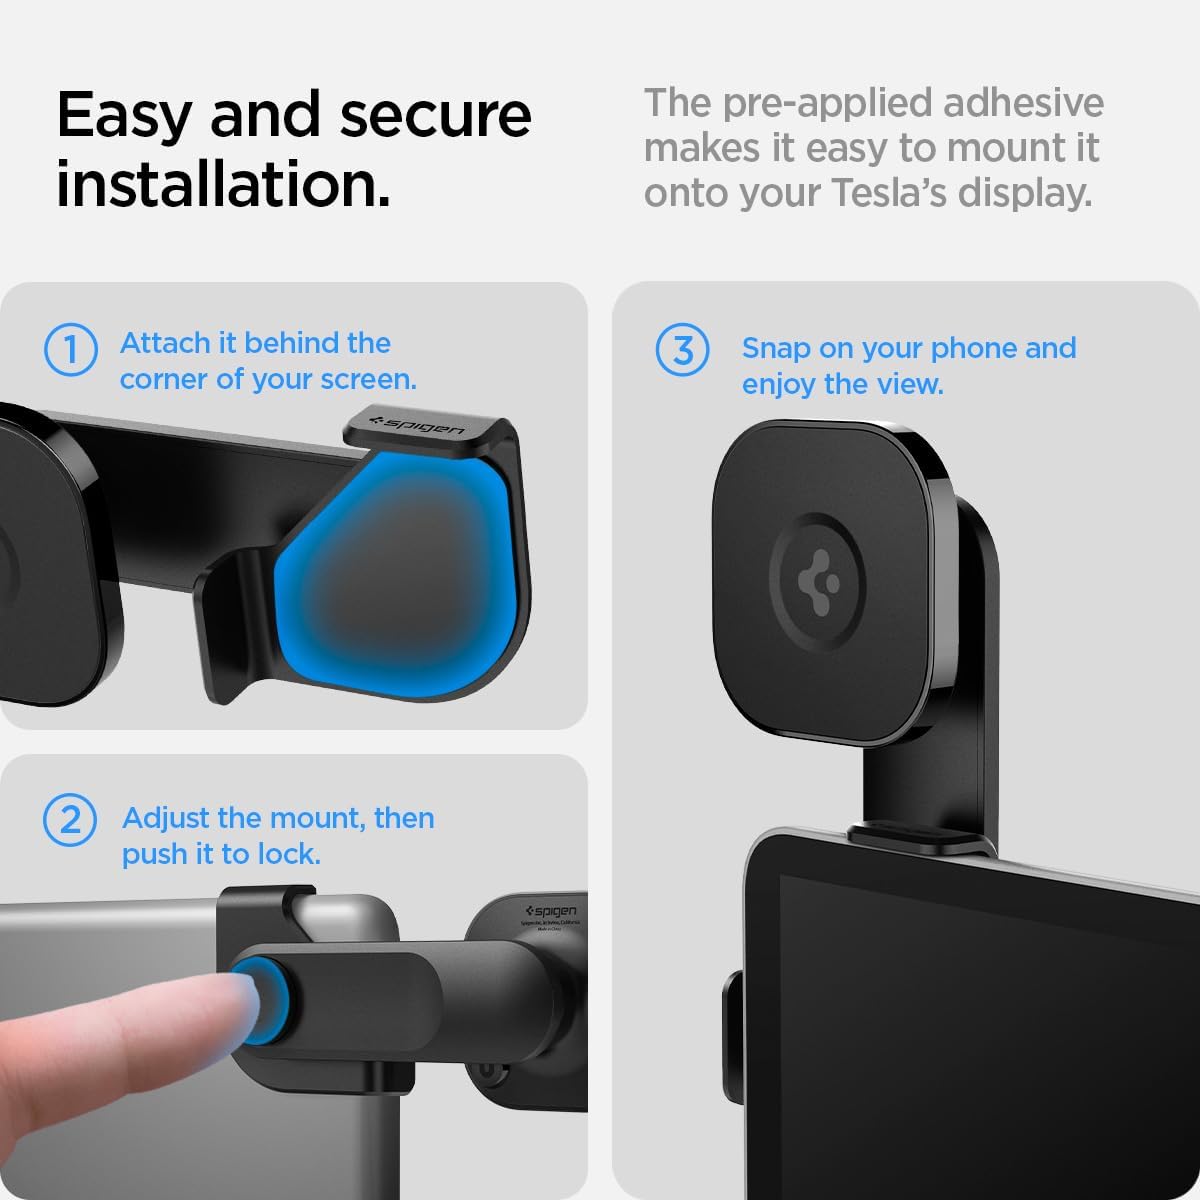
- Remove the protective film from the pre-applied adhesive on the back of the mount.
- Carefully position the mount behind the corner of your Tesla's screen.
- Press firmly on the mount for at least 30 seconds to ensure strong initial adhesion.
- Svarbu: Allow a curing time of at least 8 hours for optimal adhesion. For full strength, wait 24 hours before attaching your phone or adjusting the mount.
3 paveikslas: Visual guide for secure installation, showing adhesive placement and recommended curing times.

4 paveikslas: Step-by-step installation process for the Spigen OneTap 3 car mount.
An extra adhesive pad is included for future re-installation if needed.
3. Naudojimo instrukcijos
Telefono prijungimas:
The Spigen OneTap 3 utilizes MagFit technology for a strong magnetic connection with your iPhone (12 series or newer) or MagSafe compatible case.
- Ensure your iPhone or case is MagSafe compatible.
- Simply bring your iPhone close to the magnetic head of the mount. It will snap securely into place.
5 paveikslas: Magnetic attachment of an iPhone to the OneTap 3 mount.
Reguliuojant Viewpakreipimo kampas:
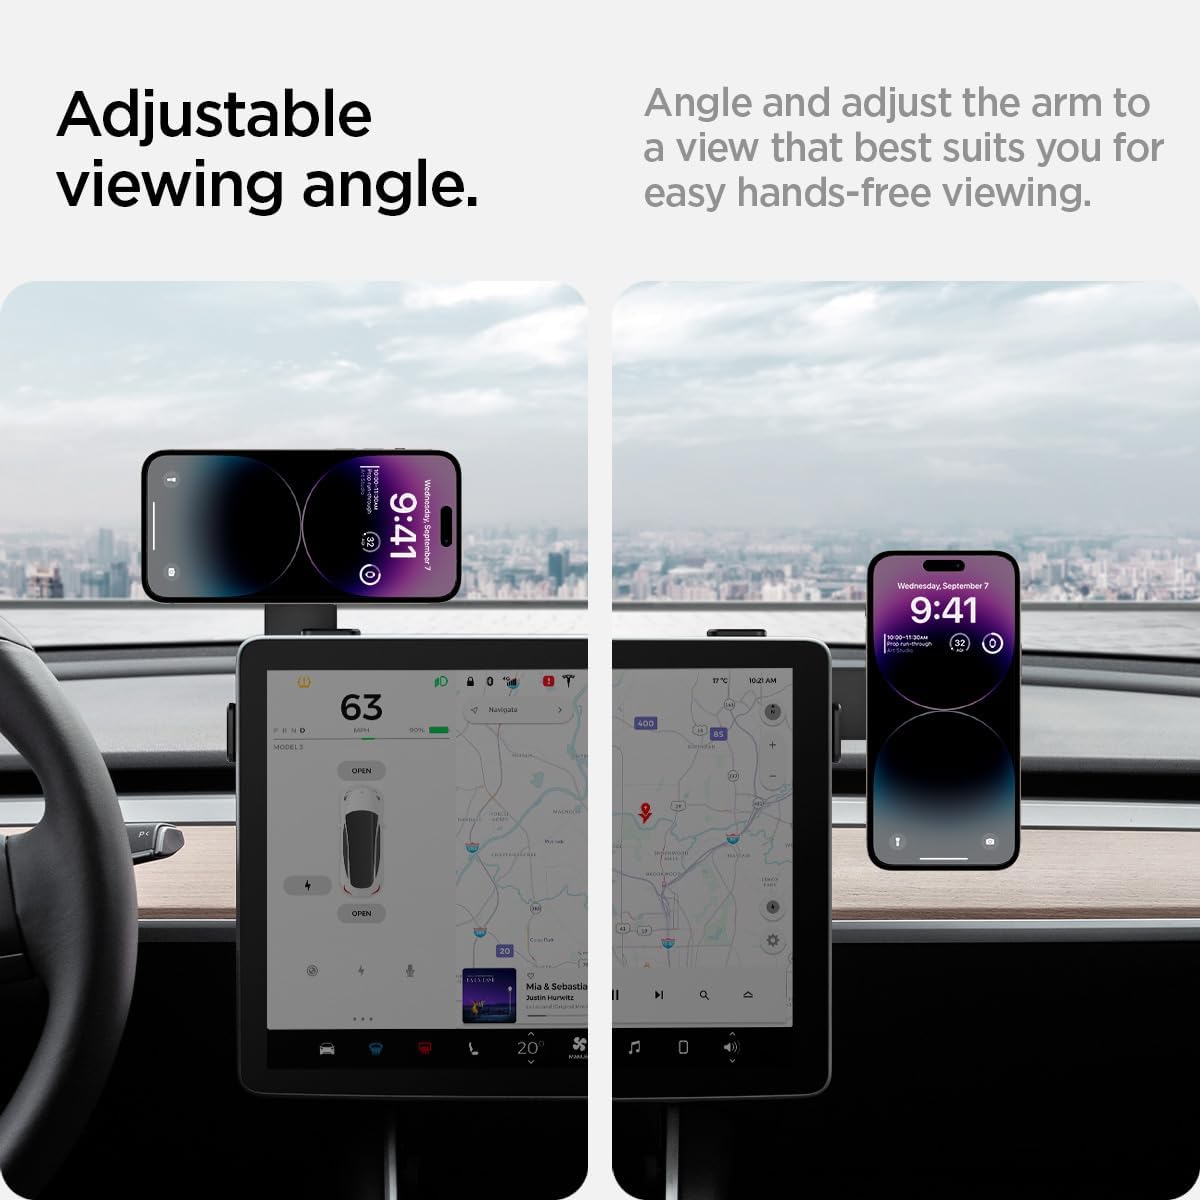
The mount features an adjustable swing arm and swivel head for optimized viewkampų.
- Sukamoji rankena: Press the button on the side of the arm to adjust its position. It locks into 0-degree, 45-degree, and 90-degree angles, allowing for both horizontal and vertical phone orientation.
- Pasukama galvutė: The magnetic head can be rotated 360 degrees to fine-tune your phone's orientation.

6 paveikslas: Reguliuojamas viewing angles, showing horizontal and vertical phone positions.

7 paveikslas: Detail of the adjustable arm mechanism and cable organizer.
Kabelių valdymas:
The mount includes two cable head organizing tapes to keep your charging cables tidy and accessible.
4. Vaizdo įrašo diegimo vadovas
For a visual demonstration of the product and installation, please watch the official video below.
„1“ vaizdo įrašas: Spigen OneTap 3 Upgraded Model - Unboxing and Installation Guide by Bazzar Reviews. This video demonstrates the product's features and installation process in a Tesla vehicle.
5. Priežiūra ir priežiūra
To ensure the longevity and optimal performance of your Spigen OneTap 3 car mount:
- Clean the mount periodically with a soft, damp skudurėliu. Venkite stiprių cheminių medžiagų ar abrazyvinių valiklių.
- Ensure the adhesive area remains clean and free from debris. If re-installation is necessary, use the provided extra adhesive pad.
- Avoid exposing the mount to extreme temperatures for prolonged periods, as this may affect the adhesive.
6. Problemų sprendimas
If you encounter issues with your Spigen OneTap 3 car mount, consider the following:
- Mount not adhering properly: Ensure the installation surface was clean and dry, and that sufficient curing time (at least 8 hours, ideally 24 hours) was allowed after initial application. Re-apply with the extra adhesive pad if necessary.
- Phone not holding magnetically: Verify that your iPhone is a 12 series or newer, or that your phone case is MagSafe compatible. Ensure no foreign objects are between the phone/case and the mount's magnetic surface.
- Arm not adjusting smoothly: Check for any obstructions in the hinge mechanism. If the issue persists, contact customer support.
7. Gaminio specifikacijos
| Prekės ženklas | Spigenas |
| Modelio pavadinimas | Spigen OneTap 3 Designed for Tesla Car Mount |
| Modelio numeris | ITT90-3 |
| Spalva | Juoda |
| Montavimo tipas | Screen Mount (Adhesive) |
| Suderinami įrenginiai | iPhone 16, 15, 14, 13, 12 Series, MagSafe compatible cases |
| Suderinamas transporto priemonės tipas | Tesla Model 3, Y, S (2021+), X (2021+) |
| Papildomos funkcijos | Adjustable swing arm, Powerful Magnetic hold, Cable organizer |
| Prekės matmenys | 1.47 x 5.44 x 2.53 colio |
| Prekės svoris | 79.65 gramų |
| Medžiaga | Metalas |
8. Garantija ir palaikymas
Informacija apie garantiją:
Šis produktas tiekiamas su a 24 mėnesių garantija be rūpesčiųPrašome išsaugoti pirkimo įrodymą garantiniams reikalavimams.
Klientų aptarnavimas:
For any questions, technical assistance, or warranty claims, please visit the official Spigen website or contact their customer support directly. Refer to the product packaging for specific contact details.


