
Della 048-OPAC-6H
Della 10000 BTU Portable Air Conditioner User Manual
Model: 048-OPAC-6H | Brand: Della
1. Svarbi saugos informacija
Please read this manual carefully before operating your portable air conditioner. Keep this manual for future reference. Always follow basic safety precautions to reduce the risk of fire, electric shock, or injury.
- Įsitikinkite, kad įrenginys pastatytas ant lygaus, stabilaus paviršiaus, kad neapvirstų.
- Nenaudokite įrenginio su pažeistu laidu arba kištuku.
- Nekiškite pirštų ar daiktų į oro įleidimo ar išleidimo angas.
- Laikykite įrenginį atokiai nuo degių medžiagų ir atviros liepsnos.
- Prieš valydami ar atlikdami bet kokią techninę priežiūrą, visada atjunkite įrenginį nuo elektros tinklo.
- Šis prietaisas nėra skirtas naudoti asmenims (įskaitant vaikus), kurių fizinės, jutimo ar psichikos negalios arba neturintys patirties ir žinių, nebent už jų saugumą atsakingas asmuo juos prižiūrėtų arba instruktuotų, kaip naudoti prietaisą.
2. Produktas baigtasview
The Della 10000 BTU Portable Air Conditioner is a versatile unit designed to provide cooling, heating, dehumidification, and fan functions for spaces up to 450 sq. ft. It features smart WiFi connectivity for convenient control via a mobile app, a remote control, and an intuitive soft-touch control panel.

Image: Della Portable Air Conditioner unit, remote control, and smartphone displaying the control app.
Key components include the main unit with integrated handle, exhaust hose, window installation kit, and remote control.

Image: Diagram showing the dimensions of the portable air conditioner: 12.2 inches (width) x 12.2 inches (depth) x 27.6 inches (height).
3. Sąranka
3.1 Išpakavimas
Carefully remove the unit and all accessories from the packaging. Retain the original packaging for future storage or transport. Allow the unit to stand upright for at least 24 hours before initial use to allow the refrigerant to settle.
3.2 Įdėjimas
Place the air conditioner on a firm, level surface in a location that allows for proper air circulation. Ensure there is at least 20 inches (50 cm) of space from walls or other objects to allow for adequate airflow around the unit.
3.3 Langų komplekto montavimas
The included window kit is designed for easy installation in both horizontal and vertical sliding windows. No drilling is required.

Image: Diagrams illustrating the installation of the window kit in both horizontal and vertical sliding windows, showing compatibility with window openings from 25.5 to 64.1 inches.
- Assemble the window slider kit by sliding the adjustable panels together to fit your window opening. The kit is compatible with window sizes from 25.5 to 64.1 inches.
- Secure the panels with the provided screws.
- Open the window and place the assembled window kit into the window frame. Extend the panels to fit snugly and close the window against the kit to secure it.
- Ensure the window kit is sealed properly to prevent air leakage. Use foam seals if necessary.
3.4 Išmetimo žarnos jungtis
- Attach the exhaust hose connector to one end of the exhaust hose.
- Pritvirtinkite langų komplekto adapterį prie kito išmetimo žarnos galo.
- Insert the exhaust hose connector into the exhaust outlet on the back of the air conditioner unit.
- Insert the window kit adapter into the opening on the window slider kit.
- Įsitikinkite, kad visos jungtys yra tvirtos, kad karštas oras nepatektų į kambarį.
3.5 Maitinimo jungtis
Plug the power cord into a grounded 115V/60Hz electrical outlet. Do not use extension cords or power strips.
4. Naudojimo instrukcijos
4.1 Valdymo skydas
The unit features an intuitive soft-touch control panel on the top of the unit.
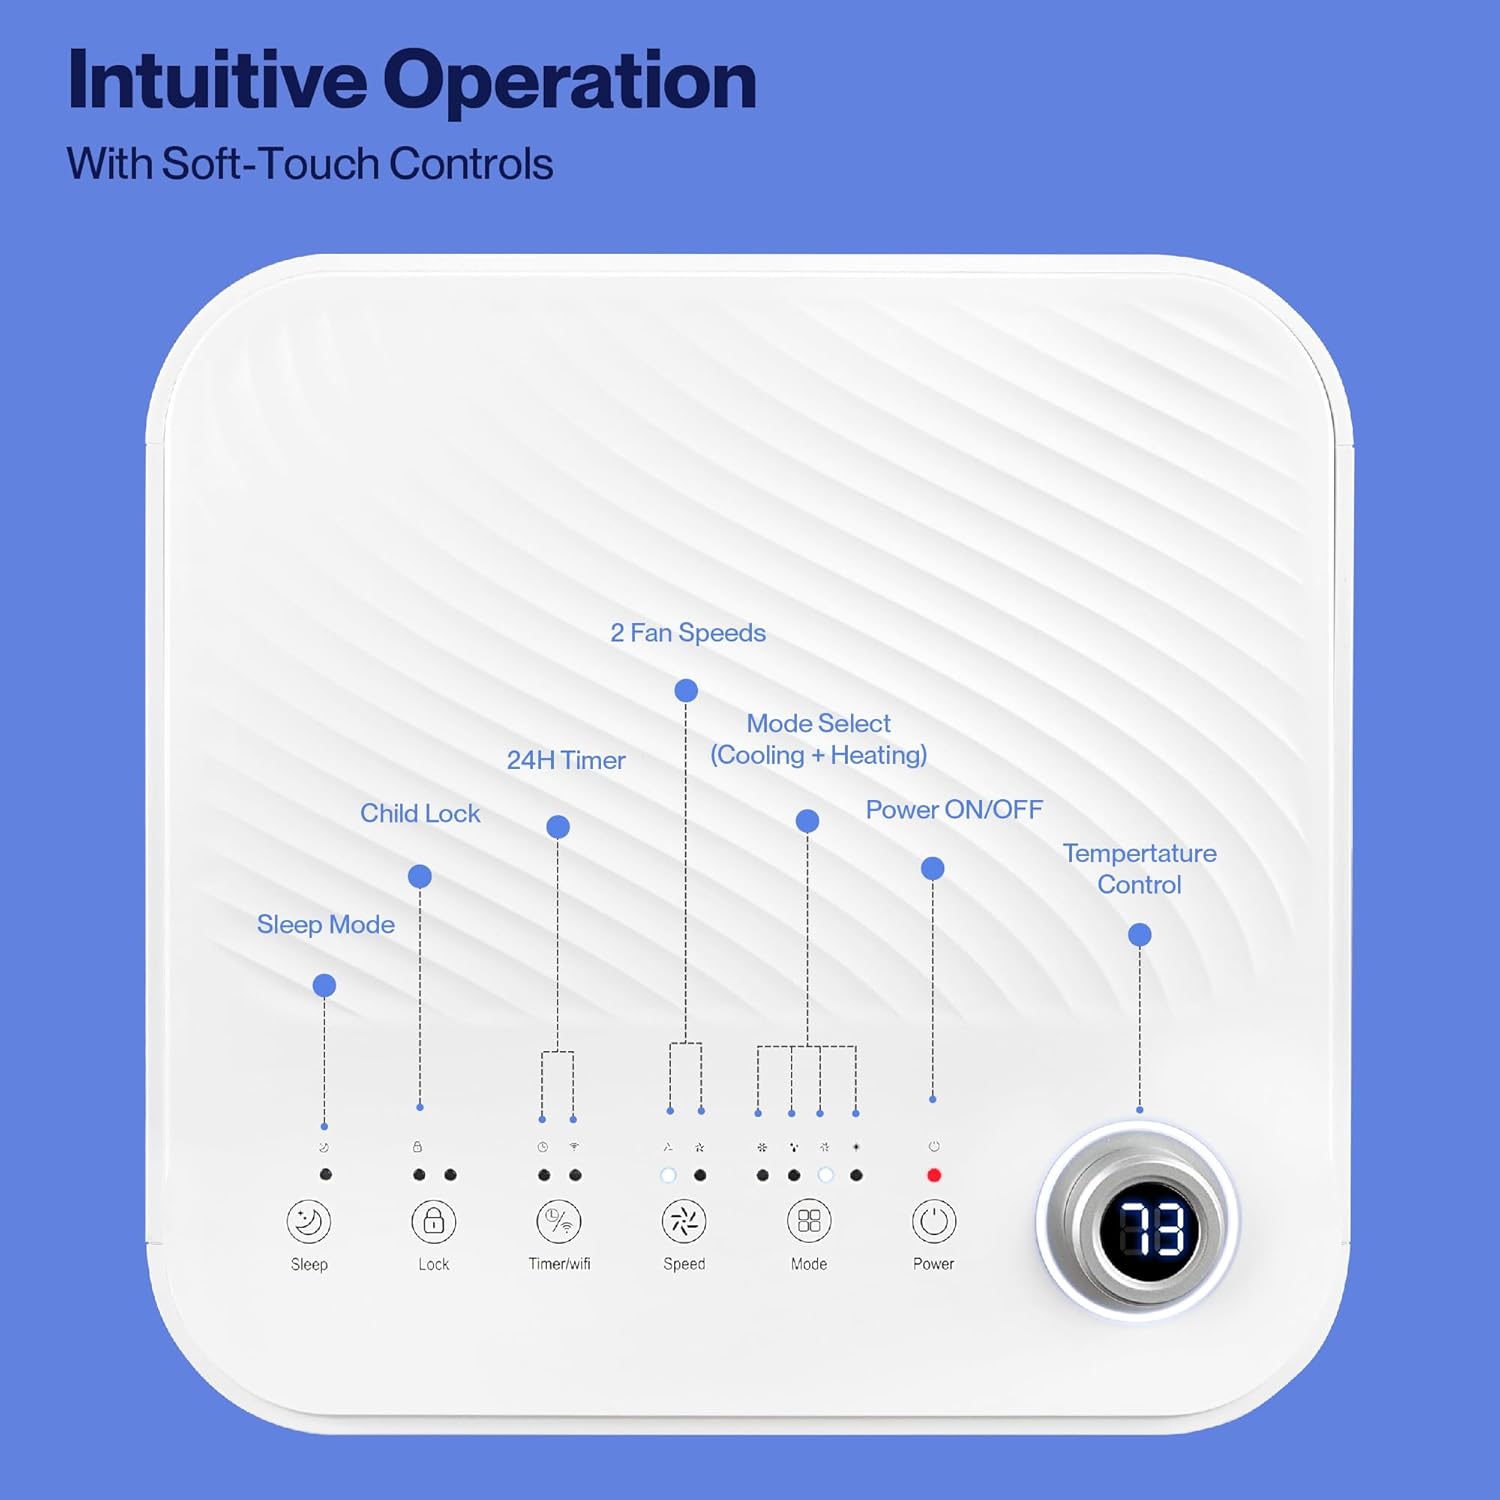
Image: Detailed diagram of the control panel with labels for each button: Sleep, Child Lock, Timer/WiFi, Fan Speed, Mode Select (Cooling + Heating), Power ON/OFF, and Temperature Control with digital display.
- Maitinimo įjungimas/išjungimas: Paspauskite norėdami įjungti arba išjungti įrenginį.
- Pasirinkite režimą: Cycle through Cooling, Heating, Dehumidification, Ventilation (Fan), and Sleep modes.
- Temperatūros valdymas: Norėdami reguliuoti norimą temperatūrą, naudokite rodykles aukštyn / žemyn.
- Ventiliatoriaus greitis: Select between 2 fan speeds (Low, High).
- Laikmatis: Nustatykite 24 valandų laikmatį automatiniam įjungimui / išjungimui.
- Užraktas nuo vaikų: Įjungia arba išjungia vaikų apsaugos funkciją.
- Miegojimo rezimas: Įjungia miego režimą, kad prietaisas veiktų tyliau ir temperatūra būtų reguliuojama palaipsniui.
4.2 Nuotolinis valdymas
The unit comes with a remote control for convenient operation from a distance. All functions available on the control panel can be accessed via the remote.
4.3 WiFi/Smart App Control
Control your Della Portable Air Conditioner from anywhere using the free DELLA+ app on your smartphone. The unit is compatible with Google Assistant and Amazon Alexa for voice control.

Image: A person relaxing on a couch, using a smartphone to control the air conditioner, with text indicating compatibility with Google Assistant and Amazon Alexa.
- Download the DELLA+ app from your smartphone's app store.
- Vadovaukitės programėlėje pateiktomis instrukcijomis, kad prijungtumėte oro kondicionierių prie namų „Wi-Fi“ tinklo.
- Once connected, you can control modes, temperature, fan speed, and set schedules remotely.
The app also supports Smart Geo Location, allowing the unit to automatically turn on or off based on your proximity to home.

Image: A smartphone screen showing a map with a car icon and a notification indicating the AC unit automatically turned on due to Smart Geo Location.
5. Priežiūra
Regular maintenance ensures optimal performance and extends the lifespan of your unit. Always unplug the unit before cleaning.
5.1 Oro filtro valymas
Oro filtrą reikia valyti kas dvi savaites arba dažniau, priklausomai nuo naudojimo ir oro kokybės.
- Suraskite oro filtro skydelį (paprastai jis yra įrenginio gale arba šone).
- Išimkite filtrą.
- Filtrą nuplaukite šiltu muiluotu vandeniu. Kruopščiai nuskalaukite ir leiskite jam visiškai išdžiūti prieš įdėdami atgal.
5.2 Vandens išleidimas
The unit has a self-evaporating system, but in high humidity conditions, water may accumulate. The "Water-full indicator" will illuminate when the water tank needs draining.
- Po išleidimo anga (esančia įrenginio apačioje, gale) padėkite negilų keptuvę arba padėklą.
- Nuimkite išleidimo kamštį.
- Allow all accumulated water to drain out.
- Tvirtai užsukite išleidimo kamštį.
5.3 Saugykla
Jei įrenginys bus sandėliuojamas ilgesnį laiką:
- Nusausinkite visą susikaupusį vandenį.
- Išvalykite oro filtrą.
- Įrenginį kelias valandas paleiskite tik ventiliatoriaus režimu, kad išdžiūtų vidus.
- Atjunkite maitinimo laidą ir tvarkingai jį suvyniokite.
- Laikykite įrenginį vėsioje, sausoje vietoje, pageidautina originalioje pakuotėje.
6. Problemų sprendimas
Dažniausiai pasitaikančias problemas ir jų sprendimus rasite šiame skyriuje.
| Problema | Galima priežastis | Sprendimas |
|---|---|---|
| Įrenginys neįsijungia | No power; Power cord unplugged; Circuit breaker tripped; Water tank full | Check power outlet; Plug in power cord; Reset circuit breaker; Drain water tank |
| Įrenginys nevėsina efektyviai | Air filter dirty; Exhaust hose not properly installed; Room too large; Doors/windows open; Temperature setting too high | Clean air filter; Ensure exhaust hose is sealed; Close doors/windows; Lower temperature setting |
| Įrenginys triukšmingas | Unit not on level surface; Air filter dirty; Obstruction in fan | Place unit on level surface; Clean air filter; Check for obstructions |
| Vandens nutekėjimas | Drain plug loose or missing; Unit tilted | Užsukite išleidimo kamštį; Įsitikinkite, kad įrenginys yra lygus |
| „Wi-Fi“ ryšio problemos | Incorrect WiFi password; Unit too far from router; Router issues | Patikrinkite slaptažodį; Perkelkite įrenginį arčiau maršrutizatoriaus; Paleiskite maršrutizatorių iš naujo |
Jei problema išlieka ir išbandžius šiuos sprendimus, susisiekite su klientų aptarnavimo tarnyba.
7. Specifikacijos
| Funkcija | Specifikacija |
|---|---|
| Modelio numeris | 048-OPAC-6H |
| Aušinimo talpa | 10000 XNUMX BTU |
| Aprėpties sritis | Iki 450 kv. Ft. |
| Funkcijos | Cooling, Heating, Dehumidifier, Fan, Sleep Mode |
| ttage | 115 voltų |
| Triukšmo lygis | 54 dB |
| Šaldymo agentas | R 410A |
| Matmenys (I x P x A) | 12.2 x 12.2 x 27.6 colio |
| Medžiaga | ABS plastikas |
| Ypatingos savybės | Portable, Dehumidifier, WiFi Enabled, Remote Control, Built-in Handle, 24-hour timer, Child Lock |
8. Garantija ir klientų aptarnavimas
For warranty information or technical assistance, please refer to the warranty card included with your product or visit the official Della website. You may also contact Della customer support directly for further assistance with troubleshooting or parts replacement.
Ask a question about this manual
Ask about setup, troubleshooting, compatibility, parts, safety, or missing instructions. Manuals+ will review the question and use this page’s manual context to help answer it.