
Homsee B0CCP22CP9
Homsee Modern Nightstands with LED Light and 2 Drawers (Set of 2)
Model: B0CCP22CP9
Svarbi saugos informacija
Prieš surinkdami ir naudodami, perskaitykite ir supraskite visas instrukcijas. Išsaugokite šį vadovą ateičiai.
- Visada laikykitės pateiktų surinkimo instrukcijų.
- Be cautious when handling sharp objects during assembly.
- Ensure the nightstand is properly assembled to maintain stability.
- Do not exceed the weight limit of the table.
- Surinkdami mažas dalis laikykite vaikams nepasiekiamoje vietoje.
Pakuotės turinys
Prieš pradėdami surinkimą, patikrinkite, ar yra visi komponentai.
- Surinkimo vadovas
- Installation Hardware (screws, dowels, etc.)
- Nightstand Panels (top, bottom, sides, back, drawer fronts, drawer sides/backs)
- Stalčių bėgeliai
- LED Light Strip with USB connector
If any parts are missing or damaged, please contact Homsee customer support.
Specifikacijos
| Prekės ženklas | Homsee |
| Modelio numeris | B0CCP22CP9 |
| Gaminio matmenys (D x P x A) | 15.7 "D x 19.6" P x 20" A |
| Rėmo medžiaga | Inžinierinė mediena |
| Spalva | White With Light |
| Stalčių skaičius | 2 |
| Reikalingas surinkimas | Taip |
| Rekomenduojami asamblėjos žmonės | 1 |
| Rekomenduojami įrankiai | Atsuktuvas |
Surinkimo instrukcijos
Follow the detailed step-by-step instructions provided in the included Assembly Guide. A screwdriver is recommended for assembly.
1 veiksmas: nustatykite komponentus
Unpack all parts and compare them with the parts list in your Assembly Guide. Ensure all hardware is present.
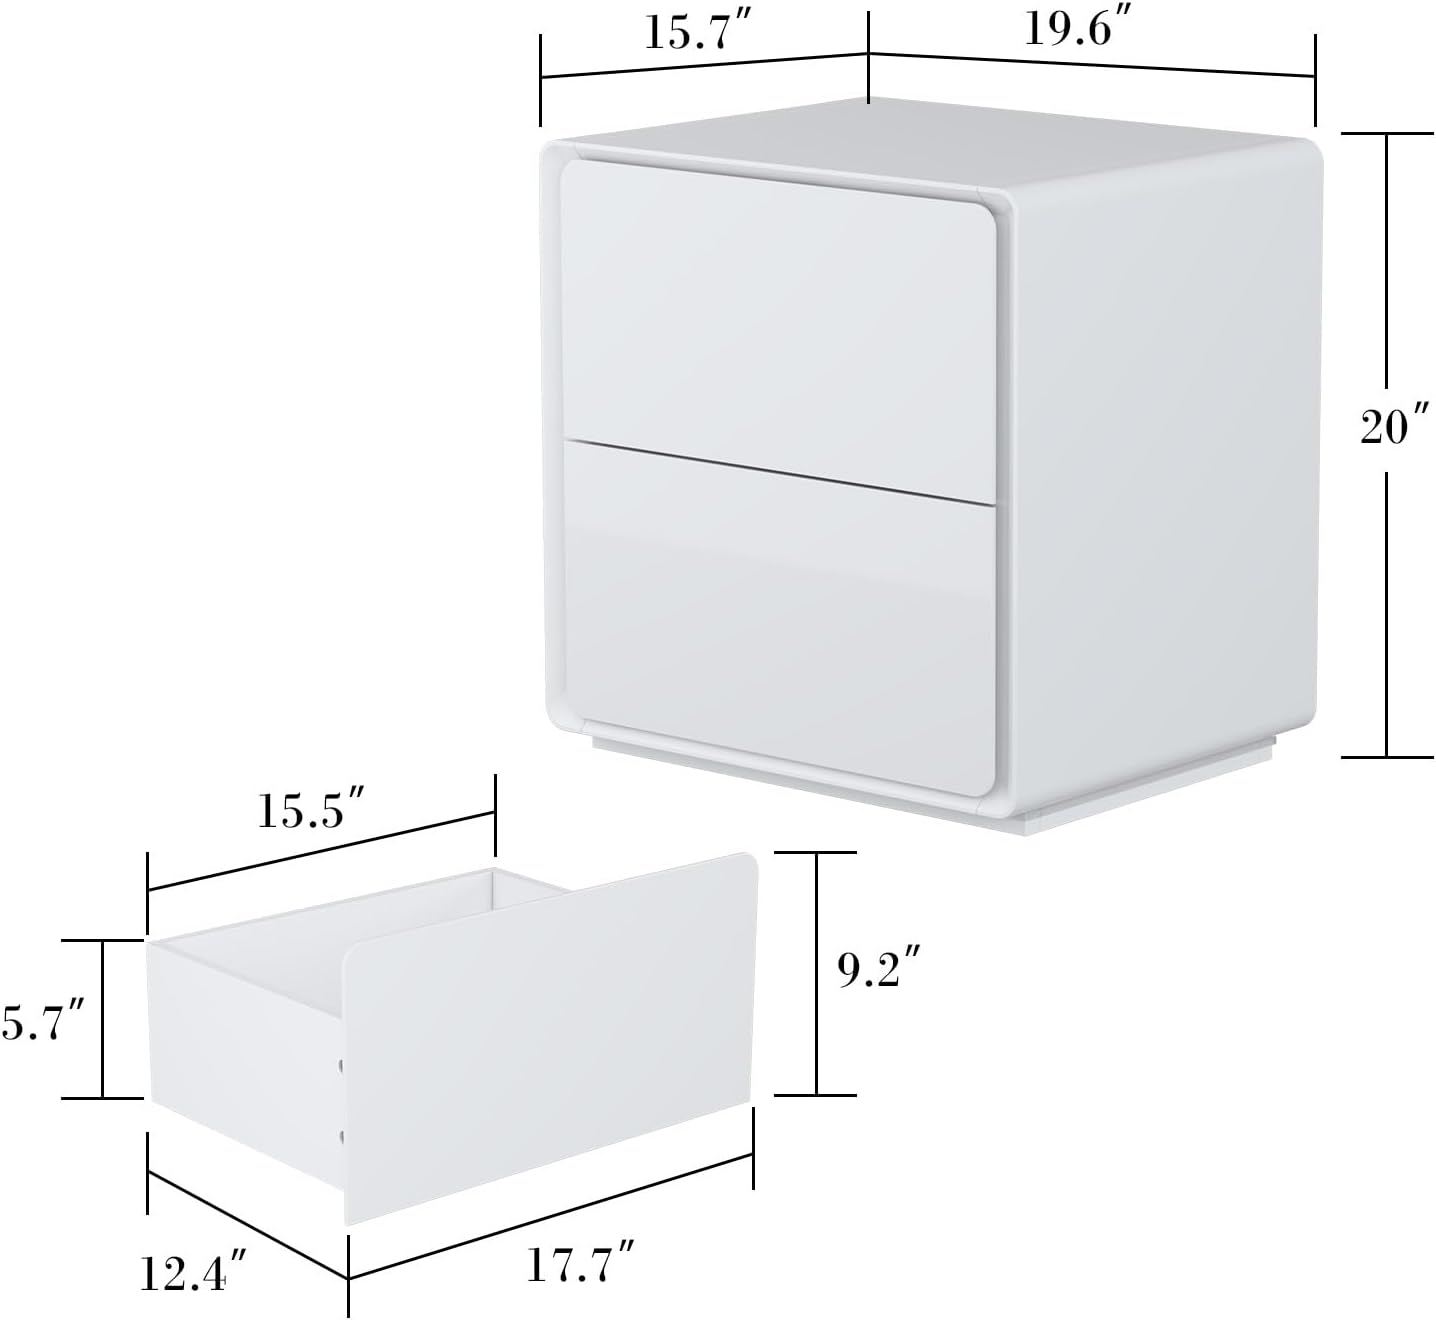
Image: Overall dimensions of the nightstand and individual drawer components.
2 veiksmas: surinkite pagrindinį rėmą
Connect the side panels to the top and bottom panels using the provided hardware. Refer to the diagrams in the Assembly Guide for correct orientation.
Step 3: Install Drawer Slide Rails
Attach the drawer slide rails to the inner sides of the nightstand frame and to the drawer boxes. Ensure they are level and aligned for smooth operation.

Image: Detail of the drawer slide mechanism.
4 žingsnis: Surinkite stalčius
Construct the two drawers according to the instructions, then attach the drawer fronts. The drawers are designed without external handles for a sleek look.

Image: The nightstand with both drawers open, demonstrating storage capacity.
5 veiksmas: įdiekite LED šviesos juostą
After completing the main assembly, carefully stick the LED light strip to the designated area on the base of the nightstand. Connect the USB port to a suitable power adapter (not included).

Image: Detail of the illuminated LED light strip at the base of the nightstand.
Naudojimo instrukcijos
LED lemputės naudojimas
The integrated LED light strip provides a warm yellow illumination. To activate, connect the USB cable from the light strip to any standard USB power adapter (e.g., phone charger, USB port on a computer). The light functions as a subtle night lamp.
Stalčių naudojimas
The two drawers operate on smooth slide rails. To open, gently pull the top edge of the drawer front. To close, push the drawer firmly until it is flush with the nightstand frame.

Image: The nightstand with drawers partially open and LED light on, showcasing jo funkcionalumą.
Priežiūra ir priežiūra
- Valymas: The coated surface is sleek and easy to clean. Use a soft, damp cloth to wipe down the surfaces. Avoid abrasive cleaners or harsh chemicals that may damage the finish.
- Dulkės: Reguliariai valykite dulkes sausa, minkšta šluoste.
- Išsiliejimai: Nedelsdami nuvalykite išsiliejusius skysčius, kad išvengtumėte dėmių ar pažeidimų ant inžinerinės medienos.
- Stalčių priežiūra: Periodically check the drawer slide rails for any debris and ensure they operate smoothly.
- LED šviesa: The LED light strip is designed for long-term use. If it malfunctions, contact customer support. Do not attempt to repair it yourself.
Trikčių šalinimas
| Problema | Galima priežastis | Sprendimas |
|---|---|---|
| Stalčiai neslysta sklandžiai. | Misaligned slide rails or debris in the tracks. | Check that the slide rails are correctly installed and aligned. Clean any debris from the tracks. |
| LED lemputė neįsijungia. | USB power not connected or faulty power adapter. | Ensure the USB cable is securely connected to a working power adapter. Try a different USB power source. |
| Naktinis staliukas nestabilus. | Atsilaisvinusios jungtys arba nelygios grindys. | Tighten all screws. Ensure the nightstand is placed on a flat, level surface. |
Garantija ir palaikymas
For warranty information or technical support, please contact Homsee customer service. Keep your purchase receipt and model number (B0CCP22CP9) handy when contacting support.
Homsee Customer Service: Refer to your purchase documentation or the Homsee official websvetainė, kurioje rasite kontaktinius duomenis.
Susiję dokumentai - B0CCP22CP9
 |
Homsee Dining Table Use and Care Guide Guidelines for returns, exchanges, and handling defective or damaged Homsee dining table products. |
 |
Homsee Product Use and Care Guide Comprehensive guide for Homsee product users, detailing return policies, handling defective or damaged items, and providing after-sales contact information. |
 |
Homsee Product Warranty Information Official warranty coverage, claim process, and conditions for Homsee products, including coverage details for panel, sheet, and electrical components. |
 |
HOMSEE HS390167US-YQ-001 Assembly Instructions Detailed assembly instructions for the HOMSEE HS390167US-YQ-001 furniture unit. Includes parts list, tool requirements, step-by-step assembly guidance, and safety warnings. |
 |
HOMSEE HS390169US-YQ-001 Assembly Instructions Comprehensive assembly instructions for the HOMSEE HS390169US-YQ-001 furniture. This guide provides detailed steps, parts lists, and important safety information for building your HOMSEE product. |
 |
HOMSEE HS020571US-ZX-001 Assembly Instructions Detailed assembly instructions for the HOMSEE HS020571US-ZX-001 furniture and storage system. Learn how to assemble your modular shelving unit safely and efficiently. |
Ask a question about this manual
Ask about setup, troubleshooting, compatibility, parts, safety, or missing instructions. Manuals+ will review the question and use this page’s manual context to help answer it.