
1. Įvadas
Thank you for choosing the Deko TV PRO2 DVB-T2 HEVC Digital Terrestrial Receiver. This device allows you to receive digital terrestrial television broadcasts (DVB-T2) with HEVC (H.265) encoding, providing high-quality video and audio. This manual will guide you through the setup, operation, and maintenance of your new receiver to ensure optimal performance and enjoyment.
2. Dėžutės turinys
Atidžiai patikrinkite pakuotės turinį. Jei trūksta kokių nors daiktų arba jie pažeisti, susisiekite su pardavėju.
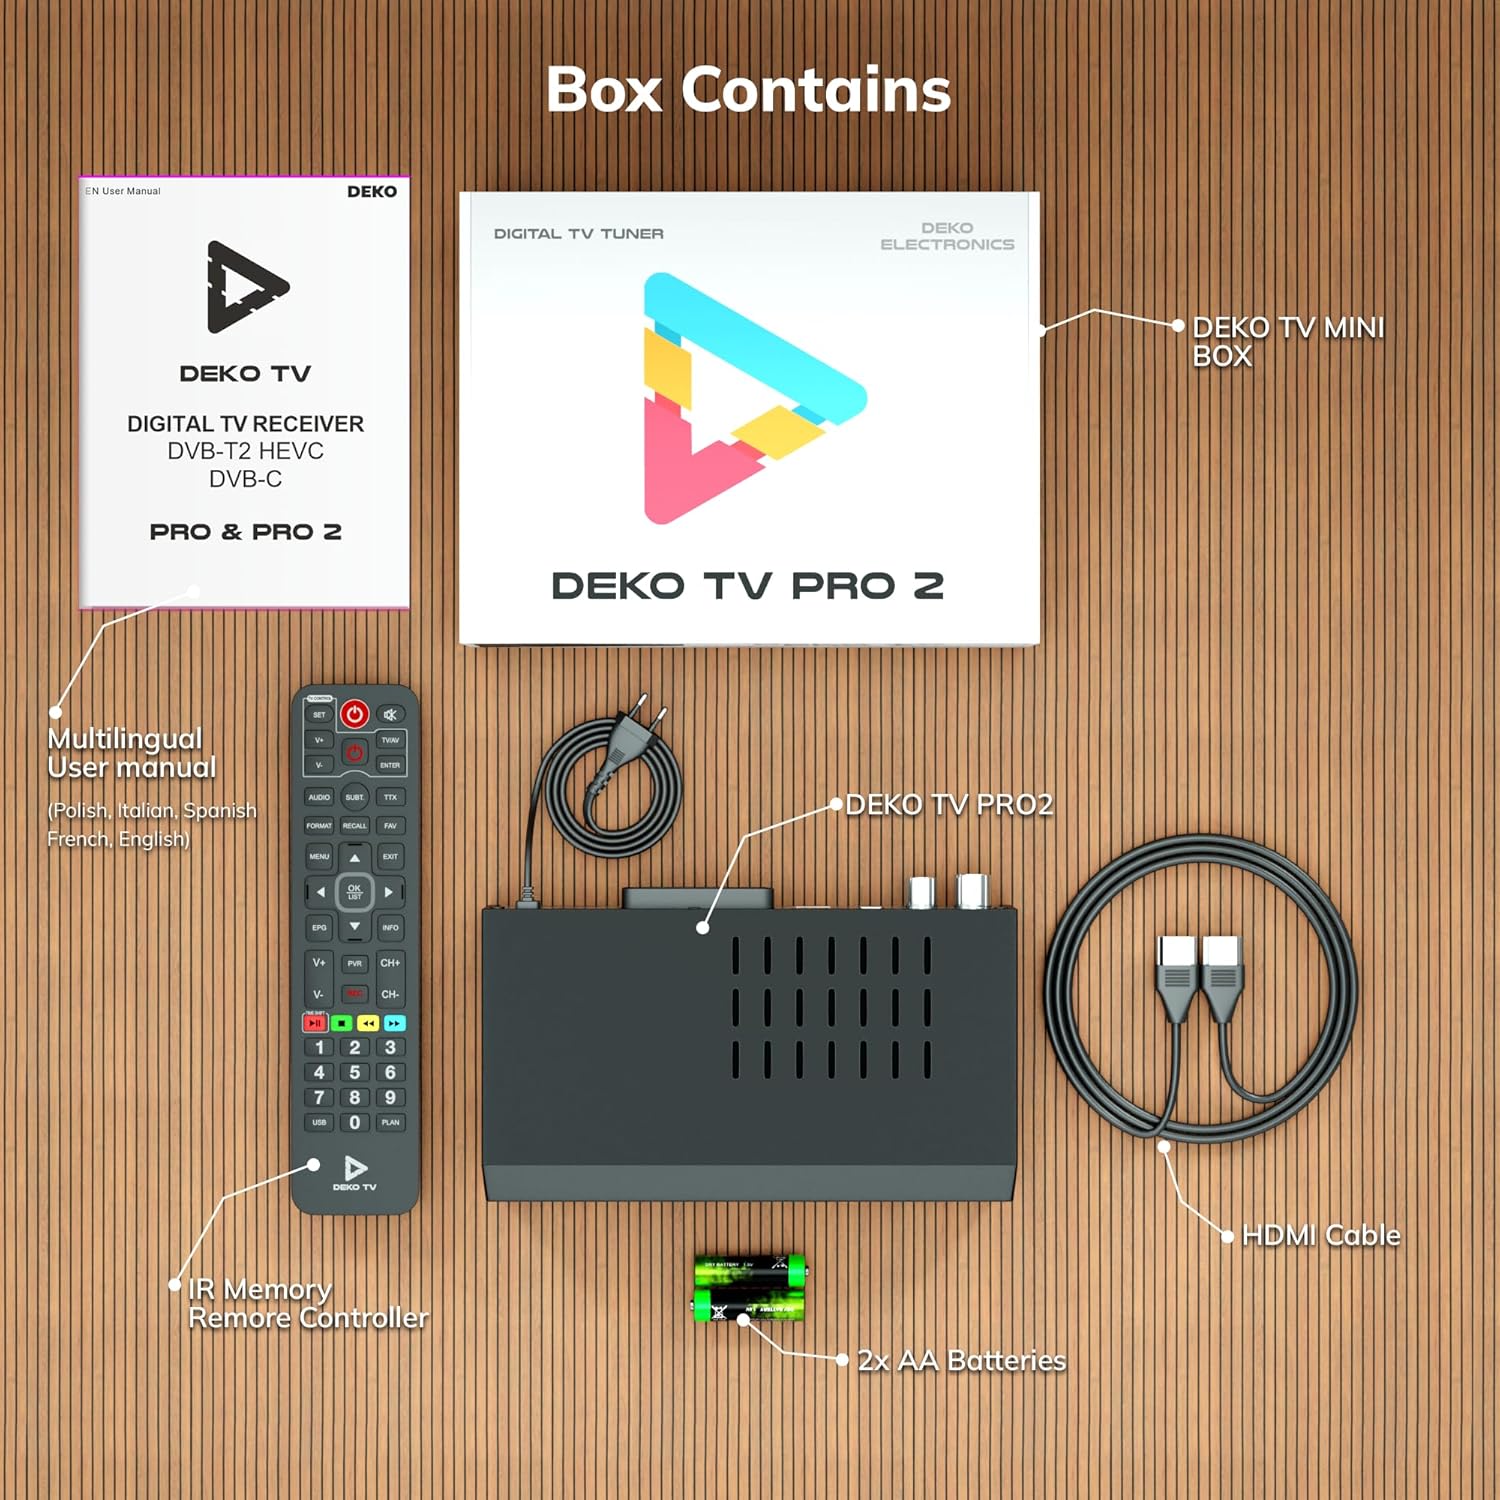
2.1 paveikslas: Deko TV PRO2 Box Contents. The image displays the Deko TV PRO2 receiver, a multilingual user manual, an IR remote control, two AA batteries, a power cable, and an HDMI cable.
- Deko TV PRO2 Digital Terrestrial Receiver
- IR nuotolinio valdymo pultas
- 2x AAA baterijos
- Maitinimo kabelis
- HDMI kabelis
- Daugiakalbis vartotojo vadovas
3. Produkto ypatybės
The Deko TV PRO2 offers a range of features designed to enhance your viewpatirtis:

3.1 paveikslas: Deko TV PRO2 Key Features. This image illustrates the main functionalities including DVB-T2 Terrestrial reception, Timeshift, HEVC H.265 Codec support, Personal Video Recorder (PVR), universal compatibility, and Crystal Clear Full HD output.
- DVB-T2 Terrestrial: Supports the latest digital terrestrial broadcasting standard.
- HEVC H.265 Codec: Ensures efficient video compression for high-quality picture.
- Visuotinis suderinamumas: Works with both modern and older television models.
- Laiko poslinkis: Pristabdykite tiesioginę TV transliaciją ir tęskite žiūrėjimą vėliau.
- Asmeninis vaizdo įrašymo įrenginys (PVR): Record your favorite programs to a connected USB storage device.
- Crystal Clear Full HD: Delivers high-definition video output.
- Dvigubos USB prievados: For media playback and PVR functionality.
4. Sąrankos vadovas
4.1. Fiziniai ryšiai
Before powering on the device, ensure all necessary connections are made.

4.1 paveikslas: Rear Panel Connections. This image details the rear panel of the Deko TV PRO2, indicating the RF IN, RF LOOP THROUGH, two USB ports, HDMI output, and SCART connector.
- Antenos jungtis: Prijunkite antžeminės antenos kabelį prie RF IN port on the back of the receiver. If you have another device (e.g., a TV with an integrated tuner) that also needs an antenna signal, you can connect it to the RF LOOP THROUGH uostas.
- Televizoriaus jungtis (HDMI): For high-definition video and audio, connect an HDMI cable from the HDMI prie imtuvo HDMI įvesties prievado prie televizoriaus.
- Televizoriaus jungtis (SCART): For older televisions, connect a SCART cable from the SCART imtuvo SCART prievadą prie televizoriaus SCART įvesties. (Note: Do not use both HDMI and SCART simultaneously for video output.)
- USB įrenginiai: Insert USB storage devices (for PVR or media playback) into the USB ports. The device has two USB ports.
- Maitinimo jungtis: Connect the power cable to the receiver and then plug it into a wall outlet.
4.2. Nuotolinio valdymo pulto baterijos įdėjimas
Atidarykite baterijų skyrių nuotolinio valdymo pulto gale ir įdėkite dvi AAA baterijas, užtikrindami teisingą poliškumą (+/-). Uždarykite skyrių.
4.3. Pradinis įjungimas ir kanalų paieška
- Įsitikinkite, kad visos jungtys yra saugios.
- Turn on your television and select the correct HDMI or SCART input source corresponding to where the Deko TV PRO2 is connected.
- Power on the Deko TV PRO2 using the power button on the front panel or the remote control.
- The first time you power on the receiver, an initial setup wizard will appear. Follow the on-screen instructions to select your language, country, and initiate an automatic channel scan. This process will find and store all available digital terrestrial channels.
- Once the scan is complete, you should be able to view kanalai.
5. Naudojimo instrukcijos
5.1. Pagrindinės televizoriaus funkcijos
- Kanalo pasirinkimas: Naudokite CH + / CH- buttons or the numeric keypad on the remote control to change channels.
- Garsumo valdymas: Naudokite VOL + / VOL- nuotolinio valdymo pulto mygtukai.
- Prieiga prie meniu: Paspauskite MENIU mygtuką, kad pasiektumėte pagrindinį meniu, kuriame yra nustatymų ir funkcijų.
- Elektroninis programų vadovas (EPG): Paspauskite EPG mygtuką prie view program information and schedules.
- Informacinis ekranas: Paspauskite INFORMACIJA mygtuką, kad būtų rodoma dabartinio kanalo ir programos informacija.
5.2. USB medijos atkūrimas
The Deko TV PRO2 supports media playback from USB storage devices.
- Insert a USB flash drive or external hard drive into one of the USB ports.
- Navigate to the "Media" or "USB" section in the main menu.
- Pasirinkite norimo leisti medijos tipą (pvz., vaizdo įrašą, muziką, nuotraukas).
- Naršykite savo files ir pasirinkite norimą leisti turinį.
5.3. PVR (Personal Video Recorder) and Timeshift
To use PVR and Timeshift functions, a USB storage device must be connected and formatted by the receiver.
- Įrašas: Žiūrėdami programą, paspauskite REC button on the remote control to start recording. Press STOP to end the recording. Recorded programs can be accessed via the "PVR" or "Recordings" menu.
- Laiko poslinkis: Paspauskite PASTABA button during live TV to activate Timeshift. The program will pause, and recording will begin in the background. You can then use ŽAISTI, GREITI PIRMYN, ir ATSUKTI buttons to control playback. Press STOP to exit Timeshift and return to live TV.
5.4. Internet and Multimedia Features (Optional Wi-Fi Adapter)
The Deko TV PRO2 supports internet connectivity via a compatible USB Wi-Fi adapter (sold separately). Once connected, you can access certain online multimedia features.

5.1 paveikslas: Internet Connectivity. This image shows the Deko TV PRO2 with an optional USB Wi-Fi adapter, indicating support for Wi-Fi, YouTube, and IPTV functionalities.
- Insert a compatible USB Wi-Fi adapter into one of the USB ports.
- Go to the "Network Settings" in the main menu to configure your Wi-Fi connection.
- Once connected, you may find options for applications like YouTube or IPTV within the receiver's menu, depending on the firmware version.
6. Priežiūra
- Valymas: Imtuvą valykite minkšta, sausa šluoste. Nenaudokite skystų ar aerozolinių valiklių.
- Vėdinimas: Ensure the receiver has adequate ventilation. Do not block the ventilation slots.
- Programinės įrangos atnaujinimai: Periodiškai tikrinkite gamintojo websvetainėje ieškokite galimų programinės įrangos atnaujinimų. Atnaujinimai gali pagerinti našumą ir pridėti naujų funkcijų. Atidžiai vykdykite kartu su atnaujinimu pateiktas instrukcijas.
7. Problemų sprendimas
| Problema | Galima priežastis | Sprendimas |
|---|---|---|
| Nėra vaizdo ar garso | Incorrect TV input selected; loose cables; receiver not powered on. | Select the correct HDMI/SCART input on your TV. Check all cable connections. Ensure the receiver is powered on. |
| Pranešimas „Nėra signalo“ | Antenna not connected; poor antenna signal; no channels scanned. | Check antenna connection. Adjust antenna position. Perform a channel scan (refer to Section 4.3). |
| Nuotolinio valdymo pultas neveikia | Batteries are dead or incorrectly inserted; obstruction between remote and receiver. | Replace batteries with new AAA batteries, ensuring correct polarity. Remove any obstructions. Point the remote directly at the receiver. |
| Cannot record to USB | USB device not connected or formatted; insufficient storage space. | Ensure USB device is properly connected. Format the USB device via the receiver's menu (this will erase all data). Check available storage space. |
8. Specifikacijos
| Funkcija | Detalė |
|---|---|
| Prekės ženklas | Deko |
| Modelio numeris | PRO2 |
| Ryšio technologija | USB |
| Jungtys | USB, Wi-Fi (via adapter), HDMI, SCART, RF IN, RF LOOP THROUGH |
| Suderinami įrenginiai | Televizija |
| Ypatingos savybės | Connected and multimedia functions, universal remote control |
| Iš viso USB prievadų | 2 |
| Iš viso HDMI prievadų | 1 |
| Garso kodavimas | DD |
| Garso išvesties režimas | Stereo, erdvinis garsas |
| Erdvinio garso kanalo konfigūracija | 2.1 |
| Nuotolinio valdymo pulto tipas | Nuotolinio valdymo pultas |
| Reikalingos baterijos | 2 AAA batteries (Zinc-carbon) |
9. Garantija ir palaikymas
The Deko TV PRO2 receiver comes with a standard manufacturer's warranty. Please refer to the warranty card included in your package or contact your retailer for specific warranty terms and conditions.
For technical support, troubleshooting assistance beyond this manual, or inquiries about spare parts and software updates, please visit the official Deko Electronics websvetainėje arba susisiekite su jų klientų aptarnavimo skyriumi. Kontaktinę informaciją paprastai galite rasti ant produkto pakuotės arba gamintojo websvetainę.