
1. Įvadas
This manual provides essential information for the safe and efficient operation, maintenance, and troubleshooting of your CREWORKS 1.5-30mm Electric Wire Stripping Machine. This automatic wire stripper is designed to remove plastic and rubber insulation from old electrical wires, facilitating copper recovery. It features a 180W motor, capable of stripping wires at speeds up to 30 meters per minute, with a low noise level of 25 dB. The machine is equipped with 5 distinct feed channels, accommodating wire widths from 1.5 mm to 30 mm, making it suitable for a wide range of common wire sizes. Its durable construction, featuring a reinforced aluminum alloy frame and steel blades, ensures long-term reliability. A built-in cooling fan prevents overheating during extended use. Please read this manual thoroughly before operating the machine.

Figure 1: CREWORKS 1.5-30mm Electric Wire Stripping Machine.
2. Saugos instrukcijos
Kad išvengtumėte sužalojimų ir įrenginio sugadinimo, visada laikykitės šių saugos nurodymų:
- Perskaitykite vadovą: Prieš naudodami supraskite visas instrukcijas ir įspėjimus.
- Asmeninės apsaugos priemonės (AAP): Always wear safety glasses, gloves, and appropriate work attire. Avoid loose clothing or jewelry that could get caught in moving parts.
- Darbo sritis: Įsitikinkite, kad jūsų darbo vieta yra švari, gerai apšviesta ir be kliūčių. Neleiskite vaikams ir pašaliniams asmenims būti šalia įrenginio veikimo metu.
- Elektros sauga: Connect the machine to a properly grounded power outlet. Do not operate in wet conditions or with wet hands. Inspect the power cord for damage before each use.
- Ašmenų sauga: The blades are extremely sharp. Exercise extreme caution when adjusting or cleaning them. Always disconnect power before performing maintenance.
- Avarinis sustojimas: Susipažinkite su avarinio stabdymo mygtuko vieta ir funkcija.
- Laido suderinamumas: Only strip wires within the specified diameter range (1.5 mm to 30 mm).
- Vėdinimas: Ensure adequate ventilation to prevent motor overheating. The integrated cooling fan assists in this.
- Saugi vieta: Anchor the machine to a stable workbench or surface before use to prevent movement during operation.
3. Pakuotės turinys
Patikrinkite, ar pakuotėje yra visi reikalingi daiktai:
- 1 x CREWORKS Electric Wire Stripping Machine
- 1 x Vartotojo vadovas
- 2 x Hex Wrenches (for adjustments)
- 1 x Ventilation Plug
- 2 x apsauginės pirštinės
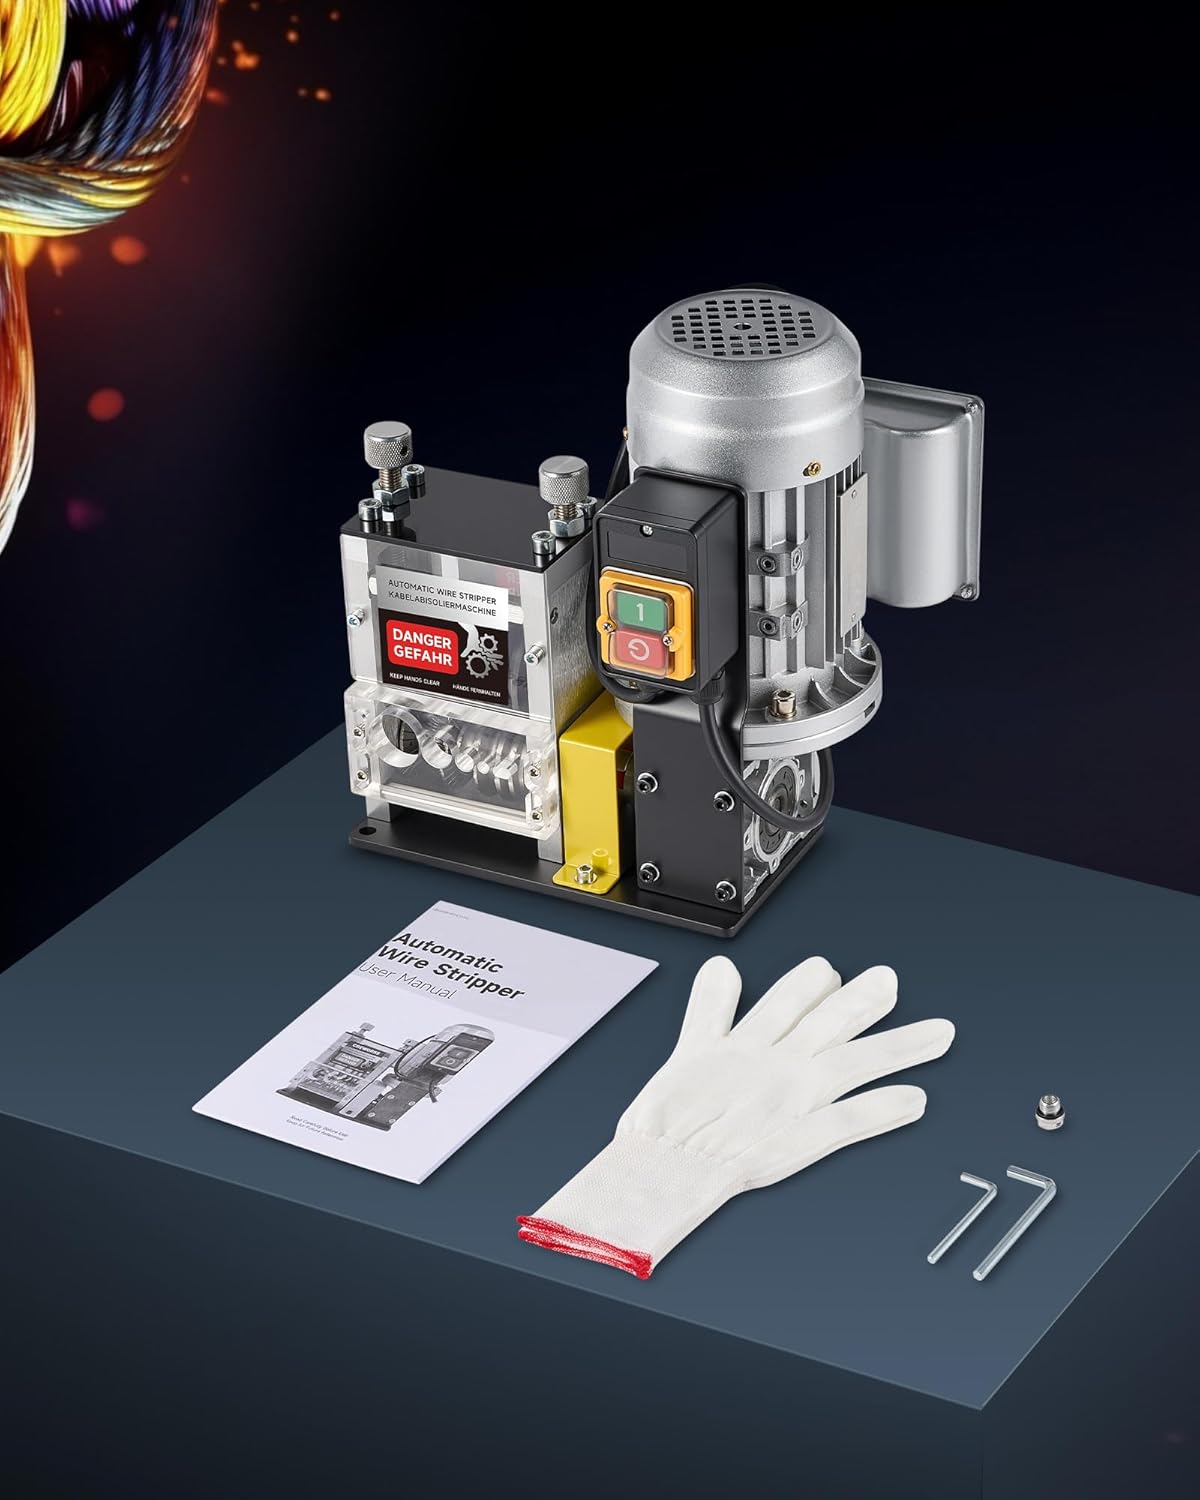
Figure 2: Package contents of the wire stripping machine.
4. Produktas baigtasview
Familiarize yourself with the components of the wire stripping machine:

Figure 3: Product Diagram with labeled parts.
- Variklis: Provides power for the stripping mechanism.
- Blade Adjustment Knobs: Used to precisely set the blade height for different wire diameters.
- Stebėjimo langas: Allows visual inspection of the stripping process.
- Blade Support: Holds the stripping blades in place.
- Ašmenys: The cutting component that removes wire insulation.
- Volelis: Guides the wire through the stripping mechanism.
- Feed Hole Plate: Features multiple channels for various wire sizes.
- Stop mygtukas (raudonas): Immediately halts machine operation.
- Pradžios mygtukas (žalias): Initiates machine operation.
- Maitinimo laidas: Connects the machine to the electrical supply.

Figure 4: Five distinct feed channels for various wire sizes.
5. Sąranka
- Išpakavimas: Atsargiai išimkite įrenginį ir visus priedus iš pakuotės. Išsaugokite pakuotę būsimam saugojimui ar transportavimui.
- Vieta: Place the wire stripping machine on a stable, level, and secure workbench. Use the mounting holes on the base to anchor the machine if prolonged or heavy-duty use is anticipated.
- Maitinimo jungtis: Ensure the machine's power switch is in the 'OFF' position. Connect the power cord to a suitable grounded electrical outlet (refer to specifications for voltage reikalavimus).
- Peilio aukščio reguliavimas: Before stripping, adjust the blade height using the adjustment knobs. Select the appropriate feed channel for your wire diameter. Turn the adjustment knob until the blade just touches the insulation of the wire without cutting into the copper conductor. Test with a small piece of wire first.

Figure 5: Close-up of the ultra-sharp blades and V-shaped rollers.
6. Naudojimo instrukcijos
Follow these steps for safe and effective wire stripping:
- Prepare Wire: Ensure the wire is straight and free of kinks or bends.
- Pasirinkite kanalą: Choose the feed channel that best matches the diameter of the wire you intend to strip.
- Adjust Blade: Fine-tune the blade height using the adjustment knob for the selected channel. The blade should score the insulation without damaging the conductor.
- Paleidimo mašina: Press the green 'Start' button to power on the machine.
- Maitinimo viela: Carefully insert the end of the insulated wire into the chosen feed hole. The rollers will automatically pull the wire through the machine.
- Collect Stripped Wire: The stripped insulation will separate from the copper conductor, which will exit from the rear of the machine. Collect the stripped copper.
- Avarinis sustojimas: In case of any malfunction or emergency, immediately press the red 'Stop' button.
- Išjungti: After use, press the red 'Stop' button and disconnect the machine from the power supply.

Figure 6: Easy-to-follow steps for operating the wire stripping machine.

Figure 7: The machine handles various wire types and sizes.
7. Priežiūra
Regular maintenance ensures optimal performance and extends the lifespan of your machine:
- Valymas: After each use, disconnect the power and clean the machine. Remove any accumulated insulation debris from the blades, rollers, and feed channels using a brush or compressed air.
- Ašmenų patikrinimas: Periodically inspect the blades for wear, dullness, or damage. Sharp blades are crucial for efficient stripping. Replace dull or damaged blades promptly.
- Tepimas: Apply a small amount of light machine oil to moving parts, such as the blade adjustment mechanism and rollers, as needed to ensure smooth operation.
- Aušinimo ventiliatorius: Ensure the cooling fan is free from dust and debris to maintain effective heat dissipation.
- Saugykla: Kai nenaudojate, laikykite mašiną sausoje, švarioje aplinkoje.

Figure 8: The powerful cooling fan helps prevent overheating.
8. Problemų sprendimas
Dažniausiai pasitaikančias problemas ir jų sprendimus rasite šiame skyriuje:
| Problema | Galima priežastis | Sprendimas |
|---|---|---|
| Mašina neužsiveda | No power supply; Emergency stop engaged; Faulty power cord/switch | Check power connection; Release emergency stop; Inspect power cord/switch, contact support if necessary |
| Wire not stripping cleanly | Incorrect blade height; Dull or damaged blades; Wrong feed channel selected | Adjust blade height; Replace blades; Select appropriate feed channel |
| Wire gets stuck or jams | Wire is bent/kinked; Debris in feed channel; Rollers are dirty | Straighten wire; Clean feed channels; Clean rollers |
| Per didelis triukšmas ar vibracija | Loose components; Lack of lubrication; Motor issue | Check for loose screws and tighten; Lubricate moving parts; Contact support for motor issues |
9. Specifikacijos
| Specifikacija | Detalė |
|---|---|
| Prekės ženklas | ĮRENGINIAI |
| Modelio numeris | WSM-NM30-DE |
| Gaminio matmenys (I x P x A) | 22 x 17 x 0.1 cm |
| Prekės svoris | 9.8 kilogramo |
| Medžiaga | Aliuminio lydinys, plienas, plastikas |
| Spalva | Juoda su sidabriniais akcentais |
| Cutting Width (Wire Diameter Range) | 1.5–30 mm |
| Variklio galia | 180W |
| Nuėmimo greitis | Up to 30 m/min |
| Triukšmo lygis | 25 dB |
| Number of Feed Channels | 5 |
| Atitinkančios specifikacijos | CE |
| Konkretus produkto naudojimas | DIY, construction sites, electrical maintenance |
| Kilmės šalis | Kinija |
10. Garantija ir palaikymas
For warranty information, please refer to the documentation included with your purchase or contact the retailer. For technical support, spare parts, or service inquiries, please contact CREWORKS customer service through their official website or the contact information provided in your purchase documentation. Please have your model number (WSM-NM30-DE) and purchase date available when contacting support.