
1. Įvadas
This manual provides comprehensive instructions for the installation, operation, and maintenance of your Juno 2-Inch Flat Trim Canless Wafer LED Downlight. This innovative lighting solution is designed for quick and easy installation in various ceiling spaces, eliminating the need for traditional recessed housings. It features an all-in-one design with switchable white color temperature and adjustable lumen output, offering versatile lighting for accent, task, or general illumination.

Figure 1: Juno 2-Inch Flat Trim Canless Wafer LED Downlight with its remote driver box.
2. Saugos informacija
Prieš montuodami atidžiai perskaitykite visas instrukcijas ir išsaugokite šį vadovą ateičiai. Nesilaikant šių instrukcijų, gali kilti elektros smūgis, gaisras ar kiti pavojai.
- Prieš pradėdami montavimą arba atlikdami bet kokią techninę priežiūrą, visada išjunkite maitinimą grandinės pertraukikliu.
- Visos elektros jungtys turi atitikti vietinius ir nacionalinius elektros kodekso (NEC) standartus. Jei nesate susipažinę su tinkamu elektros laidų prijungimu, pasitarkite su kvalifikuotu elektriku.
- Jokiu būdu nekeiskite ir nekeiskite gaminio.
- Užtikrinkite tiekimo tūrįtage yra suderinamas su šviestuvu (120 voltų).
- This product is suitable for wet locations and is IC Rated for direct contact with insulation.
- Do not install damaged products. Inspect the product upon receipt.
3. Pakuotės turinys
Prieš tęsdami montavimą, patikrinkite, ar visi komponentai yra ir nepažeisti:
- LED Lens (Integrated with Downlight Fixture)
- Mounting Hardware (Spring clips, remote driver box)
Note: The downlight fixture and remote driver box are typically pre-assembled or connected.
4. Savybės
The Juno 2-Inch Flat Trim Canless Wafer LED Downlight offers advanced features for optimal lighting performance and ease of use:
- Dizainas be skardinės: No housing required, allowing installation directly into ceiling drywall.
- Switchable White Color Temperature (SWW5): Easily select from five color temperature options:
- 2700K Soft White
- 3000K šiltai balta
- 3500K Neutrali balta
- 4000K šaltai balta
- 5000K dienos šviesa
- Adjustable Lumen Output (ALO25): Choose from three brightness levels (Low, Medium, High) to suit your needs.
- Pritemdomas: Compatible with most standard TRIAC dimmers, dimming down to 10 percent.
- Energiją taupantis: Long-life LEDs and a high-efficiency driver ensure superior illumination and extended service life.
- IC reitingas: Approved for direct contact with insulation, simplifying installation in insulated ceilings.
- Wet Location Certified: Suitable for use in bathrooms, showers, and outdoor covered areas.

Figure 2: Switches on the remote driver box allow selection of color temperature and lumen output.

Figure 3: Visual guide to the different color temperatures available.
5. Sąranka ir diegimas
The canless design simplifies installation. Follow these steps for a secure and proper setup:
- Išjungti maitinimą: Prieš pradėdami, įsitikinkite, kad montavimo zonoje maitinimas yra išjungtas grandinės pertraukikliu.
- Paruoškite atidarymą: Cut a 2-inch diameter hole in the ceiling drywall at the desired location. Ensure there are no obstructions (joists, pipes, wires) within the ceiling space.
- Prijunkite laidus:
- Open the remote driver box.
- Connect the building's supply wires (hot, neutral, ground) to the corresponding wires in the driver box using appropriate wire connectors.
- Įsitikinkite, kad visos jungtys yra saugios ir tinkamai izoliuotos.
- Close the driver box cover.
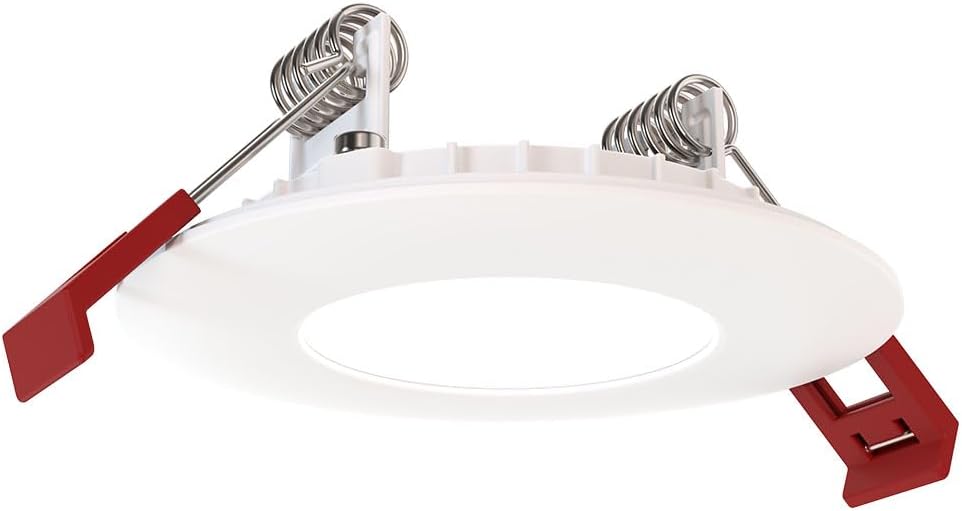
Figure 4: The remote driver box houses the electrical connections and adjustment switches.
- Select Settings (Pre-Installation): Before inserting the downlight into the ceiling, use the switches on the remote driver box to select your desired color temperature (2700K-5000K) and lumen output (Low, Medium, High). These settings can be adjusted later if needed, but it's easier before final installation.
- Insert Driver Box: Place the remote driver box into the ceiling opening. Its slim design allows it to fit into tight spaces.
- Įmontuokite įleidžiamąjį šviestuvą:
- Gently push the spring-loaded clips on the sides of the downlight upwards.
- Insert the downlight into the ceiling opening.
- Once the downlight is fully inserted, release the clips. The clips will spring back down and firmly secure the fixture against the ceiling.

Figure 5: Dimensions of the downlight and driver box for installation planning.
- Atkurti maitinimą: Turn the power back on at the circuit breaker. Test the downlight's functionality.
6. Naudojimo instrukcijos
Your Juno LED Downlight is designed for simple operation once installed.
- Maitinimo įjungimas/išjungimas: Valdykite šviesą naudodami standartinį sieninį jungiklį, prijungtą prie grandinės.
- Pritemdymas: If connected to a compatible TRIAC dimmer switch, adjust the brightness by manipulating the dimmer control. The light can be dimmed down to 10% of its maximum output.
- Adjusting Color Temperature and Lumen Output:
The color temperature and lumen output are set via switches located on the remote driver box (refer to Figure 2). To change these settings after installation, you will need to access the driver box, which may require temporarily removing the fixture from the ceiling or accessing the box through an attic/access panel if it was placed there. It is recommended to set these preferences during installation.
- Spalvos temperatūros jungiklis: Select from 2700K, 3000K, 3500K, 4000K, or 5000K.
- Lumen Output Switch: Choose Low, Medium, or High brightness.
7. Priežiūra
The Juno LED Downlight requires minimal maintenance due to its durable design and long-life LEDs.
- Valymas: Prieš valydami, įsitikinkite, kad įrenginys išjungtas. Nuvalykite įrenginį minkšta, sausa arba šiek tiek drėgna šluoste.amp šluoste. Nenaudokite abrazyvinių valiklių ar tirpiklių, nes jie gali pažeisti apdailą ar elektrinius komponentus.
- LED tarnavimo laikas: The integrated LEDs are designed for extended operation and do not require replacement under normal use.
8. Problemų sprendimas
Jei kyla problemų dėl įleidžiamojo šviestuvo, žr. šias dažniausiai pasitaikančias problemas ir sprendimus:
| Problema | Galima priežastis | Sprendimas |
|---|---|---|
| Šviesa neįsijungia. | Armatūrai nėra energijos. Atsipalaidavusi laidų jungtis. Sugedęs jungiklis arba grandinės pertraukiklis. | Patikrinkite grandinės pertraukiklį ir sieninį jungiklį. Turn off power, check all wire connections in the driver box. Test switch or breaker; replace if necessary. |
| Šviesa mirksi arba netinkamai pritemsta. | Nesuderinamas pritemdymo jungiklis. Atsilaisvinę laidai. Perkrauta grandinė. | Ensure dimmer is TRIAC compatible and designed for LED lighting. Išjunkite maitinimą, patikrinkite visus laidų sujungimus. Reduce load on the circuit or consult an electrician. |
| Neteisinga spalvų temperatūra arba ryškumas. | Switches on driver box set incorrectly. | Access the remote driver box and adjust the color temperature and lumen output switches to desired settings. |
Jei problema išlieka ir išbandžius šiuos sprendimus, susisiekite su klientų aptarnavimo tarnyba.
9. Specifikacijos
| Atributas | Detalė |
|---|---|
| Prekės ženklas | Juno |
| Modelio pavadinimas | WF2 RD ALO25 SWW5 90CRI 120 MW M6 (Round LED) |
| Dydis | 2-Inch Flat Trim |
| Spalva | Matinė Balta |
| Medžiaga | Aliuminis, polikarbonatas |
| Šviesos šaltinio tipas | LED |
| ttage | 120 voltų |
| Vattage | 9.2 vatų |
| Ypatingos savybės | Adjustable Color Temperature (2700K-5000K), Dimmable (Triac), Energy Efficient, Waterproof |
| Diegimo tipas | Flush Mount (Canless) |
| Naudojimas viduje / lauke | Indoor, Outdoor (Wet Location Certified) |
| Gaminio matmenys | 3.2"L x 3.2"W x 1.3"H (Fixture) |
| Prekės svoris | 13.2 uncijos |
| Sertifikatai | CSA certified, Title 24, Energy Star, IC Rated |
10. Garantija ir palaikymas
Garantija: This product comes with a Limited Warranty. Please refer to the product packaging or the manufacturer's official websvetainėje, kurioje pateikiamos konkrečios garantijos sąlygos.
Klientų aptarnavimas: For technical assistance, troubleshooting beyond this manual, or warranty claims, please contact Juno customer support. Contact information can typically be found on the product packaging or the official Juno websvetainę.
Internetiniai ištekliai: For additional information, product updates, or FAQs, visit the official Juno websvetainė: www.acuitybrands.com/brands/juno