
1. Įvadas
This manual provides detailed instructions for the assembly, installation, operation, and maintenance of your TOOQ DB1202TN-B Dual Monitor Desk Mount with Laptop Tray. Please read this manual thoroughly before installation and use to ensure proper setup and safe operation. Keep this manual for future reference.

Figure 1: TOOQ DB1202TN-B Dual Monitor Desk Mount with Laptop Tray in use.
2. Saugos informacija
- Perskaitykite visas instrukcijas: Ensure you understand all instructions and warnings before installation and use.
- Svorio talpa: Do not exceed the maximum weight capacity of 9 kg (19.8 lbs) per monitor arm and 9 kg (19.8 lbs) for the laptop tray. Exceeding this limit may result in serious injury or property damage.
- Monitoriaus dydis: This mount is designed for monitors between 17 and 32 inches.
- Laptop Size: The tray is suitable for laptops between 12 and 17 inches.
- VESA suderinamumas: Ensure your monitors are VESA compatible (75x75mm or 100x100mm).
- Stalo storis: Verify your desk thickness is within the specified range for clamp arba tarpiklio montavimas.
- Surinkimas: Assemble the product according to the instructions. Incorrect assembly can lead to product failure or injury.
- Vaikai: Smulkias dalis laikykite vaikams nepasiekiamoje vietoje.
- Priežiūra: Regularly check that the mount is secure and all fasteners are tight.
3. Pakuotės turinys
Please verify that all components are present and undamaged before proceeding with installation. If any parts are missing or damaged, contact customer support.
- 1x Main Pole
- 2x Monitor Arms
- 1x Laptop Tray
- 1x Desk Clamp Surinkimas
- 1x Grommet Mount Assembly
- 1x Hardware Kit (screws, washers, Allen keys)
- 1x naudojimo instrukcija

Figure 2: Included mounting hardware (M-A: M4x12, M-B: M5x12, M-C: D5 washers).
4. Specifikacijos
| Funkcija | Detalė |
|---|---|
| Modelis | DB1202TN-B |
| Monitoriaus dydžio suderinamumas | 17 colio – 32 colio |
| Monitoriaus svorio talpa | 9 kg (19.8 lbs) per arm |
| Laptop Size Compatibility | 12 colio – 17 colio |
| Laptop Tray Weight Capacity | 9 kg (19.8 svaro) |
| VESA suderinamumas | 75x75mm, 100x100mm |
| Pakreipimo kampas | +45° / -45° |
| Pasukimo kampas | +90° / -90° |
| Sukimosi kampas | +180° / -180° |
| Medžiaga | Legiruotasis plienas |
| Spalva | Juoda |
| Gaminio matmenys | 43.5 x 29.5 x 13.5 cm (approximate, as packaged) |
| Produkto svoris | 5.4 kg |

Figure 3: Detailed technical drawing with dimensions.
5. Sąranka ir diegimas
The TOOQ DB1202TN-B offers two installation options: desk clamp or grommet mount. Choose the method best suited for your desk.
5.1 stalas klamp Montavimas
- Pritvirtinkite stalą klamp base to the main pole using the provided screws.
- Padėkite klamp on the edge of your desk. Ensure the desk thickness is compatible with the clampdiapazonas.
- Priveržkite klipąamp screw until the mount is securely fastened to the desk. Do not overtighten.

4 pav.: Stalo skyriusamp įrengimas.
5.2 Žiedinio tvirtinimo montavimas
- Jei jūsų stalviršyje yra įvorės anga, nuimkite esamą įvorės dangtelį.
- Assemble the grommet base components as per the diagram in the manual (not provided here, but implied).
- Įkiškite pagrindinį stulpą per žiedo angą.
- Pritvirtinkite žiedinį pagrindą iš po stalo, naudodami pateiktą plokštelę ir veržlę. Tvirtai priveržkite.

Figure 5: Grommet mount installation.
5.3 Attaching Monitor Arms and Laptop Tray
- Slide the monitor arms onto the main pole at your desired height. Secure them with the locking collars.
- Slide the laptop tray arm onto the main pole and secure it.
- Attach the VESA plates to the back of your monitors using the appropriate M4x12 or M5x12 screws and D5 washers from the hardware kit. Ensure the screws are not overtightened and do not damage the monitor.
- Carefully slide the monitors (with VESA plates attached) onto the monitor arms. Ensure they click into place securely.
- Place your laptop onto the laptop tray. Adjust the width-adjustable claws to securely hold your laptop.

Figure 6: Attaching monitor arms and adjusting height.

Figure 7: Laptop holder with adjustable width claws (276-472mm).
6. Naudojimo instrukcijos ir reguliavimas
This monitor mount offers various adjustment options to achieve an ergonomic setup.
- Aukščio reguliavimas: Loosen the locking collar on the main pole to slide the monitor arms and laptop tray up or down. Retighten the collar once the desired height is reached.
- Pakreipimo reguliavimas: The monitor and laptop tray can be tilted +45° to -45°. Use the provided Allen key to adjust the tension if the screen does not hold its position.
- Sukimosi reguliavimas: Swivel your monitors up to 90° horizontally or vertically.
- Sukimosi reguliavimas: Rotate your monitors +180° to -180° for portrait or landscape orientation.
- Laptop Tray Tilt: The laptop tray also offers tilt adjustment for comfortable typing and viewkampų.
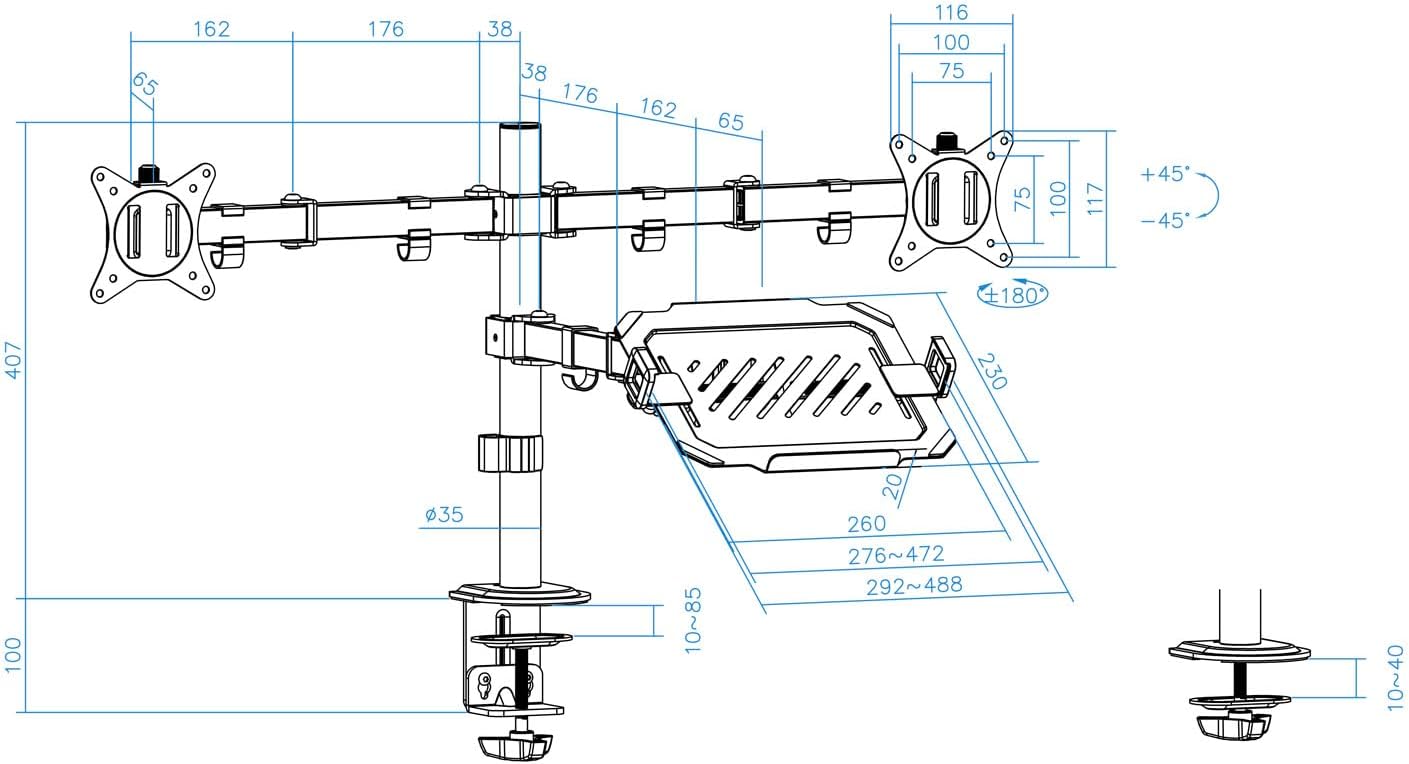
Figure 8: Laptop tray tilt adjustment.

Figure 9: Monitor swivel and rotation capabilities.
6.1 Kabelių valdymas
Utilize the integrated cable clips along the arms and main pole to route and organize your monitor and laptop cables. This helps maintain a clean and tidy workspace.

Figure 10: Cable management clips.
7. Priežiūra
- Valymas: Nuvalykite laikiklį minkšta,amp skudurėliu. Venkite abrazyvinių valiklių ar tirpiklių.
- Sandarumo patikrinimas: Periodically check all screws and fasteners to ensure they remain tight and secure. Retighten as necessary.
- Tepimas: No lubrication is required for normal operation.
8. Problemų sprendimas
- Monitorius nusmunka arba neišlaiko pozicijos:
- Ensure the monitor weight does not exceed the maximum capacity (9 kg per arm).
- Tighten the tilt adjustment screw on the VESA plate using the provided Allen key.
- Laikiklis nestabilus:
- Verify the desk clamp or grommet mount is securely tightened to the desk.
- Ensure the main pole and arm collars are tightened.
- Laptop tray sags:
- Ensure the laptop weight does not exceed the maximum capacity (9 kg).
- Tighten the tilt adjustment screw for the laptop tray.
- Trūksta dalių:
- Refer to the "Package Contents" section. If parts are missing, contact customer support.
9. Garantija ir palaikymas
For warranty information or technical support, please refer to the documentation included with your purchase or visit the official TOOQ websvetainėje. Išsaugokite pirkimo kvitą kaip pirkimo įrodymą.