1. Įvadas
Thank you for choosing the TechniSat DIGITRADIO 52 BT. This DAB+ FM alarm clock radio is designed to provide reliable timekeeping, radio reception, and Bluetooth audio streaming. This manual will guide you through the setup, operation, and maintenance of your device.
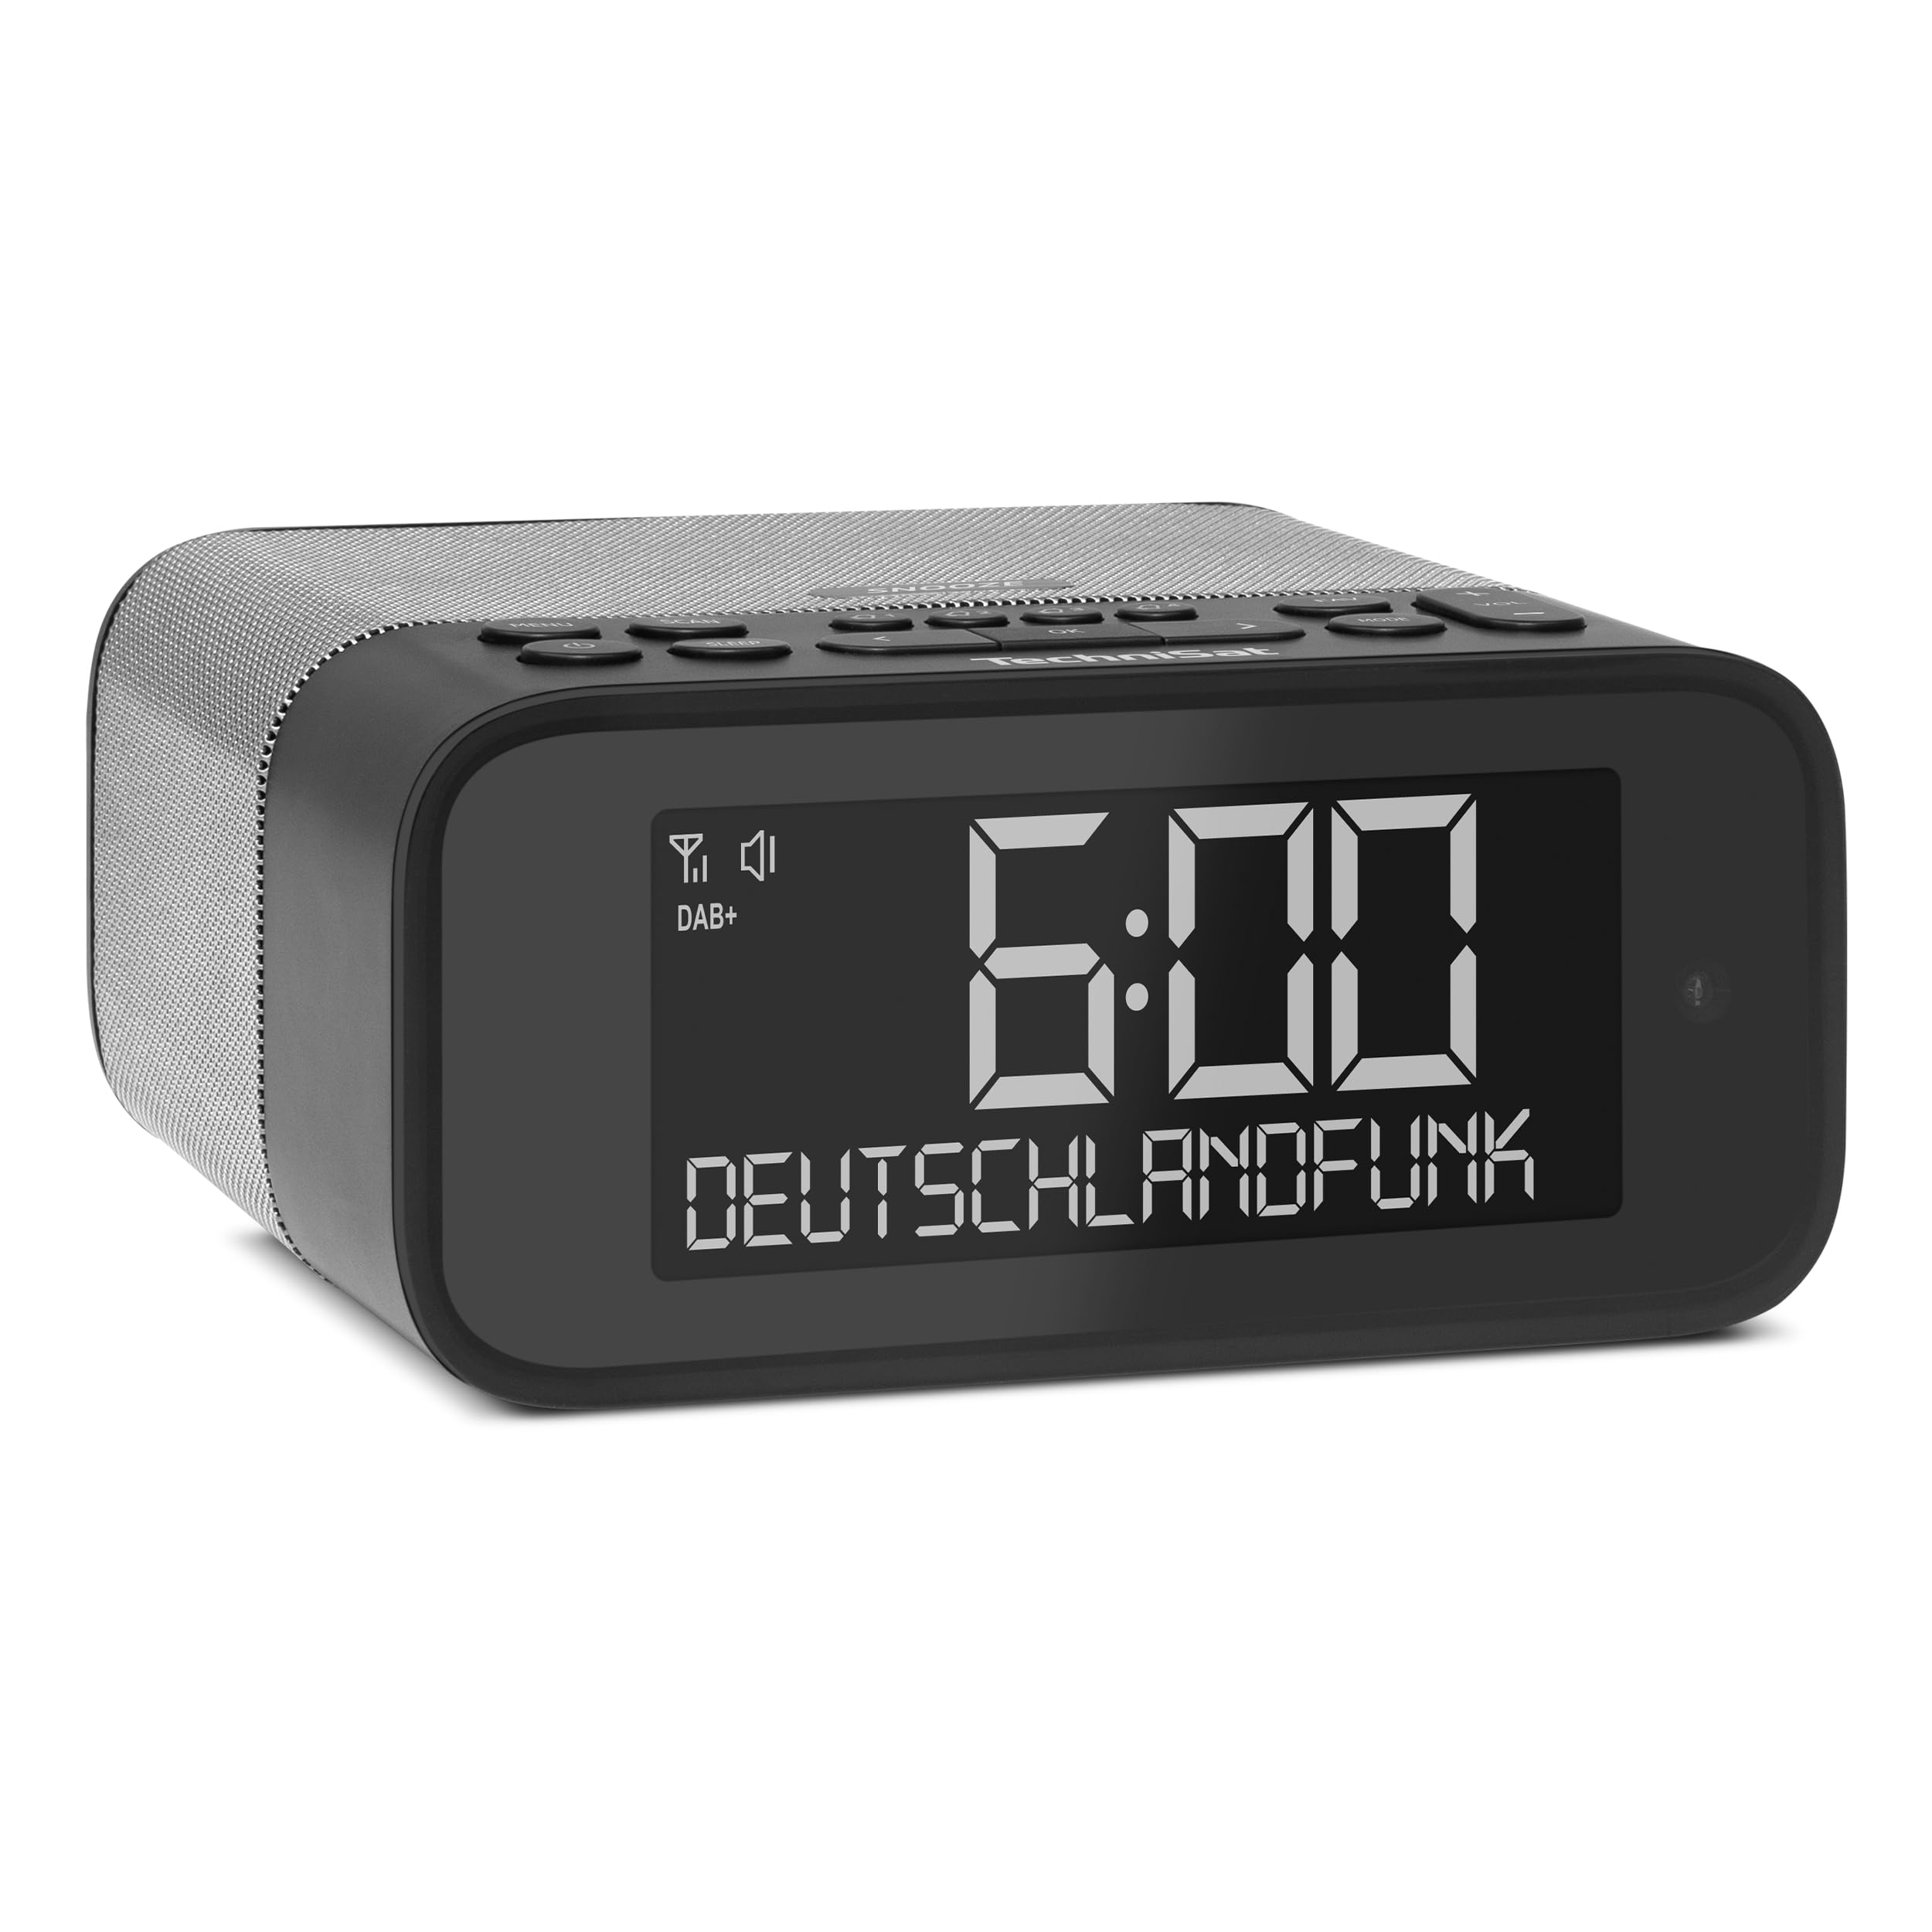
1 vaizdas: priekis view of the TechniSat DIGITRADIO 52 BT. The device is black with a large digital display showing "6:00" and "DEUTSCHLANDFUNK". Control buttons are visible on the top panel.
2. Saugos informacija
- Prieš naudodami atidžiai perskaitykite visas instrukcijas.
- Laikykite prietaisą atokiau nuo vandens, drėgmės ir tiesioginių šilumos šaltinių.
- Nebandykite ardyti ar modifikuoti įrenginio. Visus techninės priežiūros darbus patikėkite kvalifikuotiems darbuotojams.
- Naudokite tik pateiktą maitinimo adapterį.
- Užtikrinkite tinkamą vėdinimą aplink įrenginį.
- Prietaisą valykite minkštu, sausu skudurėliu. Nenaudokite skystų valiklių.
3. Pakuotės turinys
Patikrinkite pakuotę, ar joje yra šie daiktai:
- TechniSat DIGITRADIO 52 BT unit
- Maitinimo adapteris
- Vartotojo vadovas
4. Produktas baigtasview
4.1. Valdikliai ir ekranas
The DIGITRADIO 52 BT features an intuitive layout for easy access to all functions.

Image 2: Close-up of the large display with integrated light sensor. The display shows "6:00". The light sensor automatically adjusts screen brightness based on ambient light.
4.2. Galinio skydelio jungtys
The rear panel provides essential connectivity options.
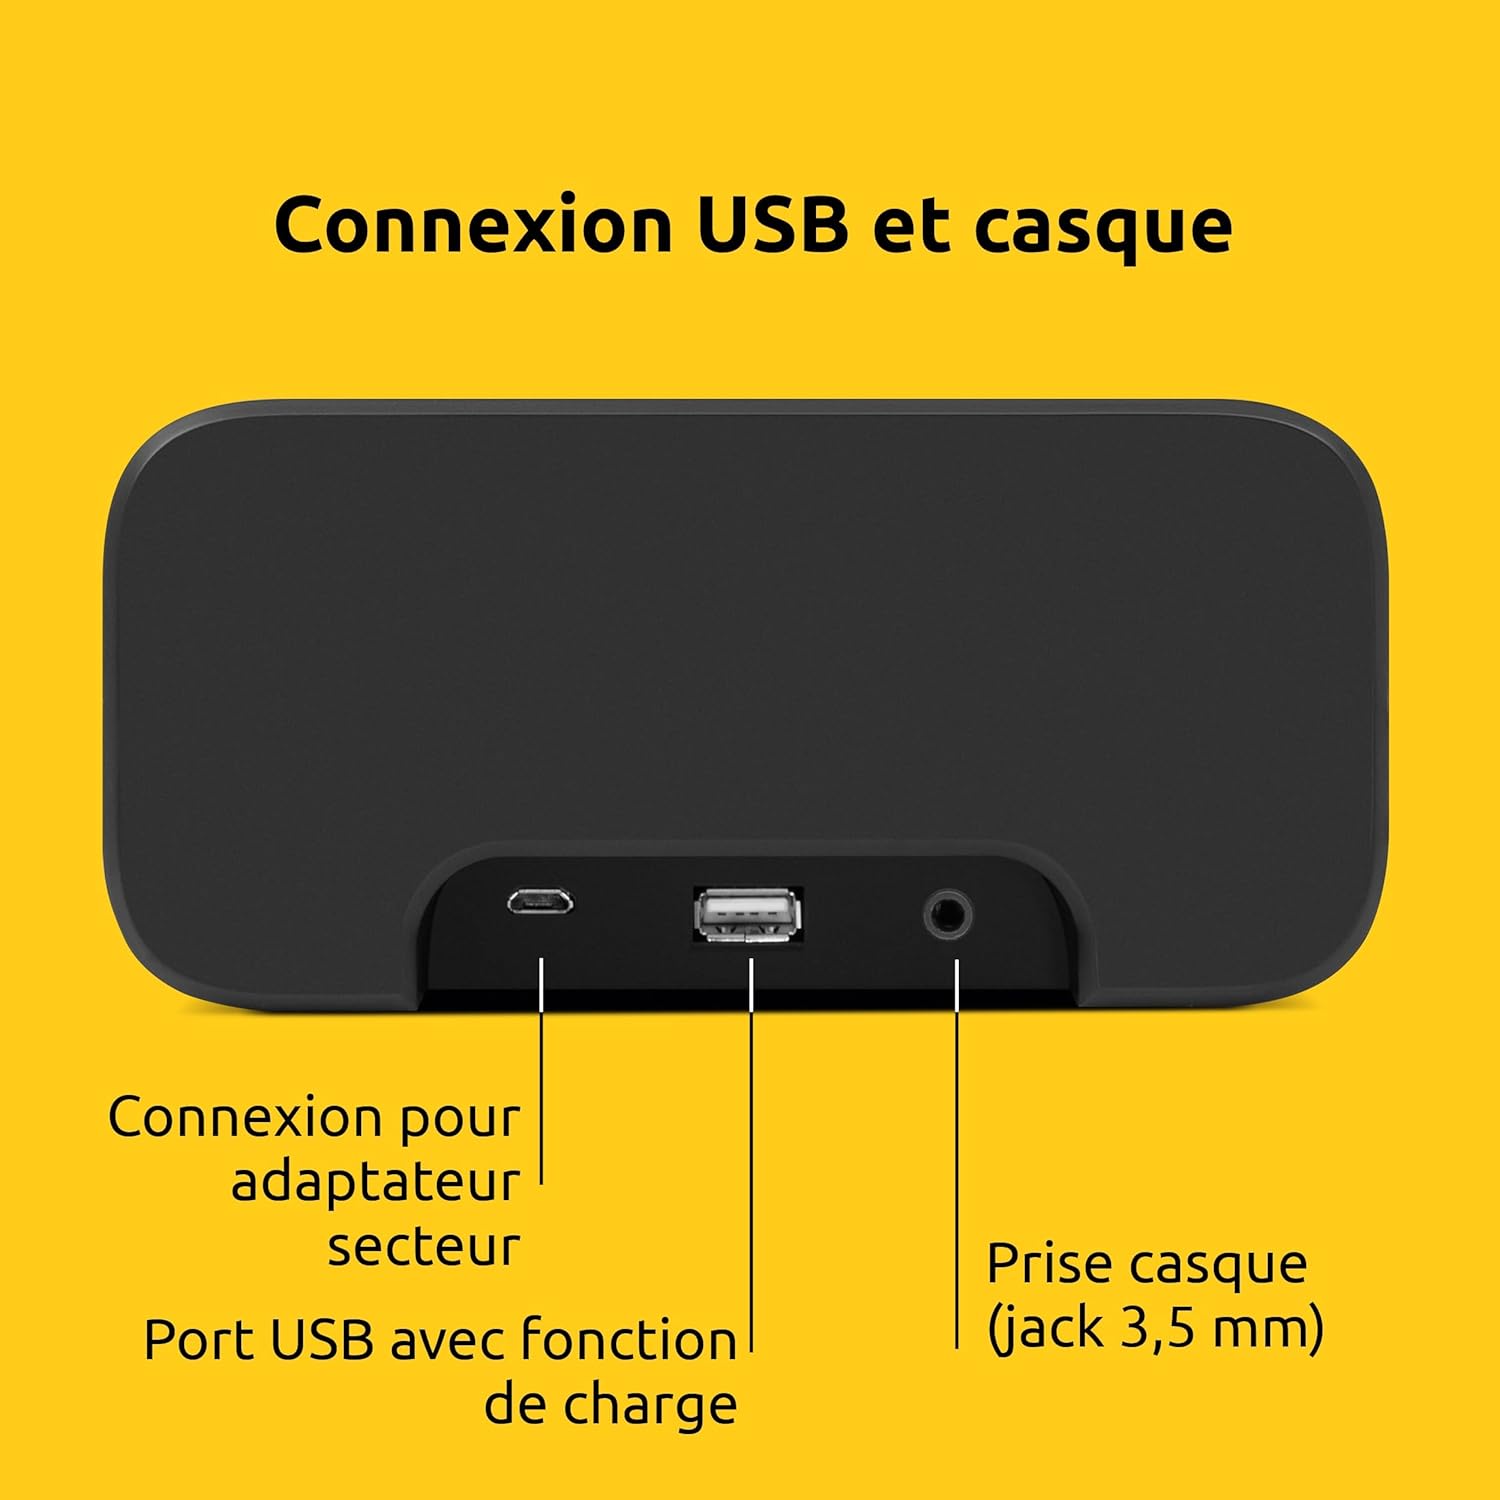
3 vaizdas: galinis view of the device showing the power adapter connection, a USB port with charging function, and a 3.5mm headphone jack.
- Maitinimo jungtis: Čia prijunkite pateiktą maitinimo adapterį.
- USB prievadas: Skirta išoriniams įrenginiams (pvz., išmaniesiems telefonams, planšetiniams kompiuteriams) įkrauti.
- Ausinių lizdas (3.5 mm): Privačiam pasiklausymui.
5. Sąranka
5.1. Maitinimo prijungimas
- Connect the power adapter to the DC input on the rear of the DIGITRADIO 52 BT.
- Plug the power adapter into a standard wall outlet (230 Volts).
- The device will power on and enter standby mode or begin initial setup.
5.2. Initial Scan (DAB+ and FM)
Upon first power-on, the radio will automatically scan for available DAB+ and FM stations. This process may take a few minutes.

Image 4: The radio display showing "DAB+" and "6:00 DEUTSCHLANDFUNK", indicating successful reception of a DAB+ station.
5.3. Laiko ir datos nustatymas
The time and date are usually synchronized automatically via DAB+ or FM signals. If manual adjustment is needed, refer to the "Operating" section for menu navigation.
6. Operacija
6.1. Power On/Off and Standby
- Paspauskite Galia mygtuką, norėdami įjungti arba išjungti įrenginį.
- In standby mode, the display shows the current time.
6.2. Radio Tuning (DAB+ / FM)
- Paspauskite Režimas button to select DAB+ or FM radio.
- Naudokite Suderinti/Pasirinkti knob or buttons to scan for stations.
- Norėdami išsaugoti mėgstamą stotį, paspauskite ir palaikykite Iš anksto nustatytas mygtuką, tada pasirinkite iš anksto nustatytos stoties numerį.
- To recall a favorite station, press the Iš anksto nustatytas button, then select the desired preset number. Up to 20 favorite stations can be stored for both DAB+ and FM.
6.3. „Bluetooth“ garso transliacija
- Paspauskite Režimas mygtuką, kad pasirinktumėte „Bluetooth“ režimą. Ekrane bus rodoma „Bluetooth Pairing“.
- On your Bluetooth-enabled device (e.g., smartphone, tablet), search for "DIGITRADIO 52 BT" in the Bluetooth settings.
- Select the device to pair. Once paired, you can stream audio from your device to the radio.
6.4. Garsumo valdymas
- Naudokite Apimtis buttons or knob to adjust the audio output level.
7. Signalizavimo funkcijos
The DIGITRADIO 52 BT supports up to four programmable alarms, a snooze function, and a sleep timer.

Image 5: Visual representation of the alarm features: 4 adjustable alarms, adjustable alarm rhythm, sleep timer, and a tactile snooze button.
7.1. Signalų nustatymas
- Paspauskite Signalizacija button to enter alarm setup.
- Select one of the four available alarms (Alarm 1-4).
- Set the desired alarm time, alarm source (radio or beep), and alarm volume.
- Choose the alarm rhythm: daily, weekdays (Mon-Fri), or weekends (Sat-Sun).
- Patvirtinkite nustatymus, kad įjungtumėte žadintuvą.
7.2. Snaudimo funkcija
- When an alarm sounds, gently touch the Snausti area on the top of the device to temporarily silence the alarm. The alarm will sound again after a set interval.
7.3. Miego laikmatis
- Paspauskite Miegoti button to activate the sleep timer.
- Select the desired duration (e.g., 15, 30, 60 minutes). The radio will play for the set duration and then automatically switch to standby.
8. Ekrano nustatymai
The large display's brightness can be adjusted manually or automatically.
- Automatinis ryškumas: The integrated light sensor automatically adjusts the display brightness based on ambient light conditions. This ensures comfortable viewing during the day and minimal disturbance at night.
- Manual Brightness: Access the display settings through the menu to manually set the desired brightness level.
9. USB įkrovimas
The USB port on the rear panel can be used to charge external devices.
- Connect your smartphone, tablet, or other USB-powered device to the USB port using a compatible charging cable.
- Įrenginys pradės krautis automatiškai.
10. Problemų sprendimas
| Problema | Galima priežastis | Sprendimas |
|---|---|---|
| Nėra galios | Neprijungtas maitinimo adapteris arba sugedęs lizdas. | Įsitikinkite, kad maitinimo adapteris yra tvirtai prijungtas, o lizdas veikia. |
| Prastas radijo priėmimas | Weak signal, antenna position. | Adjust the antenna position. Try moving the radio to a different location. Perform a new station scan. |
| „Bluetooth“ susiejimas nepavyko | Device not in pairing mode, out of range, or already paired. | Ensure the radio is in Bluetooth pairing mode. Move your device closer. Disconnect from other Bluetooth devices. |
| Signalizacija neskamba | Alarm not activated, volume too low. | Patikrinkite žadintuvo nustatymus, kad įsitikintumėte, jog jis įjungtas ir garsumas tinkamas. |
| Ekranas per blankus/ryškus | Automatic brightness setting, manual override needed. | Adjust manual brightness settings or ensure the light sensor is not obstructed. |
11. Specifikacijos
| Funkcija | Detalė |
|---|---|
| Prekės ženklas | TechniSat |
| Modelis | DR 52 (0000/2938) |
| Radijo imtuvas | DAB+, FM |
| Bluetooth | Taip („Bluetooth 5“) |
| Išėjimo galia | 3W RMS (mono) |
| Ekranas | 4.2-inch Dimmable LCD with Light Sensor |
| Signalizacijos | 4 programmable alarms (radio/beep) |
| Snaudimo funkcija | Yes (tactile button) |
| Miego laikmatis | Taip |
| Ryšys | USB (charging), 3.5mm Headphone Jack |
| Maitinimo šaltinis | Electric Cable (230V input) |
| Matmenys (I x A x G) | 15 cm x 7 cm x 14 cm |
| Svoris | 606 gramų |
| Medžiaga | Plastikiniai |

Image 6: The compact design of the radio with its dimensions indicated as 15 cm (length), 7 cm (height), and 14 cm (depth).
12. Garantija ir palaikymas
12.1. Gamintojo garantija
The TechniSat DIGITRADIO 52 BT comes with a 2 metų ribota garantija nuo įsigijimo datos. Ši garantija taikoma medžiagų ir gamybos defektams įprasto naudojimo sąlygomis. Išsaugokite pirkimo įrodymą, jei norėtumėte pateikti pretenzijas dėl garantijos.
12.2. Pagalba klientams
For technical assistance, troubleshooting, or warranty inquiries, please contact TechniSat customer support. Refer to the official TechniSat website for contact details and further information.
Note: Software updates are not guaranteed. Information on spare parts availability is not provided.