
1. Įvadas
The Zwide M2 Plus+C2 is a professional dual-channel wireless lavalier microphone system designed for high-quality audio recording. This system includes two transmitters (TX), one receiver (RX), and a portable charging case. It is ideal for various applications such as filmmaking, live streaming, vlogging, online classes, video conferences, and interviews, offering reliable performance up to 140 meters (460 feet) in open environments.
2. Kas yra dėžutėje
Atidarę pakuotę, patikrinkite, ar yra visi komponentai:
- Charging Case C2
- Transmitter (TX) x2
- Imtuvas (RX) x1
- Wired Microphone with Clip x2
- Priekinis stiklas x2
- Monitoriaus ausinės
- USB-A to USB-C Digital Audio Cable
- Camera Cable (3.5mm TRS)
- 3.5mm TRRS Cable (for smartphones)
3. Produktas baigtasview
The Zwide M2 Plus+C2 system consists of compact and lightweight units designed for portability and ease of use.
3.1. Sistemos komponentai
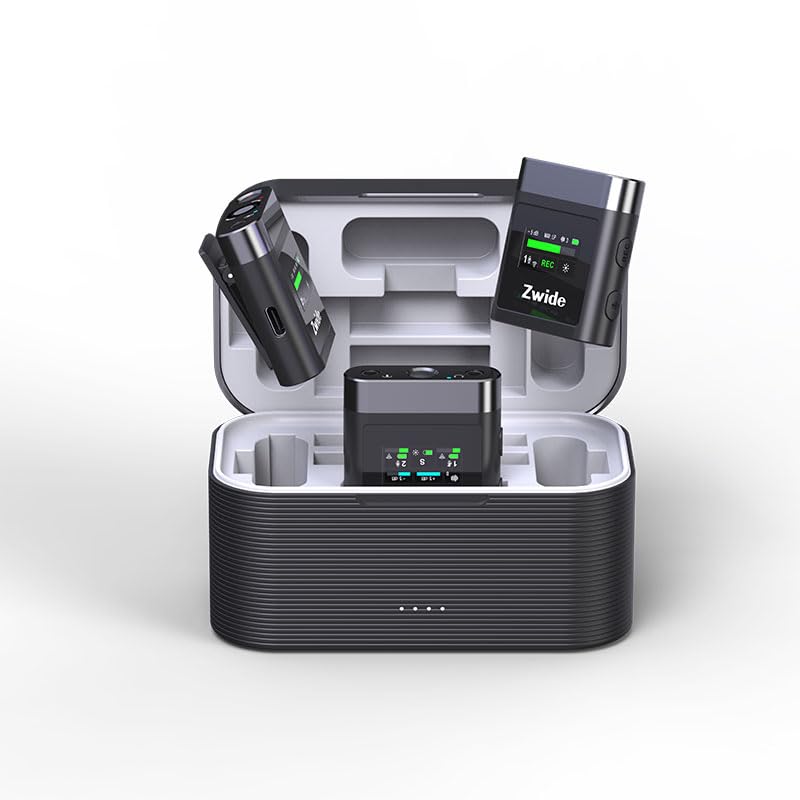
Image: The Zwide M2 Plus+C2 system, showing two transmitters, one receiver, and the charging case.
The system includes two transmitters (TX) for capturing audio from two separate sources, one receiver (RX) to connect to your recording device, and a charging case for convenient storage and power replenishment.
3.2. Siųstuvas (TX)
Each transmitter features a built-in microphone and a 0.96-inch LCD for real-time status display. It also includes a 3.5mm TRS input for an external lavalier microphone.
- Integruotas mikrofonas: For direct audio capture.
- 0.96 colio LCD ekranas: Displays noise cancellation level, gain (dB), mute status, signal strength, channel, screen mode, volume, recording data rate, and battery level.
- MIC įvestis: 3.5mm TRS for connecting external lavalier microphones.
- USB-C prievadas: Įkrovimui ir duomenų perdavimui.
- Maitinimo mygtukas: Long press to power on/off. Short press for other functions.
- Nutildymo mygtukas: To mute/unmute the microphone.
- Stiprinimo valdymo mygtukai: Adjust audio input level.
- Vidinė saugykla: 64GB for up to 270 hours of 256kb/s audio recording.
3.3. Imtuvas (RX)
The receiver connects to your camera, PC, or smartphone and receives audio from both transmitters. It also features a 0.96-inch LCD for monitoring.
- 0.96 colio LCD ekranas: Displays status of both TX units, signal strength, battery levels, and audio output settings.
- OUT prievadas: 3.5mm TRRS/TRS female unbalanced output for connecting to recording devices.
- Headphone Monitoring Port: 3.5mm for real-time audio monitoring.
- USB-C prievadas: For charging and connecting to digital devices.
- Maitinimo mygtukas: Ilgai paspauskite, kad įjungtumėte / išjungtumėte.
- Kanalo perjungimo mygtukas: To switch between mono, stereo, or mono with safety track modes.
- Garsumo valdymo mygtukai: Sureguliuokite išvesties garsumą.
3.4. Įkrovimo dėklas (C2)
The charging case provides portable power for the transmitters and receiver, extending their operational time.
- Baterijos talpa: 3500mAh, providing up to 19 hours of additional battery life for the system.
- Įkrovimo indikatoriai: Shows charging status for the case and individual units.
- USB-C įkrovimo prievadas: Dėl dėklo įkrovimo.
4. Sąrankos vadovas
4.1. Pradinis įkrovimas
- Place the transmitters (TX) and receiver (RX) into the charging case.
- Connect the charging case to a USB power adapter (not included) using the provided USB-A to USB-C cable.
- Ensure all units are fully charged before first use. The charging indicators on the units and case will show their status.
4.2. Įjungimas/išjungimas
- Norėdami įjungti: Long press the power button on each TX and RX unit. The LCD screens will illuminate.
- Norėdami išjungti: Long press the power button on each TX and RX unit. The LCD screens will turn off.
4.3. Pairing (Automatic)
The Zwide M2 Plus+C2 units are pre-paired at the factory. Simply power on both transmitters and the receiver, and they will automatically connect. The signal strength indicator on the LCD will confirm a successful connection.
4.4. Prijungimas prie įrašymo įrenginių
- For Cameras/DSLRs: Use the provided 3.5mm TRS camera cable. Connect one end to the RX's OUT port and the other end to your camera's microphone input.
- Išmaniesiems telefonams / planšetiniams kompiuteriams: Use the provided 3.5mm TRRS cable. Connect one end to the RX's OUT port and the other end to your smartphone's headphone/microphone jack. For devices without a 3.5mm jack, an appropriate adapter (e.g., USB-C to 3.5mm or Lightning to 3.5mm) may be required (not included).
- Kompiuteriams / nešiojamiesiems kompiuteriams: Use the provided USB-A to USB-C digital audio cable. Connect the USB-C end to the RX and the USB-A end to your computer. Select the Zwide M2 Plus+C2 as the audio input device in your computer's sound settings.
4.5. Attaching Microphones
- Įmontuotas mikrofonas: Clip the TX unit directly onto the speaker's clothing, ensuring the built-in microphone faces the sound source.
- External Lavalier Mic: Connect the wired lavalier microphone to the 3.5mm MIC input on the TX unit. Secure the lavalier mic to clothing, typically 6-8 inches from the mouth, and clip the TX unit to a belt or pocket. Attach the windscreen to the lavalier mic to reduce plosives and wind noise.
5. Naudojimo instrukcijos
5.1. Adjusting Audio Gain (TX)
Use the gain control buttons on the transmitter to adjust the input audio level. Monitor the audio levels on the TX's LCD or your recording device to prevent clipping (distortion) or excessively low volume.
5.2. Mute Function (TX)
Press the mute button on the transmitter to temporarily silence the microphone. The LCD will indicate when the microphone is muted.
5.3. Noise Cancellation (TX)
The transmitters feature 3 levels of Environmental Noise Cancellation (ENC). Short press the dedicated noise cancellation button on the TX to cycle through the levels (Off, Level 1, Level 2, Level 3). The LCD will display the active level. Choose the appropriate level based on your recording environment to reduce unwanted background noise.
5.4. Internal Recording (TX)
Each transmitter has 64GB of internal storage for standalone recording. To start/stop recording, short press the record button on the TX. The LCD will show the recording status and remaining time. To transfer recorded files, connect the TX to a computer using the USB-C cable; the device will appear as a removable drive.
5.5. Audio Output Modes (RX)
The receiver supports Mono, Stereo, and Mono with Safety Track output modes. Press the channel switch button on the RX to cycle through these modes:
- Mono: Combines audio from both transmitters into a single mono track.
- Stereo: Separates audio from TX1 to the left channel and TX2 to the right channel.
- Mono su saugos takeliu: Provides a primary mono track and a secondary mono track recorded at a lower volume (-6dB) as a backup against unexpected audio peaks.
5.6. Monitoring Audio (RX)
Connect the provided monitor earphone to the 3.5mm headphone monitoring port on the receiver to listen to the audio in real-time. Adjust the monitoring volume using the volume control buttons on the RX.
6. Priežiūra
- Valymas: Įrenginiams valyti naudokite minkštą, sausą šluostę. Venkite naudoti stiprias chemines medžiagas ar abrazyvines medžiagas.
- Saugykla: Kai nenaudojate, laikykite sistemą įkrovimo dėkle vėsioje, sausoje vietoje.
- Akumuliatoriaus priežiūra: For optimal battery life, fully charge the units and charging case regularly, especially if storing for extended periods. Avoid extreme temperatures.
- Firmware atnaujinimai: Patikrinkite gamintojo website periodically for firmware updates to ensure optimal performance and access to new features.
7. Problemų sprendimas
7.1. Nėra garso išvesties
- Ensure all units (TX and RX) are powered on and fully charged.
- Verify that the TX and RX are successfully paired (check signal indicator on LCD).
- Check cable connections between the RX and your recording device. Ensure the correct cable (TRS for camera, TRRS for smartphone) is used and fully inserted.
- Confirm the recording device's input settings are correctly configured to recognize the Zwide M2 Plus+C2.
- Adjust the gain on the TX and volume on the RX.
- Ensure the TX is not muted.
7.2. Poor Audio Quality/Interference
- Reduce the distance between the TX and RX.
- Avoid obstacles between the TX and RX that may block the signal.
- Ensure there are no strong 2.4GHz wireless devices operating nearby that could cause interference.
- Activate or adjust the Environmental Noise Cancellation (ENC) level on the TX.
- Check if the external lavalier microphone is securely connected and not damaged.
- Ensure the windscreen is properly attached to reduce wind noise and plosives.
7.3. Units Not Charging
- Verify the USB-C cable is properly connected to both the charging case and the power source.
- Ensure the power adapter is functional and providing sufficient power.
- Check that the TX and RX units are correctly seated in the charging case.
8. Specifikacijos
| Funkcija | Specifikacija |
|---|---|
| Modelio pavadinimas | M2 Plus+C2 |
| Mikrofono formos faktorius | Lavalier |
| Polinis raštas | Visakryptis |
| Ryšio technologija | 2.4 GHz belaidžio dažnio moduliacijos technologija |
| Veikimo diapazonas | Up to 140m (460 ft.) in open, unobstructed environments |
| Garso jautrumas | 42 decibelų |
| Signalo ir triukšmo santykis | 73 dB |
| Dažnio atsakas | 100 Hz |
| Varža | 2.2 kiloomo |
| Siųstuvo baterijos veikimo laikas | apytiksliai 4.5 valandas |
| Imtuvo baterijos veikimo laikas | apytiksliai 5.5 valandas |
| Bendras baterijos veikimo laikas (su įkrovimo dėklu) | Iki 24 valandų |
| Įkrovimo dėklo talpa | 3500 mAh |
| Internal Storage (TX) | 64GB (up to 270 hours at 256kb/s) |
| LCD ekranas | 0.96-inch with full lamination technology |
| Triukšmo panaikinimas | 3 Levels ENC |
| Išvesties režimai | Mono, Stereo, Mono with Safety Track |
| Suderinami įrenginiai | Camera/Camcorder/DSLR/SLR, PC/Laptop/Desktop, Smartphone/iPhone/iPad/Android Phone/Tablet |
| Prekės matmenys (I x P x A) | 4.72 x 2.76 x 2.64 colio |
| Prekės svoris | 12.5 uncijos (355 gramų) |
9. Garantija ir palaikymas
Zwide products are covered by a limited warranty. For detailed warranty information, technical support, or service inquiries, please refer to the warranty card included in your product packaging or visit the official Zwide websvetainėje. Prašome išsaugoti pirkimo įrodymą garantiniams reikalavimams.