
HITBOX HBT250P (Welder), HT-111 (Welding Helmet)
HITBOX HBT250P AC/DC TIG Welder and HT-111 Welding Helmet User Manual
Model: HBT250P (Welder), HT-111 (Welding Helmet)
1. Įvadas
This manual provides essential information for the safe and effective operation, setup, maintenance, and troubleshooting of your HITBOX HBT250P AC/DC TIG Welder and HT-111 Welding Helmet. Please read this manual thoroughly before using the equipment to ensure proper function and safety.

Figure 1.1: The HITBOX HBT250P AC/DC TIG Welder and HT-111 Welding Helmet. This image displays the complete welding setup, including the orange and black TIG welder unit, the TIG torch, ground clamp, and the black auto-darkening welding helmet.
2. Saugos informacija
ĮSPĖJIMAS: Suvirinimas gali būti pavojingas. Visada laikykitės saugos atsargumo priemonių, kad išvengtumėte sužalojimų ar mirties.
- Elektros šokas: Can kill. Do not touch live electrical parts. Wear dry gloves and protective clothing. Insulate yourself from work and ground.
- Dūmai ir dujos: Can be hazardous to your health. Keep your head out of the fumes. Use ventilation or exhaust to remove fumes from the breathing zone.
- Lanko spinduliai: Can burn eyes and skin. Wear a welding helmet with a proper shade filter to protect your eyes and face. Wear appropriate clothing to protect your skin.
- Gaisras ir sprogimas: Suvirinimo kibirkštys gali sukelti gaisrą arba sprogimą. Laikykite degias medžiagas atokiau nuo suvirinimo zonos. Turėkite gesintuvą šalia.
- Karštos dalys: Can cause severe burns. Allow hot parts to cool before handling.
- Triukšmas: Per didelis triukšmas gali pažeisti klausą. Dėvėkite ausų apsaugos priemones.
3. Produktas baigtasview
3.1. HITBOX HBT250P AC/DC TIG Welder
The HBT250P is an inverter-based arc welding power source designed for AC/DC TIG welding and Stick (MMA) welding. It features advanced waveforms, 2T/4T mode, and pulse controls, allowing for precise customization of welding parameters.

3.1 pav.: priekis view of the HITBOX HBT250P AC/DC TIG Welder. This image shows the welder's front panel with various connectors for the TIG torch, ground clamp, and gas input, along with the main control panel.
Valdymo skydo ypatybės:

3.2 pav. Išsamus view of the HBT250P Welder control panel. This image highlights the digital display, mode selection buttons (MMA, TIG, AC, DC, Pulse), and the mechanical gear knob for parameter adjustment, along with a diagram illustrating TIG welding waveform settings.
- Skaitmeninis ekranas: Rodo esamus suvirinimo parametrus.
- Mechanical Gear Knob: For precise adjustment of settings.
- Režimo pasirinkimo mygtukai:
- MMA (Stick Welding)
- TIG (Tungsten Inert Gas Welding)
- AC (Alternating Current for Aluminum)
- DC (Direct Current for Steel, Stainless Steel)
- Pulse (Pulsed TIG welding)
- 2T/4T režimas: Torch trigger control options.
- Parameter Adjustments: Up Slope, Peak Amps, bazė Amps, Down Slope, AC Frequency, AC Balance, Pulse Frequency, Pulse Duty Cycle.
3.2. HT-111 Welding Helmet
The HT-111 Welding Helmet is designed for comfort and protection during welding operations. It features auto-darkening technology, real color view, and is ultra-lightweight.

Figure 3.3: The HT-111 Welding Helmet highlighting its lightweight design and wide vision area. This image shows the helmet from a side profile, emphasizing its minimal weight (0.86 lbs) and the 150-degree rotation capability of the visor.
Helmet Features:

Figure 3.4: Lens specifications of the HT-111 Welding Helmet. This image details the internal components and controls of the helmet's auto-darkening lens, including the TEST button, Low Battery Light, Sensitivity Knob, Delay Time Knob, Lithium Battery, Solar Cell, and Arc Sensors.
- Auto-Darkening Lens: Automatically adjusts shade level upon arc strike.
- Real Color Technology: Provides higher clarity and a more natural view.
- Reguliuojamas jautrumas: Controls how quickly the lens reacts to light.
- Reguliuojamas delsos laikas: Controls how long the lens stays dark after welding stops.
- Shade Control Knob: DIN 4/9-13 for various welding processes.
- Maitinimo šaltinis: Solar cell with lithium battery backup.
- Optinė klasė: 1/1/1/2 for superior optical clarity.
4. Sąranka
4.1. Welder Setup (HBT250P)
- Vieta: Place the welder on a stable, level surface with adequate ventilation. Ensure clear space around the machine for airflow.
- Maitinimo jungtis: Connect the welder to a suitable power supply according to the specifications. Ensure the power outlet is properly grounded.
- Dujų jungtis: Connect your inert gas cylinder (e.g., Argon for TIG welding) to the gas inlet on the welder using a gas hose and regulator. Ensure all connections are tight to prevent leaks.
- TIG degiklio jungtis: Connect the TIG torch to the appropriate port on the front panel. Ensure the gas line and power cable are securely attached.
- Gruntas Clamp Ryšys: Prijunkite įžeminimą klamp cable to the ground terminal on the welder. Attach the ground clamp tvirtai pritvirtinkite prie ruošinio arba suvirinimo stalo, užtikrindami gerą elektros kontaktą.
- Elektrodo montavimas: Insert the appropriate tungsten electrode into the TIG torch collet and tighten.
4.2. Welding Helmet Setup (HT-111)
- Galvos apdangalo reguliavimas: Adjust the headgear straps to ensure a comfortable and secure fit. The helmet should sit firmly on your head without being too tight or loose.
- Lens Protection Film: Remove any protective films from the inside and outside of the auto-darkening lens.
- Funkcijų testas: Press the 'TEST' button on the lens cartridge to verify the auto-darkening function. The lens should momentarily darken and then return to its clear state. If it does not, check the battery or expose the solar cells to light.
5. Naudojimo instrukcijos
5.1. Welder Operation (HBT250P)
- Maitinimas: Turn on the main power switch on the welder. The digital display will illuminate.
- Pasirinkite suvirinimo režimą: Use the mode selection buttons to choose between MMA (Stick) or TIG welding.
- Select Current Type (TIG): For TIG welding, select AC for aluminum or DC for steel, stainless steel, and other metals.
- Koreguoti parametrus: Use the mechanical gear knob and corresponding buttons to set welding parameters such as:
- Amppakilimas: Set the desired welding current based on material thickness and type.
- Pulse (Optional): If using pulse, adjust Peak Amps, bazė Amps, Pulse Frequency, and Pulse Duty Cycle. Pulse helps control heat input and improve bead appearance.
- AC Frequency (AC TIG): Adjust for arc cone width and penetration. Higher frequency narrows the arc.
- AC Balance (AC TIG): Adjust for cleaning action on aluminum. Higher balance provides more cleaning.
- Up Slope/Down Slope: Valdykite ramp-aukštyn ir ramp-down of current at the start and end of the weld.
- 2T/4T režimas:
- 2T (dviejų prisilietimų): Press and hold the torch trigger to start the arc; release to stop.
- 4T (keturių prisilietimų): Press and release to start; press and release again to stop. Useful for long welds.
- Dujų srautas: Open the gas cylinder valve and adjust the regulator to the recommended gas flow rate for your welding application.
- Pradėkite suvirinimą: With all safety precautions in place and helmet on, initiate the arc according to your selected mode and torch trigger setting.

5.1 pav. Baigtaview of the HBT250P's 6-in-1 TIG Welder capabilities. This image illustrates the various welding modes supported, including AC Pulsed TIG, DC Pulsed TIG, AC HF TIG, DC HF TIG, MMA (Stick), and AC Square Waveform, demonstrating its versatility.
5.2. Welding Helmet Operation (HT-111)
- Atspalvio reguliavimas: Rotate the external shade control knob to select the appropriate shade level (DIN 4/9-13) for your welding process. Refer to welding safety standards for recommended shades.
- Jautrumo reguliavimas: Use the internal sensitivity dial to adjust how sensitive the lens is to the welding arc. Higher sensitivity means it will darken with less light.
- Uždelsimo laiko reguliavimas: Use the internal delay time dial to set how long the lens remains dark after the arc extinguishes. A longer delay is useful for high amperage welding or tack welding to prevent eye fatigue.
- Šlifavimo režimas: Some helmets have a 'Grind' mode (often a fixed shade 4). If available, switch to this mode for grinding operations to prevent the lens from darkening. Ensure you switch back to a welding shade before striking an arc.
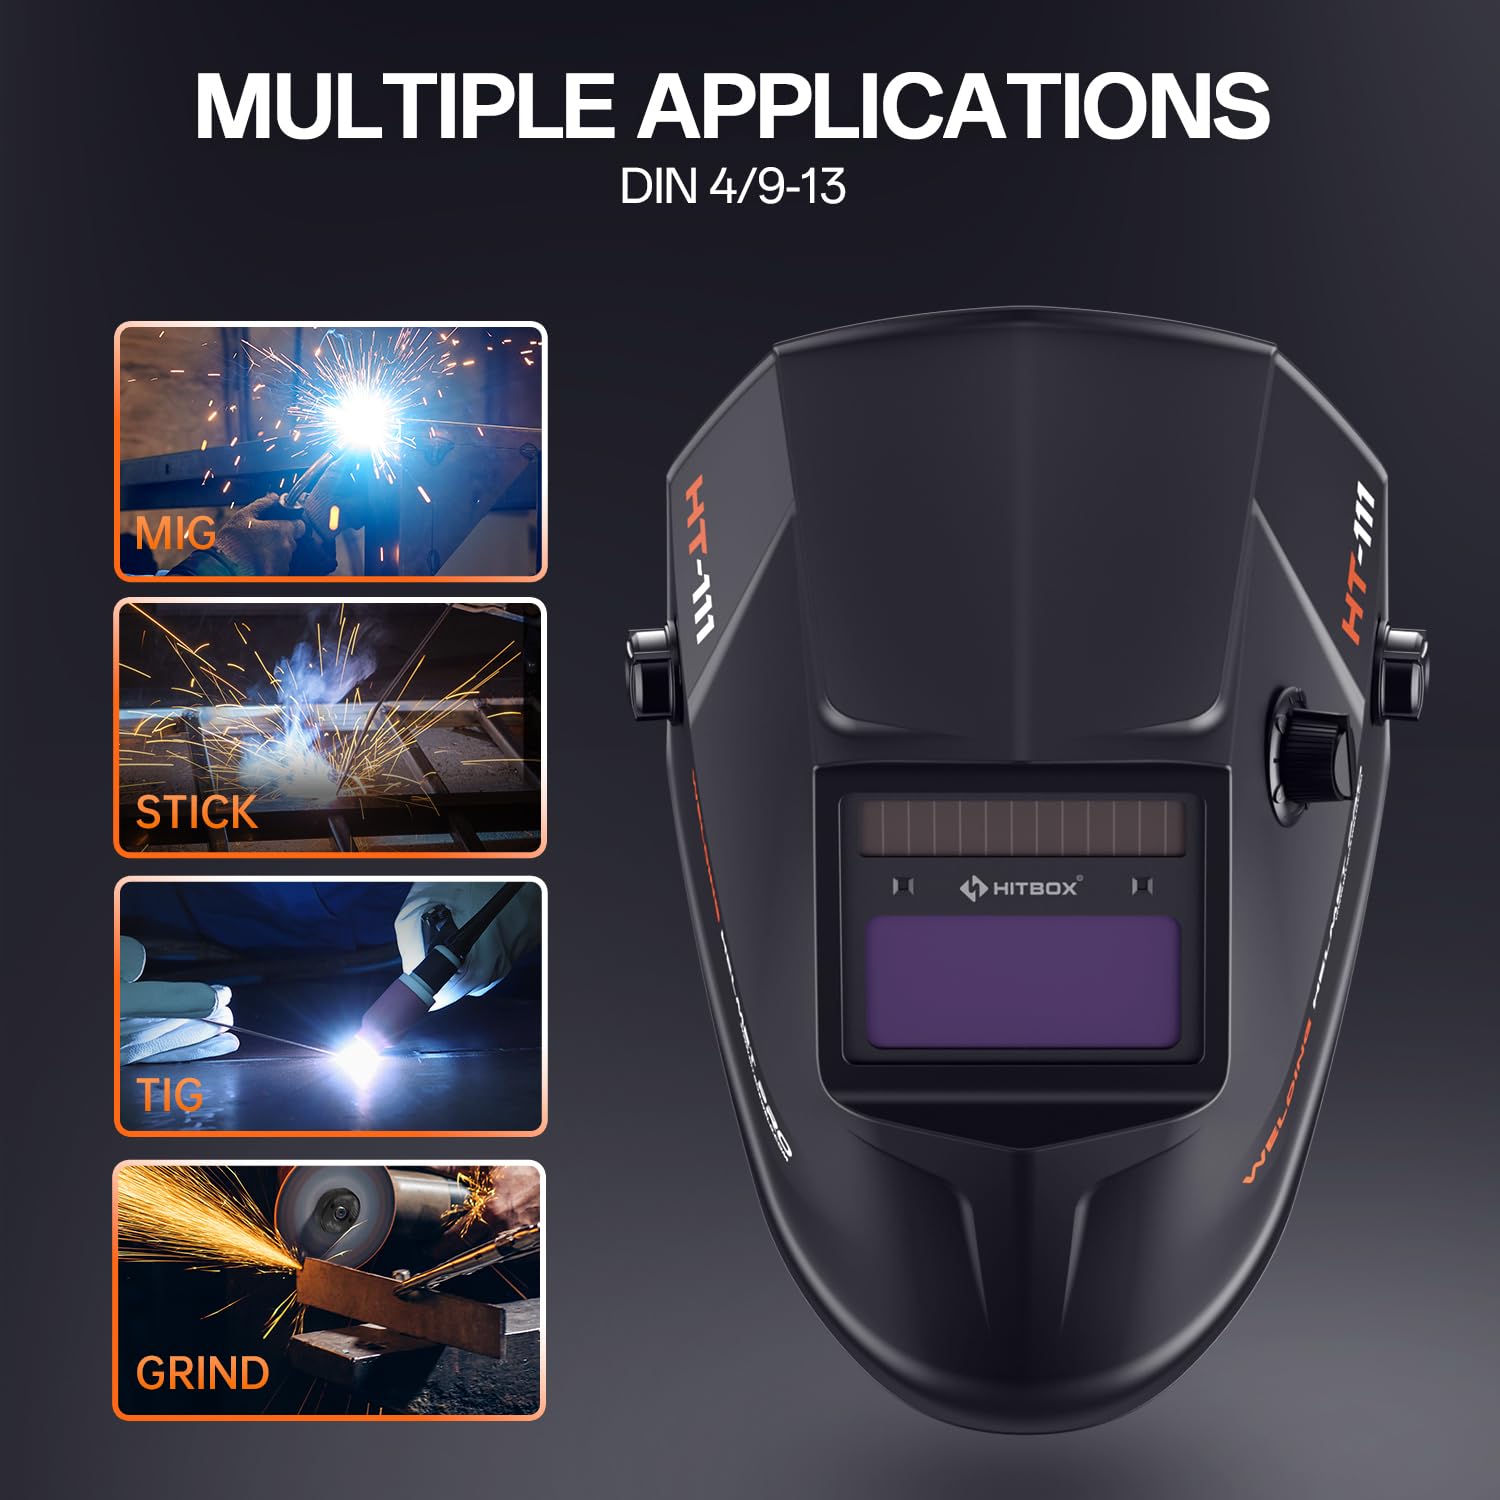
Figure 5.2: The HT-111 Welding Helmet's multiple application capabilities. This image shows the helmet alongside icons representing MIG, Stick, TIG welding, and Grinding, indicating its suitability for various tasks.
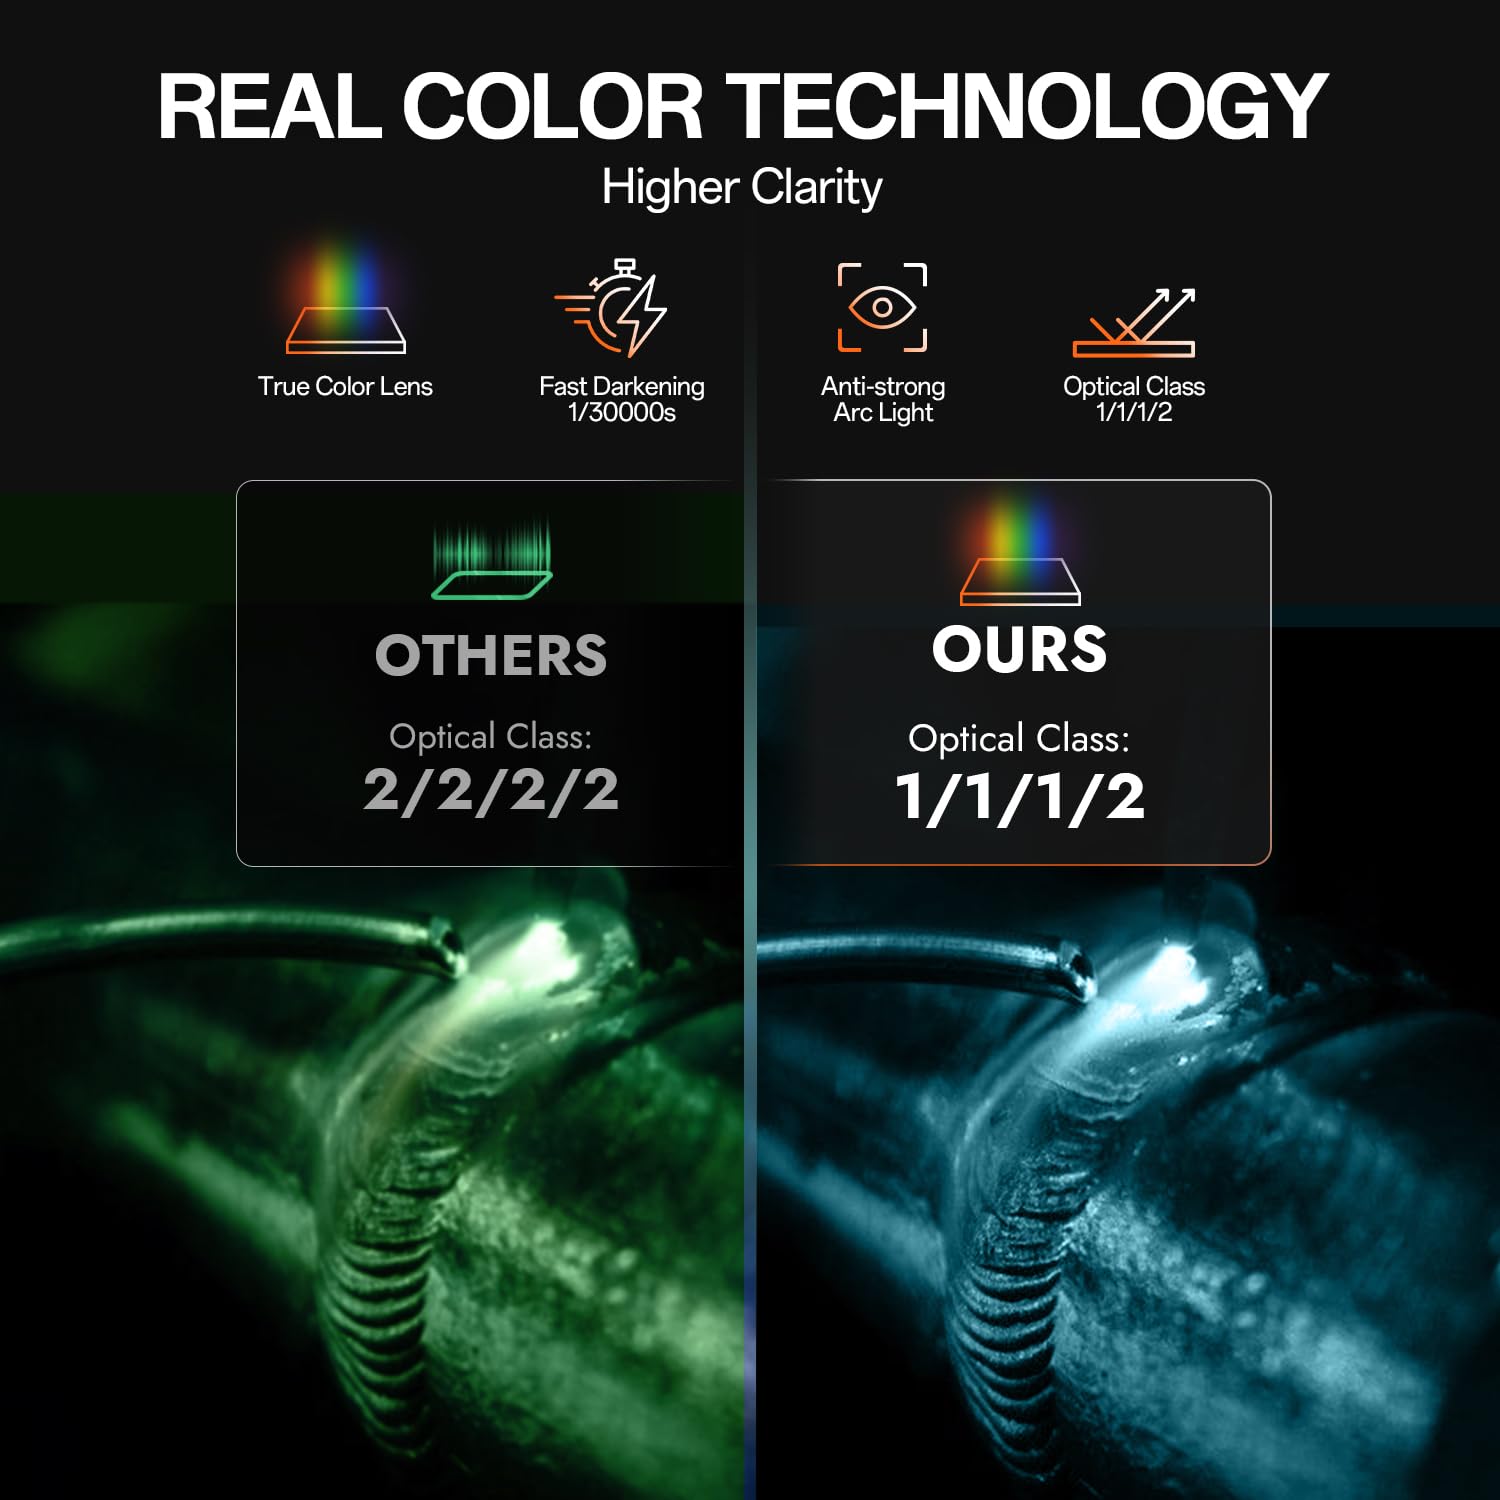
Figure 5.3: Comparison of Real Color Technology in the HT-111 Welding Helmet. This image visually contrasts the view through a standard welding lens (green tint) versus the HT-111's real color lens, demonstrating improved clarity and natural color perception.
6. Priežiūra
6.1. Welder Maintenance
- Valymas: Regularly clean the exterior of the welder with a dry, soft cloth. Keep the ventilation openings free from dust and debris. Use compressed air to blow out internal dust periodically, ensuring the machine is unplugged.
- Kabelio apžiūra: Inspect all welding cables, torch, and ground clamp for cuts, cracks, or loose connections before each use. Replace damaged cables immediately.
- Dujų jungtys: Check gas hoses and fittings for leaks regularly.
- Saugykla: Suvirinimo aparatą laikykite sausoje, švarioje aplinkoje, atokiau nuo dulkių, drėgmės ir ekstremalių temperatūrų.
6.2. Welding Helmet Maintenance
- Objektyvo valymas: Clean the auto-darkening lens and outer/inner protective plates with a soft, clean cloth and a mild soap solution. Do not use abrasive cleaners or solvents.
- Protective Plates: Replace scratched or damaged outer and inner protective plates immediately to maintain clear vision and protect the auto-darkening filter.
- Baterijos patikrinimas: Periodically check the battery status (if applicable) or ensure the solar cells are exposed to light to keep the internal battery charged.
- Galvos apdangalai: Inspect the headgear for wear and tear. Replace if damaged to ensure proper fit and protection.
- Saugykla: Store the helmet in a protective bag or case to prevent scratches and damage to the lens.
7. Problemų sprendimas
| Problema | Galima priežastis | Sprendimas |
|---|---|---|
| Suvirinimo aparatas neįsijungia. | No power supply; main switch off; circuit breaker tripped. | Check power cord connection; turn on main switch; reset circuit breaker. |
| Nėra suvirinimo lanko. | Loose connections; wrong mode selected; insufficient amperage; faulty torch/ground. | Check all cable connections; ensure correct mode (TIG/MMA); increase amperage; inspect/replace torch or ground clamp. |
| Poor weld quality (e.g., porosity, poor penetration). | Incorrect gas flow; contaminated tungsten/material; wrong parameters; improper technique. | Adjust gas flow; clean tungsten/material; optimize welding parameters (amperage, AC balance, frequency); refine welding technique. |
| Welding helmet lens does not darken. | Low battery; arc sensors blocked; sensitivity too low; lens damaged. | Ensure solar cells are exposed to light; check/replace battery (if applicable); clean arc sensors; increase sensitivity; replace lens if damaged. |
| Welding helmet lens flickers or stays dark. | Sensitivity too high; delay time too short; external light interference. | Decrease sensitivity; increase delay time; ensure no strong ambient light interferes with sensors. |
8. Specifikacijos
8.1. HITBOX HBT250P AC/DC TIG Welder
- Modelis: HBT250P
- Suvirinimo procesai: AC TIG, DC TIG, MMA (Stick)
- Įvesties tomastage: (Typically 110V/220V or 220V, refer to product label for exact range)
- Išėjimo srovės diapazonas: (Specific range, e.g., 10-250A, refer to product label)
- Darbo ciklas: (Specific percentage at max amps, refer to product label)
- Aušinimas: Ventiliatorius aušinamas
- Savybės: Pulse Control, 2T/4T Mode, AC Frequency Control, AC Balance Control
8.2. HT-111 Welding Helmet
- Modelis: HT-111
- Optinė klasė: 1/1/1/2
- Viewsritis: Approximately 3.66" x 1.69" (9.3cm x 4.3cm)
- Šviesos būsena: DIN 4
- Tamsi būsena: DIN 9-13 (Adjustable)
- Perjungimo laikas: 1/30000s (from light to dark)
- Vėlavimo laikas: Reguliuojamas
- Jautrumas: Reguliuojamas
- Maitinimas: Solar Cell + Lithium Battery
- Svoris: Maždaug 0.86 svaro
9. Garantija ir palaikymas
HITBOX provides reliable welding products and is committed to customer satisfaction. If you encounter any quality problems with your product, please contact HITBOX customer service. They promise to arrange an immediate replacement or a 100% refund for quality-related issues.
For support, please refer to the contact information provided with your purchase or visit the official HITBOX websvetainę.
Ask a question about this manual
Ask about setup, troubleshooting, compatibility, parts, safety, or missing instructions. Manuals+ will review the question and use this page’s manual context to help answer it.