
1. Įvadas
This manual provides detailed instructions for the installation, operation, and maintenance of your Haloview Byte Tango BT6 Touch RV Backup Camera System. Please read this manual thoroughly before using the product to ensure proper function and safety.
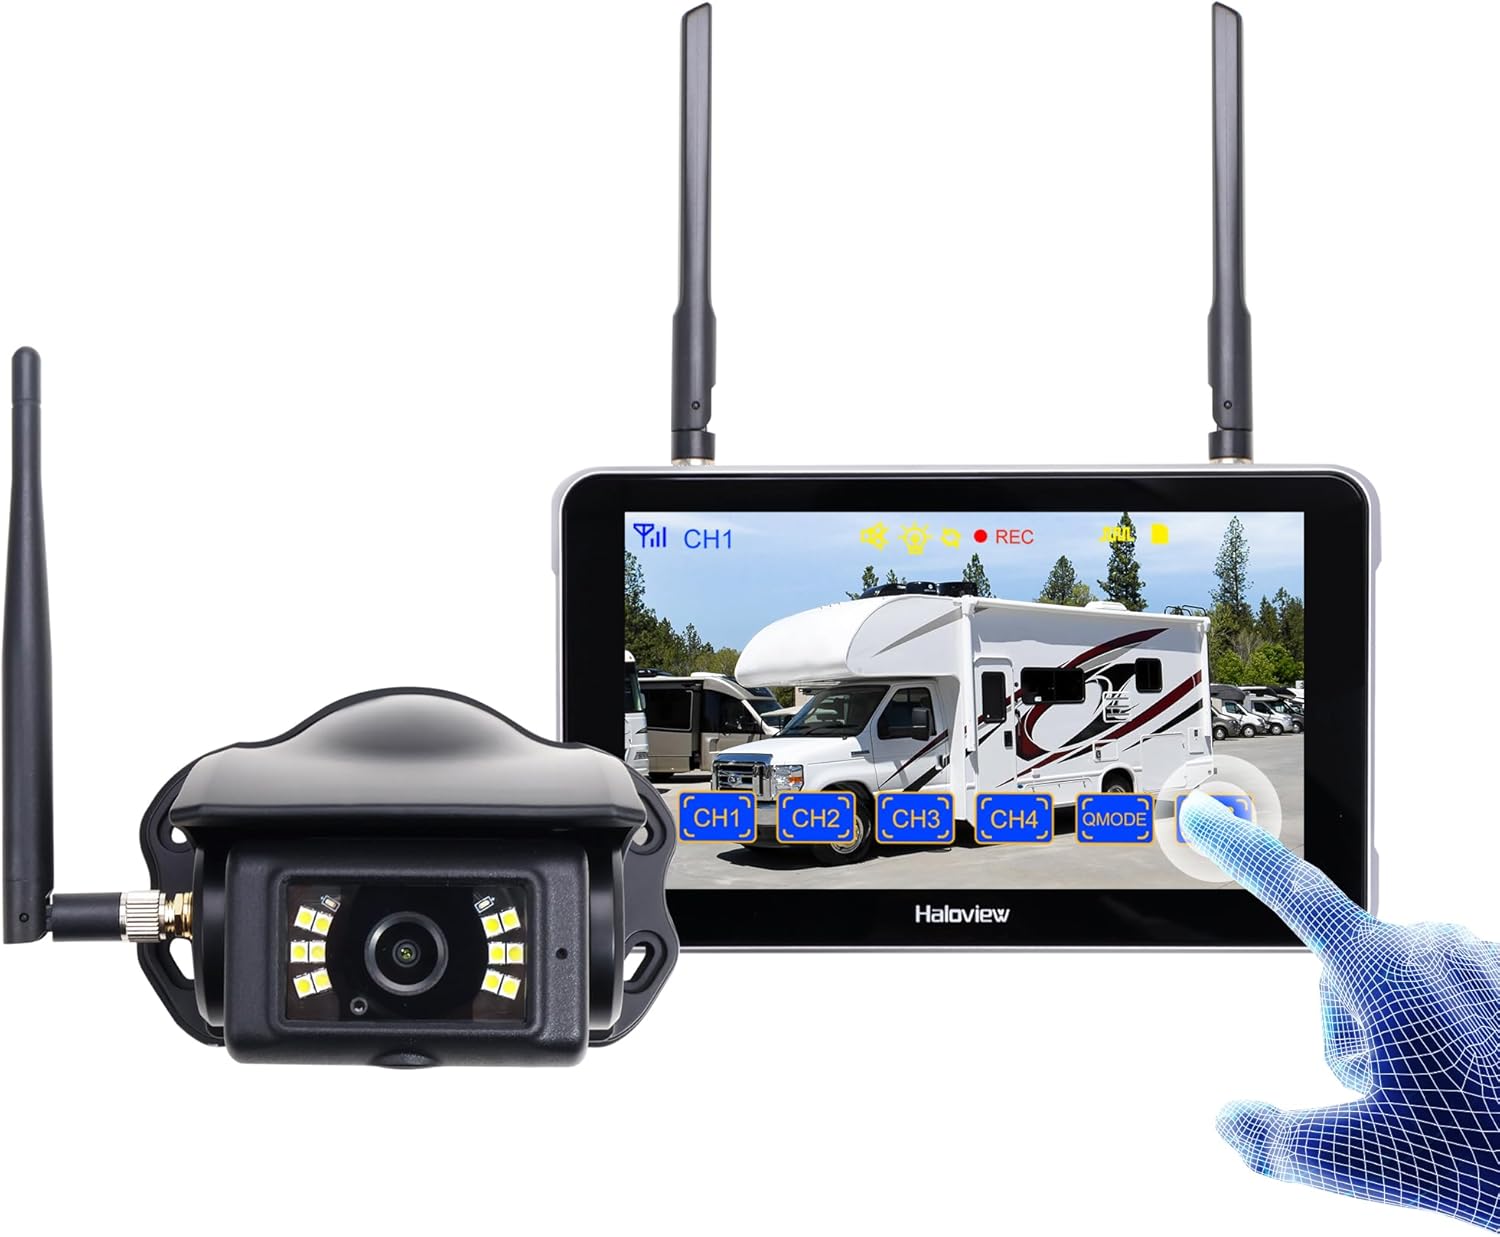
Image 1.1: Haloview Byte Tango BT6 Touch RV Backup Camera System components, including the 5.5-inch touch screen monitor and the wireless camera.
Pagrindinės funkcijos:
- 2.5D Curved Glass 5.5'' Touch Screen: Offers a smooth and responsive user interface.
- Low Latency Wireless Technology: Ensures minimal lag and interference-free signal transmission, supporting vehicles up to 65ft in length (e.g., RVs, travel trailers, trucks, campers, vans, pickups, tractors, fifth wheels, motorhomes).
- Full-Color Dim-Light Night Vision: Advanced image sensors provide full-color video even in low-light conditions. Night Vision Fill Lights can be activated or deactivated remotely via the monitor.
- Garso įrašymas: Built-in speaker alerts users to pedestrians, animals, or unusual sounds in the surroundings.
- Integruotas vaizdo registratorius: Supports real-time recording and video playback with 1080P@30fps FHD resolution.
2. Kas yra dėžutėje
Patikrinkite, ar pakuotėje yra visi toliau išvardyti daiktai:

Image 2.1: All components included in the Haloview Byte Tango BT6 Touch system package.
- BT6 Touch Screen Monitor
- BTC128 fotoaparatas
- Siurbimo taurės tvirtinimo laikiklis
- 3M tvirtinimo laikiklis
- C tipo kabelis
- Kameros konvertavimo kabelis
- Maitinimo adapteris Furrion Iš anksto prijungtas RV
- Poravimo kabelis
- Cigarečių žiebtuvėlių maitinimo adapteris
3. Sąranka ir diegimas
3.1 Fotoaparato diegimas
- Pasirinkite montavimo vietą: Select a suitable surface mount location at the rear of your vehicle, ensuring a clear view and protection from direct impact.
- Apsaugokite fotoaparatą: Mount the BTC128 camera securely using appropriate fasteners. Ensure the antenna is positioned for optimal signal reception.
- Maitinimo jungtis: Connect the camera to a 12V DC power source. If your RV is pre-wired for Furrion, use the provided power adapter. Otherwise, connect to your vehicle's reverse light circuit or another suitable 12V power source.
3.2 Monitoriaus įrengimas
- Monitoriaus montavimas: Attach the 5.5-inch monitor to your dashboard or windshield using either the suction cup mount bracket or the 3M adhesive mount bracket. Ensure the monitor is positioned for easy viewnetrukdydamas vairuoti view.
- Power the Monitor: Connect the monitor to power using the provided cigarette lighter power adapter or the Type-C cable for USB power.
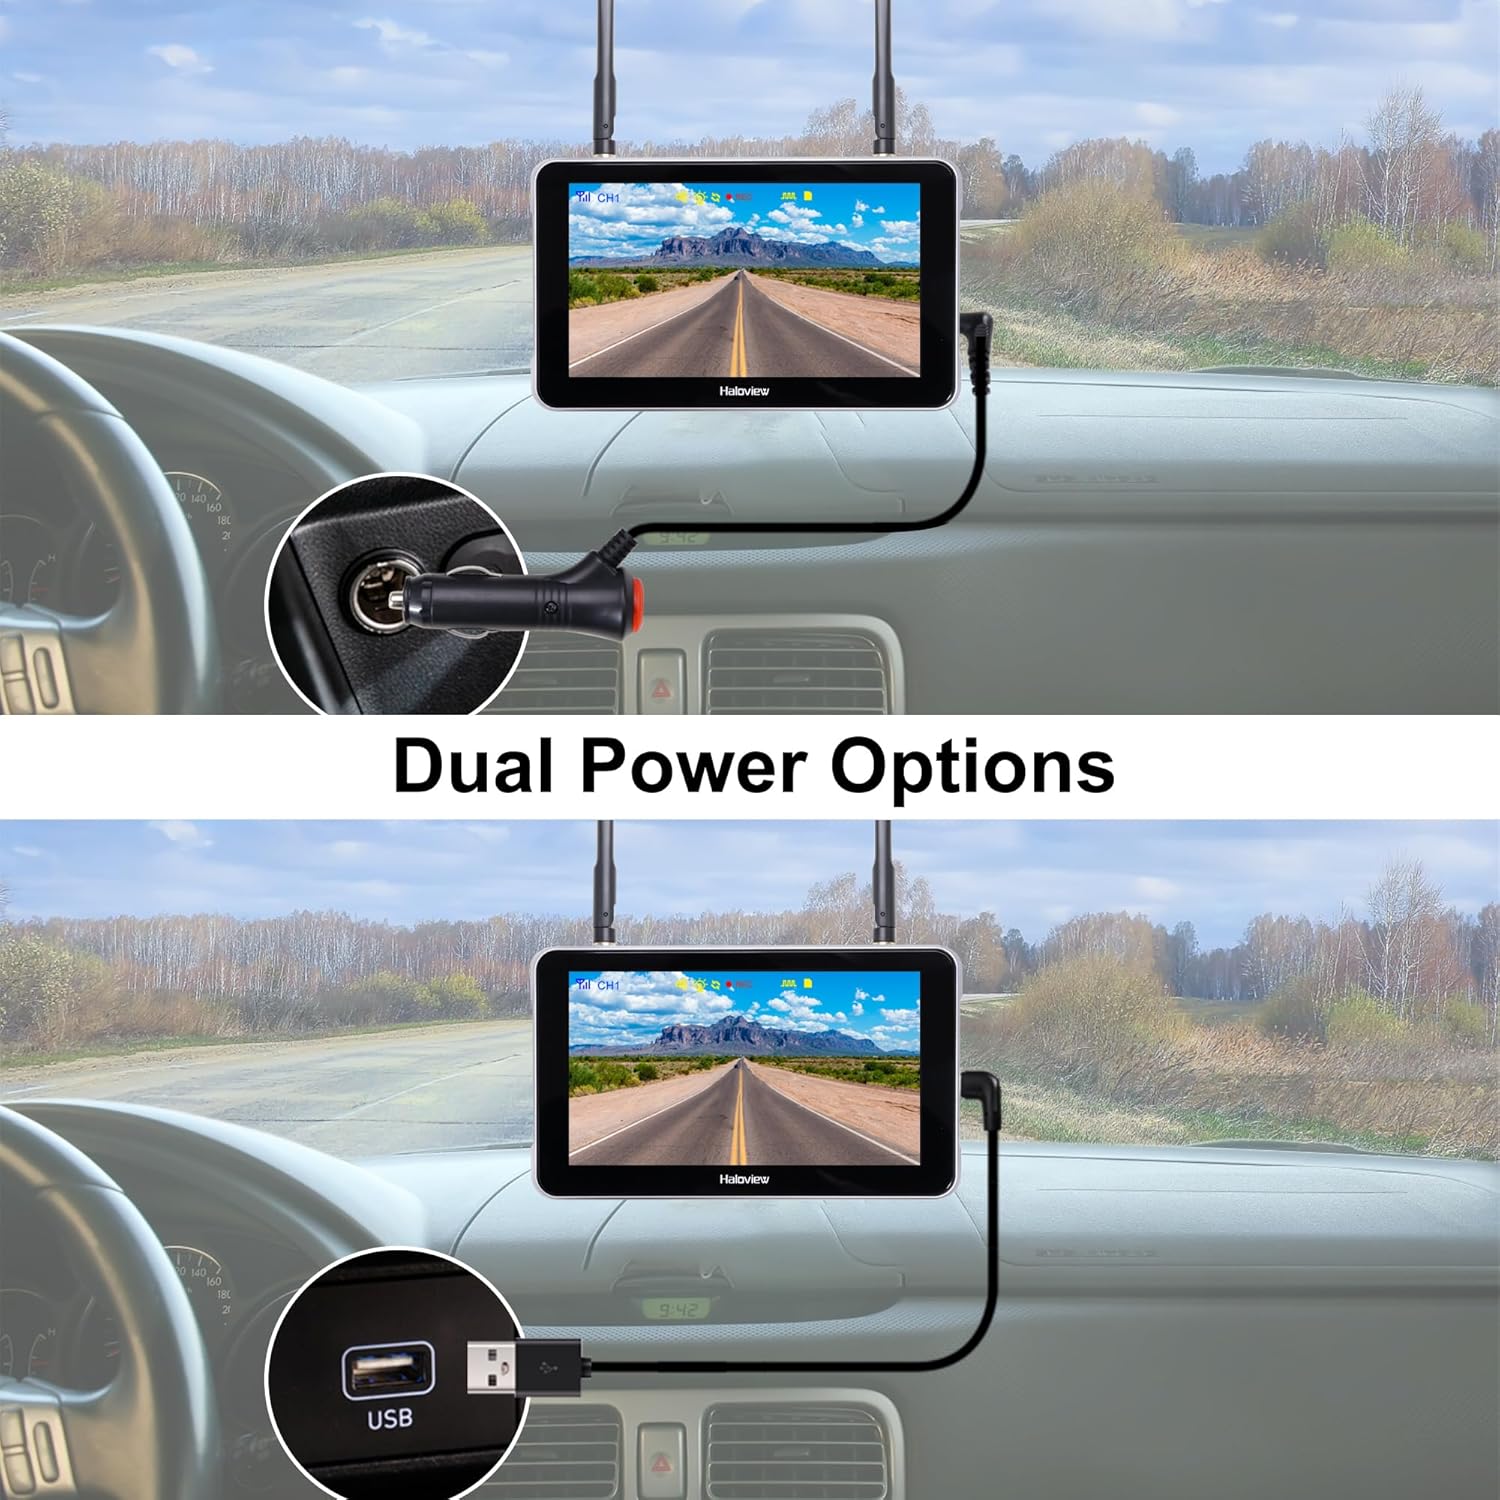
Image 3.1: The monitor can be powered via a cigarette lighter adapter or a USB Type-C cable.
3.3 Pairing the Camera and Monitor
The camera and monitor are typically pre-paired from the factory. If no image appears or you are adding additional cameras, follow these steps:
- Įjunkite ir kamerą, ir monitorių.
- On the monitor, navigate to the pairing menu (refer to the operating section for menu access).
- Select an available channel for pairing.
- Press the pairing button on the camera (if applicable, consult camera-specific instructions) or follow the on-screen prompts on the monitor to initiate pairing.
- Once paired, the camera's video feed will appear on the monitor.

Image 3.2: Wireless signal transmission between the camera and monitor.
4. Naudojimo instrukcijos
4.1 Pagrindinės operacijos
- Maitinimo įjungimas/išjungimas: Press and hold the power button on the monitor to turn it on or off.
- Jutiklinio ekrano sąsaja: Navigate through menus and settings by tapping and swiping on the 5.5-inch touch screen.
- Kanalo perjungimas: If multiple cameras are connected, tap the channel buttons (CH1, CH2, etc.) on the screen to switch between camera views.

Image 4.1: The touch screen allows for intuitive control of the system.
4.2 Išplėstinės funkcijos
- Vaizdo apvertimas: Access the settings menu to adjust the image orientation (horizontal/vertical flip) to match your camera's mounting position.

Image 4.2: The image flip function allows for various display orientations.
- Naktinis matymas: The system automatically adjusts for low-light conditions. Night Vision Fill Lights can be manually controlled via the monitor settings if ambient light is extremely low.

Image 4.3: The camera provides full-color images even in dim light conditions.
- DVR įrašymas: Insert a Micro-SD card (not included) into the monitor's slot to enable continuous recording. Access recorded footage through the playback menu. The system records in 1080P at 30 frames per second.

Image 4.4: The monitor supports Micro-SD card recording for continuous video capture.
- Rear Assist Marker Lines: Customizable parking guidelines can be activated and adjusted via the monitor settings to aid in reversing and parking maneuvers.
Image 4.5: Customizable rear assist marker lines for precise maneuvering.
5. Priežiūra
- Valymas: Use a soft, dry cloth to clean the monitor screen and camera lens. For stubborn dirt, slightly dampNuvalykite šluostę vandeniu. Venkite abrazyvinių valiklių ar tirpiklių.
- Kabelių jungtys: Periodically check all cable connections for tightness and signs of wear. Ensure power cables are securely plugged in.
- Kameros objektyvas: Keep the camera lens clear of dirt, snow, or ice to maintain optimal image quality.
- Antenos: Ensure antennas on both the camera and monitor are securely attached and positioned for best signal.
6. Problemų sprendimas
- Monitoriuje nėra vaizdo:
- Įsitikinkite, kad ir kamera, ir monitorius yra įjungti.
- Patikrinkite visas maitinimo jungtis.
- Verify that the camera and monitor are properly paired (refer to Section 3.3).
- Check for obstructions between the camera and monitor that might block the wireless signal.
- Prasta vaizdo kokybė:
- Nuvalykite fotoaparato objektyvą.
- Įsitikinkite, kad kamera yra tvirtai pritvirtinta ir nevibruoja.
- Patikrinkite, ar netoliese nėra stiprių trukdžių šaltinių.
- Įrašymo problemos:
- Ensure a compatible Micro-SD card is inserted correctly.
- Check if the Micro-SD card is full; format it if necessary (this will erase all data).
- Verify recording settings in the monitor menu.
- Monitor Not Responding to Touch:
- Restart the monitor by powering it off and on again.
- Įsitikinkite, kad ekranas yra švarus ir be šiukšlių.
7. Specifikacijos
| Funkcija | Specifikacija |
|---|---|
| Produkto matmenys (monitorius) | 6.1 x 1 x 8.8 colio (155 mm ilgio x 25 mm pločio x 88 mm aukščio) |
| Prekės svoris | 2.7 svaro |
| Ekrano dydis | 5.5 colių |
| Ekrano technologija | LCD |
| Belaidis ryšys | 2.4G skaitmeninis belaidis ryšys |
| Suderinami įrenginiai | BTC128, BTC129, BTC126, BTC125, BTC131 |
| Diegimo tipas | Paviršinis montavimas |
| Veiklos ttage | 12 volto (DC) |
| Optinių jutiklių technologija | CMOS |
| Objektyvo tipas | Fiksuotas plataus kampo |
| Tikrasis kampas View | 120 laipsnių |
| Vaizdo įrašymo raiška | 1080P@30fps FHD |

Image 7.1: Physical dimensions of the Haloview monitor and a summary of key features.
8. Garantija ir palaikymas
8.1 Informacija apie garantiją
Haloview products are covered by a limited warranty. Please refer to the warranty card included with your product or visit the official Haloview webIšsamias garantijos sąlygas ir nuostatas rasite svetainėje. Išsaugokite pirkimo kvitą kaip pirkimo įrodymą garantijos pretenzijoms.
8.2 Pagalba klientams
For technical assistance, troubleshooting, or product inquiries, please contact Haloview klientų aptarnavimas šiais kanalais:
- Websvetainė: Visit the official Haloview webDUK, pagalbos išteklių ir kontaktinių formų svetainė.
- El. paštas: Refer to your product packaging or the Haloview webklientų aptarnavimo el. pašto adreso svetainė.
- Telefonas: Kontaktiniai numeriai gali būti pateikti oficialiame puslapyje webtiesioginės pagalbos svetainė.
When contacting support, please have your product model (BT6 Touch) and purchase information ready.