
1. Įvadas
The CUQI 7 Inch IPS Portable Monitor is a compact display designed for versatility and ease of use. Featuring a 1024 x 600 resolution IPS screen, it offers wide viewing angles and accurate color reproduction. This monitor is compatible with a variety of devices, including Raspberry Pi, laptops, PCs, and gaming consoles, making it suitable for various applications such as dual monitor setups, embedded systems, or portable entertainment.
2. Pakuotės turinys
Patikrinkite, ar pakuotėje yra visi toliau išvardyti daiktai. Jei kurių nors daiktų trūksta arba jie pažeisti, susisiekite su klientų aptarnavimo tarnyba.
- 7 colių ekranas
- Leather stand
- HDMI į Mini HDMI laidas
- „Micro HDMI to HDMI“ adapteris
- Dual Type-A to Type-C Cable
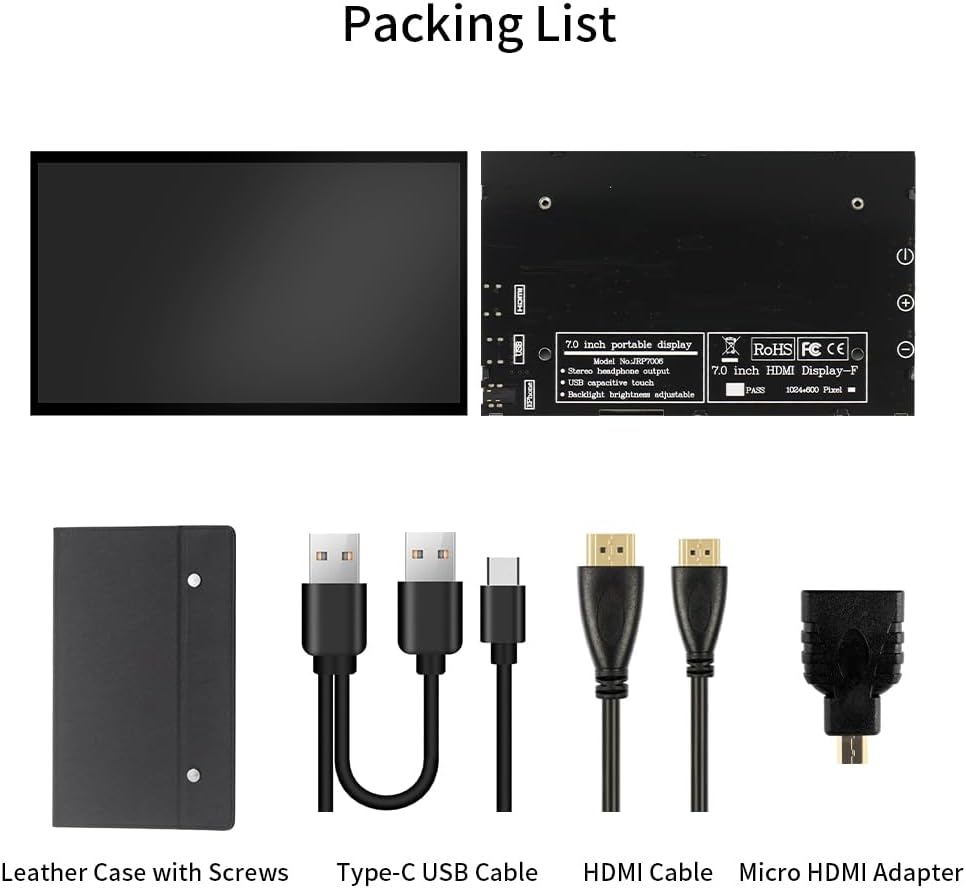
Figure 2.1: Included accessories with the CUQI 7 Inch Portable Monitor.
3. Savybės
The CUQI 7 Inch IPS Portable Monitor offers a range of features designed for optimal performance and user convenience:
- IPS Screen: Provides a clear and high-quality display with 178-degree full viewing angles, 1024 x 600 resolution, and accurate color reproduction.
- Prijunkite ir paleiskite: Connects via HDMI and USB ports without requiring driver or software installation.
- Reguliuojamas ryškumas: Screen brightness can be adjusted, and a backlight off button allows the screen to be switched off when not in use.
- Portable Leather Stand: Includes a lightweight leather protective case that doubles as a stand with two adjustable angles. The case is removable via two screws.
- Platus suderinamumas: Supports Raspberry Pi 5/4/4B/3B+/3B, Banana Pi, Windows 7/8/10 PC, Mac, Microsoft, and systems like Retro Pi, NOOBS, Raspbian, Ubuntu, and Kodi.

Figure 3.1: IPS 178-degree wide viewing kampas.
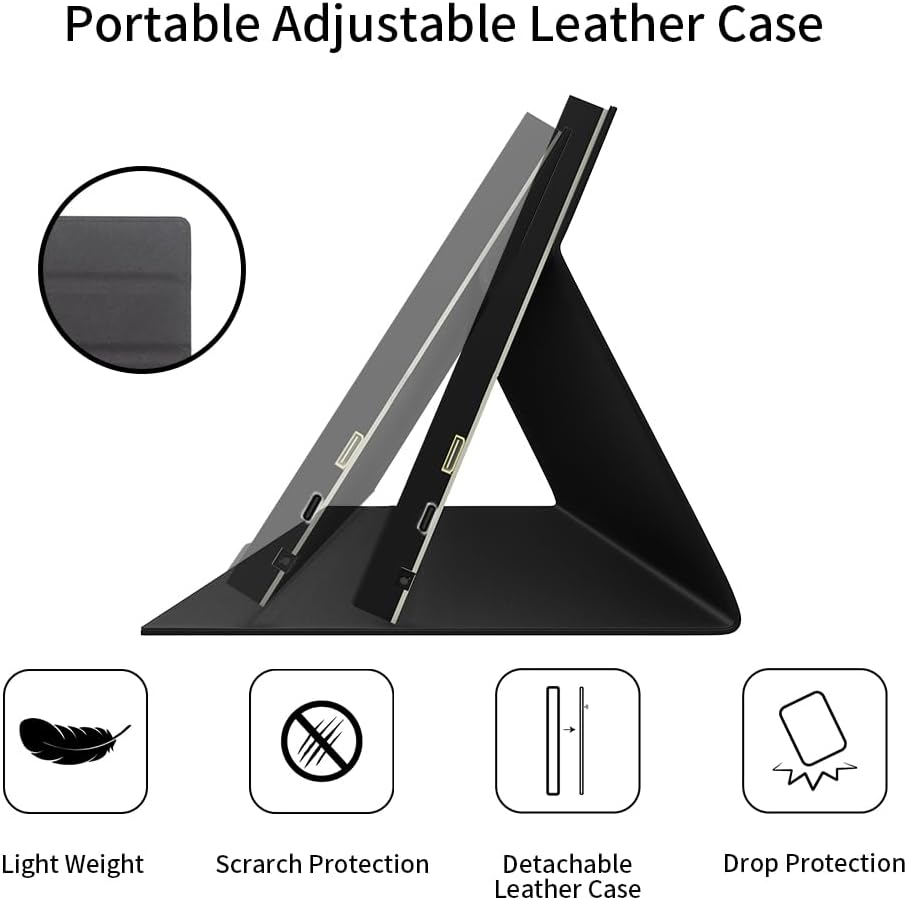
Figure 3.2: Portable adjustable leather case features.
4. Sąrankos instrukcijos
Follow these steps to set up your CUQI 7 Inch IPS Portable Monitor:
- Attach the Leather Stand: If not already attached, secure the leather stand to the monitor using the two removable screws on the back. The stand allows for two adjustable viewkampų.
- Prijunkite vaizdo įrašo šaltinį: Use the provided HDMI to Mini HDMI Cable (and Micro HDMI to HDMI Adapter if needed) to connect the monitor's Mini HDMI interface to your device (e.g., Raspberry Pi, laptop, PC, gaming console).
- Prijunkite maitinimą: Use the provided Dual Type-A to Type-C Cable to connect the monitor's Type-C Power port to a 5V/3A power source (e.g., a USB port on your device or a USB power adapter).
- Maitinimas: Press the power button on the side of the monitor to turn it on. The monitor should automatically detect the video input.

Figure 4.1: Connecting the monitor to a Raspberry Pi.

Figure 4.2: Monitor ports and control buttons.
5. Naudojimo instrukcijos
Once connected, the monitor operates as a secondary display for your device.
- Maitinimo įjungimas/išjungimas: Use the dedicated power button on the side of the monitor to turn it on or off.
- Ryškumo reguliavimas: Use the '+' and '-' buttons on the side of the monitor to adjust the screen brightness.
- Apšvietimas išjungtas: The backlight off button allows you to turn off the screen display while keeping the monitor powered, useful for power saving or when the display is not needed temporarily.
- Garso išvestis: If your source device transmits audio via HDMI, you can connect headphones or external speakers to the 3.5mm Audio Interface for sound output.

Figure 5.1: Monitor in use as a gaming display.
6. Priežiūra
Norėdami užtikrinti monitoriaus ilgaamžiškumą ir optimalų veikimą, laikykitės šių priežiūros nurodymų:
- Valymas: Švelniai nuvalykite ekraną minkštu, nepūkuotu audiniu. Jei dėmės sunkiai įveikiamos, šiek tiek pamirkykite.ampNuvalykite šluostę vandeniu arba ekranui saugiu valymo tirpalu. Venkite stiprių cheminių medžiagų ar abrazyvinių medžiagų.
- Saugykla: When not in use, store the monitor in a cool, dry place, preferably in its protective leather case, to prevent dust accumulation and physical damage.
- Tvarkymas: Avoid dropping the monitor or subjecting it to strong impacts. Handle it by the edges to prevent fingerprints on the screen.
- Temperatūra: Do not expose the monitor to extreme temperatures or direct sunlight for extended periods.
7. Problemų sprendimas
Jei kyla problemų dėl monitoriaus, žr. šias dažniausiai pasitaikančias problemas ir sprendimus:
- Nėra ekrano / juodas ekranas:
- Ensure both the HDMI (or equivalent video) cable and the USB-C power cable are securely connected.
- Verify that the power source provides sufficient power (5V/3A).
- Check if the monitor is powered on using the power button.
- Confirm your source device is outputting video correctly.
- Flickering/Unstable Image:
- Patikrinkite vaizdo kabelį, ar nėra pažeistų ar atsilaisvinusių jungčių.
- Įsitikinkite, kad maitinimo šaltinis yra stabilus.
- Try a different video cable or port on your source device.
- Image Retention/Ghosting:
- If static images are displayed for very long periods, temporary image retention may occur. This is common with some display technologies.
- To mitigate, display a dynamic image or turn off the monitor for a period. Avoid displaying static images for extended durations.
- Monitor Disconnecting/Reconnecting:
- Ensure the power cable and video cable connections are firm.
- Test with a different USB power source or cable to rule out power supply issues.
- Check for updated drivers for your source device's graphics card.
If these steps do not resolve the issue, please contact CUQI technical support.
8. Specifikacijos
| Funkcija | Specifikacija |
|---|---|
| Gaminio matmenys | 6.58 x 0.39 x 4.06 colio |
| Prekės svoris | 14.9 uncijos |
| Gamintojas | CUQI |
| Prekės modelio numeris | 7 inch leather |
| Stovinčio ekrano dydis | 7 colių |
| Krašto santykis | 1.60:1 |
| Rezoliucija | 1024 x 600 pikselių |
| Vaizdo ryškumas | 500 kandelų |
| Iš viso USB prievadų | 1 (Type-C for power) |
| Ekrano paviršiaus aprašymas | Matinis |
9. Garantija ir palaikymas
CUQI provides professional technical support for this product. If you have any questions, require assistance with setup, operation, or troubleshooting that is not covered in this manual, please contact us via email. Refer to your purchase documentation for specific warranty details and contact information.