1. Įvadas
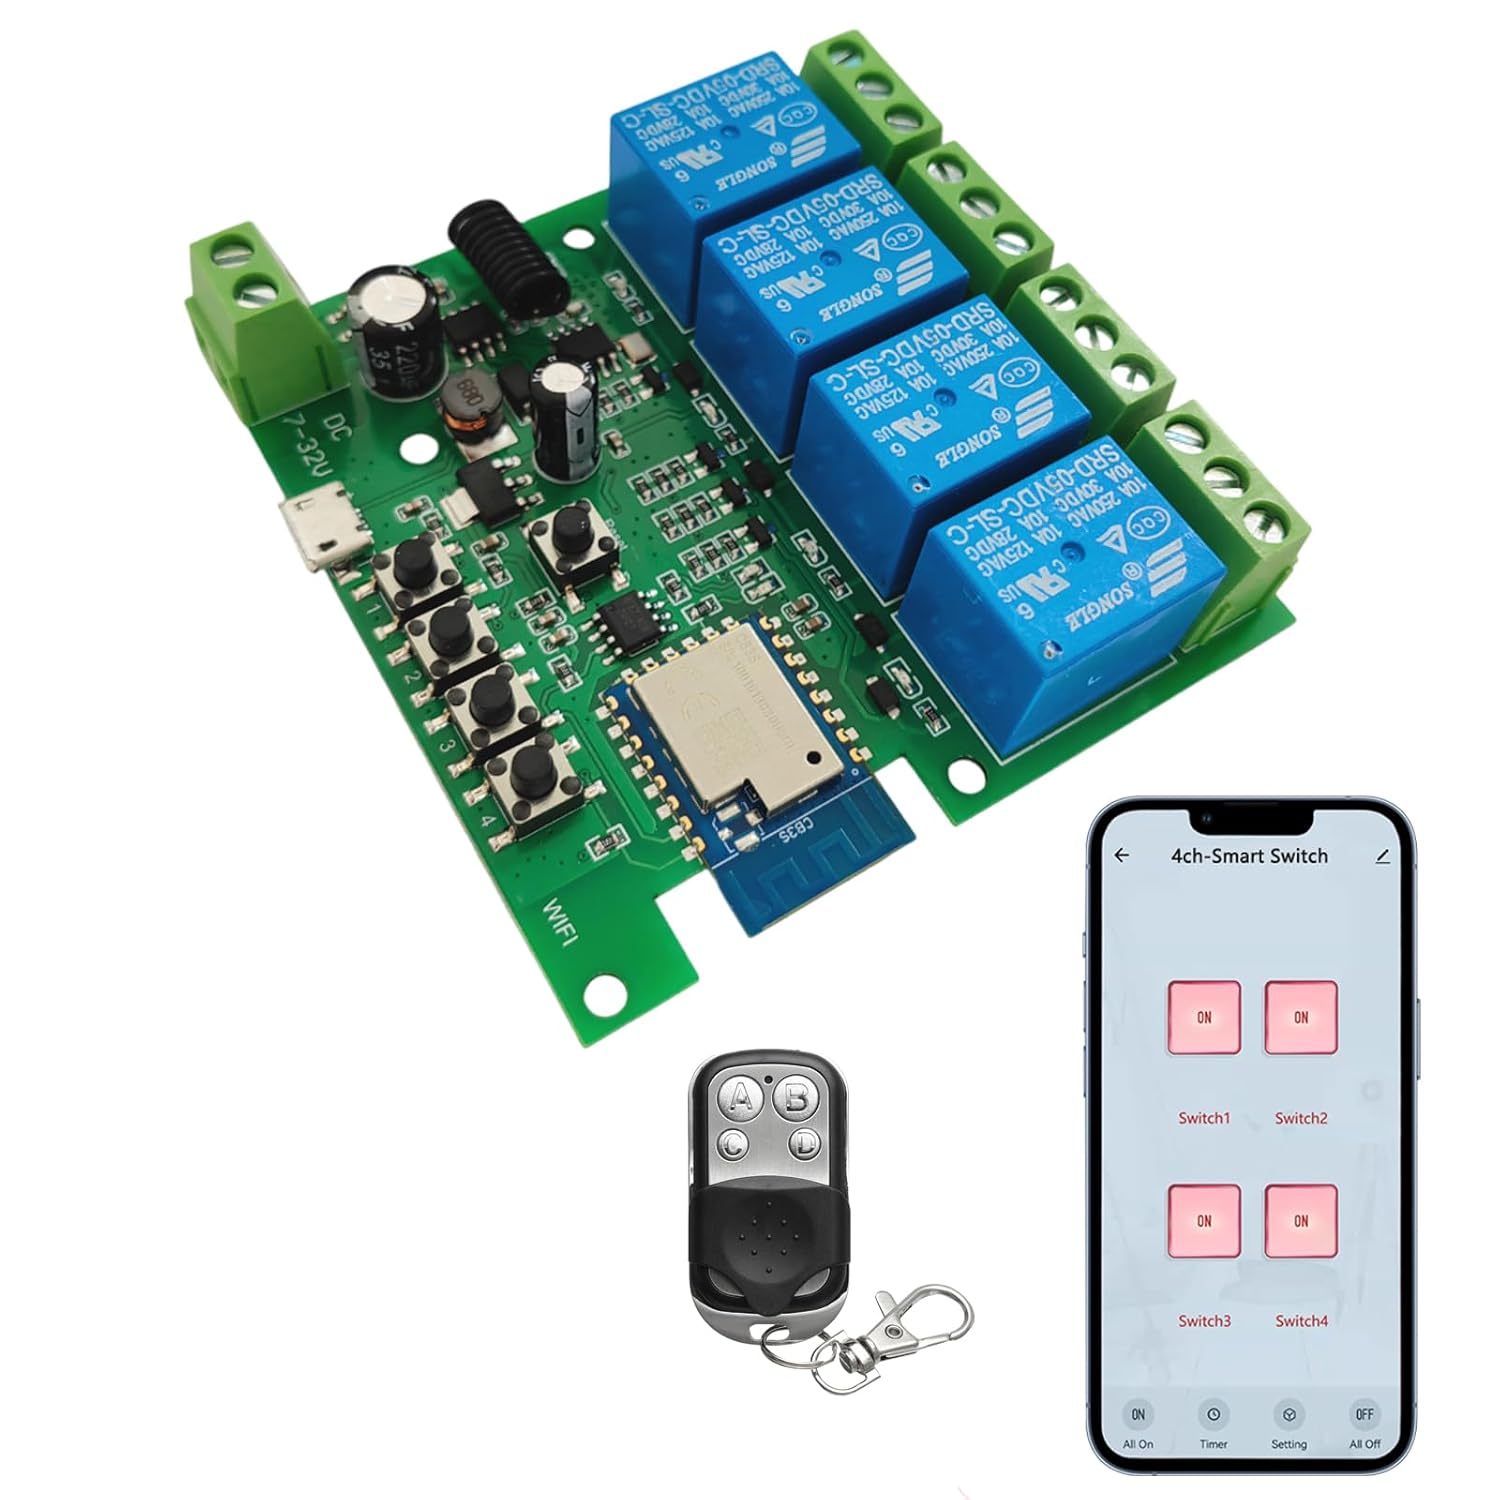
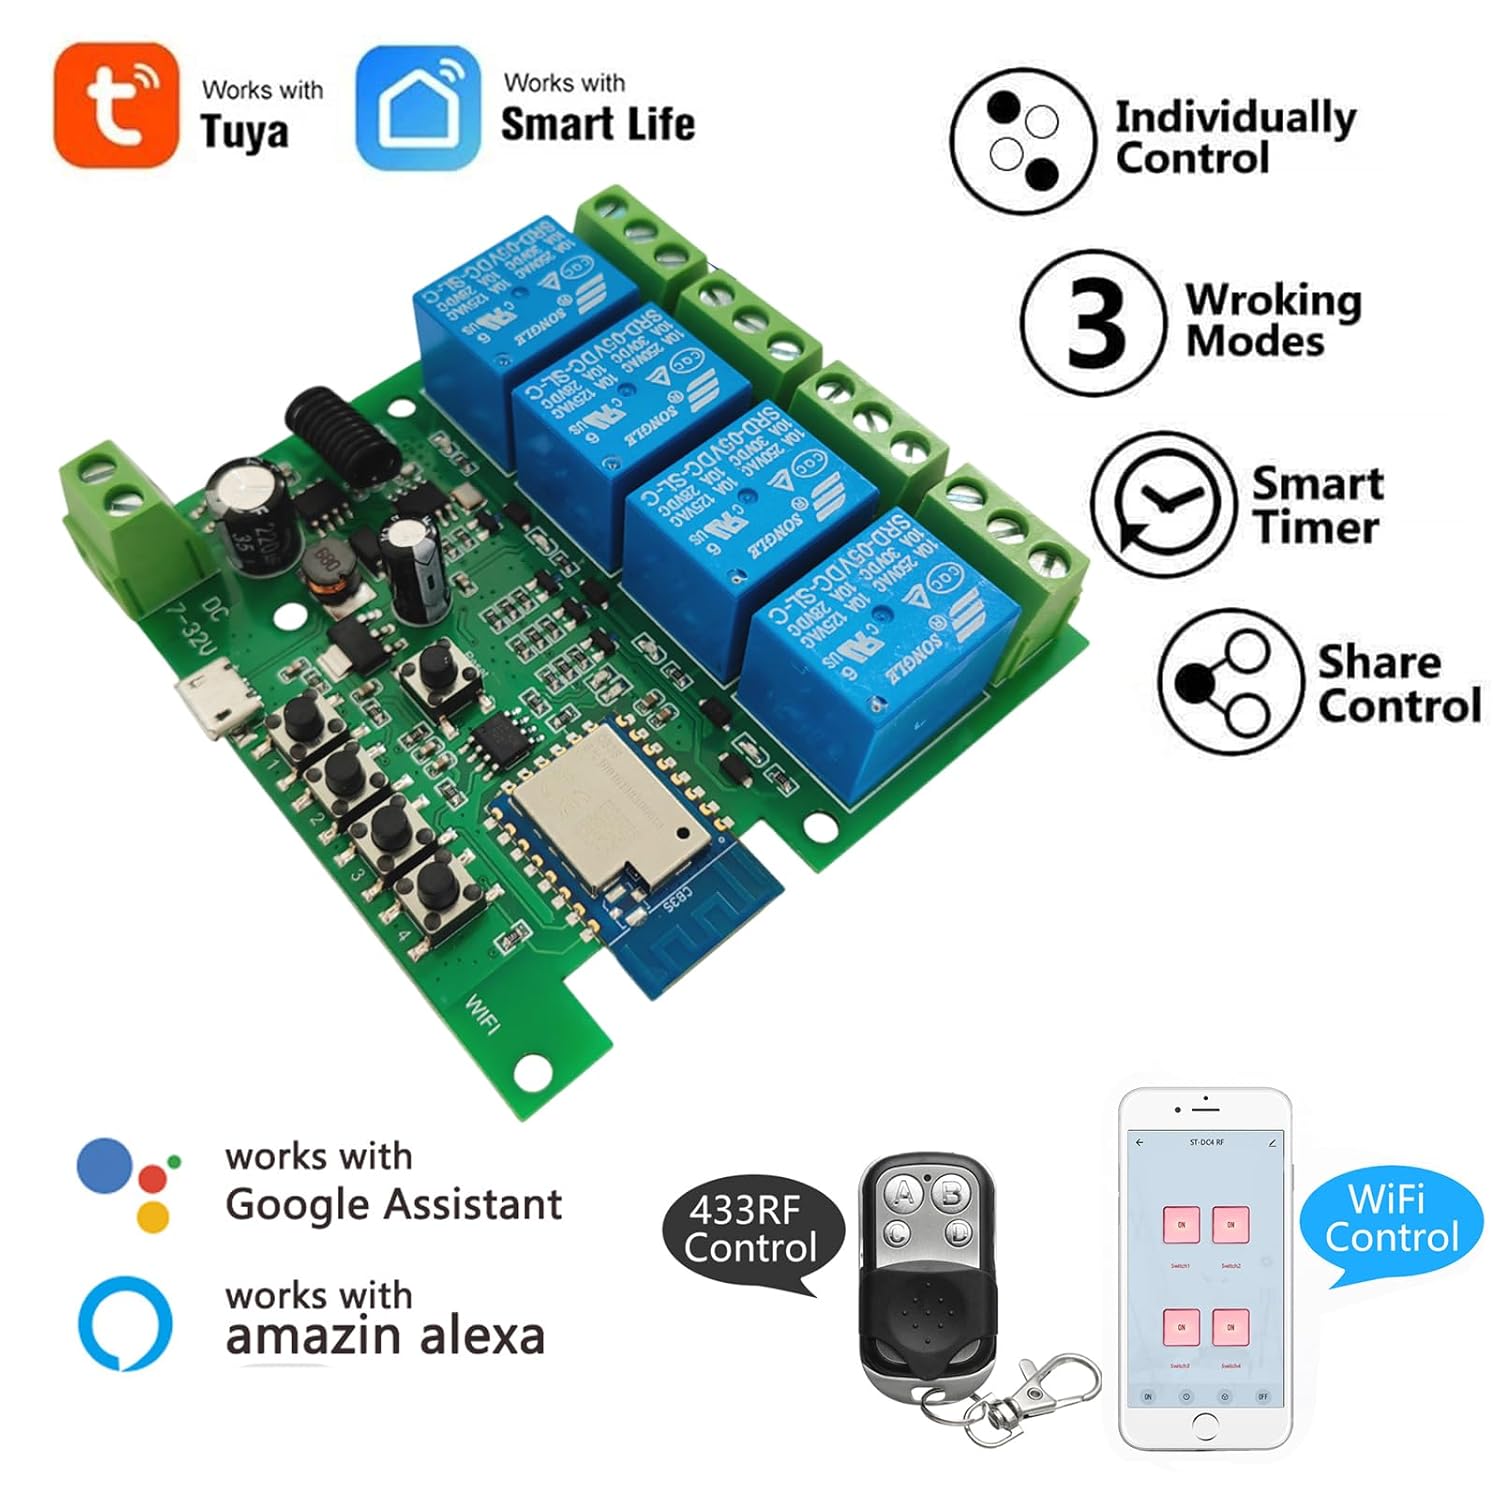
The Newgoal 4-Channel Smart Wireless Relay Switch is a versatile device designed for home automation, allowing remote control of connected appliances or power circuits. It supports multiple operating modes, including momentary (inching), self-locking, and interlock, and can be controlled via the Tuya Smart Life mobile application, a 433MHz RF remote control, or voice commands through Amazon Alexa and Google Home.
2. Saugos informacija
- Ensure all power is disconnected before installation or wiring to prevent electric shock.
- This device operates with electrical currents. If you are unsure about electrical wiring, consult a qualified electrician.
- Do not exceed the maximum rated current of 10 Amperes arba ttage iš 250V AC/DC.
- The device supports 2.4GHz Wi-Fi networks only. It is not compatible with 5GHz Wi-Fi or Mesh Wi-Fi systems.
- Saugokite įrenginį nuo vandens ir ekstremalių temperatūrų.
3. Pakuotės turinys
- 1 x Newgoal 4-Channel WiFi Relay Module
- 1 x 433 MHz RF Remote Control
- 1 x Naudotojo vadovas (anglų ir kinų kalbomis)
4. Specifikacijos
| Funkcija | Specifikacija |
|---|---|
| Modelis | 4CH Tuya App/Smart Life |
| Matmenys | 7.4 x 7.4 x 1.9 cm |
| Svoris | 98 g |
| Maitinimo šaltinis | USB 5V or AC/DC 7-32V |
| Nominali srovė | 10 Amperes (per channel) |
| Veiklos ttage (Relay Output) | Kintamosios srovės 0-250V / DC 0-30V |
| Kontakto tipas | Normally Open (NO), Common (COM), Normally Closed (NC) |
| Grandinės tipas | 4 krypčių |
| Belaidis ryšys | Wi-Fi 2.4GHz (IEEE 802.11 b/g/n) |
| RF kontrolė | 433MHz (Fixed code / Learning code, up to 14 codes per gang) |
| Programų palaikymas | Tuya Smart Life (Android/iOS) |
| Valdymas balsu | Amazon Alexa, Google Home |
| Veikimo režimai | Momentary (Inching), Self-locking, Interlock |
5. Produktas baigtasview

6. Sąranka
6.1 Įrenginio maitinimas
The relay module can be powered in two ways:
- USB 5V: Connect a standard Micro USB cable to the 'Power Input 1' port.
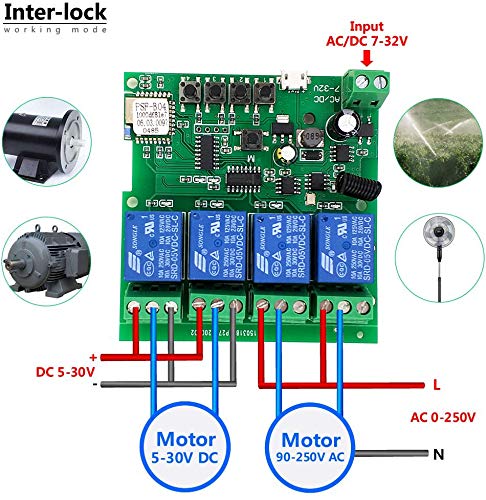
- AC/DC 7-32V: Connect a power source within this voltage range to the 'Power Input 2' screw terminals.
Note: The power supply input is for the PCBA (circuit board) only. The relays themselves are switches without output; they control the power to your connected devices.
6.2 Wiring Connected Devices
Refer to the wiring diagrams in Section 9 for specific connection instructions based on your desired operating mode and device type. Each relay has Normally Open (NO), Common (COM), and Normally Closed (NC) terminals. Connect your appliance's power line through the appropriate relay terminals.
6.3 App Installation and Device Pairing (Tuya Smart Life)
- Atsisiųskite Tuya Smart or Protingas gyvenimas programėlę iš „App Store“ („iOS“) arba „Google Play Store“ („Android“).
- Prisiregistruokite arba prisijunkite prie savo paskyros.
- Įsitikinkite, kad jūsų išmanusis telefonas prijungtas prie 2.4 GHz „Wi-Fi“ tinklo. Įrenginys nepalaiko 5 GHz „Wi-Fi“.
- Power on the Newgoal relay module. The WiFi LED should blink, indicating it's in pairing mode. If not, press and hold the central button on the module for 5 seconds until the LED blinks rapidly.
- In the app, tap '+' to add a device. The app should automatically discover the device nearby. Follow the on-screen instructions to connect the device to your Wi-Fi network.
- Once connected, you can rename the device and individual channels within the app.
6.4 RF Remote Control Pairing
To pair the 433MHz RF remote control with the relay module:
- Press and hold one of the manual switch buttons (RF Pairing Button) on the relay module for 3 seconds. The corresponding LED will illuminate.
- While the LED is lit, press the desired button on your 433MHz remote control. The LED on the module will flash to confirm successful pairing.
- Repeat this process for each channel you wish to control with the remote. The module can learn up to 14 different 433MHz codes per channel.
To clear all paired RF codes for a specific channel, press and hold the corresponding manual switch button for 15 seconds until the LED flashes rapidly and then turns off.
7. Veikimo režimai
The Newgoal 4-Channel Smart Wireless Relay Switch supports three operating modes, which can be configured via the Tuya Smart Life app:
- Momentary (Inching) Mode: In this mode, the relay turns on for a set duration (e.g., 1 second) and then automatically turns off. This is ideal for applications like garage door openers or momentary button presses. You can configure two wiring ways: turn on for 1s then auto-off, or turn off for 1s then auto-on.
- Savaiminio užsifiksavimo režimas: The relay acts like a standard toggle switch. Pressing the button (in app or on remote) turns the relay ON, and pressing it again turns it OFF. This is suitable for controlling lights or other devices that need to stay on or off until manually changed.
- Blokavimo režimas: (Supported on 2-gang and 4-gang versions) In this mode, only one relay can be ON at a time. If one relay is activated, any other active relay in the group will automatically turn OFF. This is useful for controlling motors with forward/reverse functions or ensuring only one device operates at a time.
8. Programų valdymas („Tuya Smart Life“)
Once paired, the Tuya Smart Life app provides comprehensive control and automation features:
- Nuotolinis įjungimas / išjungimas: Control connected devices from anywhere with an internet connection.
- Laiko grafikai: Set schedules for devices to turn on or off automatically at specific times.
- Atgalinės atskaitos funkcija: Set a timer for a device to automatically turn off after a specified duration.
- Įrenginio bendrinimas: Bendrinkite įrenginio valdymą su šeimos nariais.
- Grupės valdymas: Sugrupuokite kelis įrenginius, kad galėtumėte valdyti vienu metu.
- Scenos automatizavimas: Create custom scenes and automations based on conditions like time, weather, or other smart devices.


8.1 Balso valdymo integravimas
The device is compatible with Amazon Alexa and Google Home. After linking your Tuya Smart Life account in the Alexa or Google Home app, you can use voice commands to control your connected devices. For exampLe:
- "Alexa, turn on Switch 1."
- „Ei, Google, išjunk šviesą svetainėje.“
Note: Currently, US/UK English and German voice commands are supported.
9. Elektros instaliacijos schemos
Proper wiring is crucial for safe and correct operation. Always ensure power is off before making any connections.


10. Priežiūra
- Laikykite prietaisą švarų ir be dulkių.
- Avoid exposing the device to moisture or direct sunlight.
- Reguliariai tikrinkite laidų jungtis, kad įsitikintumėte, jog jos yra tvirtos.
- Periodically update the Tuya Smart Life app to ensure optimal performance and access to new features.
11. Problemų sprendimas
- Įrenginys neprisijungia prie „Wi-Fi“:
– Įsitikinkite, kad jūsų „Wi-Fi“ tinklas yra 2.4 GHz dažnio. 5 GHz tinklai nepalaikomi.
- Make sure the device is within range of your Wi-Fi router during pairing.
- Check if the Wi-Fi password entered in the app is correct.
- Try resetting the device by holding the central button for 5 seconds until the WiFi LED blinks rapidly, then attempt pairing again. - RF nuotolinio valdymo pultas neveikia:
- Ensure the remote control has a working battery (27A 12V).
- Re-pair the remote control with the specific channel on the module (refer to Section 6.4).
- Ensure the remote is within the maximum range of 30 meters (98 feet). - Prijungtas prietaisas nereaguoja:
- Verify that the relay module is powered on and the WiFi LED is solid (indicating a stable connection).
- Check the wiring connections to the appliance (refer to Section 9). Ensure they are secure and correct for the chosen operating mode.
- Confirm the appliance itself is functional. - Balso valdymas neveikia:
- Ensure your Tuya Smart Life account is correctly linked to your Amazon Alexa or Google Home app.
- Check that the device names in the smart assistant app match those in Tuya Smart Life.
- Verify your voice commands are in a supported language (US/UK English, German).
12. Garantija ir palaikymas
For warranty information and technical support, please refer to the documentation provided with your purchase or contact Newgoal customer service through their official channels. Keep your purchase receipt for warranty claims.