
1. Įvadas
This manual provides detailed instructions for the installation, operation, and maintenance of your RSNAVI Android Car Stereo. This unit is designed to integrate advanced multimedia and navigation features into your Chrysler Grand Voyager (2011-2015 model years).
Prieš įdiegdami ir naudodami atidžiai perskaitykite šį vadovą, kad užtikrintumėte tinkamą veikimą ir kuo geriau išnaudotumėte įrenginį.

1.1 paveikslas: RSNAVI Android Car Stereo with included accessories.
This image displays the RSNAVI 9-inch Android Car Stereo unit integrated into a vehicle's dashboard, specifically designed for the Chrysler Grand Voyager. Surrounding the main unit are various accessories: a rearview camera for enhanced visibility, an external microphone for clear audio input during calls, and a cooling fan to maintain optimal operating temperature. The screen shows a map interface and various application icons, indicating its multimedia and navigation capabilities.
2. Suderinamumas ir pakuotės turinys
2.1 Transporto priemonių suderinamumas
This RSNAVI Android Car Stereo is specifically designed for the Chrysler Grand Voyager manufactured between 2011 ir 2015. Before installation, confirm the year, size, and shape of your vehicle's center console to ensure proper fitment.
2.2 Pakuotės turinys
Standartinį paketą sudaro šie komponentai:
- RSNAVI Android Car Stereo Head Unit
- Canbus dekoderis
- Maitinimo laidas
- RCA kabelis
- Radijo antena
- GPS antena
- USB Cables (Dual USB interface)
- Išorinis mikrofonas
- Galinisview Camera (AHD/CVBS compatible)
- Installation Frame (if applicable for specific models)
3. Sąranka ir diegimas
3.1 Patikra prieš montavimą
- Ensure the vehicle's ignition is off and the battery is disconnected before starting any electrical work.
- Patikrinkite, ar yra visi 2.2 skyriuje išvardyti komponentai.
- Familiarize yourself with your vehicle's dashboard removal process. Online video tutorials specific to the Chrysler Grand Voyager 2011-2015 can be helpful.
3.2 Laidų prijungimas ir prijungimas
The car stereo comes with dedicated wiring harnesses designed for your vehicle. Connect the power cord, RCA cables, radio antenna, GPS antenna, USB cables, external microphone, and rearview camera to their respective ports on the head unit and to the vehicle's wiring system.
- Maitinimo laidas: Connect to the vehicle's power supply, ensuring correct polarity. The included Canbus decoder facilitates integration with vehicle systems.
- RCA kabeliai: For audio/video input/output connections (e.g., external amplifier, additional monitors).
- Antenos: Connect the radio antenna for FM/RDS reception and the GPS antenna for navigation functionality. Position the GPS antenna in a location with a clear view dangaus.
- USB sąsajos: Use the dual USB interfaces for connecting USB drives, charging devices, or for wired CarPlay/Android Auto connections.
- Išorinis mikrofonas: Prisijunkite, kad pagerintumėte skambučių kokybę ir balso komandas.
- Galinisview Kamera: Connect the camera to the 'Inverted Input' (AHD/CVBS) port. Ensure proper routing of the camera cable to the rear of the vehicle.

3.1 paveikslas: Included wiring harness and installation frame.
This image displays the specific wiring harness and a custom-fit frame provided with the RSNAVI car stereo. The harness includes various connectors for power, speakers, and data, designed to integrate seamlessly with the Chrysler Grand Voyager's electrical system. The frame ensures a flush and secure installation of the 9-inch head unit into the vehicle's dashboard opening.

3.2 paveikslas: Dashboard before and after stereo installation.
This image set illustrates the visual transformation of a Chrysler Grand Voyager dashboard. The top-left panel shows the original factory radio. The other panels demonstrate the RSNAVI Android Car Stereo installed, displaying various interfaces such as a navigation map, a media player, and the main application screen, highlighting the integrated appearance and functionality.
3.3 Patikrinimai po įdiegimo
- Vėl prijunkite automobilio akumuliatorių.
- Turn on the ignition and power on the head unit.
- Test all functions: radio, Bluetooth, GPS, USB, steering wheel controls, and rearview fotoaparatas.
- If any issues arise, refer to the Troubleshooting section or recheck connections.
4. Naudojimo instrukcijos
4.1 Sistema baigtaview
The RSNAVI car stereo operates on an Android system, providing a familiar and customizable user interface via its 9-inch touchscreen. The system supports various applications and features, similar to a smartphone or tablet.
4.2 Belaidis „CarPlay“ / „Android Auto“
Connect your smartphone wirelessly to access Apple CarPlay or Android Auto. This feature allows for hands-free calls, access to phone contacts, emails, notifications, map navigation, music, and video playback directly on the car stereo display. This integration is designed to enhance driving safety by minimizing phone interaction.
- Įsitikinkite, kad jūsų išmaniajame telefone įjungti „Bluetooth“ ir „Wi-Fi“.
- Automobilio stereo sistemoje atidarykite „CarPlay“ arba „Android Auto“ programėlę.
- Vykdykite ekrane pateikiamus nurodymus, kad susietumėte savo įrenginį.
- Once connected, your phone's compatible apps will appear on the stereo display.

4.1 paveikslas: CarPlay, Android Auto, and Mirror Link interfaces.
This image illustrates the various smartphone integration options available with the RSNAVI car stereo. It shows the user interfaces for Wireless CarPlay and Android Auto, displaying familiar app icons for navigation, music, and communication. Additionally, it demonstrates the Mirror Link function, which allows the display of an iOS or Android phone screen directly onto the car stereo, enabling full control of the phone's interface.
4.3 GPS navigacija
The unit features a dual navigation system supporting both offline and online maps. A built-in offline map is provided, but internet data download is required for initial setup or updates. Online maps require a Wi-Fi connection.
- Įsitikinkite, kad GPS antena tinkamai sumontuota ir siunčia aiškų signalą.
- To use offline maps, navigate to the map application and download the necessary regional data via a Wi-Fi connection.
- For online navigation, connect the unit to a Wi-Fi hotspot.
4.4 „Wi-Fi“ ryšys
Connect the car stereo to a Wi-Fi hotspot (e.g., from your smartphone) to access online features. This enables app installation from the Play Store, online navigation, and streaming media.
- Eikite į sistemos nustatymus ir pasirinkite „Wi-Fi“.
- Įjunkite „Wi-Fi“ ir pasirinkite norimą tinklą.
- Jei būsite paraginti, įveskite slaptažodį.

4.2 paveikslas: GPS Navigation and WiFi Hotspot features.
This image highlights the navigation and connectivity capabilities of the RSNAVI car stereo. The top section displays a detailed GPS map with route guidance, indicating distance and estimated travel time. The bottom section illustrates the WiFi Hotspot feature, showing a screen filled with various streaming applications like Netflix, Hulu, and YouTube, demonstrating the unit's ability to access online content when connected to a network.
4.5 „Bluetooth“ funkcionalumas
The integrated Bluetooth module allows for hands-free calling, phone book synchronization, and audio streaming from your smartphone.
- Įjunkite „Bluetooth“ savo išmaniajame telefone ir padarykite jį aptinkamą.
- Automobilio stereo sistemoje atidarykite „Bluetooth“ programėlę ir ieškokite įrenginių.
- Pasirinkite savo telefoną iš sąrašo ir patvirtinkite susiejimo kodą.
- Susiejus, galite belaidžiu būdu skambinti / priimti skambučius ir leisti muziką.
4.6 FM/RDS radijas
The unit includes an FM/RDS radio tuner for clear channel reception and low noise. RDS (Radio Data System) provides additional information such as station name and program type.
- Atidarykite radijo programėlę.
- Naudokite nuskaitymo funkciją, kad automatiškai rastumėte ir išsaugotumėte galimas stotis.
- Rankiniu būdu derinkite dažnius arba pasirinkite iš išsaugotų išankstinių nustatymų.
4.7 Garso ekvalaizeris (EQ)
Adjust the audio output using the built-in equalizer to customize the sound profile. This includes settings for bass, treble, and mid-range frequencies, as well as various sound field modes.
- EQ nustatymus pasiekite iš pagrindinio meniu arba garso nustatymų.
- Select a preset or manually adjust the frequency bands to your preference.
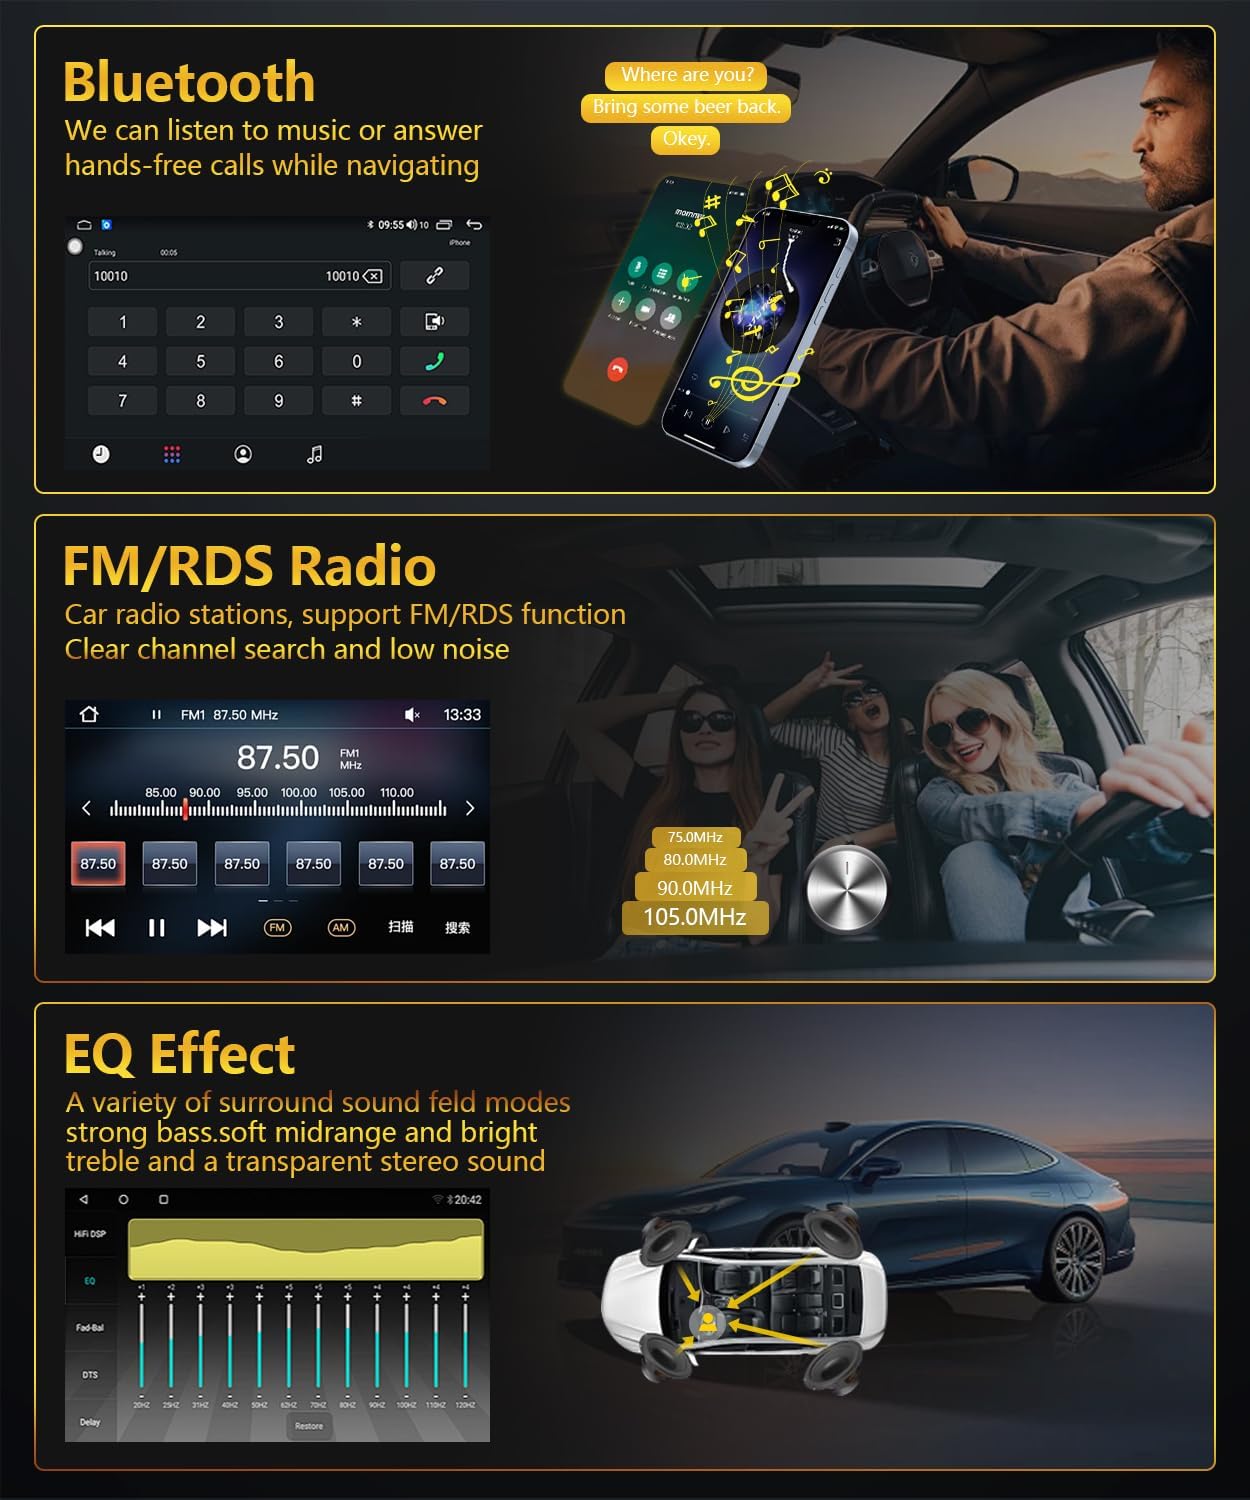
4.3 paveikslas: Bluetooth, FM/RDS Radio, and EQ Effect features.
This image showcases three key audio features of the RSNAVI car stereo. The top section displays the Bluetooth calling interface, showing a dial pad and contact information. The middle section illustrates the FM/RDS radio tuner, with frequency display and station presets. The bottom section presents an audio equalizer (EQ) interface, allowing users to fine-tune sound characteristics like bass, mid-range, and treble, accompanied by a diagram showing speaker placement in a car for optimal sound distribution.
4.8 Atbulinės eigos kameros ekranas
Įrenginys palaiko galinįview camera input. When the vehicle is shifted into reverse gear, the screen automatically switches to display the camera feed, aiding in safe maneuvering. The included camera is waterproof and features night vision and a wide-angle view.
- Užtikrinkite galinę dalįview camera is correctly installed and connected to the 'Inverted Input'.
- Shift the vehicle into reverse gear; the display will automatically show the camera view.
4.9 Vairo valdymas
If your vehicle has original steering wheel control buttons, they can be configured to operate the car radio, providing convenient and safe control while driving.
- Access the 'Steering Wheel Control' settings in the system menu.
- Follow the on-screen instructions to map the vehicle's steering wheel buttons to the desired functions on the car stereo.

4.4 paveikslas: Reversing Display and Steering Wheel Control.
This image highlights two important safety and convenience features. The top section illustrates the rearview camera system, detailing its HD image quality, waterproof design, night vision, and wide-angle capabilities, with a visual representation of the camera's field of view. The bottom section displays the car stereo's interface for configuring steering wheel controls, showing various button functions like volume, track skip, and call management, allowing for seamless operation without taking hands off the wheel.
5. Priežiūra
5.1 Bendroji priežiūra
Norėdami užtikrinti automobilio garso sistemos ilgaamžiškumą ir optimalų veikimą, laikykitės šių bendrųjų priežiūros gairių:
- Ekrano valymas: Jutiklinį ekraną švelniai nuvalykite minkšta, nepūkuota šluoste. Įsisenėjusias dėmes šiek tiek nuvalykiteampNuvalykite šluostę vandeniu arba ekranui saugiu valikliu. Venkite stiprių cheminių medžiagų ar abrazyvinių medžiagų.
- Dulkių šalinimas: Periodically clean dust from the unit's vents and openings using a soft brush or compressed air to prevent overheating.
- Temperatūra: Avoid exposing the unit to extreme temperatures for extended periods. The operating temperature range is -20℃ to 75℃.
- Programinės įrangos atnaujinimai: Check for available software updates periodically to ensure the system has the latest features and bug fixes.
6. Problemų sprendimas
This section addresses common issues you might encounter with your RSNAVI Android Car Stereo.
6.1 Bendrosios problemos ir sprendimai
- Nėra galios:
- Patikrinkite visas maitinimo jungtis ir saugiklius.
- Ensure the vehicle battery is properly connected.
- Nėra garso:
- Patikrinkite garsiakalbių jungtis.
- Patikrinkite garsumo lygius ir nutildymo nustatymus.
- Įsitikinkite, kad pasirinktas teisingas garso šaltinis.
- GPS signalo praradimas:
- Įsitikinkite, kad GPS antena yra tvirtai prijungta ir pastatyta vietoje, kurioje nėra šviesos. view dangaus.
- If using offline maps, ensure map data has been fully downloaded.
- „Bluetooth“ ryšio problemos:
- Įsitikinkite, kad „Bluetooth“ įjungtas ir stereo sistemoje, ir telefone.
- Ištrinkite ankstesnius suporavimus ir bandykite suporuoti iš naujo.
- Iš naujo paleiskite abu įrenginius.
- Poor UI Responsiveness:
- Uždarykite nereikalingas fonines programas.
- Atlikite sistemos paleidimą iš naujo.
- Vairo valdikliai neveikia:
- Verify the Canbus decoder is correctly installed.
- Reconfigure the steering wheel control settings in the system menu.
6.2 Gamykliniai nustatymai
If persistent issues occur, a factory reset may resolve them. The factory setting keyword is 3368. Use this option with caution as it will erase all user data and settings.
7. Specifikacijos
| Funkcija | Specifikacija |
|---|---|
| Sistema | Android |
| Lustų rinkinys | UIS81411 |
| Ekrano dydis | 9 colių |
| Atmintis (RAM + ROM) | 2 GB (RAM) + 64 GB (ROM) |
| Ekrano raiška | 1280*720 |
| Radijo lustas | UIS |
| Maitinimo išvestis | 4x45W |
| Darbinė temperatūra | -20 ℃ iki 75 ℃ |
| Galia Ampkeltuvas Chip | TDA7388 |
| Radijo grupė | FM/RDS |
| Vaizdo išvestis | Palaikoma |
| Inverted Input | AHD/CVBS (Rearview fotoaparatas) |
| Išorinis mikrofonas | Palaikoma |
| Padalintas ekranas | Palaikoma |
| Žemėlapis | Built-in offline map (Internet download data required) |
| WIFI | Palaikoma |
| USB | Dviguba USB sąsaja |
| Ryšio technologija | „Bluetooth“, USB, „Wi-Fi“ |
| Garso išvesties režimas | Stereo |
| Įtraukti komponentai | Canbus, Car Radio, Power cord, RCA Cable, Radio Antenna |
| Gaminio matmenys | 33.02 x 27 x 11.02 cm; 1 kg |
| Modelio numeris | 4 Core 2G-64G CAM |
8. Garantija ir klientų aptarnavimas
RSNAVI is committed to providing quality products and support. Your purchase includes:
- 30 dienų pinigų grąžinimo garantija: Jei nesate patenkinti pirkiniu, galite jį grąžinti per 30 dienų ir atgauti visus pinigus.
- 24 mėnesių garantija: Produktams suteikiama 24 mėnesių garantija nuo gamybos defektų.
- Techninis palaikymas visą gyvenimą: RSNAVI offers lifetime technical assistance for any questions regarding installation or use.
For any questions or assistance, please contact our customer service team via email. We aim to respond and address your concerns within 24 hours.