
CUSHYBITE PBLSV716B
User Manual: CUSHYBITE HP 18V Cordless Pet Stick Vacuum
Model: PBLSV716B
1. Įvadas
Thank you for choosing the CUSHYBITE HP 18V Cordless Pet Stick Vacuum, model PBLSV716B. This manual provides essential information for the safe operation, maintenance, and troubleshooting of your new vacuum cleaner. Please read this manual thoroughly before using the product and keep it for future reference.
This cordless stick vacuum is designed for efficient floor-to-ceiling cleaning, featuring HP Technology for powerful suction. It is ideal for tackling pet hair, dirt, and debris on various surfaces including hard floors, carpets, and rugs.
2. Svarbi saugos informacija
Naudodami elektros prietaisus, visada laikykitės pagrindinių saugos priemonių, kad sumažintumėte gaisro, elektros smūgio ar sužalojimo riziką.
- Prieš naudodami prietaisą perskaitykite visas instrukcijas.
- Nepalikite siurblio be priežiūros, kai jis įjungtas. Ištraukite kištuką iš elektros lizdo, kai nenaudojate ir prieš atlikdami techninę priežiūrą.
- Nenaudokite lauke arba ant šlapių paviršių.
- Neleisti naudoti kaip žaislo. Būtinas didelis dėmesys, kai naudojasi vaikai arba jie yra šalia jų.
- Naudokite tik taip, kaip aprašyta šiame vadove. Naudokite tik gamintojo rekomenduojamus priedus.
- Nenaudokite su pažeistu laidu ar kištuku. Jei prietaisas neveikia taip, kaip turėtų, buvo numestas, sugadintas, paliktas lauke arba įmestas į vandenį, grąžinkite jį į techninės priežiūros centrą.
- Netraukite ir neneškite už laido, nenaudokite laido kaip rankenos, neuždarykite durelių ant laido ir netraukite laido už aštrių briaunų ar kampų. Neleiskite prietaiso per laidą. Laikykite laidą toliau nuo įkaitusių paviršių.
- Neištraukite kištuko traukdami už laido. Norėdami atjungti kištuką, imkite už kištuko, o ne už laido.
- Nelieskite kištuko ar prietaiso šlapiomis rankomis.
- Nekiškite jokių daiktų į angas. Nenaudokite, kai jokia anga užblokuota; saugokite nuo dulkių, pūkelių, plaukų ir nieko, kas gali sumažinti oro srautą.
- Plaukus, laisvus drabužius, pirštus ir visas kūno dalis laikykite toliau nuo angų ir judančių dalių.
- Neimkite nieko, kas dega ar rūko, pavyzdžiui, cigarečių, degtukų ar karštų pelenų.
- Būkite ypač atsargūs valydami laiptus.
- Nenaudokite degiems ar degiems skysčiams, pvz., benzinui, surinkti arba nenaudokite vietose, kur jų gali būti.
- Nerinkite toksiškų medžiagų, tokių kaip chloro baliklis, amoniakas ar kanalizacijos valiklis.
- Nenaudokite be dulkių puodelio ir (arba) filtrų.
- This product is compatible with all RYOBI 18V batteries. Ensure the battery is fully charged before use.
3. Gaminio komponentai
Familiarize yourself with the parts of your CUSHYBITE HP 18V Cordless Pet Stick Vacuum.
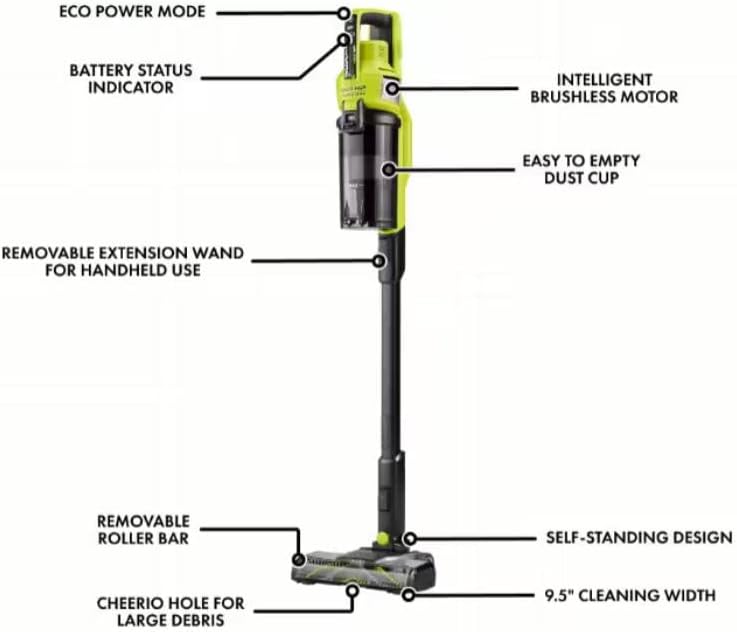
3.1 paveikslas: Labeled components of the vacuum cleaner.
- ECO Power Mode Button: For energy-efficient cleaning.
- Baterijos būsenos indikatorius: Rodo likusį akumuliatoriaus veikimo laiką.
- Pažangus bešepetis variklis: Provides powerful and efficient suction.
- Lengvai ištuštinamą dulkių talpyklą: For convenient debris disposal.
- Nuimamas prailginimo vamzdelis: Allows conversion to handheld use.
- Nuimamas ritininis laikiklis: Lengvam valymui ir priežiūrai.
- Cheerio Hole for Large Debris: Designed to pick up larger particles.
- 9.5 colių valymo plotis: Wide cleaning path for efficiency.
- Savarankiškai stovintis dizainas: Allows the vacuum to stand upright on its own.
The vacuum also includes a crevice tool and a brush for specialized cleaning tasks.
4. Sąranka ir surinkimas
Your CUSHYBITE HP 18V Cordless Pet Stick Vacuum requires minimal assembly.
- Išpakuoti: Atsargiai išimkite visus komponentus iš pakuotės. Įsitikinkite, kad yra visos 3 skyriuje išvardytos dalys.
- Pritvirtinkite prailginimo lazdelę: Įkiškite ilgintuvą į pagrindinį dulkių siurblio korpusą, kol jis tvirtai užsifiksuos.
- Grindų galvutės pritvirtinimas: Connect the floor head to the bottom of the extension wand, ensuring it locks firmly.
- Įdėkite bateriją: Insert a charged RYOBI 18V battery into the battery slot on the main vacuum body. Ensure it clicks into place.
- Pirmasis įkrovimas: Optimaliam veikimui, prieš pirmą kartą naudodami visiškai įkraukite bateriją.
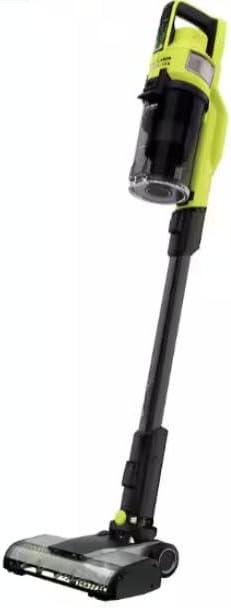
4.1 paveikslas: The vacuum fully assembled and ready for use.
5. Naudojimo instrukcijos
Your vacuum offers versatile cleaning options.
5.1. Standard Stick Vacuum Mode
- Ensure the vacuum is fully assembled with the extension wand and floor head attached.
- Paspauskite maitinimo mygtuką, kad įjungtumėte siurblį.
- Use the ECO Power Mode button to switch between power settings as needed for different surfaces or debris levels.
- The LED lights on the roller bar will illuminate, helping to spot dirt and debris on the floor.
- Maneuver the vacuum across hard floors, carpets, and rugs. The 9.5" cleaning width ensures efficient coverage.
- The self-standing design allows you to pause cleaning and leave the vacuum upright without support.
5.2. Rankinio dulkių siurblio režimas
For cleaning cars, stairs, upholstery, and tight spaces:
- Detach the extension wand from the main vacuum body by pressing the release button.
- Attach the desired accessory (crevice tool or brush) directly to the main vacuum body.
- Turn on the vacuum and use it for targeted cleaning.
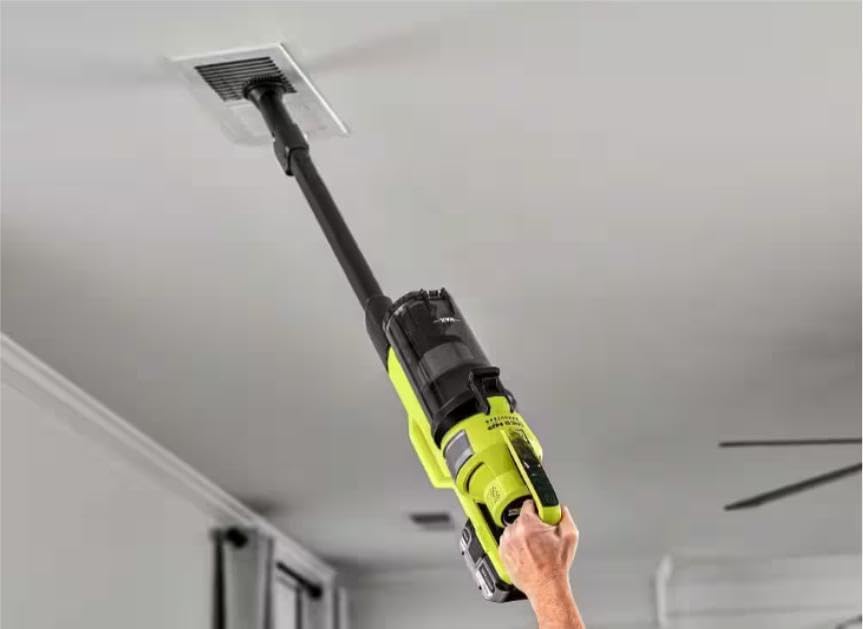
5.1 paveikslas: Using the vacuum in handheld mode for high-reach cleaning.
6. Priežiūra
Reguliarus valymas užtikrina optimalų veikimą ir prailgina dulkių siurblio tarnavimo laiką.
6.1. Dulkių surinktuvo ištuštinimas
- Įsitikinkite, kad dulkių siurblys yra išjungtas ir išimta baterija.
- Suraskite dulkių surinktuvo atlaisvinimo mygtuką ir paspauskite jį, kad dulkių surinktuvas būtų nuimtas nuo pagrindinio korpuso.
- Hold the dust cup over a trash bin and open the bottom flap to empty the contents.
- Close the flap and reattach the dust cup to the vacuum until it clicks securely.
6.2. Filtrų valymas
Rekomenduojama reguliariai valyti filtrus, ypač jei pastebite sumažėjusią siurbimo galią.
- Nuimkite dulkių siurblį, kaip aprašyta aukščiau.
- Carefully remove the filters from inside the dust cup.
- Tap the filters over a trash bin to remove loose dirt and debris.
- If necessary, rinse the filters with cold water. Ensure they are completely dry before reinserting them into the vacuum. Do not use hot water or detergents.
- Surinkite filtrus ir dulkių surinktuvą.
6.3. Ritininio strypo valymas
Periodiškai tikrinkite volelio siją, ar nėra susivėlusių plaukų ar šiukšlių.
- Įsitikinkite, kad dulkių siurblys išjungtas ir išimta baterija.
- Detach the floor head from the extension wand.
- Locate the release mechanism for the roller bar (refer to Figure 3.1) and remove the roller bar.
- Use scissors or a brush to remove any tangled hair, string, or debris from the roller bar.
- Reinsert the roller bar until it clicks into place.
7. Problemų sprendimas
Dažniausiai pasitaikančias problemas ir jų sprendimus rasite šiame skyriuje.
| Problema | Galima priežastis | Sprendimas |
|---|---|---|
| Dulkių siurblys neįsijungia. | Baterija neįkrauta arba netinkamai įdėta. | Ensure the RYOBI 18V battery is fully charged and securely inserted. |
| Siurbimo praradimas. | Dust cup is full; Filters are clogged; Obstruction in nozzle or hose; Roller bar is tangled. | Empty the dust cup. Clean or replace filters. Check for and remove any obstructions. Clean the roller bar. |
| Ritininis laikiklis nesisuka. | Obstruction in roller bar; Roller bar not properly installed. | Remove any tangled hair or debris from the roller bar. Ensure the roller bar is correctly reinserted. |
| Dulkių siurblys skleidžia neįprastą triukšmą. | Obstruction in air path; Damaged component. | Check for and remove any obstructions in the dust cup, filters, or air path. If noise persists, contact customer support. |
8. Specifikacijos
| Funkcija | Detalė |
|---|---|
| Modelio numeris | PBLSV716B |
| Prekės ženklas | CUSHYBITE |
| Maitinimo šaltinis | 18V Battery (RYOBI compatible) |
| Variklio tipas | Brushless (HP Technology) |
| Valymo plotis | 9.5 colių |
| Konfigūracijos | Up to 8 cleaning configurations (stick and handheld) |
| Ypatingos savybės | Self-standing design, LED lights on roller bar, Easy-to-empty dust cup, Removable roller bar |
9. Garantija ir palaikymas
For warranty information or technical support, please refer to the documentation included with your purchase or contact CUSHYBITE customer service.
For best results and proper fitment, always compare the product's image and listed dimensions before purchase.
Gamintojas: CUSHYBITE
Pirmą kartą pasiekiama data: 22 m. sausio 2025 d
Ask a question about this manual
Ask about setup, troubleshooting, compatibility, parts, safety, or missing instructions. Manuals+ will review the question and use this page’s manual context to help answer it.