
1. Įvadas
Thank you for choosing the Xega Solar Security Camera. This device is designed to provide reliable outdoor surveillance with the convenience of solar power and wireless connectivity. Featuring 2K resolution, Pan-Tilt-Zoom (PTZ) functionality, color night vision, and smart motion detection, it offers comprehensive monitoring for your property. This manual will guide you through the installation, operation, and maintenance of your camera system.

Image: The Xega Solar WiFi Camera mounted on a house, illustrating its wireless connectivity.
2. Kas yra dėžutėje
Patikrinkite pakuotės turinį, kad įsitikintumėte, jog yra visi reikalingi daiktai:
- WiFi Camera (4 units)
- Saulės baterijos (4 vnt.)
- Solar Panel Bracket (4 units)
- 3-meter Connection Cable (4 units)
- Vartotojo vadovas
- Sraigtai ir sieniniai kištukai
3. Produktas baigtasview ir Savybės
The Xega Solar Security Camera is equipped with advanced features for reliable outdoor surveillance:
- Solar-Powered & Easy Installation: Operates entirely on solar energy with a built-in 5200mAh rechargeable battery. No electrical wiring required, allowing flexible installation. The 3.5W angle-adjustable solar panel maximizes sunlight exposure.
- 2K Image & PTZ Technology: Delivers 2K HD clarity with a high-performance image sensor. Features 355° horizontal and 90° vertical rotation for wide area coverage.
- Spalvotas naktinis matymas: Provides vibrant full-color night vision up to 25 meters (82ft) in darkness.
- Išmanusis aptikimas ir momentiniai įspėjimai: Built-in PIR sensor with adjustable sensitivity supports human detection and customizable detection zones to minimize false alarms. Triggers bright floodlights and audible alarms upon detection. Real-time alerts are pushed to your phone via the Ubox app.
- Dvipusis pokalbis: Built-in microphone and speaker enable real-time two-way communication.
- Optional Storage: Supports local storage via TF card (up to 128GB, not included) and cloud storage (30-day trial available).
- IP66 atsparumas oro sąlygoms: Designed to withstand various weather conditions, ensuring year-round security.
Visual Features Overview

Image: The camera and solar panel setup, emphasizing continuous solar power for 365 days.
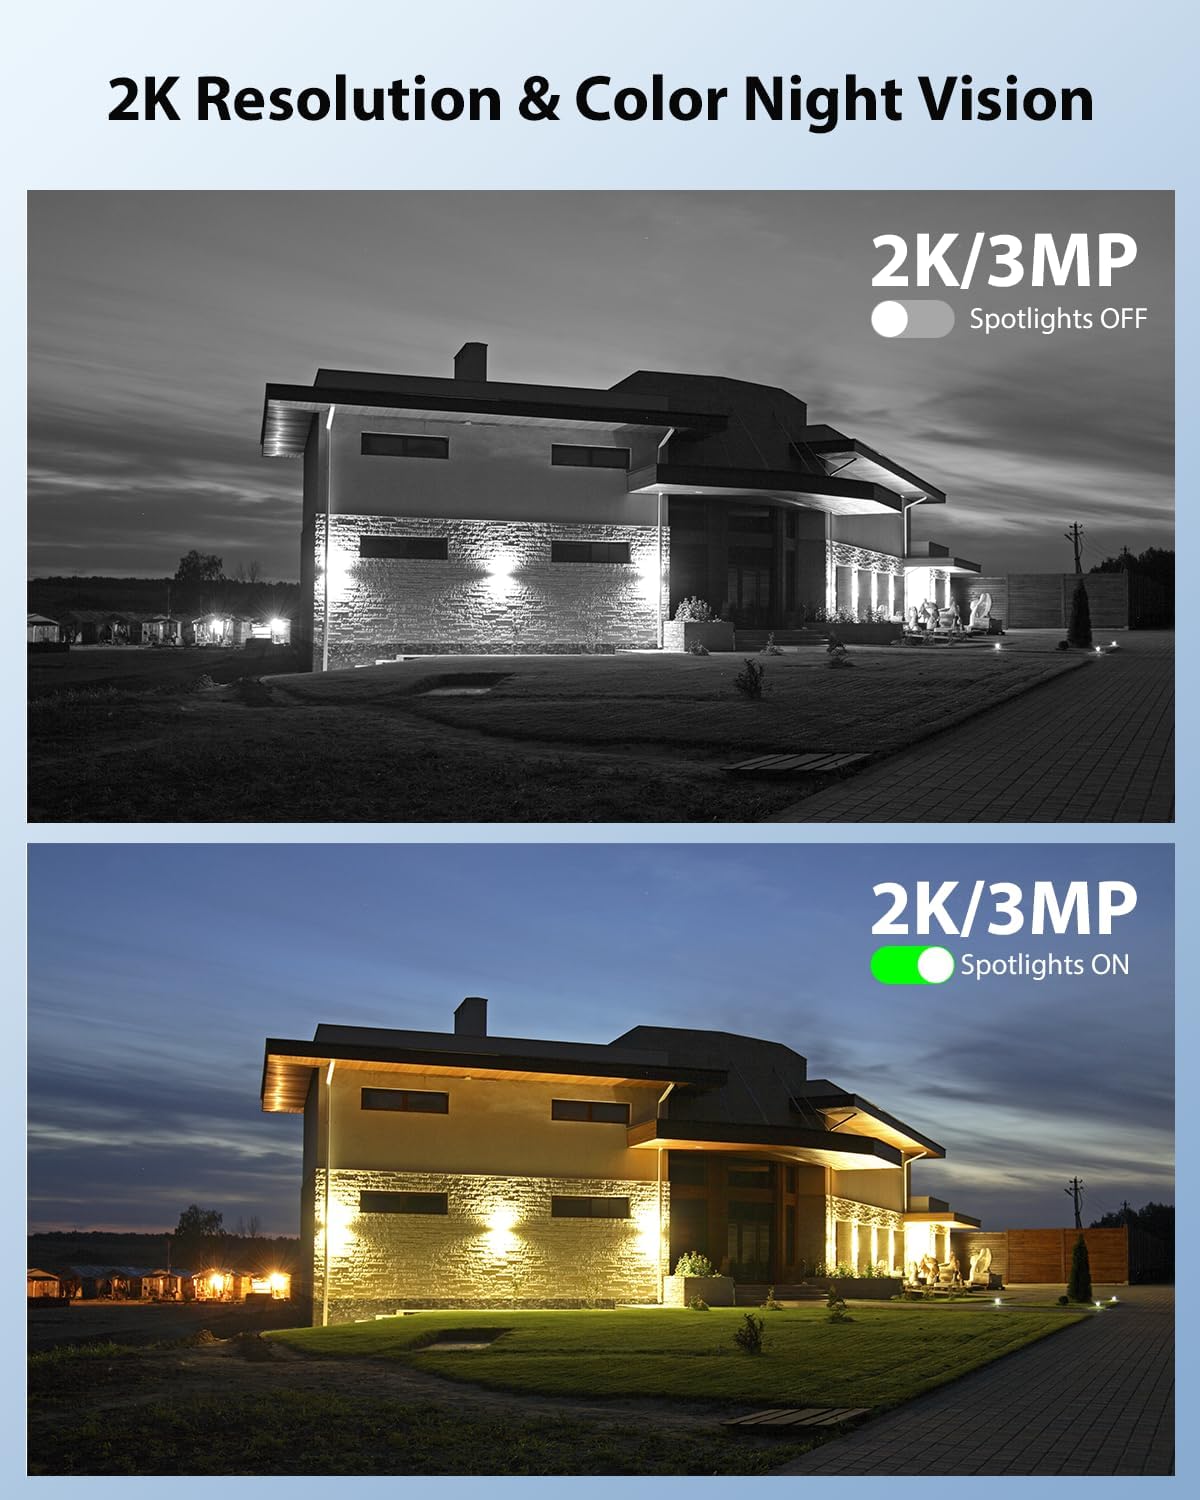
Image: Demonstrates 2K resolution and the difference between infrared and color night vision with spotlights.

Image: Illustrates the panoramic view and PTZ (Pan-Tilt-Zoom) capabilities controlled via a smartphone app.
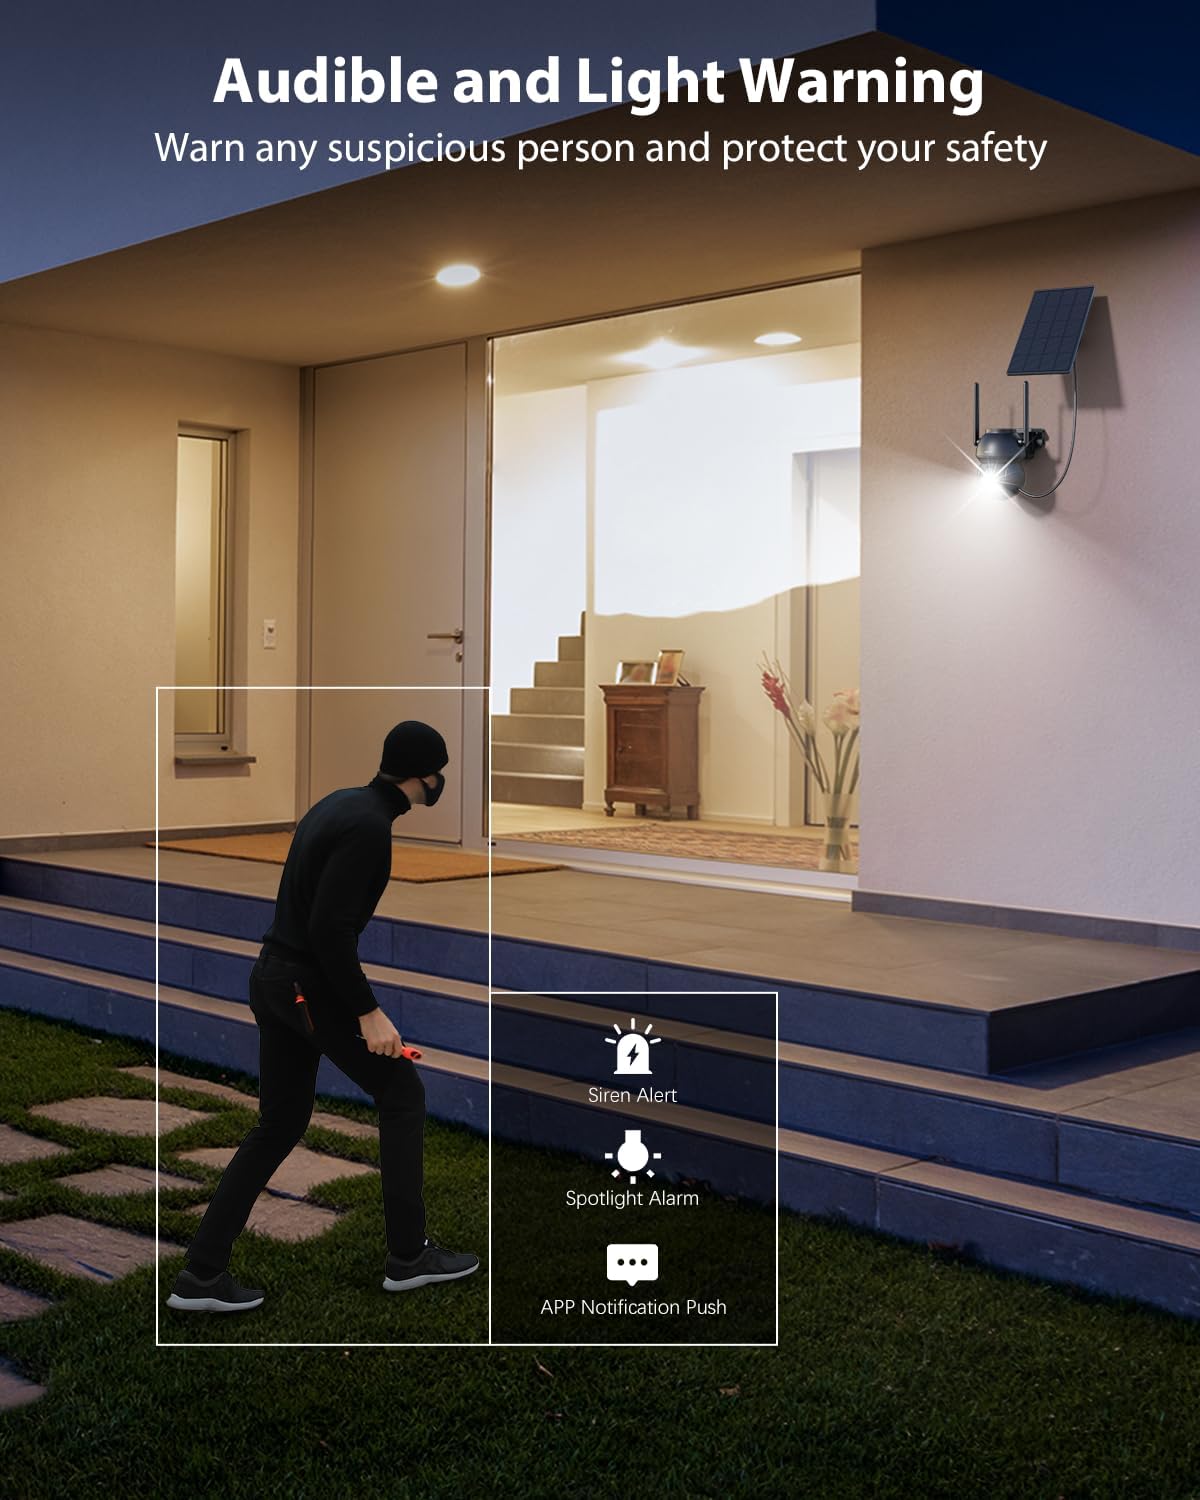
Image: Shows the camera's audible and light warning system deterring a suspicious person.

Image: Depicts the two-way audio function, allowing communication through the camera.

Image: Shows how to customize detection areas to focus monitoring on important zones and reduce false alarms.

Image: Highlights the IP66 weather-resistant design, showing the camera's durability in various weather conditions.
Produkto vaizdo įrašas
Vaizdo įrašas: Viršijimasview of the Xega Solar WiFi Camera Outdoor Wireless, demonstrating its key features and ease of installation.
4. Sąrankos vadovas
4.1 Akumuliatoriaus įkrovimas
Before initial use, fully charge the camera's built-in 5200mAh battery using the provided USB cable. Although solar-powered, a full initial charge ensures optimal performance from the start.
4.2 Programėlės diegimas ir paskyros sukūrimas
- Atsisiųskite Ubox programėlę iš savo išmaniojo telefono programėlių parduotuvės („iOS“ arba „Android“).
- Atidarykite programėlę ir vykdykite ekrane pateikiamus nurodymus, kad sukurtumėte naują paskyrą arba prisijunkite, jei jau turite.
4.3 Camera Pairing with Wi-Fi
- Įsitikinkite, kad jūsų išmanusis telefonas yra prijungtas prie 2.4 GHz „Wi-Fi“ tinklasKamera nepalaiko 5 GHz „Wi-Fi“.
- In the Ubox app, tap the "Add Device" or "+" icon.
- Power on the camera. It will enter pairing mode, indicated by a specific LED light pattern (refer to the camera's LED indicator guide in the app for details).
- Follow the app's instructions to connect the camera to your Wi-Fi network. This usually involves scanning a QR code displayed on your phone with the camera lens.
- Once connected, the camera will confirm successful pairing, and you can name your device.
4.4 Kameros ir saulės baterijos montavimas
The camera and solar panel are designed for wall mount installation.
- Pasirinkite vietą: Select an outdoor location with good Wi-Fi signal strength and ample sunlight exposure for the solar panel. The camera should be mounted at a height that provides optimal viewing angles and detection range.
- Sumontuokite fotoaparatą: Use the provided screws and wall plugs to securely attach the camera bracket to a wall or suitable surface. Ensure the camera has a clear line of sight to the area you wish to monitor.
- Sumontuokite saulės kolektorių: Attach the solar panel bracket to a location where it receives direct sunlight for most of the day. Adjust the angle of the solar panel to maximize sunlight exposure.
- Prijunkite saulės skydelį: Use the 3-meter connection cable to link the solar panel to the camera.
5. Naudojimo instrukcijos
5.1 Tiesiogiai View ir PTZ valdymas
- Open the Ubox app and select your camera to access the live view.
- Use the on-screen joystick or swipe gestures to control the camera's 355° pan and 90° tilt movements.
- Pinch to zoom in or out (digital zoom).
5.2 Dvipusis garsas
- Gyvai view, palieskite mikrofono piktogramą, kad kalbėtumėte per kameros garsiakalbį.
- Norėdami klausytis garso iš kameros aplinkos, palieskite garsiakalbio piktogramą.
5.3 Judesio aptikimas ir įspėjimai
- Navigate to the camera settings in the Ubox app.
- Adjust PIR sensor sensitivity to optimize detection and minimize false alarms.
- Set up custom detection zones to monitor specific areas of interest.
- Enable or disable floodlight and siren alarms for motion events.
- Ensure push notifications are enabled in your phone settings and the Ubox app to receive instant alerts.
5.4 Naktinio matymo režimai
The camera offers different night vision modes:
- Infraraudonųjų spindulių nakties vizija: Užtikrina aiškius nespalvotus vaizdus esant prastam apšvietimui.
- Spalvotas naktinis matymas: Activates built-in spotlights to provide full-color images at night when motion is detected. This can be configured in the app settings.
5.5 Saugojimo parinktys
- TF kortelės saugykla: Insert a TF (microSD) card (up to 128GB, not included) into the camera's designated slot for local recording.
- Saugykla debesyje: Subscribe to the optional cloud storage service via the Ubox app for secure, remote storage of your recordings. A 30-day trial may be available.
- Prieiga įrašyta footage and playback options through the Ubox app.
6. Priežiūra
- Saulės baterijų valymas: Reguliariai valykite saulės baterijos paviršių minkšta,amp šluoste pašalinkite dulkes, nešvarumus ar šiukšles, kurios gali sumažinti įkrovimo efektyvumą.
- Kameros objektyvo valymas: Gently clean the camera lens with a microfiber cloth to ensure clear image quality. Avoid abrasive materials.
- Firmware atnaujinimai: Check the Ubox app periodically for firmware updates. Keeping your camera's firmware updated ensures optimal performance and access to new features.
- Baterijos būklė: While solar-powered, extreme weather or prolonged periods of low sunlight may affect battery levels. Ensure the solar panel is optimally positioned.
- Atsparumas oro sąlygoms: The IP66 rating ensures protection against dust and strong jets of water. No special weather-proofing maintenance is typically required beyond ensuring secure mounting.
7. Problemų sprendimas
- Fotoaparatas neprisijungia prie „Wi-Fi“:
- Įsitikinkite, kad jūsų „Wi-Fi“ tinklas yra 2.4 GHz dažnio.
- Patikrinkite „Wi-Fi“ signalo stiprumą kameros vietoje.
- Iš naujo paleiskite maršrutizatorių ir kamerą.
- Patikrinkite, ar programėlėje įvestas teisingas „Wi-Fi“ slaptažodis.
- Prasta vaizdo kokybė:
- Nuvalykite fotoaparato objektyvą.
- Ensure adequate lighting, especially for color night vision.
- Patikrinkite savo interneto ryšio greitį.
- Klaidingi judėjimo įspėjimai:
- Adjust PIR sensor sensitivity in the app.
- Define or refine custom detection zones to exclude irrelevant areas (e.g., public roads, swaying trees).
- Akumuliatorius neįkraunamas:
- Užtikrinkite, kad saulės baterijos modulis kasdien kelias valandas gautų tiesioginių saulės spindulių.
- Nuvalykite saulės baterijos paviršių.
- Patikrinkite jungiamąjį laidą tarp saulės baterijos ir kameros.
- Dvipusio garso problemos:
- Ensure your phone's volume is up and the microphone is enabled for the Ubox app.
- Check the camera's speaker and microphone settings in the app.
8. Specifikacijos
| Funkcija | Specifikacija |
|---|---|
| Modelio pavadinimas | XG-22-WIFI-P4 |
| Naudojimas viduje / lauke | Lauke |
| Maitinimo šaltinis | Solar and Battery Powered (5200mAh Lithium Ion batteries included) |
| Ryšio technologija | 2.4 GHz „WiFi“ |
| Vaizdo įrašymo raiška | 2K (1296p) |
| PTZ (panoraminis/pakreipimas) | 355° horizontaliai, 90° vertikaliai |
| Naktinio matymo diapazonas | 25 metrų (82 pėdų) |
| Silpnos šviesos technologija | Spalvotas naktinis matymas |
| Judesio aptikimas | PIR Sensor, Human Detection, Customizable Alarm Areas |
| Dvipusis garsas | Taip |
| Saugojimo parinktys | TF Card (Max. 128GB), Cloud Storage |
| Tarptautinis apsaugos įvertinimas | IP66 |
| Montavimo tipas | Sieninis laikiklis |
| Medžiaga | Akrilnitrilo butadieno stirenas (ABS) |
| Gaminio matmenys | 5 x 5 x 5 colio |
| Prekės svoris | 6.43 svaro (4 vnt. pakuotė) |
9. Garantija ir palaikymas
9.1 Informacija apie garantiją
Xega products typically come with a manufacturer's warranty. Please refer to the product packaging or the official Xega webKonkrečias garantijos sąlygas ir nuostatas rasite svetainėje. Išsaugokite pirkimo kvitą kaip pirkimo įrodymą.
9.2 Pagalba klientams
For technical assistance, troubleshooting, or any product-related inquiries, please contact Xega customer support. You can usually find contact information on the Xega official website or through the Ubox app.

Image: Xega offers 24/7 online customer support for assistance.