
1. Įvadas
Thank you for choosing the Osram Ceiling Wing Fan 36W D105. This manual provides essential information for the safe installation, operation, and maintenance of your new ceiling fan. Please read these instructions carefully before installation and retain them for future reference.
This modern ceiling fan features an integrated LED light with adjustable white color and dimming capabilities, controlled conveniently by a remote. It is designed for indoor use in various rooms such as living rooms, bedrooms, kitchens, and dining areas.
2. Saugos instrukcijos
- Elektros sauga: Always disconnect power at the main circuit breaker before attempting any installation, maintenance, or cleaning. Ensure all wiring is performed by a qualified electrician and complies with local electrical codes.
- Montavimas: The mounting structure must be capable of supporting the weight of the fan (approximately 4.2 kg) and the dynamic load during operation.
- Ašmenų prošvaisa: Ensure there is adequate clearance between the fan blades and any obstacles, including walls and furniture, to prevent injury or damage.
- Vandens ekspozicija: This product is designed for indoor use only and has a water resistance level of 'Water Resistant'. Do not expose it to direct water spray or high humidity environments like uncovered outdoor areas.
- Vaikai ir augintiniai: Ventiliatoriaus eksploatavimo ir montavimo metu laikykite vaikus ir naminius gyvūnus atokiau nuo jo.
- Priežiūra: Do not attempt to repair or modify the fan. Refer all servicing to qualified personnel.
3. Pakuotės turinys
Atsargiai išpakuokite dėžę ir įsitikinkite, kad visos dalys yra nepažeistos. Jei trūksta kokių nors dalių arba jos pažeistos, nedelsdami susisiekite su pardavėju.
- Osram Ceiling Wing Fan Unit (with integrated LED light)
- Nuotolinio valdymo pultas
- Montavimo įranga (varžtai, inkarai ir kt.)
- Instrukcijų vadovas (šis dokumentas)
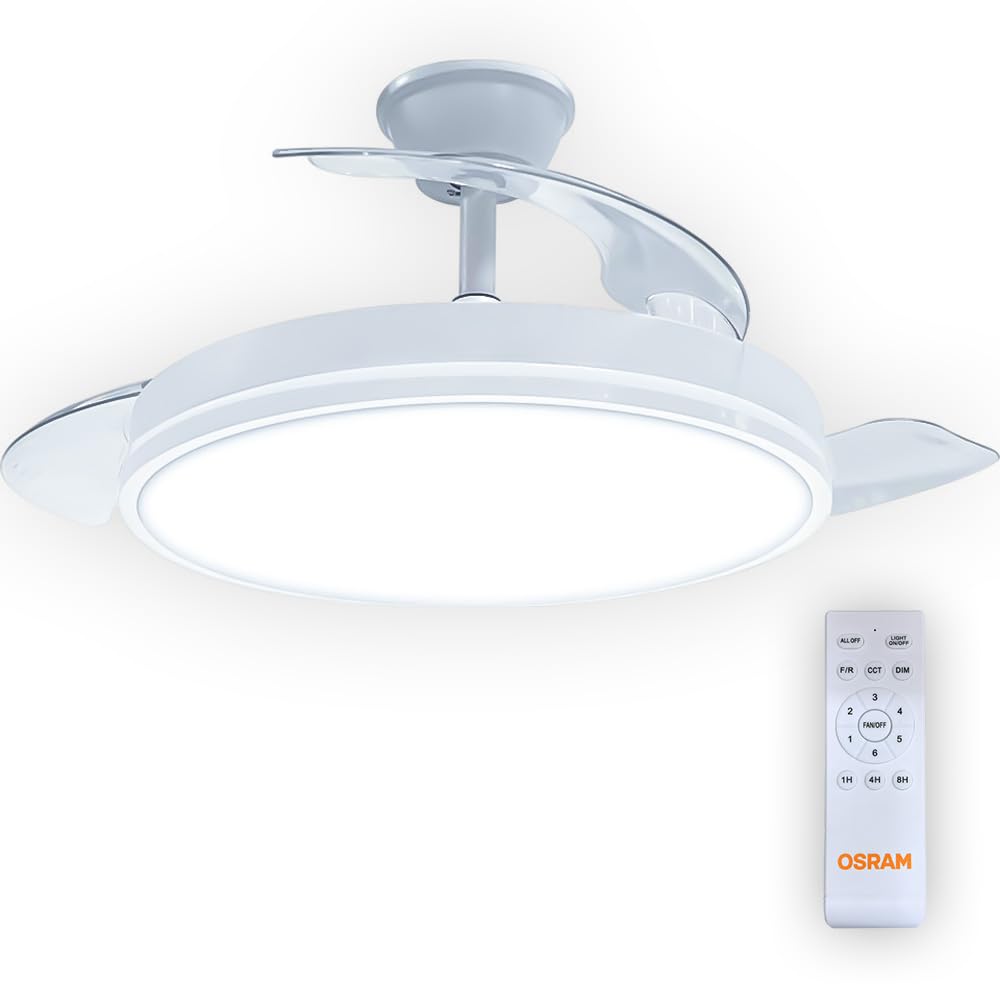
Image 1: Osram Ceiling Wing Fan 36W D105. This image shows the complete ceiling fan unit with its central LED light and transparent wing-like blades.
4. Sąranka ir diegimas
Assembly is required for this product. Follow these steps carefully. If you are unsure about any part of the installation, consult a qualified electrician.
4.1 Išankstinis montavimas
- Išjunkite maitinimą: Locate the circuit breaker for the room where you will install the fan and turn off the power. Verify power is off using a voltage testeris.
- Paruoškite montavimo vietą: Įsitikinkite, kad lubų jungiamoji dėžutė yra tvirtai pritvirtinta ir gali atlaikyti ventiliatoriaus svorį.
4.2 Ventiliatoriaus montavimas
- Pritvirtinkite montavimo laikiklį: Pritvirtinkite tvirtinimo laikiklį prie lubų jungiamosios dėžutės naudodami pateiktus varžtus ir poveržles. Įsitikinkite, kad jis tvirtai pritvirtintas.
- Laidų jungtys: Connect the electrical wires from the ceiling to the fan's wiring. Typically, this involves connecting Live (L), Neutral (N), and Ground (GND) wires. Match colors (e.g., Black to Black, White to White, Green/Bare Copper to Green/Bare Copper). Use wire nuts to secure connections.
- Secure Fan Body: Carefully lift the fan body and attach it to the mounting bracket. Follow the specific instructions in the included diagram for your model to ensure proper alignment and secure fastening. This fan uses a Semi-Flush Mount installation type.
- Įdiekite peilius: If the blades are separate, attach them to the fan motor housing according to the instructions. Ensure all screws are tightened securely.
- Attach Light Cover: Secure the LED light cover to the fan body.

2 paveikslėlis: Šonas view of the Osram Ceiling Wing Fan. This view highlights the fan's profile and the semi-flush mounting point, which is crucial for installation planning.
4.3 Po įrengimo
- Atkurti maitinimą: Kai įrengimas baigtas ir visos jungtys pritvirtintos, atkurkite elektros tiekimą automatiniu jungikliu.
- Test Fan: Use the remote control to test the fan and light functions.
5. Naudojimo instrukcijos
Your Osram Ceiling Wing Fan is controlled by the included remote control. Ensure the remote has working batteries (not included, typically 2x AAA) before use.

Image 3: Osram Ceiling Fan Remote Control. This image displays the layout of the remote control with buttons for fan speed, light control, timer, and direction.
5.1 Nuotolinio valdymo pulto funkcijos
- VISKAS IŠJUNGTA: Išjungia ir ventiliatorių, ir šviesą.
- ŠVIESOS ĮJUNGTA/IŠJUNGTA: Toggles the LED light on or off.
- F/R (Forward/Reverse): Changes the direction of the fan blades. Use forward rotation for cooling in summer and reverse rotation for circulating warm air in winter.
- CCT (koreliuota spalvų temperatūra): Adjusts the color temperature of the LED light (e.g., warm white, neutral white, cool white).
- DIM: Dims or brightens the LED light. Press and hold to cycle through brightness levels.
- VENTILIATORIUS/IŠJUNGTA: Įjungia arba išjungia ventiliatorių.
- 1-6: Selects one of the six available fan speeds. '1' is the lowest speed, '6' is the highest.
- 1H / 4H / 8H: Activates the timer function, setting the fan to turn off automatically after 1, 4, or 8 hours, respectively.
6. Priežiūra
Reguliarus valymas užtikrina optimalų ventiliatoriaus veikimą ir pailgina jo tarnavimo laiką.
- Valymas: Always turn off the power before cleaning. Use a soft, damp cloth to wipe down the fan body and blades. Do not use abrasive cleaners or solvents, as they may damage the finish.
- Dulkės: Regularly dust the fan blades and light cover to prevent dust buildup, which can affect performance and light output.
- Priveržkite varžtus: Periodically check and tighten all screws on the fan body and mounting bracket to ensure secure operation.
- Tepimas nereikalingas: Ventiliatoriaus variklis yra nuolat tepamas ir nereikalauja papildomo tepalo.
7. Problemų sprendimas
Jei kyla problemų dėl ventiliatoriaus, žr. šias dažniausiai pasitaikančias problemas ir sprendimus:
| Problema | Galima priežastis | Sprendimas |
|---|---|---|
| Ventiliatorius neįsijungia | Ventiliatoriui nėra maitinimo Nuotolinio valdymo pulto baterijos išsikrovusios Neteisingi laidai | Patikrinkite grandinės pertraukiklį ir sieninį jungiklį Pakeiskite nuotolinio valdymo pulto baterijas Patikrinkite laidų jungtis (pasitarkite su elektriku) |
| Šviesa neveikia | Nėra galios šviesai Neteisingi laidai LED module failure | Patikrinkite grandinės pertraukiklį ir sieninį jungiklį Patikrinkite laidų jungtis (pasitarkite su elektriku) Contact customer support for LED module replacement |
| Ventiliatoriaus virpėjimas | Atsilaisvinę tvirtinimo varžtai Nesubalansuoti peiliai | Ensure all mounting screws are tight Check if blades are securely attached and balanced (balancing kit may be needed if severe) |
| Nuotolinio valdymo pultas nereaguoja | Išsikrovusios baterijos Kliūtis tarp nuotolinio valdymo pulto ir imtuvo Remote not paired (if applicable) | Pakeiskite baterijas Ensure clear line of sight to the fan Refer to specific pairing instructions if provided (not common for basic fans) |
8. Specifikacijos
| Prekinis ženklas: | Osram |
| Modelio numeris: | Ceiling Blade |
| Produkto tipas: | Lubų ventiliatorius su šviesa |
| Elektros galia: | 36 vatų |
| Šviesos šaltinis: | LED |
| Šviesos spalva: | Reguliuojama balta |
| Kontrolės metodas: | Nuotolinis |
| Maitinimo šaltinis: | Su laidu elektra |
| Montavimo tipas: | Ceiling Mount, Semi-Flush Mount |
| Vidaus / lauko naudojimas: | Vidinis |
| Gaminio matmenys (I x P x A): | 50U x 20G x 50Y centimeters |
| Svoris: | 4.2 kg |
| Atspalvio medžiaga: | Plastikiniai |
| Spalva: | Baltas |
| Stilius: | Modernus |
| Reikalingas surinkimas: | Taip |
| Įtraukti komponentai: | Nuotolinio valdymo pultas |
9. Garantija ir palaikymas
Dėl garantijos informacijos ar techninės pagalbos žr. kartu su pirkiniu pateiktus dokumentus arba susisiekite su pardavėju. Išsaugokite pirkimo įrodymą, jei prireiktų pateikti garantijos pretenziją.