1. Įvadas
This manual provides instructions for the assembly, operation, and maintenance of the MONTECH X5M Micro ATX Gaming PC Case. The X5M is designed for high airflow and features pre-installed ARGB fans, a glass side panel, and an integrated GPU holder.
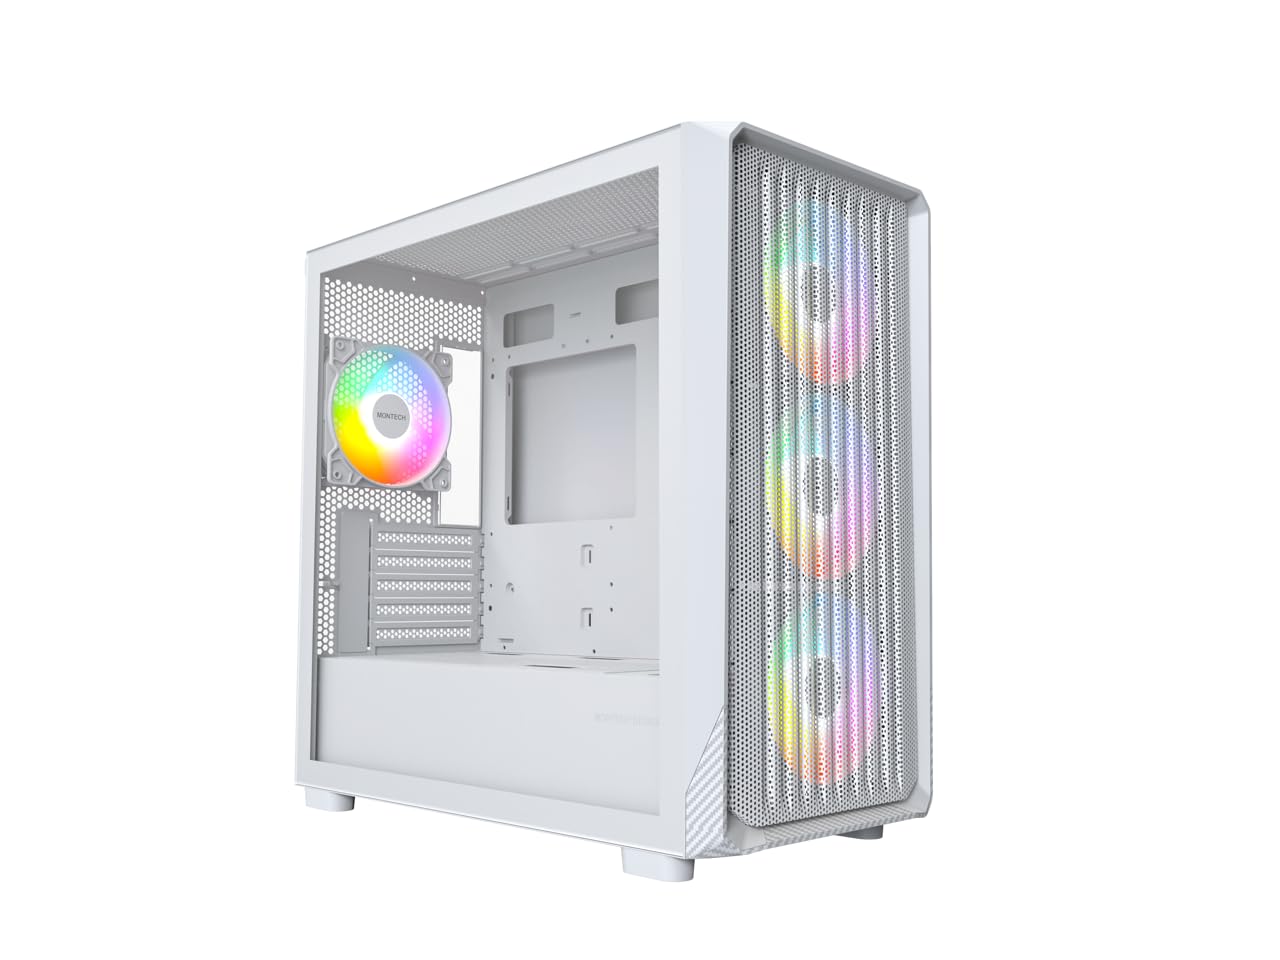
Figure 1: MONTECH X5M Micro ATX Gaming PC Case (White variant).
2. Pagrindinės savybės
- Integrated GPU Holder: An adjustable GPU support stand is included to provide physical support for graphics cards.
- Didelio oro srauto konstrukcija: Optimized structure for efficient cooling.
- Iš anksto įdiegti ARGB ventiliatoriai: Four 120mm ARGB fans are pre-installed for immediate cooling and customizable lighting.
- Grūdinto stiklo šoninė panelė: Suteikia aiškų view vidinių komponentų.
- Carbon Fiber Print Accents: Aesthetic detailing on the front panel.
- Universalus ryšys: Front I/O panel includes USB 2.0, USB 3.0, USB Type-C, and audio ports.

2 pav. Baigtaview of the MONTECH X5M case highlighting internal layout and ARGB fans.
3. Specifikacijos
| Prekės ženklas | Montech |
| Modelio pavadinimas | X5M |
| Atvejo tipas | Micro ATX Mid Tower |
| Pagrindinės plokštės suderinamumas | Mikro ATX |
| Iš anksto įdiegti ventiliatoriai | 4 x 120 mm ARGB ventiliatoriai |
| GPU ilgio palaikymas | Iki 405 mm |
| CPU Cooler Height Support | Iki 165 mm |
| PSU Length Support | Iki 230 mm |
| Sandėliavimo skyriai | Up to 2 HDDs & 4 SSDs |
| Priekinės įvesties / išvesties prievadai | 1x USB 2.0, 1x USB 3.0, 1x USB Type-C, Mic & Audio, LED Button, Power Button |
| Aušinimo būdas | Oras |
| AIO radiatoriaus atrama | Top: Up to 360mm; Front: Up to 360mm |
| Medžiaga | Plastic with Carbon Fiber Accents, Tempered Glass |
| Prekės svoris | 14.3 svarų (6.49 kg) |

Figure 3: Close-up of the carbon fiber print detailing on the front panel of the X5M case.
4. Sąranka ir diegimas
Follow these steps for installing components into your MONTECH X5M PC case. Ensure your system is powered off and unplugged before beginning any installation.
4.1. Bylos rengimas
- Carefully remove the tempered glass side panel by unscrewing the thumb screws and sliding it off.
- Remove the rear side panel to access the cable management area.
4.2. Pagrindinės plokštės montavimas
- Įdėkite įvesties / išvesties skydą (jei jis nėra iš anksto pritvirtintas prie pagrindinės plokštės) į korpuso galinę angą.
- Align your Micro ATX motherboard with the standoffs inside the case.
- Pritvirtinkite pagrindinę plokštę naudodami pateiktus varžtus.
4.3. Maitinimo šaltinio (PSU) įrengimas
- Place the PSU into the dedicated compartment at the bottom rear of the case.
- Pritvirtinkite maitinimo bloką varžtais iš korpuso galo.
4.4. Atminties įrenginių (HDD/SSD) diegimas
The X5M supports up to 2 HDDs and 4 SSDs.
- 2.5 colio SSD diskai: Mount SSDs onto the designated brackets behind the motherboard tray or on the PSU shroud.
- 3.5 colio kietieji diskai: Install HDDs into the drive cage located under the PSU shroud.
4.5. Vaizdo plokštės (GPU) diegimas
- Nuimkite reikiamus PCIe lizdų dangtelius nuo korpuso galo.
- Insert the GPU into the appropriate PCIe slot on your motherboard.
- Pritvirtinkite GPU varžtais.
- Adjust the integrated GPU support stand to provide stability for your graphics card.
4.6. Ventiliatoriaus ir radiatoriaus montavimas
The X5M comes with four 120mm ARGB fans pre-installed. Additional fans or AIO radiators can be installed as follows:
- Į viršų: Supports 3x 120mm or 2x 140mm fans, or AIO radiators up to 360mm.
- Priekyje: Supports 3x 120mm or 2x 140mm fans, or AIO radiators up to 360mm.
- Galinis: Palaiko 1 x 120 mm ventiliatorių.
- PSU gaubtas: Supports 2x 120mm fans.

Figure 4: Illustration of airflow within the MONTECH X5M case and the pre-installed ARGB fans.

Figure 5: Diagram detailing fan and radiator support locations and sizes within the X5M case.
4.7. Kabelių valdymas
Kabelių išdėstymui naudokite laidų išpjovas ir tvirtinimo taškus už pagrindinės plokštės dėklo. Tai pagerina oro srautą ir vizualiai pagerina vaizdą.
4.8. Priekinio įvesties/išvesties skydelio jungtys
Connect the front panel cables (USB 2.0, USB 3.0, USB Type-C, HD Audio, Power Switch, Reset Switch, LED) to the corresponding headers on your motherboard. Refer to your motherboard manual for specific header locations.

Figure 6: Front I/O panel of the MONTECH X5M, showing USB 2.0, USB 3.0, USB Type-C, Mic & Audio jacks, LED button, and Power button.
5. Operacija
5.1. Įjungimas
After all components are installed and cables connected, replace the side panels. Connect your monitor, keyboard, mouse, and power cable. Press the Power Button on the front I/O panel to start your system.
5.2. ARGB ventiliatoriaus valdymas
Iš anksto įdiegtus ARGB ventiliatorius galima valdyti dviem būdais:
- Dedicated LED Button: Use the LED button on the front I/O panel to cycle through 25 built-in lighting modes.
- Pagrindinės plokštės sinchronizavimas: Connect the ARGB cables to a compatible 5V 3-pin ARGB header on your motherboard. Use your motherboard's RGB software (e.g., ASUS Aura Sync, MSI Mystic Light Sync, GIGABYTE RGB Fusion, ASRock Polychrome Sync) to synchronize and customize lighting effects.
6. Priežiūra
Reguliarus techninis aptarnavimas padeda užtikrinti optimalų kompiuterio komponentų veikimą ir ilgaamžiškumą.
- Dulkių filtro valymas: Periodically remove and clean the dust filters (located on the top, front, and bottom) to maintain optimal airflow. Use compressed air or a soft brush.
- Išorinis valymas: Išorinius paviršius nuvalykite minkšta, damp audinys. Venkite abrazyvinių valiklių.
- Vidaus valymas: With the system powered off and unplugged, use compressed air to remove dust from internal components and fans.
7. Problemų sprendimas
- Sistema neįsijungia:
- Įsitikinkite, kad maitinimo laidas yra tvirtai prijungtas prie maitinimo bloko ir sieninio lizdo.
- Patikrinkite, ar maitinimo bloko jungiklis yra „ĮJUNGTA“ padėtyje.
- Verify all front panel connectors (especially the Power Switch) are correctly attached to the motherboard.
- Confirm the 24-pin ATX and 8-pin CPU power cables are securely connected to the motherboard.
- Ventiliatoriai nesisuka / RGB nešviečia:
- Check that all fan power cables are securely connected to the fan hub or motherboard headers.
- Ensure ARGB cables are properly connected to the fan hub or a compatible 5V 3-pin ARGB header on the motherboard.
- If using motherboard synchronization, verify that the RGB software is installed and configured correctly.
- Try cycling through modes using the dedicated LED button on the front panel.
- Nėra ekrano išvesties:
- Ensure your monitor cable is connected to the graphics card (GPU) and not the motherboard's integrated graphics port (unless you are using integrated graphics).
- Įstatykite vaizdo plokštę į PCIe lizdą.
- Check that the GPU power cables are securely connected.
8. Garantija ir palaikymas
8.1. Informacija apie garantiją
The MONTECH X5M PC Case comes with a 1 metų gamintojo garantija. This warranty covers defects in materials and workmanship under normal use. For specific terms and conditions, please refer to the official Montech websvetainėje arba susisiekite su klientų aptarnavimo tarnyba.
8.2. Pagalba klientams
For further assistance, technical support, or warranty claims, please visit the official Montech website or contact their customer service department. You can find contact information on the Montech websvetainė: www.montechpc.com