1. Įvadas
This manual provides detailed instructions for the installation, operation, maintenance, and troubleshooting of your GIGABYTE B760 DS3H GEN5 Desktop Motherboard. This motherboard is designed to support Intel Core 14th, 13th, and 12th Generation Processors, offering advanced features for a robust computing experience.
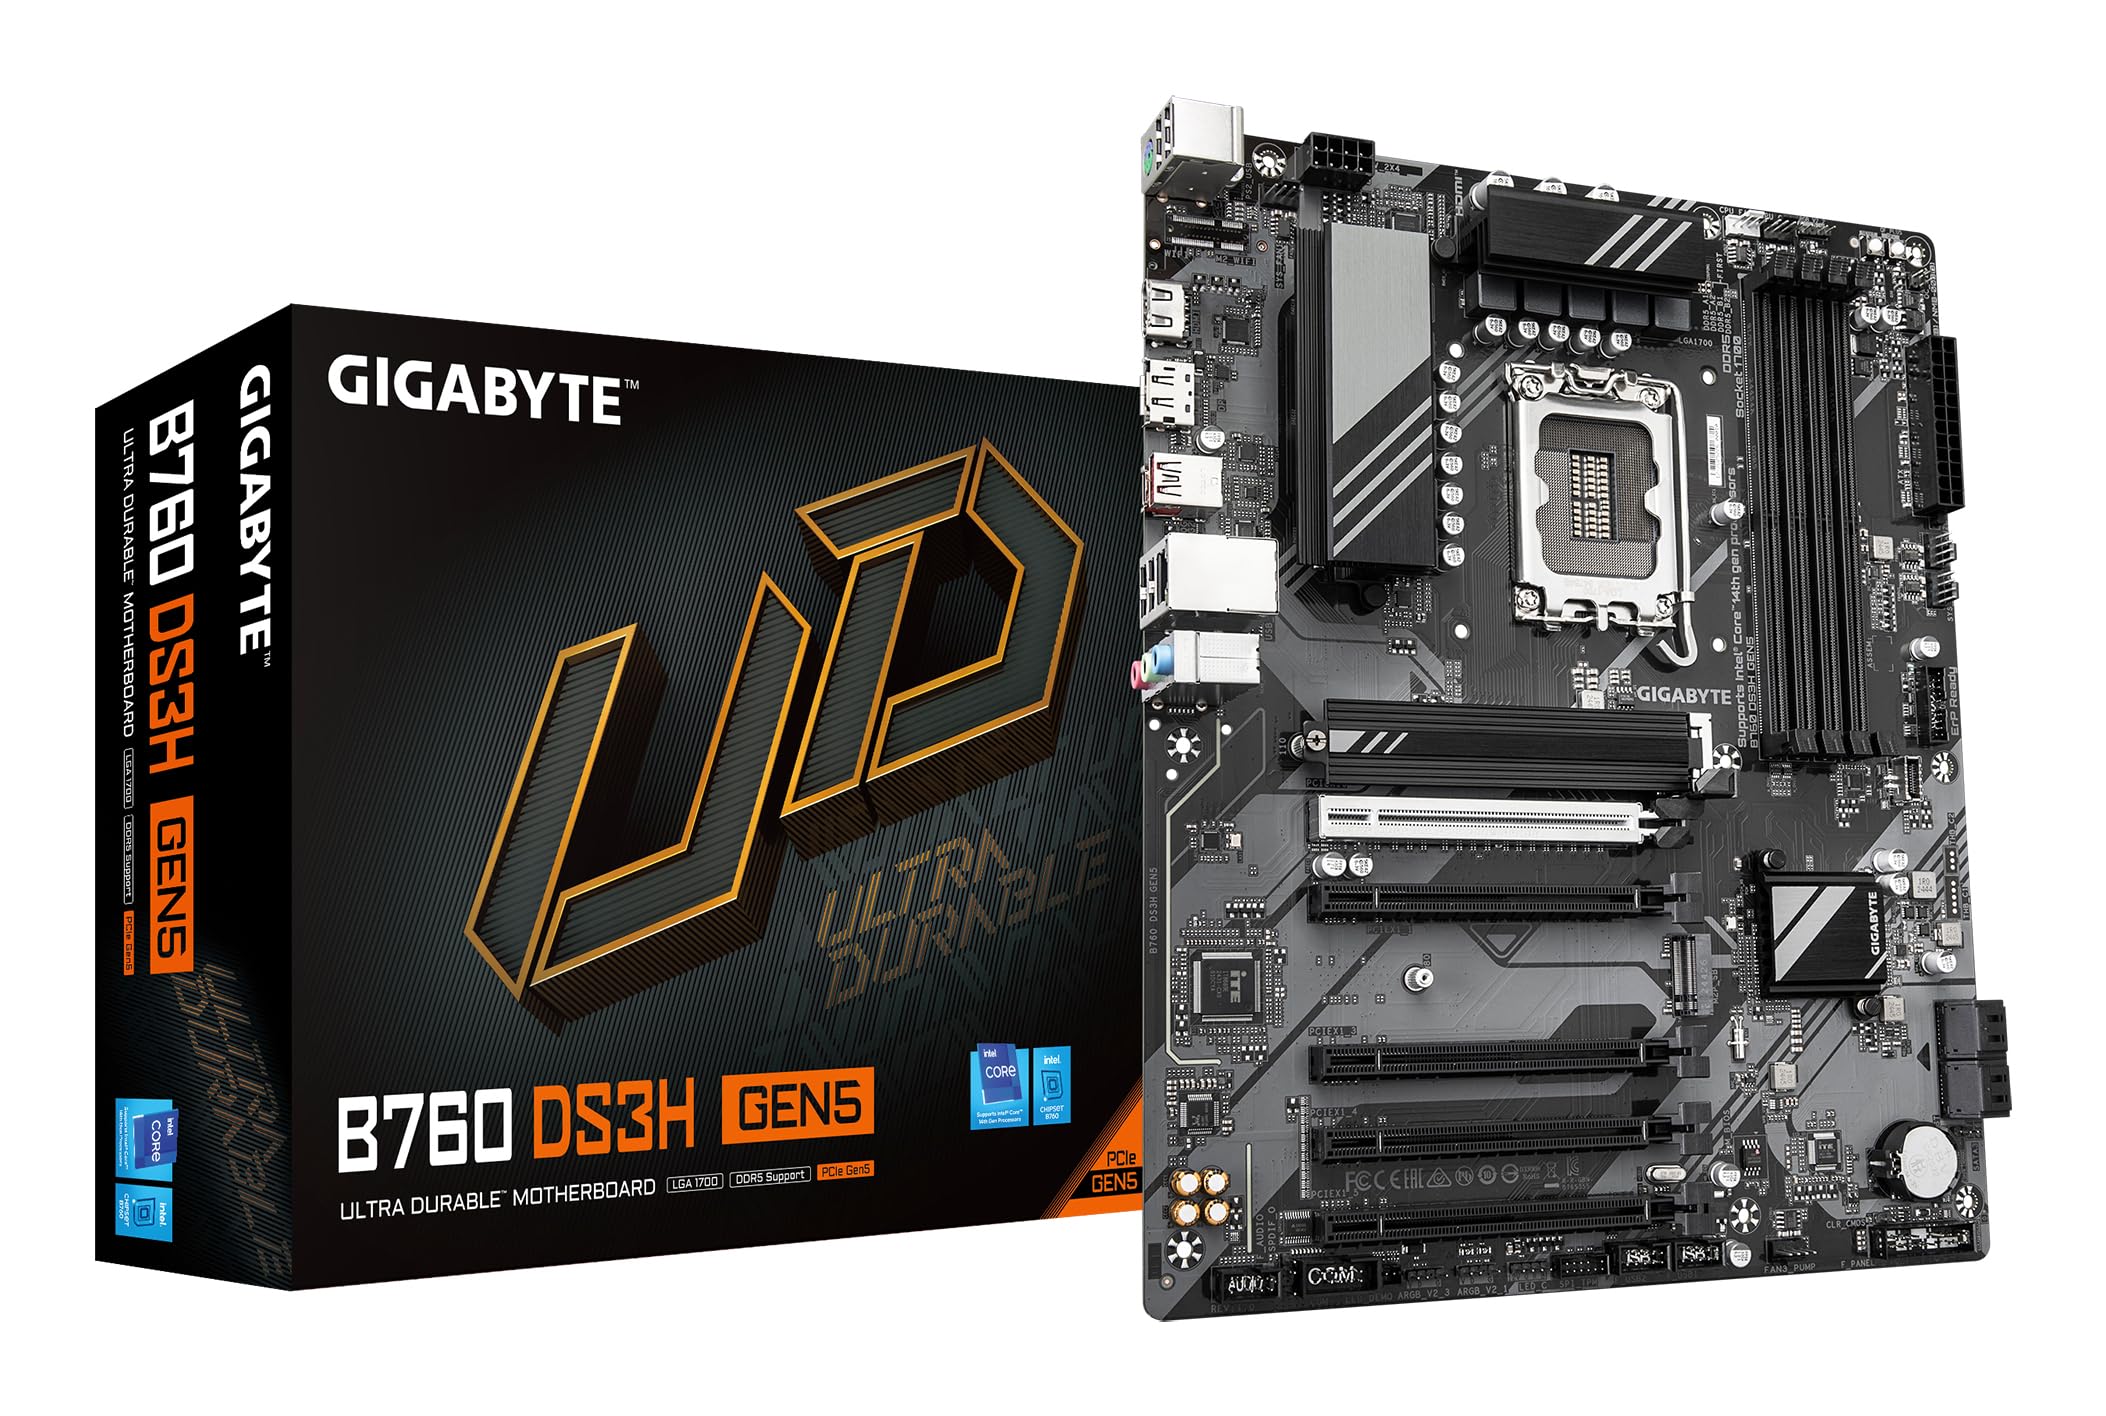
Figure 1.1: GIGABYTE B760 DS3H GEN5 Motherboard Layout. This image displays the overall layout of the motherboard, highlighting the LGA 1700 CPU socket, four DDR5 DIMM slots, and multiple PCIe expansion slots.
2. Pagrindinės savybės
- PCIe Gen5 Performance: Equipped with a PCIe 5.0 x16 slot for high-speed graphics card support.
- Procesoriaus palaikymas: Compatible with 14th, 13th, and 12th Gen Intel Core Processors (LGA 1700 socket).
- EZ skląstis: Features a quick-release design for the PCIe 5.0 x16 slot, simplifying component installation and removal.
- PCIe UD Slot: Enhanced PCIe 5.0 SMD Armor for improved graphics card stability and durability.
- Maitinimo tiekimas: Robust 8+2+1 Phase Hybrid VRM Solution for stable power to the CPU.
- Atminties palaikymas: Dual Channel DDR5 with support for 4 DIMMs of XMP Memory Modules, up to 5600MHz.
- Tinklas: Integrated GbE LAN for reliable wired network connectivity.
- Saugykla: Two PCIe 4.0 x4 M.2 Connectors for high-speed NVMe SSDs.
- Ryšys: Rear USB-C 20Gb/s, DisplayPort (DP), and HDMI for versatile peripheral and display connections.
- Aušinimas: Smart Fan 6 with multiple temperature sensors and hybrid fan headers, including FAN STOP functionality for optimized cooling.

Figure 2.1: Motherboard Features Overview. This image provides an angled perspective, showcasing the VRM heatsinks, M.2 slots, and the PCIe 5.0 x16 slot with its reinforced design.
3. Sąranka ir diegimas
3.1 Saugos priemonės
Always disconnect power from your system before installing or removing any components. Wear an anti-static wrist strap to prevent electrostatic discharge (ESD) damage to sensitive components.
3.2 Komponentų diegimas
- CPU diegimas: Carefully open the CPU socket lever. Align the triangular mark on the Intel processor with the mark on the LGA 1700 socket. Gently place the CPU into the socket without forcing it. Close the lever to secure the CPU.
- CPU aušintuvo montavimas: Install your CPU cooler according to its manufacturer's instructions. Ensure proper thermal paste application and secure mounting.
- RAM diegimas: Open the clips on the DDR5 DIMM slots. Align the notch on the memory module with the key in the slot. Press down firmly on both ends of the module until the clips snap into place. For dual-channel operation, refer to your motherboard manual for recommended slot pairing.
- M.2 SSD diegimas: Locate the M.2 connectors. Remove the M.2 screw/standoff. Insert the M.2 SSD into the slot at an angle, then gently push it down and secure it with the screw/standoff.
- Vaizdo plokštės montavimas: Open the EZ-Latch on the PCIe 5.0 x16 slot. Align your graphics card with the slot and press down firmly until it is fully seated and the latch clicks into place. Secure the card to your case with screws.
- Pagrindinės plokštės tvirtinimas: Install standoffs in your PC case according to the ATX form factor. Carefully place the motherboard onto the standoffs and secure it with screws.
- Maitinimo jungtys: Connect the 24-pin ATX main power connector and the 8-pin (or 4+4-pin) CPU power connector from your power supply to the motherboard. Connect SATA power cables to storage devices if applicable.
- Priekinio skydelio jungtys: Connect the front panel headers (power button, reset button, USB ports, audio jacks, LED indicators) to the corresponding pins on the motherboard. Refer to the motherboard's silkscreen labels for correct orientation.
3.3 Rear I/O Panel Connections
Connect your peripherals to the appropriate ports on the rear I/O panel.

Figure 3.1: Rear I/O Panel. This image illustrates the available ports on the rear of the motherboard, including USB 3.2 Gen 2x2 Type-C, USB Type-A, DisplayPort, HDMI, GbE LAN, and audio jacks.
- USB prievadai: Connect keyboards, mice, and other USB devices. The USB-C port offers 20Gb/s data transfer.
- Vaizdo išėjimai: Use HDMI or DisplayPort for connecting to a monitor if using an integrated GPU.
- LAN prievadas: Prijunkite Ethernet kabelį, kad galėtumėte pasiekti tinklą.
- Garso lizdai: Connect speakers, headphones, or microphones.
4. Naudojimo instrukcijos
4.1 Pradinis paleidimas ir BIOS / UEFI sąranka
After assembling your system, connect a monitor, keyboard, and mouse. Power on the system. During startup, repeatedly press the DEL key to enter the BIOS/UEFI setup utility. Here you can configure boot order, system time, and other advanced settings.
4.2 Tvarkyklės diegimas
After installing your operating system (Windows 10 or Windows 11 recommended), install the necessary drivers for the motherboard chipset, LAN, audio, and any other integrated components. These drivers are typically available on the GIGABYTE support websvetainė, skirta jūsų konkrečiam pagrindinės plokštės modeliui.
4.3 Smart Fan 6
The Smart Fan 6 utility allows for precise control over your system's cooling. You can monitor temperatures, adjust fan curves, and utilize the FAN STOP feature to keep your system quiet during low loads. Access these settings through the BIOS/UEFI or a dedicated GIGABYTE software utility.
5. Priežiūra
5.1 Valymas
Regularly clean your PC to prevent dust buildup, which can lead to overheating and reduced performance. Use compressed air to remove dust from fans, heatsinks, and other components. Ensure the system is powered off and unplugged before cleaning.
5.2 BIOS / UEFI atnaujinimai
Reguliariai tikrinkite GIGABYTE website for BIOS/UEFI updates. Updates can provide improved compatibility, stability, and new features. Follow the instructions provided by GIGABYTE carefully when performing a BIOS update to avoid system damage.
5.3 Vairuotojų atnaujinimai
Keep your motherboard drivers updated to ensure optimal performance and compatibility with new hardware and software. Download the latest drivers from the official GIGABYTE support page.
6. Problemų sprendimas
If you encounter issues with your motherboard, refer to the following basic troubleshooting steps:
- Nėra galios: Įsitikinkite, kad visi maitinimo laidai (24 kontaktų ATX, 8 kontaktų CPU) yra tvirtai prijungti. Patikrinkite maitinimo šaltinį (PSU) ir sieninį lizdą.
- Nėra ekrano: Verify that your monitor is connected to the graphics card (or motherboard if using integrated graphics) and is powered on. Reseat the graphics card and RAM modules.
- Sistemos nestabilumas / gedimai: Check CPU and GPU temperatures. Ensure RAM modules are properly seated. Update drivers and BIOS/UEFI. Test components individually if possible.
- Neaptiktas komponentas: Ensure the component (e.g., M.2 SSD, SATA drive, PCIe card) is correctly installed and powered. Check BIOS/UEFI settings to ensure it is enabled.
- Beep Codes: If your system emits a series of beeps, consult the GIGABYTE website or the motherboard's full manual for a list of beep codes and their meanings, which can indicate specific hardware issues.
If troubleshooting steps do not resolve the issue, contact GIGABYTE technical support for further assistance.
7. Specifikacijos
| Funkcija | Specifikacija |
|---|---|
| Prekės ženklas | GIGABITAS |
| Modelio pavadinimas | B760 DS3H GEN5 |
| CPU lizdas | LGA 1700 |
| Suderinami procesoriai | Intel 14th/13th/12th Gen Core Processors |
| Lustų rinkinio tipas | Intel B760 Express |
| RAM atminties technologija | DDR5 |
| Atminties laikrodžio greitis | Up to 5600 MHz (XMP) |
| Galimi atminties lizdai | 4 |
| Ram Memory Maximum Size | 256 GB |
| Grafikos plokštės sąsaja | PCI Express (PCIe 5.0 x16) |
| Total PCIe Ports | 5 |
| Next Generation Storage | 2 x PCIe 4.0 x4 M.2 Connectors |
| Iš viso SATA prievadų | 4 |
| LAN | GbE LAN |
| Iš viso USB prievadų | 6 (Rear I/O) + Internal Headers |
| Rear USB-C | 1 x USB 3.2 Gen 2x2 (20Gb/s) |
| Total Number of HDMI Ports | 1 |
| DisplayPort | Taip |
| Pagrindinės maitinimo jungties tipas | 24-Pin ATX |
| Platforma | Langai 10 Windows 11 |
| Prekės matmenys P x P x A | 9.61 colio ilgio x 12.01 colių pločio x 1.38 colio aukščio |
| Prekės svoris | 1000 gramų |
8. Informacija apie garantiją
GIGABYTE motherboards typically come with a limited manufacturer's warranty. The duration and terms of the warranty may vary by region and retailer. Please retain your proof of purchase for warranty claims. For detailed warranty information, visit the official GIGABYTE websvetainėje arba susisiekite su pirkimo vieta.
9. Parama
Dėl techninės pagalbos, tvarkyklių atsisiuntimų, BIOS atnaujinimų ir papildomos informacijos apie produktą apsilankykite oficialioje GIGABYTE pagalbos svetainėje. website. You can also find FAQs and community forums there to help with common issues.
Oficialus GIGABYTE atstovas Websvetainė: https://www.gigabyte.com/