
MARSTEK Triple Power 63A
MARSTEK Triple Power 63A 110/120V automatinio perjungimo jungiklio naudotojo vadovas
Model: Triple Power 63A
1. Įvadas
This manual provides detailed instructions for the installation, operation, maintenance, and troubleshooting of the MARSTEK Triple Power 63A 110/120V Automatic Transfer Switch (ATS). This device is designed to automatically switch between three power sources (e.g., utility power, generator, inverter) to ensure a continuous and stable power supply to connected loads. It incorporates advanced protection features against overvoltage, nesuprantamatage, and overcurrent conditions.
Prieš montuodami ir naudodami gaminį, atidžiai perskaitykite šį vadovą, kad užtikrintumėte saugų ir efektyvų jo naudojimą.
2. Saugos informacija
WARNING: Risk of Electric Shock. Installation and servicing should only be performed by qualified personnel.
- Always disconnect all power sources before installing or servicing the ATS.
- Užtikrinkite tinkamą įrenginio įžeminimą.
- Patikrinkite, ar visos laidų jungtys yra tvirtos ir teisingos pagal laidų schemą.
- Do not operate the ATS if it appears damaged.
- Laikykitės visų vietinių ir nacionalinių elektros taisyklių.
- This device is not suitable for use with neutral-bonded generators without appropriate isolation or modification to prevent ground fault issues. Consult a qualified electrician if using with such generators.

Image: Safety warning indicating to power off and test for electricity before installation. Always ensure zero voltage is detected before proceeding with any work on the device.
3. Produkto ypatybės
The MARSTEK Triple Power 63A ATS offers a range of features designed for reliable power management:
- Triple-Source Automatic Switching: Seamlessly transfers loads between Primary, Backup 1, and Backup 2 power sources during outages, ttage sags/surges, or irregularities. Automatically reverts to the preferred source once stable.
- Built-in Electrical Protection: Safeguards connected equipment with advanced Overvoltage (140V max), Undervoltage (90V min), and Overcurrent (63A max) protection, preventing damage from unstable power.
- Flexible Priority Phase Setting: Designate ANY input (L1/L2/L3) as Primary—optimize for cost, reliability, or grid conditions without fixed "Main" limitations.
- Real-Time LED Voltage Stebėjimas: Intuitive display shows live voltage levels (e.g., 120V, 108V) for all 3 sources, with instant status indicators for active source, transfer, and faults.
- Quick DIN Rail Installation & Compact Design: Space-saving unit installs in minutes via standard DIN rail mounting, rated for 63A at AC 110V with a 106 mechanical lifespan.

Image: Visual representation of the intelligent protection features, including overvoltage, nesuprantamatage, and overcurrent protection, designed to safeguard connected equipment.

Image: Detailed breakdown of the comprehensive electrical protection, showing default and adjustable values for overvoltage (>140V), undervoltage (<90V), and overcurrent (>63A).

Image: Diagram demonstrating the flexibility to set any input phase (L1, L2, or L3) as the primary power source, optimizing power configuration based on reliability or cost.
4. Pakuotės turinys
Produkto paketą sudaro:
- 1 x MARSTEK Triple Power 63A 110/120V Automatic Transfer Switch
Note: DIN rail may be included separately or integrated. Please check your packaging.
5. Specifikacijos
| Parametras | Vertė |
|---|---|
| Vardinis tiekimas Voltage | AC 110V (N-L1/L2/L3) |
| Nominali veikimo srovė | 63 Amps |
| Veiklos ttage | 120 voltų |
| Perdavimo greitis | 1-600s (Adjustable, 5s Default) |
| Mechaninis gyvenimas | 106 operacijos |
| Overvoltage Apsauga | Adjustable 120V-300V (Default 140V) |
| Undervoltage Apsauga | Adjustable 80V-210V (Default 90V) |
| Apsauga nuo viršsrovių | Adjustable 1A-63A (Default 63A) |
| Veikimo režimas | ĮJUNGTI IŠJUNGTI |
| Kontakto tipas | Paprastai uždaryta |
| Jungties tipas | Prijunkite |
| Terminalas | Varžtas |
| Grandinės tipas | 3 krypčių |
| Kontaktinė medžiaga | Varis |
| Gaminio matmenys (I x P x A) | 4.3 x 3.5 x 3.3 colio |
| Svoris | 15.2 uncijos |
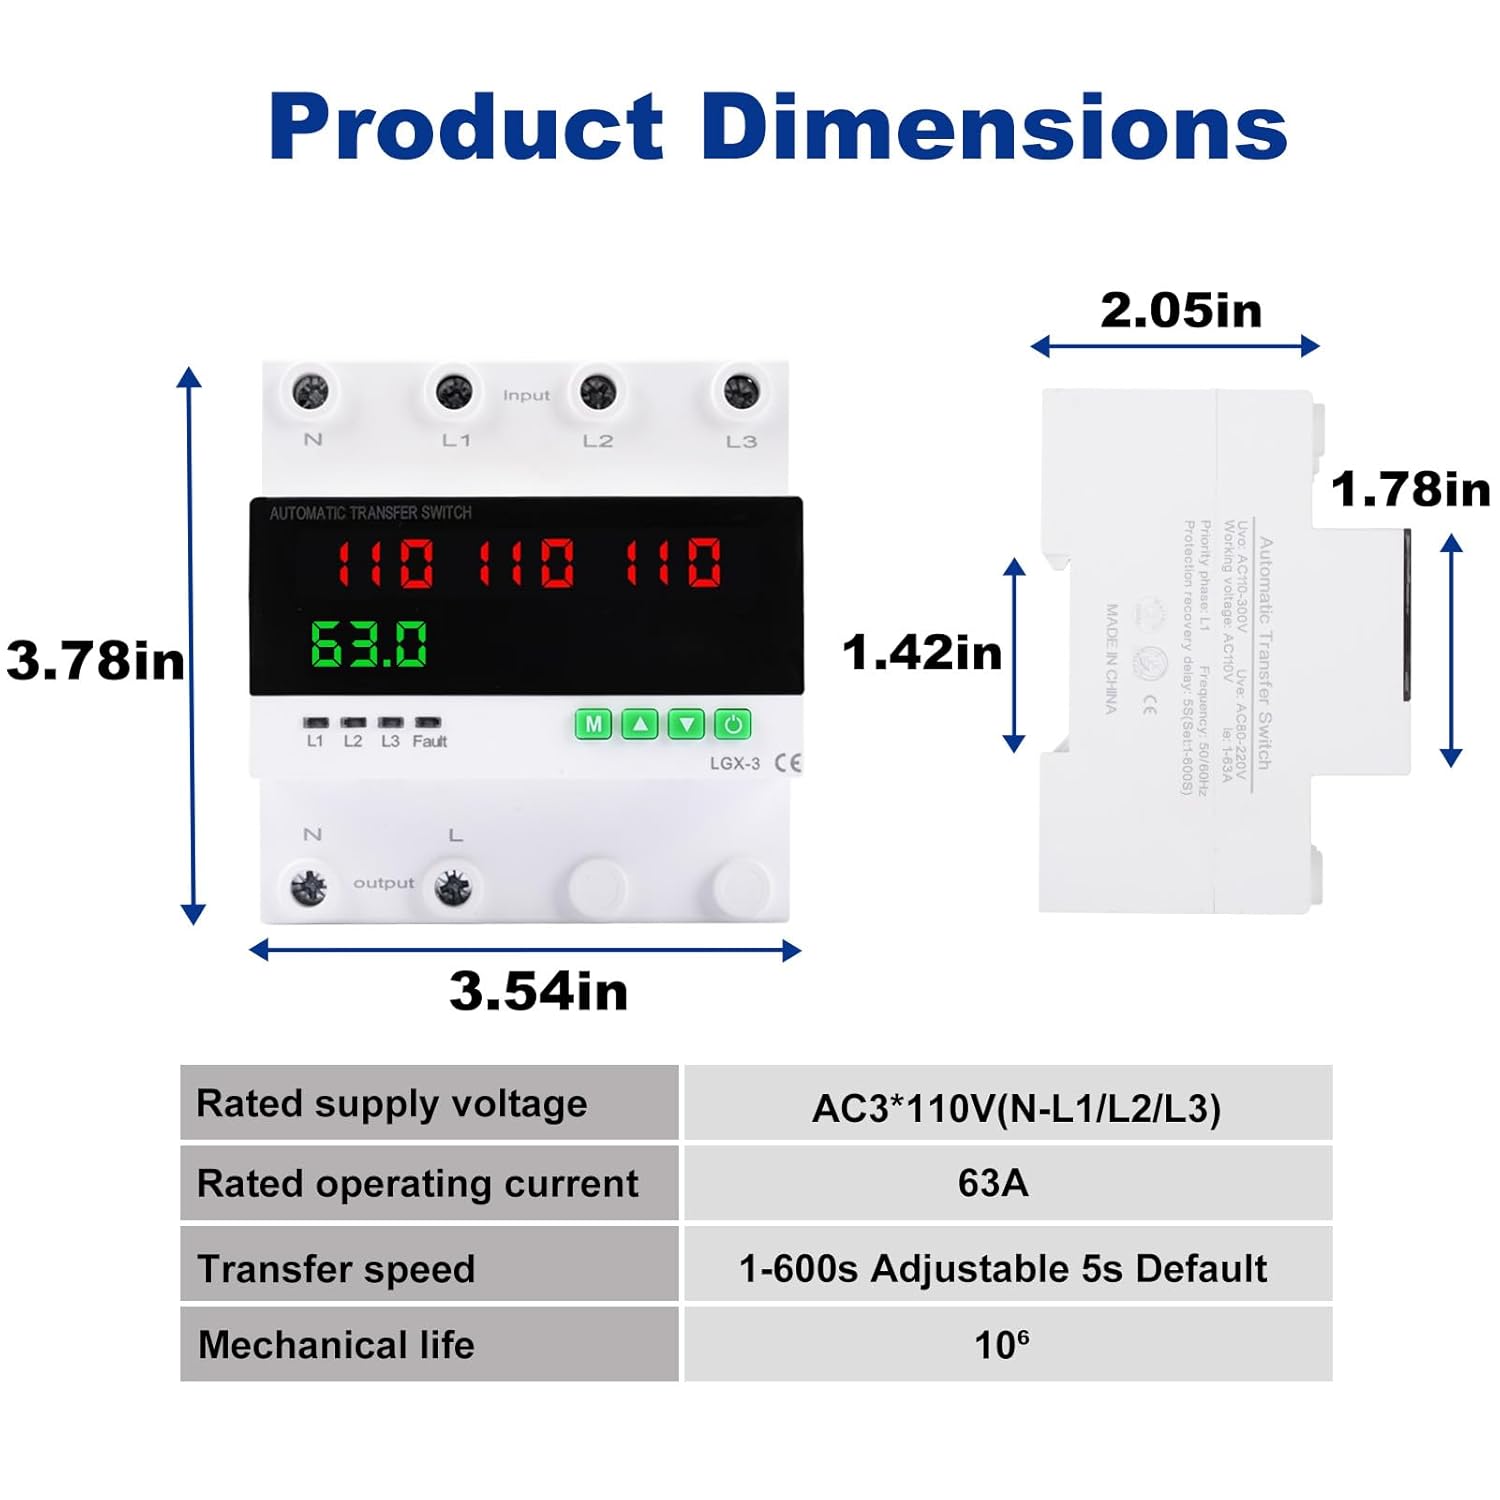
Image: Diagram illustrating the physical dimensions of the ATS and a summary table of its key electrical and mechanical specifications.
6. Montavimas
6.1 DIN bėgelio montavimas
The MARSTEK ATS is designed for quick and easy installation on a standard DIN rail.
- Ensure all power sources are disconnected and verified as de-energized.
- Align the back panel display of the ATS with the DIN rail.
- Press the latch located on the bottom of the ATS.
- Insert the ATS onto the DIN rail.
- Release the latch to secure the ATS firmly in place. You should hear a "click" sound.

Image: Step-by-step visual guide for installing the ATS onto a DIN rail, demonstrating the alignment, latch pressing, insertion, and latch release process.
6.2 Sujungimo schema
Refer to the following diagram for correct wiring connections. Ensure all connections are tight and properly insulated.

Image: Detailed wiring diagram illustrating the input connections for Neutral (N), Line 1 (L1), Line 2 (L2), Line 3 (L3), and output connections for Neutral (N) and Line (L).
- Įvesties gnybtai: Connect your three power sources (e.g., Utility, Generator, Inverter) to L1, L2, and L3 respectively. Connect the neutral lines to the N terminals.
- Išvesties gnybtai: Connect your load to the N (Neutral) and L (Line) output terminals.
- Svarbu: Ensure correct phase and neutral connections. Incorrect wiring can damage the device or connected equipment.
7. Operacija
7.1 Power-On and Initial State
Once wired and power is applied, the ATS will perform a self-check. The LED display will show the voltage levels of the connected sources. The device will automatically select the primary source (as configured) if it is stable and within acceptable parameters.

Image: Close-up of the multi-function digital adjustment panel, featuring a high-definition LED display for real-time voltage and current monitoring, alongside menu options for customizing parameters.
7.2 Automatic Switching Logic
ATS nuolat stebi tūrįtage and stability of all three connected power sources. The switching logic is as follows:
- If the designated primary source (L1, L2, or L3) is stable and within acceptable voltage/current limits, the load will be connected to it.
- If the primary source experiences an outage, ttage sag/surge, or overcurrent condition, the ATS will automatically transfer the load to the next available stable backup source (Backup 1, then Backup 2).
- Once the primary source is restored and stabilized, the ATS will automatically revert the load back to the primary source after a configurable delay.

Image: Flowchart depicting the automatic switching mechanism, showing how the ATS transitions between the normal power source and backup sources in response to power outages arba ttage abnormalities, and reverts once stability is restored.
7.3 Parametrų reguliavimas
The ATS features a digital adjustment panel for customizing various parameters. Use the 'M' (Menu), 'Up' (Digit+), and 'Down' (Digit-) buttons to navigate and adjust settings.
- Power-on delay time (PE): Time delay before the ATS powers on after initial power application.
- Transfer time/Protection recovery delay time (rE): Delay before switching to a backup source or reverting to primary.
- Overvoltage protection value (oU): Sets the upper voltage riba.
- Undervoltage protection value (UU): Sets the lower voltage riba.
- Priority phase (PS): Designate L1, L2, or L3 as the primary power source.
- Overcurrent protection value (oC): Sets the maximum current limit.
- Overcurrent protection action time (CtT): Delay before overcurrent protection trips.
- Continuous overcurrent protection frequency (CC): How often overcurrent protection can trip.
Refer to the on-screen menu for specific navigation and adjustment procedures. Always ensure settings are appropriate for your electrical system and connected loads.
8. Priežiūra
The MARSTEK ATS is designed for minimal maintenance. However, regular checks can ensure optimal performance and longevity:
- Vizuali apžiūra: Periodiškai apžiūrėkite įrenginį, ar nėra kokių nors fizinių pažeidimų, atsilaisvinusių jungčių ar spalvos pakitimų.
- Ryšio patikrinimai: Ensure all wiring terminals remain tight. Loose connections can lead to overheating and device failure.
- Švara: Laikykite įrenginį be dulkių ir šiukšlių. Valymui naudokite sausą, minkštą šluostę. Nenaudokite skystų valiklių.
- Funkcionalumo testas: If possible and safe to do so, periodically test the automatic transfer function by simulating a power outage on the primary source.
WARNING: Always disconnect power before performing any maintenance or cleaning.
9. Problemų sprendimas
| Problema | Galima priežastis | Sprendimas |
|---|---|---|
| Įrenginys neįsijungia. | No input power; incorrect wiring; internal fault. | Verify input power to L1/L2/L3 and N terminals. Check wiring against diagram. If power is present and wiring is correct, contact support. |
| No automatic transfer. | Backup source not stable; primary source still active; incorrect settings (e.g., transfer delay). | Patikrinkite ttage of backup sources. Ensure primary source is truly unavailable. Review transfer delay settings (rE). |
| Frequent tripping (Overvoltage/Undervoltage/Overcurrent). | Unstable power supply; load exceeds rating; protection settings too sensitive. | Monitor power quality. Reduce load if exceeding 63A. Adjust protection thresholds (oU, UU, oC) if appropriate for your system, but do not exceed safe limits. |
| GFI/GFCI trips when using a generator. | Generator has a neutral-ground bond, creating multiple bonding points when connected to a house system. | This ATS is designed for systems where neutral and ground are bonded at a single point (e.g., main service panel). If using a neutral-bonded portable generator, consult a qualified electrician for proper isolation or alternative wiring solutions to avoid ground fault issues. |
| LED display shows "Fault". | Indicates an error condition (e.g., overvoltage, nesuprantamatage, overcurrent). | Check the specific fault indicator (L1, L2, L3, Fault LED). Address the underlying power issue or load condition. Review protection settings. |
10. Garantija ir palaikymas
MARSTEK products are manufactured to high-quality standards. For warranty information, please refer to the terms and conditions provided at the point of purchase or contact MARSTEK customer support.
If you encounter any issues not covered in this manual or require further assistance, please contact MARSTEK customer service through your retailer or the official MARSTEK websvetainę.
Ask a question about this manual
Ask about setup, troubleshooting, compatibility, parts, safety, or missing instructions. Manuals+ will review the question and use this page’s manual context to help answer it.