
1. Įvadas
This manual provides comprehensive instructions for the safe and efficient operation and maintenance of your PYY Lapidary Saw. Please read this manual thoroughly before initial use and retain it for future reference. This device is designed for precision cutting and polishing of various materials including wood, acrylic, small stones, jade, plastic, aluminum, chrome, and precious metals.
2. Saugos informacija
Naudodami elektrinius įrankius, visada teikite pirmenybę saugai. Nesilaikant šių nurodymų, galite sunkiai susižaloti arba sugadinti įrangą.
- Dėvėkite tinkamas asmenines apsaugos priemones (AAP), įskaitant apsauginius akinius, pirštines ir klausos apsaugos priemones.
- Užtikrinkite, kad darbo vieta būtų švari, gerai apšviesta ir be kliūčių.
- Secure the saw to a stable work surface using the fixed holes provided to prevent slips, vibrations, and accidents.
- Keep hands and fingers clear of the blade and moving parts during operation.
- Prieš atlikdami bet kokius reguliavimo, techninės priežiūros ar peilių keitimo darbus, atjunkite maitinimą.
- Do not operate the saw if any parts are damaged or missing.
- Ensure proper ventilation, especially when cutting materials that may produce dust or fumes.
- The maximum thickness of stone that can be cut is 35mm. Do not exceed this limit.
3. Pakuotės turinys
Patikrinkite, ar jūsų pakuotėje yra visi toliau išvardyti daiktai:
- PYY Lapidary Saw Base Unit
- Woodworking Saw Blade
- Jade Cutting Disc (Diamond Blade)
- Peilių dangtis
- Pusher Angle Ruler
- Fiber Wheel
- Verpstė
- Slėgio plokštė
- Veržliaraktis
- Vandens siurblys
- Cooling Pipe (Serpentine Water Pipe)
- Lankstus velenas
- Handle for Flexible Shaft
- 1.5-10mm Drill Clamp
- Chuck Key
- Carbon Brush (Spare)
- Fiber Wheel Connecting Rod
- Cloth Wheel Sink Rod
- Kriauklė
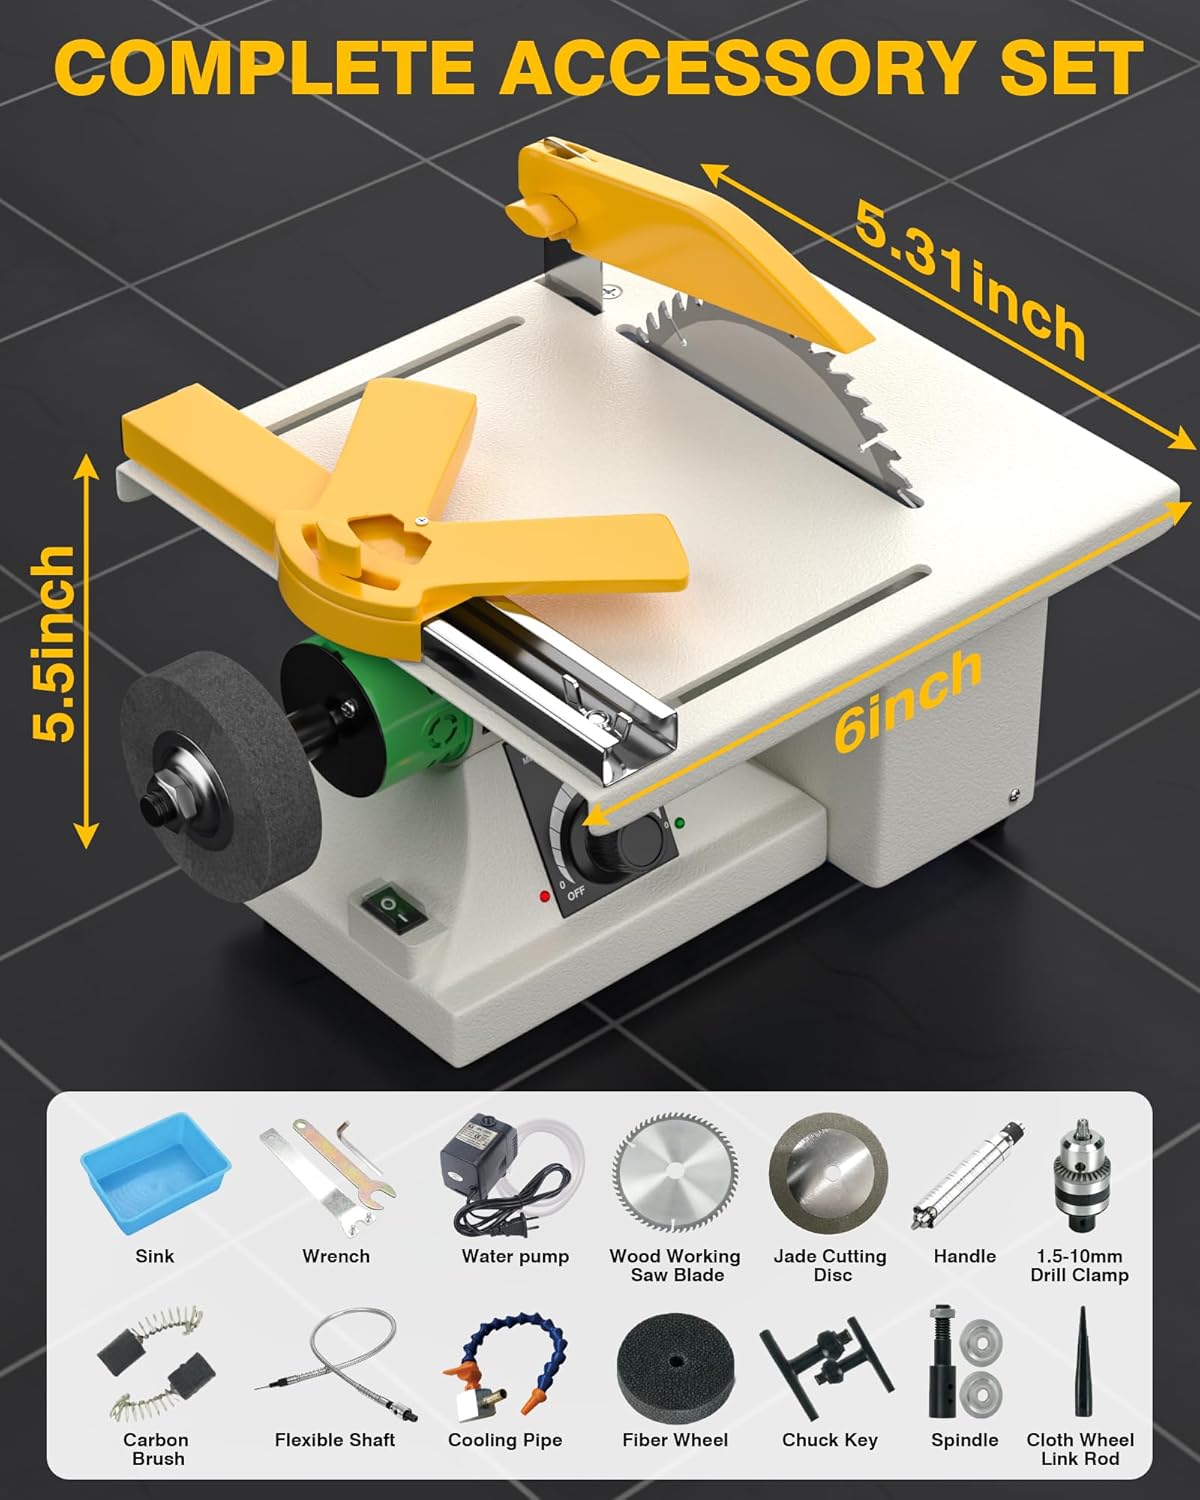
Figure 1: All included accessories for the PYY Lapidary Saw.
4. Sąrankos instrukcijos
Follow these steps to assemble and prepare your PYY Lapidary Saw for operation.
4.1. Blade Installation (Woodworking Saw Blade or Jade Cutting Disc)
- Įsitikinkite, kad pjūklas yra atjungtas nuo maitinimo šaltinio.
- Carefully place the desired blade (woodworking saw blade or jade cutting disc) onto the motor shaft.
- Use the provided wrench to securely tighten the blade in place. Ensure it is firmly seated and does not wobble.
- Install the blade cover over the blade, ensuring it is properly aligned and secured.
- Install the pusher angle ruler onto the table, sliding it into the designated track.
Video 1: Installation guide for the PYY Lapidary Saw, demonstrating blade and accessory setup.
4.2. Fiber Wheel Installation
- Insert the fiber wheel onto the spindle.
- Place the pressure plate onto the spindle, securing it with a screw.
- Attach the assembled spindle with the fiber wheel onto the base unit's left shaft.
- Secure it firmly with a screw.
4.3. Flexible Shaft Installation
- Attach the flexible shaft onto the base unit's left shaft and secure it with a screw.
- Lock the flexible shaft into the handle.
- Connect the flexible shaft to the cooling pipe.
4.4. Wet Sawing Setup
- Place the water pump into a container of water (e.g., the provided sink).
- Ensure the cooling pipe is positioned to direct water onto the cutting area.
- Adjust the cooling pipe switch to control the water flow during operation.
5. Naudojimo instrukcijos
This section details the operation of your PYY Lapidary Saw for various tasks.
5.1. Įjungimas ir greičio valdymas
- Plug the saw into a standard 110V power outlet.
- Pasukite maitinimo jungiklį į padėtį „ĮJUNGTA“.
- Use the front dial to adjust the motor speed from 0 to 10,000 RPM. Start at a lower speed and gradually increase as needed for the material being worked on.

Figure 2: The speed control dial and power switch for precise operation.
5.2. Cutting Operations
- Select the appropriate blade for your material (woodworking blade for wood/plastic, diamond blade for stone/metal).
- For wet cutting (stone, jade), ensure the water pump and cooling pipe are set up and providing a steady stream of water to the blade.
- Position the material against the pusher angle ruler for accurate cuts.
- Slowly and steadily feed the material into the rotating blade. Do not force the material, as this can cause kickback or damage the blade/motor.
- Maintain a firm grip on the material and keep hands away from the blade.
- The maximum cutting thickness for stone is 35mm.

Figure 3: Wet cutting function with the water cooling system in operation.

Figure 4: The upgraded diamond blade allows for cutting a variety of materials.
5.3. Polishing and Grinding
- Attach the fiber wheel to the left shaft as described in the setup section.
- Turn on the saw and adjust the speed as appropriate for polishing or grinding.
- Gently press the material against the rotating fiber wheel to polish or grind.

Figure 5: Versatile tool functions including burnishing, abrasion, carving, and wet sawing.
5.4. Using the Flexible Shaft for Carving/Engraving
- Ensure the flexible shaft is correctly installed and connected to the handle.
- Insert the desired carving or engraving bit into the 1.5-10mm drill clamp on the flexible shaft handle. Tighten with the chuck key.
- Turn on the saw and adjust the speed. The flexible shaft allows for intricate work on smaller pieces.
6. Priežiūra
Regular maintenance ensures the longevity and optimal performance of your PYY Lapidary Saw.
- Always unplug the saw before cleaning or performing maintenance.
- Clean the saw after each use, removing any dust, debris, or slurry from the table, blade guard, and motor housing.
- Inspect blades for wear or damage. Replace dull or damaged blades promptly.
- Check the cooling pipe and water pump for blockages or leaks. Clean as necessary.
6.1. Replacing the Motor Carbon Brush
- Įsitikinkite, kad pjūklas yra atjungtas nuo elektros tinklo.
- Locate the carbon brush covers on the motor housing.
- Use a screwdriver to remove the cover and extract the worn carbon brush.
- Insert a new carbon brush into the housing and secure the cover.
Video 2: Guide on how to replace the motor carbon brush.
7. Problemų sprendimas
This section addresses common issues you might encounter with your PYY Lapidary Saw.
| Problema | Galima priežastis | Sprendimas |
|---|---|---|
| Saw does not power on. | No power supply, faulty switch, worn carbon brushes. | Check power connection. Ensure switch is ON. Replace carbon brushes if worn (refer to Maintenance section). |
| Peilis nepjauna efektyviai. | Dull or incorrect blade for material, insufficient speed. | Replace blade. Ensure correct blade type is used. Increase motor speed. |
| Pernelyg didelė vibracija ar triukšmas. | Loose blade, unstable mounting, damaged motor. | Tighten blade. Secure saw to workbench. If motor is damaged, contact customer support. |
| Water cooling system not working. | Water pump not submerged, clogged pipe, faulty pump. | Ensure pump is fully submerged. Check and clear any blockages in the cooling pipe. Verify pump operation. |
8. Specifikacijos
| Prekės ženklas | PYY |
| Modelio numeris | PYYTJHC96011YEUSSP04 |
| Galia | 350W |
| ttage | 110 V |
| Greitis | 0-10000 aps./min |
| Ašmenų medžiaga | Alloy Steel (Woodworking), Diamond (Jade/Rock) |
| Max Stone Cutting Thickness | 35 mm (1.37 colio) |
| Gaminio matmenys | 14.57 colio ilgio x 11.22 colių pločio x 9.06 colio aukščio |
| Prekės svoris | 13.36 svaro |
| UPC | 784316211465 |
9. Garantija ir palaikymas
PYY offers a one-year coverage for this product. For any issues or technical assistance, please contact our professional one-on-one technical support. Refer to your purchase documentation for contact details.