
1. Įvadas
This manual provides detailed instructions for the installation, operation, and maintenance of your UNITOPSCI Android 15 Car Stereo. Please read this manual thoroughly before using the product to ensure proper functionality and safety. This unit is specifically designed for Lexus ES models from 2001 to 2005 (ES250, ES300, ES330).

Image 1.1: UNITOPSCI Android 15 Car Stereo with main accessories.
2. Pakuotės turinys
Patikrinkite, ar pakuotėje yra visi toliau išvardyti daiktai:
- 1 x automobilio radijo įrenginys
- 1x maitinimo laidas
- 1x automobilio galinis View Fotoaparatas
- 1 x montavimo įrankių rinkinys
- 1x GPS antena
- 1 x galinio kameros įvesties kabelis
- 1 x RCA kabelis
- 2 x USB kabeliai
- 1 x Vartotojo vadovas
- 1x mikrofonas

Image 2.1: Visual representation of the package contents and unit dimensions.
3. Suderinamumas ir svarbios pastabos
This car stereo is designed for Lexus ES 2001-2005 ES250/300/330 models. It features a 9-inch IPS touchscreen with 1280*720P resolution and runs on Android 15 with 4GB RAM and 64GB ROM.
3.1 Wiring Harness and CANBUS
Svarbu: If your vehicle's original CD player has an incompatible back interface (as shown in Image 3.1, types B, C, or D), you may need to purchase an additional wiring harness and CANBUS decoder separately. The standard wiring harness included is for basic configurations (Type A). Please consult customer support if you are unsure about your vehicle's specific configuration.
3.1 pav.: pvz.amples of compatible (A) and incompatible (B, C, D) CD player back interfaces.
4. Sąranka ir diegimas
Installation of this car stereo requires technical knowledge. It is recommended to seek professional installation to avoid damage to the unit or your vehicle. Ensure the vehicle's battery is disconnected before beginning installation.
4.1 General Installation Steps (Consult a professional or vehicle-specific guide for detailed steps):
- Remove the original car stereo unit from the dashboard.
- Connect the provided power cable, RCA cables, USB cables, GPS antenna, and rear camera input cable to the new head unit.
- If required, connect the additional wiring harness and CANBUS decoder.
- Carefully route all cables to their respective locations in the vehicle.
- Mount the new car stereo into the dashboard opening.
- Prijunkite automobilio akumuliatorių ir patikrinkite visas funkcijas.
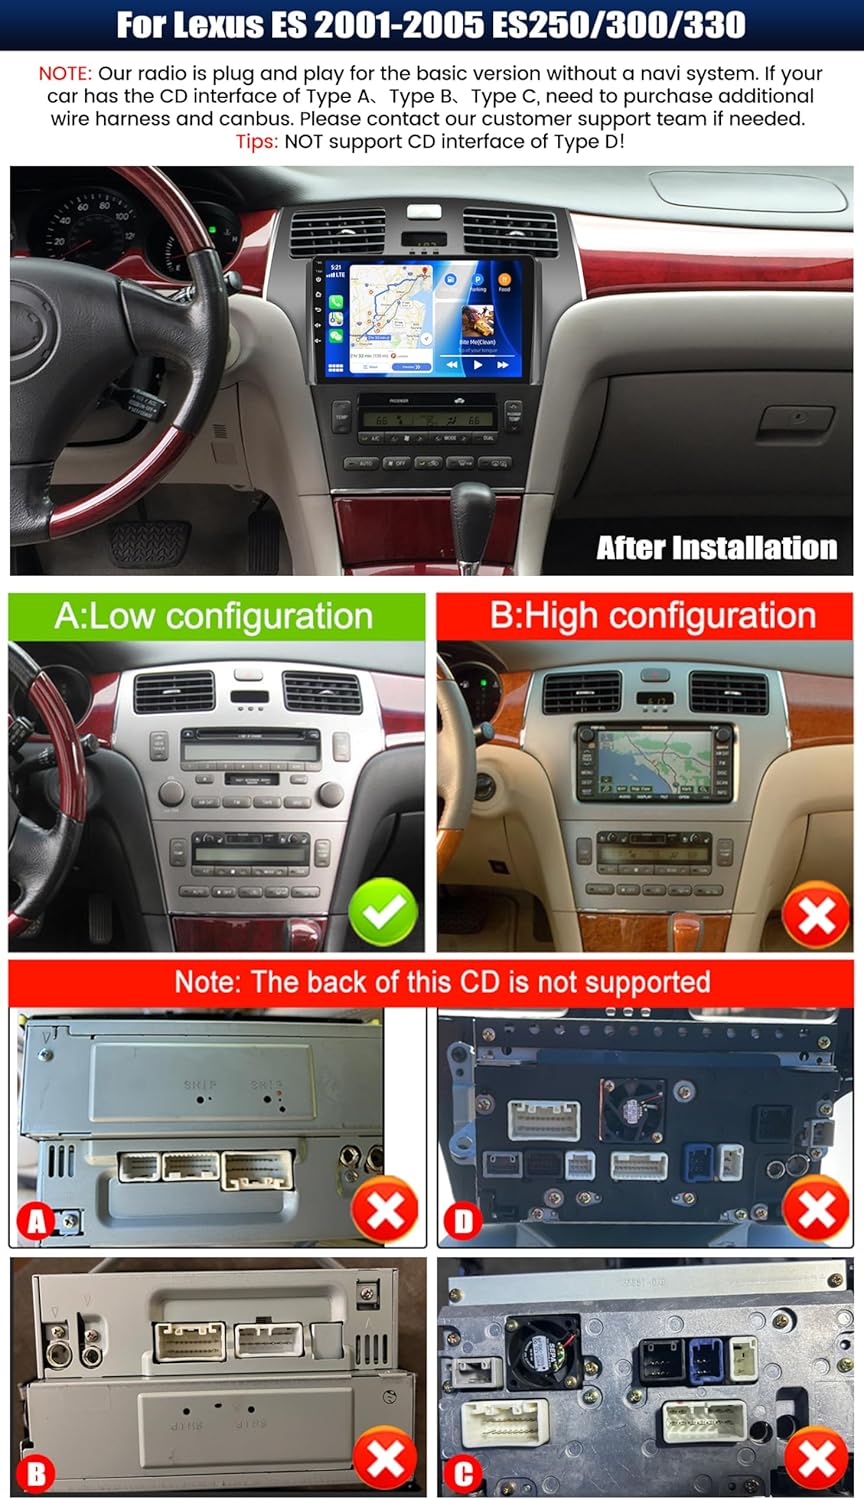
4.1 pav.: pvz.ample of the car stereo installed in a Lexus ES dashboard.
5. Naudojimo instrukcijos
5.1 Belaidis „CarPlay“ / „Android Auto“
The unit supports wireless CarPlay for iOS devices and wireless Android Auto for Android devices. This allows seamless integration of your smartphone's navigation, music, calls, and messaging functions directly on the car stereo display.
- Įsitikinkite, kad jūsų išmaniajame telefone įjungti „Bluetooth“ ir „Wi-Fi“.
- Automobilio stereo sistemoje eikite į „CarPlay“ arba „Android Auto“ programėlę.
- Vykdykite ekrane pateikiamus nurodymus, kad susietumėte savo įrenginį.
- Once connected, you can access compatible apps and use voice commands (Siri or Google Assistant).

5.1 pav.: Belaidžio „CarPlay“ ir „Android Auto“ funkcionalumas.
5.2 Veidrodinio susiejimo funkcija
Mirror Link allows you to display your smartphone's screen on the car stereo. For Android devices, you can also control the phone directly from the stereo's touchscreen.
- Prijunkite savo išmanųjį telefoną prie automobilio stereo sistemos per USB arba „Wi-Fi“.
- Automobilio stereo sistemoje atidarykite programėlę „Mirror Link“.
- Vykdykite ekrane pateikiamus nurodymus, kad užmegztumėte ryšį.
5.3 GPS navigacija
The unit features a built-in GPS module supporting both online and offline navigation. Pre-installed maps for North America and worldwide are available.
- To use online navigation, ensure the unit is connected to Wi-Fi.
- For offline navigation, download map data in advance.
- Access navigation through the dedicated 'GPS' or 'Maps' application.

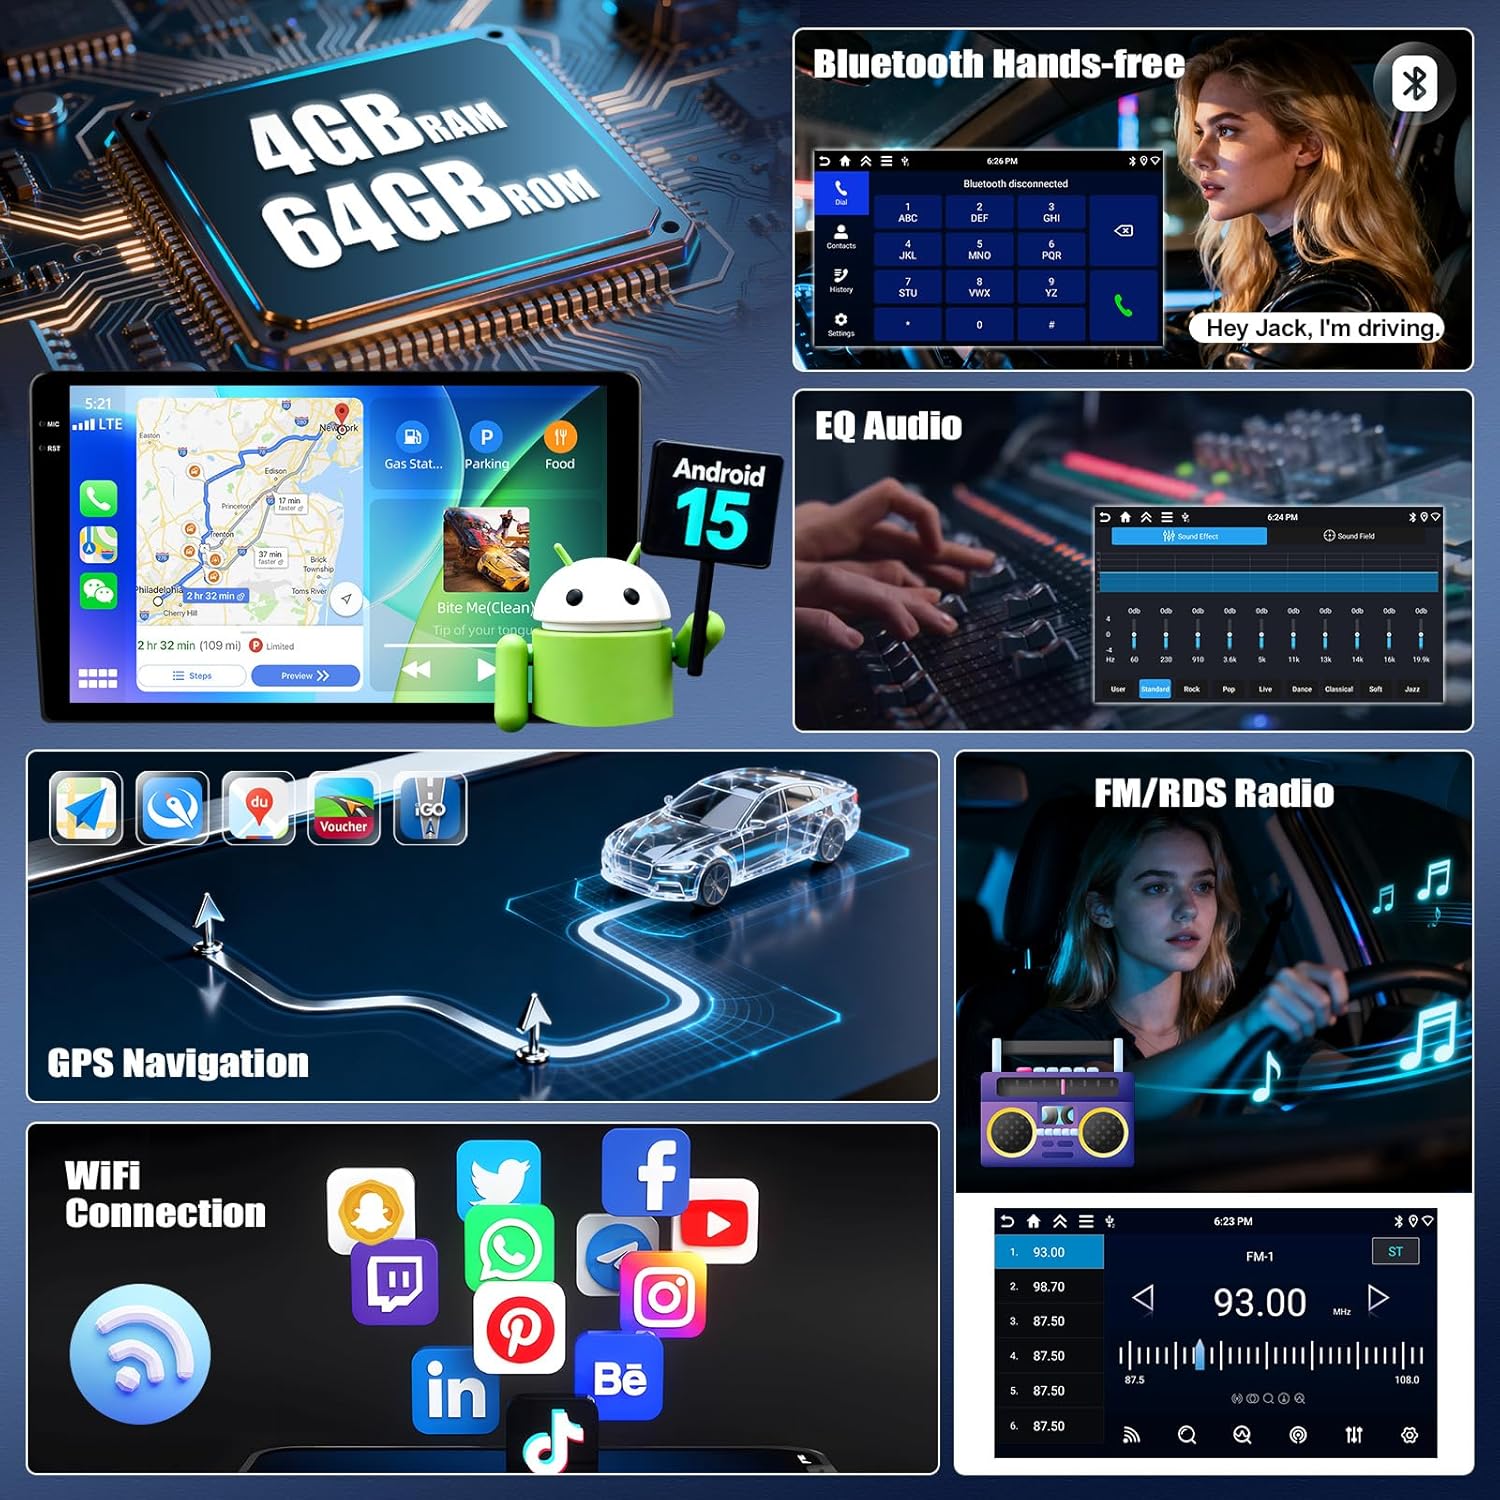
Image 5.2: GPS Navigation and Wi-Fi connectivity.
5.4 „Bluetooth“ ryšys 5.0
Prijunkite savo išmanųjį telefoną per „Bluetooth“, kad galėtumėte skambinti laisvų rankų įranga ir transliuoti garsą.
- Įjunkite „Bluetooth“ savo išmaniajame telefone ir automobilio garso sistemoje.
- Ieškokite available devices on the car stereo and select your phone.
- Patvirtinkite susiejimo kodą abiejuose įrenginiuose.
- Susiejus, galite belaidžiu būdu skambinti / priimti skambučius ir leisti muziką.
5.5 FM/RDS radijas
The built-in FM/RDS tuner provides enhanced radio signal reception. You can store up to 18 preset stations.
- Pasiekite programėlę „Radijas“.
- Norėdami rasti pasiekiamas stotis, naudokite nuskaitymo funkciją.
- Norėdami išsaugoti dabartinę stotį, paspauskite ir palaikykite iš anksto nustatytos stoties mygtuką.
5.6 EQ Audio Settings
Adjust audio output with the integrated Equalizer (EQ) to customize your listening experience. Multiple preset sound effects are available.
- Navigate to 'Sound Settings' or 'EQ' in the main menu.
- Choose from various preset sound modes (e.g., Pop, Rock, Jazz) or manually adjust frequency bands.

Image 5.3: Bluetooth, FM/RDS Radio, and EQ Audio interfaces.
5.7 Vairo valdymas (SWC)
The unit supports steering wheel controls, allowing you to manage audio functions (volume, track skipping, call answering) without taking your hands off the wheel.
- Access the 'Steering Wheel Control' settings in the system menu.
- Vykdykite ekrane pateikiamus nurodymus, kad užprogramuotumėte kiekvieną vairo mygtuką norimai funkcijai.
5.8 Padalintojo ekrano funkcionalumas
The split-screen feature allows you to run two applications simultaneously on the display, such as navigation and music playback. You can adjust the size and position of each app.
- From a running application, swipe from the side or long-press the recent apps button (method may vary by UI theme) to activate split-screen mode.
- Pasirinkite antrą programą, kuri bus paleista kartu su pirmąja.

Image 5.4: Display features including IPS touchscreen, UI themes, and split screen.
6. Galinė View Kameros veikimas
Pridedama AHD galinio vaizdo kamera užtikrina aiškų vaizdą view of the area behind your vehicle when reversing. It automatically activates when the vehicle is shifted into reverse gear.
- Ensure the rear camera is properly installed and connected to the 'Rear Camera Input' on the head unit.
- When the vehicle is in reverse, the display will automatically switch to the camera feed, showing parking assist lines.

Image 6.1: Steering Wheel Control interface and AHD Backup Camera view.
7. Specifikacijos
| Funkcija | Specifikacija |
|---|---|
| Operacinė sistema | Android 15 |
| RAM | 4 GB |
| ROM | 64 GB |
| Ekrano dydis | 9 colių |
| Ekrano raiška | 1280 x 720P IPS |
| Bluetooth versija | 5.0 |
| Ryšys | Bluetooth, Wi-Fi, USB |
| Ypatingos savybės | Wireless CarPlay, Android Auto, Mirror Link, GPS Navigation, FM/RDS, EQ, Steering Wheel Control, AHD Backup Camera, Multiple UI Themes, Split Screen |
| Žemėlapio tipas | Šiaurės Amerika, visame pasaulyje (neprisijungus / internetu) |
| Prekės svoris | 3.89 svaro |
| Pakuotės matmenys | 15.35 x 9.65 x 3.35 colio |
8. Problemų sprendimas
Jei kyla problemų dėl automobilio garso sistemos, žr. šiuos įprastus trikčių šalinimo veiksmus:
- Nėra galios: Patikrinkite visas maitinimo jungtis ir saugiklius. Įsitikinkite, kad transporto priemonės akumuliatorius tinkamai prijungtas.
- Nėra garso: Patikrinkite garsiakalbių jungtis. Patikrinkite garsumo lygius ir ekvalaizerio nustatymus. Įsitikinkite, kad pasirinktas teisingas garso šaltinis.
- GPS signalo praradimas: Įsitikinkite, kad GPS antena yra tinkamai sumontuota ir turi laisvą view dangaus. Patikrinkite įrenginio GPS nustatymus.
- „Bluetooth“ ryšio problemos: Ensure Bluetooth is enabled on both devices. Delete previous pairings and attempt to re-pair.
- „CarPlay“ / „Android Auto“ neprisijungia: Ensure Wi-Fi and Bluetooth are active on your phone. Try restarting both the phone and the car stereo. Check for software updates for the car stereo.
- Galinė kamera nerodo vaizdo: Patikrinkite kameros maitinimo ir vaizdo įvesties jungtis. Įsitikinkite, kad atbulinės pavaros signalo laidas yra tinkamai prijungtas.
- Jutiklinis ekranas nereaguoja: Pabandykite paleisti įrenginį iš naujo. Jei problema išlieka, gali tekti atkurti gamyklinius nustatymus (pastaba: tai ištrins visus naudotojo duomenis).
Jei problemos išlieka, susisiekite su klientų aptarnavimo tarnyba.
9. Priežiūra
Tinkama priežiūra užtikrina jūsų automobilio garso sistemos ilgaamžiškumą ir optimalų veikimą.
- Ekrano valymas: Jutiklinį ekraną švelniai nuvalykite minkšta, nepūkuota šluoste. Įsisenėjusias dėmes šiek tiek nuvalykiteampNuvalykite šluostę vandeniu arba ekranui saugiu valikliu. Venkite stiprių cheminių medžiagų ar abrazyvinių medžiagų.
- Programinės įrangos atnaujinimai: Periodically check for available software updates to ensure optimal performance and access to new features. Follow the instructions provided with the update.
- Aplinkos sąlygos: Venkite įrenginio ilgalaikio laikymo tiesioginiuose saulės spinduliuose, itin aukštose temperatūrose ar drėgmės.
- Kabelių jungtys: Reguliariai tikrinkite, ar visi laidai yra tvirtai prijungti, kad išvengtumėte atsitiktinių problemų.
10. Garantija ir palaikymas
UNITOPSCI offers comprehensive support for your product:
- Garantija: The product comes with a 12-month replacement service.
- Pinigų grąžinimo garantija: A 30-day money-back guarantee is provided.
- Grąžinimai: Enjoy 60-days no-worry returns.
- Techninė pagalba: Dedicated 24/7 professional after-sales team is available to assist with installation or usage inquiries. Lifetime after-sales consultation and technical support are provided.
Kontaktinė informacija:
For online support, please contact: UNITOPSCI@126.com

Image 10.1: UNITOPSCI customer support information.