1. Įvadas
This manual provides detailed instructions for the installation, operation, and maintenance of your plplaaoo 100A MPPT Solar Charge Controller. This advanced controller is designed to optimize energy harvest from your solar panels and manage battery charging efficiently for 12V, 24V, 36V, and 48V solar power systems. Please read this manual thoroughly before installation and use to ensure proper function and safety.
2. Saugos instrukcijos
Montavimo ir eksploatavimo metu laikykitės šių saugos priemonių:
- Ensure all wiring is correctly connected and securely fastened to prevent loose connections and overheating.
- Prieš montuodami arba reguliuodami valdiklį, visada atjunkite saulės bateriją ir akumuliatoriaus maitinimą.
- Use appropriate tools and wear protective gear, including eye protection, during installation.
- Install the controller in a well-ventilated area, away from flammable gases and liquids.
- Neardykite ir nebandykite patys taisyti valdiklio. Dėl aptarnavimo kreipkitės į kvalifikuotus specialistus.
- Ensure the battery bank is properly sized and compatible with the controller's voltage ir dabartiniai reitingai.
- Avoid short-circuiting the solar panel, battery, or load terminals.
3. Produkto ypatybės
- Maksimalios galios taško sekimas (MPPT): Achieves up to 98% conversion efficiency by intelligently tracking the maximum power point of solar panels under varying conditions.
- Automatinis ttage. Adaptacija: Automatically detects and adapts to 12V, 24V, 36V, or 48V battery systems.
- Daugiafunkcinis valdymas: Supports various operating modes including PWM charging, constant current output, and voltage reguliavimas.
- Integrated USB and DC Outputs: Features dual 5V 1A USB ports and a 2A DC output for charging external devices.
- Visapusiška apsauga: Includes safeguards against overvoltage, overcurrent, overtemperature, overload, short circuits, and reverse polarity.
- Patogi vartotojo sąsaja: Equipped with a backlit LCD display for real-time monitoring and intuitive buttons for configuration.
- Patvari konstrukcija: Features an aluminum heatsink for efficient cooling and robust design for harsh environments (0°C to 60°C).
- Suderinamumas su baterijomis: Compatible with gel, sealed lead-acid, and lithium batteries.
4. Pakuotės turinys
- 1 x plplaaoo 100A MPPT Solar Charge Controller
- 1 x Vartotojo vadovas
5. Produktas baigtasview ir komponentai
Familiarize yourself with the main components and interface of the solar charge controller.

5.1 paveikslas: Priekyje view of the solar charge controller, highlighting the LCD screen and various connection terminals.
The controller features an intuitive LCD display and clearly labeled ports for easy connection. The display provides real-time information about the system's status.
5.2 paveikslas: Išsamus view of the controller's connection ports.

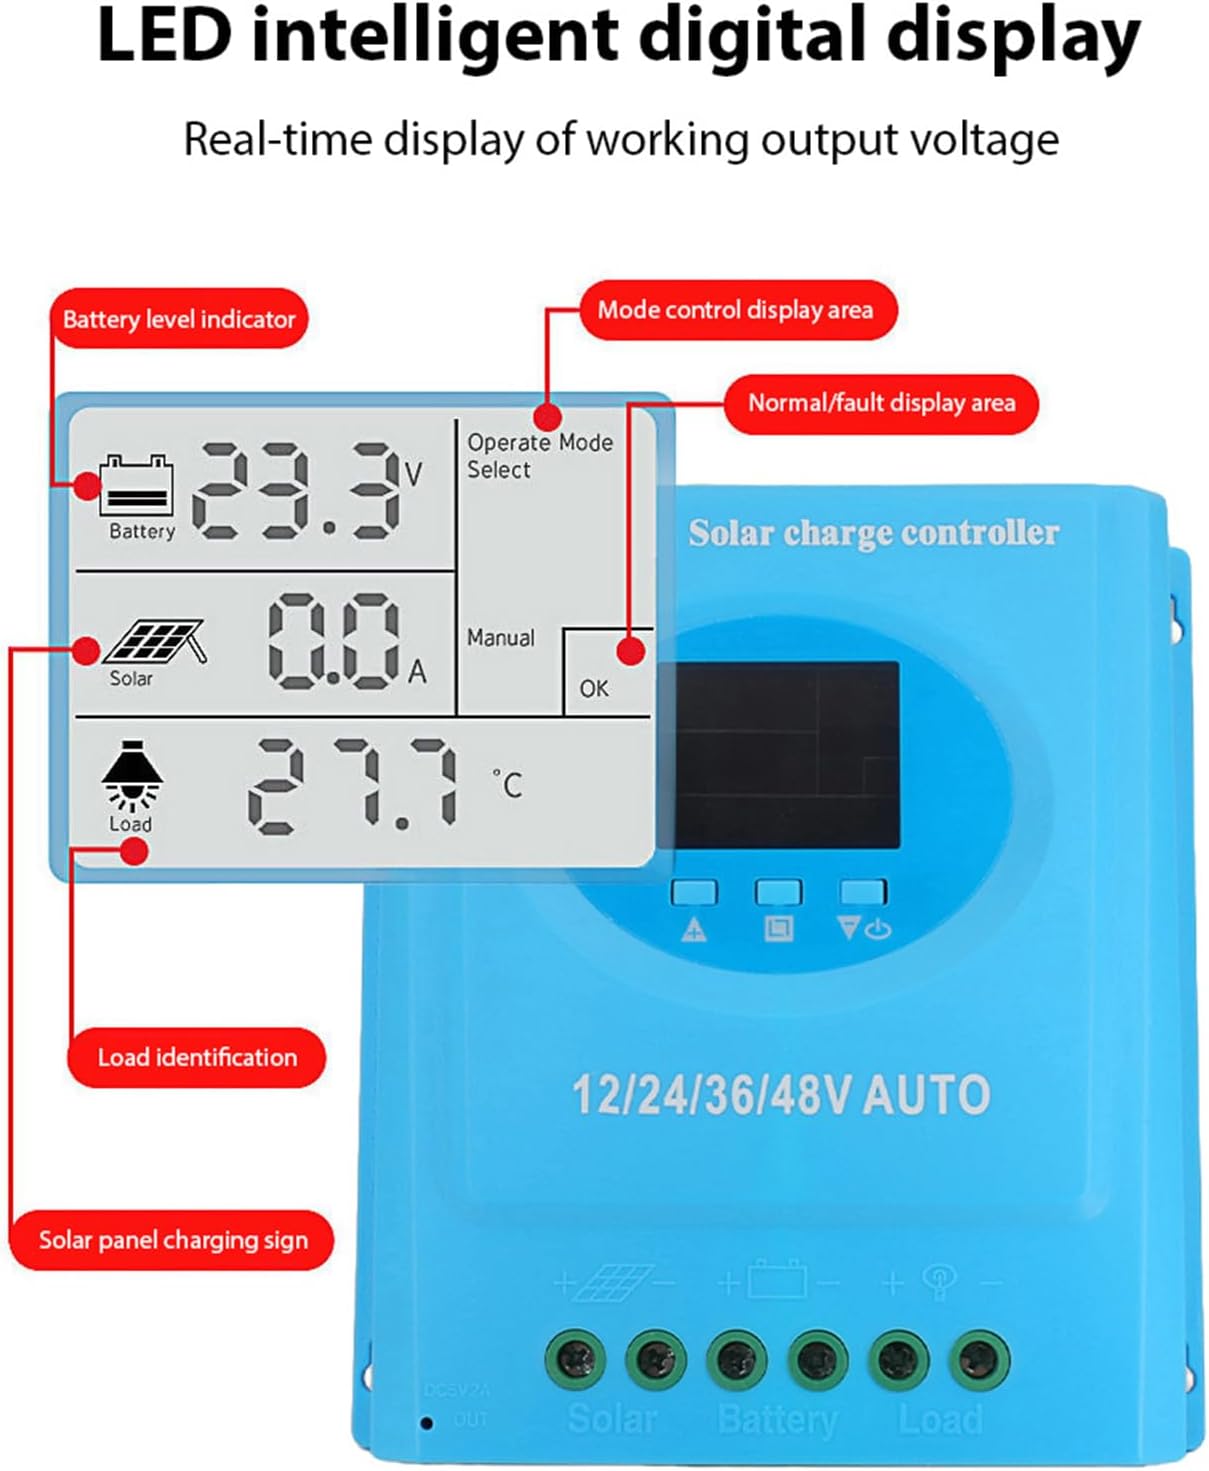
5.3 paveikslas: Išsamus view of the LCD display, indicating battery level, solar panel charging sign, load identification, operating mode, and real-time voltage.
5.1. Jungčių jungtys
- Dviguba USB sąsaja: Two 5V 1A USB ports for charging mobile devices.
- Saulės baterijų prievadas: Connects to your solar panels (positive and negative).
- Akumuliatoriaus prievadas: Connects to your battery bank (positive and negative).
- DC Load Port: Connects to your DC loads (positive and negative).
- DC išvesties prievadas: Additional DC output.
6. Sąranka ir diegimas
Follow these steps for proper installation of the solar charge controller. Ensure all power sources are disconnected before beginning.
6.1. Laidų sujungimo būdas
Connect the components in the following order to prevent damage:
- Prijunkite akumuliatorių: Connect the battery to the controller's battery terminals (positive to positive, negative to negative). The controller will automatically detect the battery voltage.
- Prijunkite saulės kolektorių: Connect the solar panel to the controller's solar panel terminals (positive to positive, negative to negative).
- Prijunkite nuolatinės srovės apkrovą: Connect the DC load to the controller's load terminals (positive to positive, negative to negative).
Svarbu: Visada pirmiausia prijunkite akumuliatorių, tada saulės bateriją ir galiausiai apkrovą. Atjunkite atvirkštine tvarka.

6.1 paveikslas: Solar energy system wiring diagram. Note the correct polarity for all connections.
6.2. Montavimas
Mount the controller vertically on a flat surface in a well-ventilated area, ensuring adequate clearance for air circulation around the heatsink. Avoid direct sunlight, high temperatures, and humid environments.
7. Naudojimo instrukcijos
Once installed, the controller will automatically begin operating. The LCD display provides real-time system status.
7.1. LCD ekrano informacija
The LCD screen displays various parameters:
- Baterijos lygio indikatorius: Shows the current charge status of the battery.
- Solar Panel Charging Sign: Indicates when the solar panels are actively charging the battery.
- Load Identification: Shows the status of the connected DC load.
- Operating Mode Display Area: Displays the current operating mode (e.g., manual, automatic).
- Normal/Fault Display Area: Indicates normal operation or displays error codes if a fault occurs.
- Real-time Working Output Voltage: Rodo dabartinį garsumątage sistemos.
7.2. Mygtukų funkcijos
The controller typically features multiple buttons for navigation and setting adjustments:
- Meniu mygtukas: Used to enter and exit the menu settings.
- Aukštyn/žemyn mygtukai: Used to navigate through menu options and adjust parameter values.
- Gerai mygtukas: Used to confirm selections and save settings.
Refer to the on-screen menu for specific parameter adjustments such as battery type, load control mode, and charging thresholds.
8. Priežiūra
Reguliarus saulės įkrovimo valdiklio veikimas ir ilgaamžiškumas užtikrinamas reguliariu jo aptarnavimu.
- Valymas: Reguliariai valykite valdiklio išorę sausa šluoste, kad pašalintumėte dulkes ir šiukšles. Įsitikinkite, kad ventiliacijos angos yra švarios.
- Ryšio patikrinimas: Kasmet patikrinkite visas laidų jungtis, ar jos tvirtos ir nėra korozijos. Jei reikia, priveržkite.
- Aplinkosaugos patikrinimas: Ensure the installation environment remains within the specified operating temperature range and is free from excessive moisture or dust.
- Akumuliatoriaus patikrinimas: Regularly check the battery terminals for corrosion and ensure the battery is in good condition.
9. Problemų sprendimas
Jei kyla problemų dėl saulės energijos įkrovimo valdiklio, žr. šias dažniausiai pasitaikančias problemas ir sprendimus:
| Problema | Galima priežastis | Sprendimas |
|---|---|---|
| Valdiklis neįsijungia / LCD ekranas tuščias |
|
|
| Akumuliatorius neįkraunamas |
|
|
| Įkrova neveikia |
|
|
| Rodomas klaidos kodas | Specifinis sistemos gedimas. | Refer to the controller's display for the specific error code and consult the full product documentation or contact support for detailed interpretation and resolution. |
10. Specifikacijos
| Parametras | Vertė |
|---|---|
| Modelis | plplaaoozi6egog4wm-0A |
| Prekės ženklas | plplaaoo |
| Nominali srovė | 100A |
| Sistemos ttage | 12V / 24V / 36V / 48V Automatic Adaptation |
| Įkrovimo tipas | MPPT (maksimalus galios taškų sekimas) |
| Konversijos efektyvumas | iki 98 proc. |
| USB išvestis | Dual 5V 1A ports |
| DC išėjimas | 2A |
| Darbinė temperatūra | 0°C iki 60°C |
| Matmenys (apytiksliai) | 19.5 cm x 18.3 cm x 6.8 cm (7.7 x 7.2 x 2.7 colio) |

10.1 paveikslas: Approximate dimensions of the solar charge controller.
11. Garantija ir palaikymas
Dėl garantijos informacijos, techninės pagalbos ar paslaugų kreipkitės tiesiogiai į pardavėją arba gamintoją. Išsaugokite pirkimo kvitą kaip pirkimo įrodymą.