1. Įvadas
Thank you for choosing the KEENSTAR 20Bar Espresso Machine. This manual provides essential information for the safe operation, maintenance, and troubleshooting of your new espresso machine. Please read it thoroughly before first use and keep it for future reference.
2. Svarbios saugos instrukcijos
- Prieš naudodami prietaisą perskaitykite visas instrukcijas.
- Nelieskite karštų paviršių. Naudokite rankenas arba rankenėles.
- Kad apsisaugotumėte nuo gaisro, elektros smūgio ir žmonių sužalojimų, nemerkite laido, kištukų ar prietaiso į vandenį ar kitą skystį.
- Atidžiai prižiūrėti būtina, kai bet kurį prietaisą naudoja vaikai arba jį naudoja šalia vaikų.
- Ištraukite kištuką iš elektros lizdo, kai nenaudojate ir prieš valydami. Prieš uždėdami ar nuimdami dalis ir prieš valydami prietaisą, leiskite atvėsti.
- Nenaudokite prietaiso su pažeistu laidu ar kištuku arba prietaisui sugedus arba jokiu būdu sugadinus.
- Prietaiso gamintojo nerekomenduojamų priedų naudojimas gali sukelti gaisrą, elektros smūgį arba susižaloti žmones.
- Nenaudoti lauke.
- Neleiskite laidui kaboti virš stalo ar prekystalio krašto ir neliesti karštų paviršių.
- Nedėkite ant įkaitusios dujinės ar elektrinės viryklės ar šalia jos, taip pat į įkaitintą orkaitę.
- Visada pirmiausia prijunkite kištuką prie prietaiso, o tada įjunkite laidą į elektros lizdą. Norėdami atjungti, išjunkite bet kurį valdiklį ir ištraukite kištuką iš elektros lizdo.
- Nenaudokite prietaiso ne pagal paskirtį.
- Šalindami karštus garus, būkite itin atsargūs.
- Šis prietaisas skirtas tik buitiniam naudojimui.
3. Pakuotės turinys
Išpakuodami patikrinkite pakuotės turinį, kad įsitikintumėte, jog yra visos dalys ir jos nepažeistos.
Vaizdas: All components included in the KEENSTAR 20Bar Espresso Machine package. This includes the main unit, portafilter with handle, single and double shot filters, coffee spoon with tamper, and a removable drip tray. The water tank and steam nozzle are also visible.
- KEENSTAR 20Bar Espresso Machine Main Unit
- Portafiltro rankena
- 1-Shot Filter Basket
- 2-Shot Filter Basket
- Coffee Spoon with Tamper
- Nuimamas lašų padėklas
- Vartotojo vadovas
4. Produktas baigtasview
Familiarize yourself with the various parts of your espresso machine.

Vaizdas: Priekyje view of the KEENSTAR 20Bar Espresso Machine, showcasing its sleek stainless steel design and key operational areas.
- Vandens bakas: Detachable, 1.1 Liter capacity. Located at the back of the machine.
- Valdymo skydelis: Intuitive touch screen for selecting brew options (Espresso, Americano, Espresso Cool, Steam, ON/OFF, 2X Espresso).
- Portafiltras: Talpina maltą kavą plikymui.
- Garų lazdelė: For frothing milk for lattes and cappuccinos. Features a 360-degree rotation.
- Lašėjimo padėklas: Nuimamas, kad būtų lengva valyti.
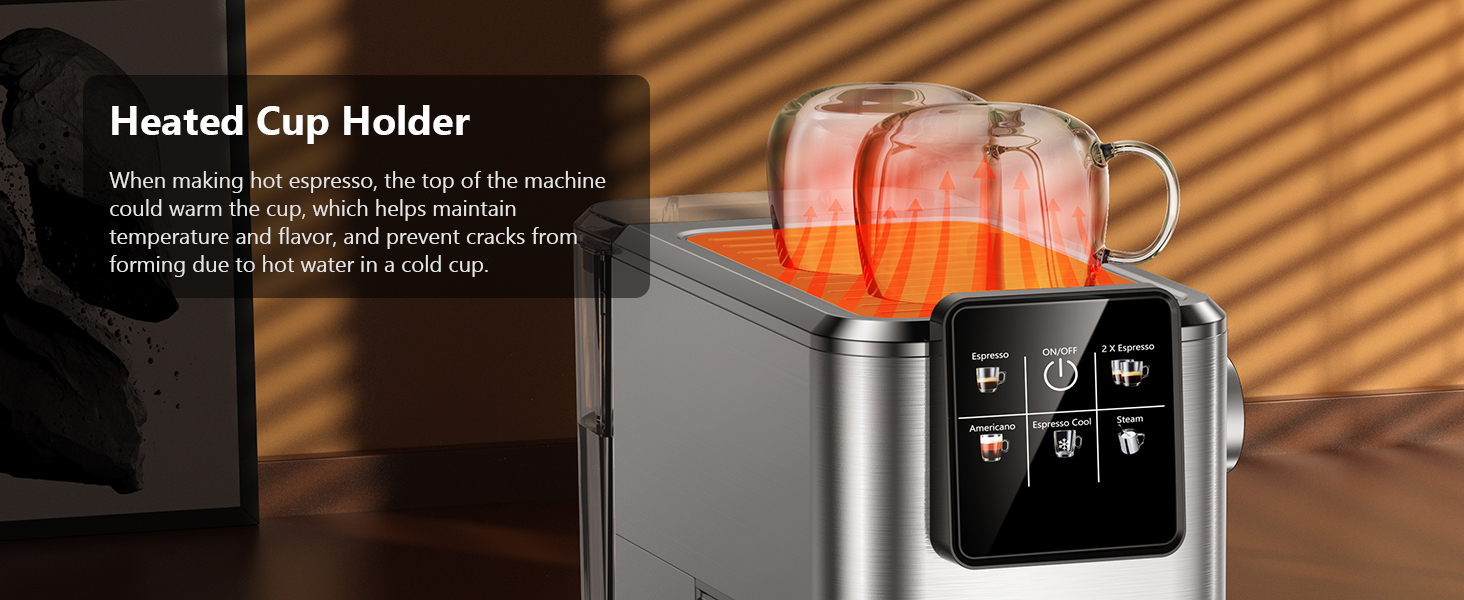
- Heated Cup Holder: Located on top of the machine to warm cups, maintaining coffee temperature.
5. Sąranka
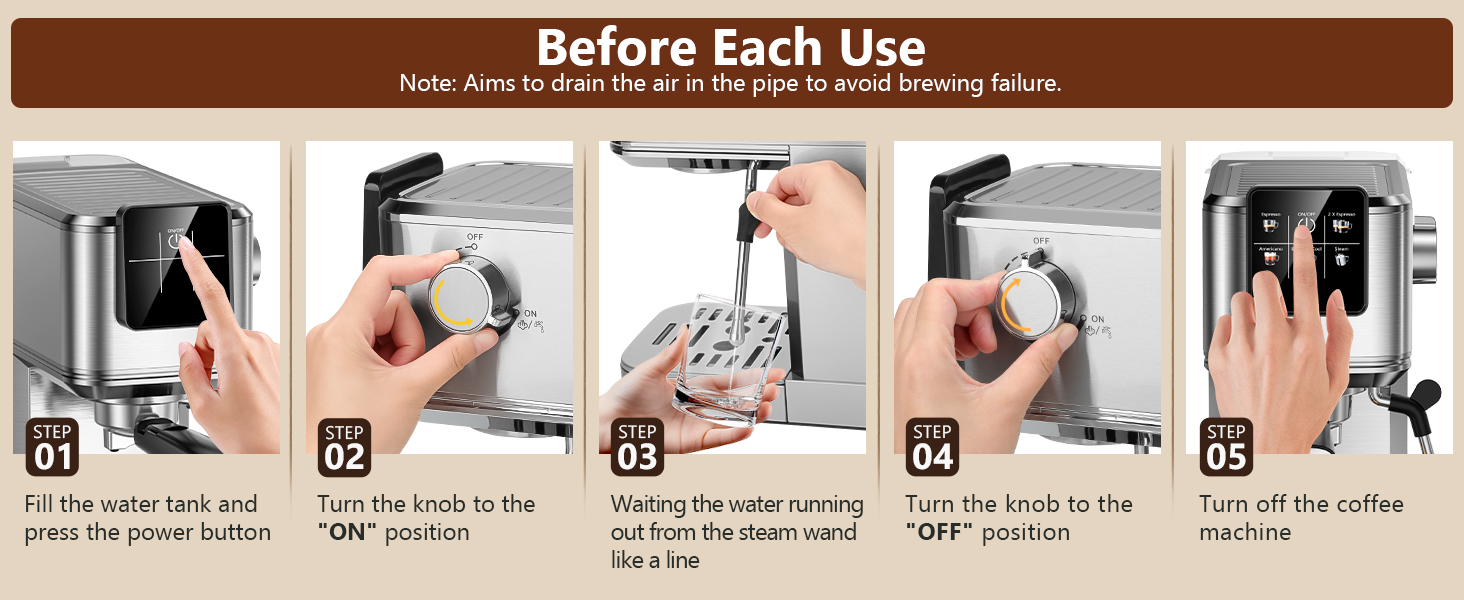
5.1 Initial Use and Priming
Before first use, or if the machine has not been used for a long time, it is essential to prime the system to ensure proper operation and remove any air from the pipes.
- Fill the water tank with fresh water and place it back into the machine. Ensure the tank cover is properly closed.
- Plug the machine into a power outlet. The ON/OFF button on the touch screen will illuminate.
- Press the ON/OFF button to turn on the machine. The indicator lights will blink as the machine preheats.
- Once the indicator lights are steady, the machine is ready.
- Padėkite tuščią puodelį po garų vamzdeliu.
- Turn the steam knob to the "ON" position. Water will run out from the steam wand like a line. Let it run for about 10-15 seconds to purge air.
- Turn the steam knob to the "OFF" position.
- Press the ON/OFF button to turn off the machine. The machine is now primed and ready for use.

Vaizdas: Visual steps for priming the espresso machine before its first use or after a period of inactivity. This process drains air from the internal pipes.
5.2 vandens bako užpildymas
The water tank has a maximum capacity of 1200ml. Do not exceed the maximum fill line to prevent overflow.
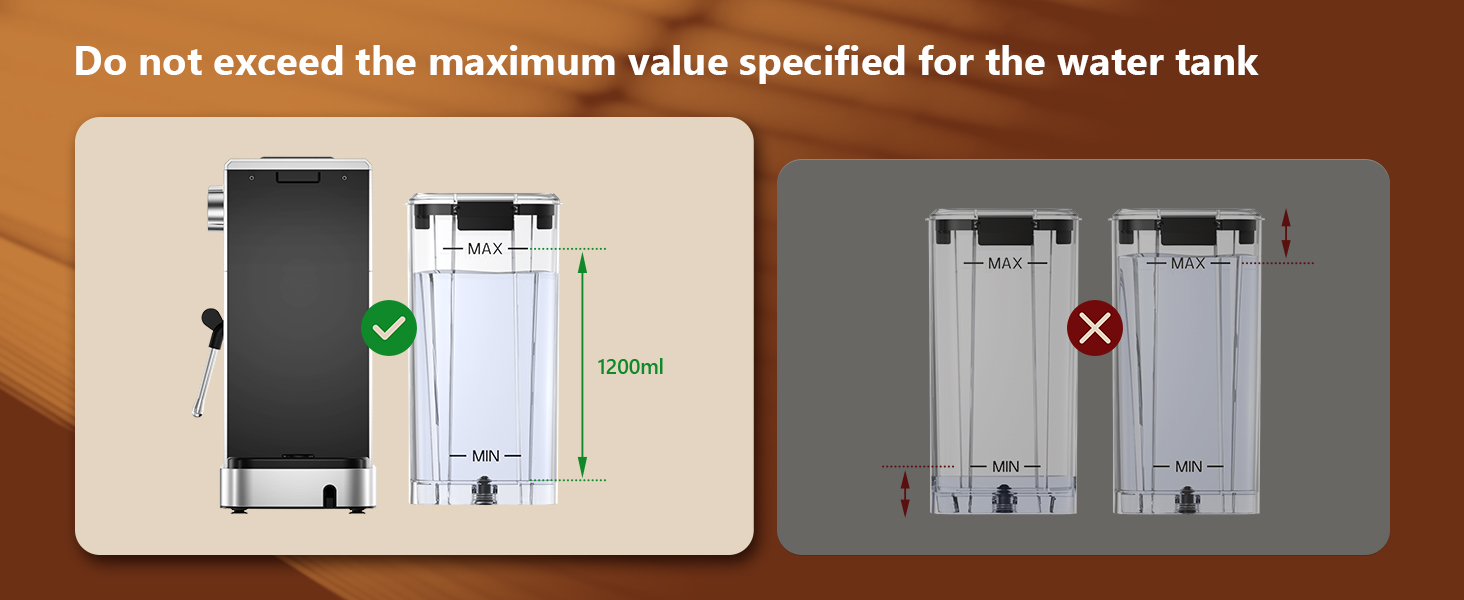
Vaizdas: Guidance on filling the water tank, indicating the 1200ml maximum fill level to avoid overfilling.
6. Naudojimo instrukcijos
6.1 Espreso virimas
The machine features a 20-bar pressure system and pre-soak technology for rich espresso extraction.
- Ensure the steam knob is set to the "OFF" position before brewing coffee.
- Fill the water tank with fresh water and press the ON/OFF button to power on. Wait for the indicator to become steady, signifying preheating is complete.
- Select the appropriate filter basket (1-shot or 2-shot) and place it into the portafilter.
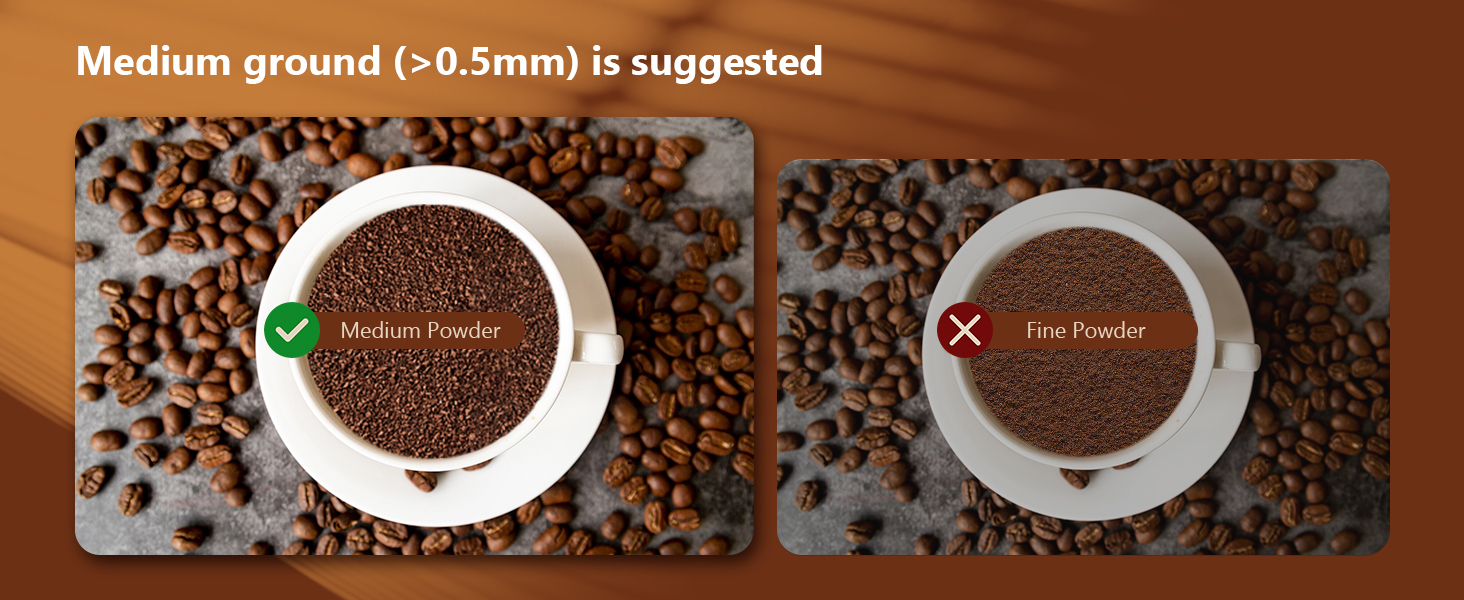
- Add ground coffee to the filter basket. Use medium ground coffee (greater than 0.5mm) for optimal results.
- Tamp the ground coffee firmly and evenly using the coffee tamper.
- Attach the portafilter to the machine, ensuring it is fully locked into place.
- Padėkite puodelį (-ius) ant lašėjimo padėklo po portafiltru.
- Select "Espresso" for a single shot or "2 X Espresso" for a double shot on the touch screen. The machine will begin brewing.
- Kai virimas bus baigtas, aparatas automatiškai sustos.

Vaizdas: Step-by-step visual instructions for brewing espresso, from preparing the machine to the final extraction.
Vaizdas: Illustration demonstrating the correct way to lock the portafilter before brewing to prevent leaks and ensure proper extraction.

Vaizdas: Recommended coffee grind size (medium, >0.5mm) for optimal espresso extraction, contrasting it with fine ground coffee.
6.2 Making Cold Brew Espresso
This machine offers a rapid cold brew function, producing smooth cold brew in as little as 10 minutes.
- Ensure the water tank is filled with iced water for the cold brew function.
- Prepare the portafilter with ground coffee as described in Section 6.1.
- Attach the portafilter to the machine and place a cup underneath.
- Select "Espresso Cool" on the touch screen. The machine will begin the cold brew process.
- Enjoy your rapid cold brew espresso.

Vaizdas: The espresso machine preparing cold brew, emphasizing the requirement for iced water in the tank.
6.3 Pieno putojimas
The powerful steam wand allows you to create creamy microfoam for lattes and cappuccinos.
- Fill the water tank with fresh water and press the ON/OFF button to power on.
- Press the "Steam" button on the touch screen to preheat the steam function. The indicator will blink during preheating and become steady when ready.
- After preheating, turn the steam knob to the "ON" position to release any remaining water in the pipe before frothing.
- Insert the steam nozzle approximately 1 inch into the surface of your milk.
- Gradually turn the steam knob to increase steam until the desired foam consistency is achieved.
- Once finished, turn the steam knob to the "OFF" position and clean the steam wand immediately.
Vaizdas: Visual instructions for frothing milk, detailing the steps from preheating to creating microfoam.
7. Priežiūra ir valymas
Reguliarus valymas užtikrina jūsų espreso aparato ilgaamžiškumą ir optimalų veikimą.
- Bendras valymas: Nuvalykite mašinos išorę skelbimuamp audinys. Nenaudokite abrazyvinių valiklių ar šveitiklių.
- Lašėjimo padėklas: The removable drip tray should be emptied and cleaned regularly.
- Portafiltras ir filtrų krepšeliai: Po kiekvieno naudojimo išimkite portafiltrą ir išmeskite panaudotus kavos tirščius. Portafiltrą ir filtro krepšelį nuplaukite tekančiu vandeniu.
- Garų lazdelė: Iškart po pieno suplakimo nuvalykite garų antgalį drėgnu rankšluosčiu.amp cloth to prevent milk residue from drying. Purge steam briefly to clear any internal blockages.
- Vandens bakas: Reguliariai valykite vandens bakelį švelniu plovikliu ir kruopščiai nuplaukite.
- Nukalkinimas: Depending on water hardness, descale the machine every 2-3 months. Follow the instructions provided with a suitable descaling solution.

Vaizdas: Important cleaning instruction: All accessories must be washed by hand and are not dishwasher safe.
8. Problemų sprendimas
Dažniausiai pasitaikančias problemas ir jų sprendimus rasite šiame skyriuje.
| Problema | Galima priežastis | Sprendimas |
|---|---|---|
| Kava nebėga / Lėta srovė |
|
|
| Water leaks from portafilter edge |
|
|
| Garų vamzdelis negamina garų |
|
|
| Kava nėra pakankamai karšta |
|
|
9. Specifikacijos
- Prekinis ženklas: KEENSTAR
- Modelio pavadinimas: JH-C5210
- Slėgio sistema: 20 barų
- Galia: 1350W
- Vandens bako talpa: 1.1 litro (37 uncijų)
- Gaminio matmenys: 11.8 "D x 12.6" P x 5.5" A
- Prekės svoris: 4.6 svaro
- Medžiaga: Nerūdijantis plienas
- Ypatinga funkcija: Programmable, Touch Screen, Milk Frother, Hot & Rapid Cold Brew
- Kavos įvedimo tipas: Malta kava
- Filtro tipas: Daugkartinio naudojimo
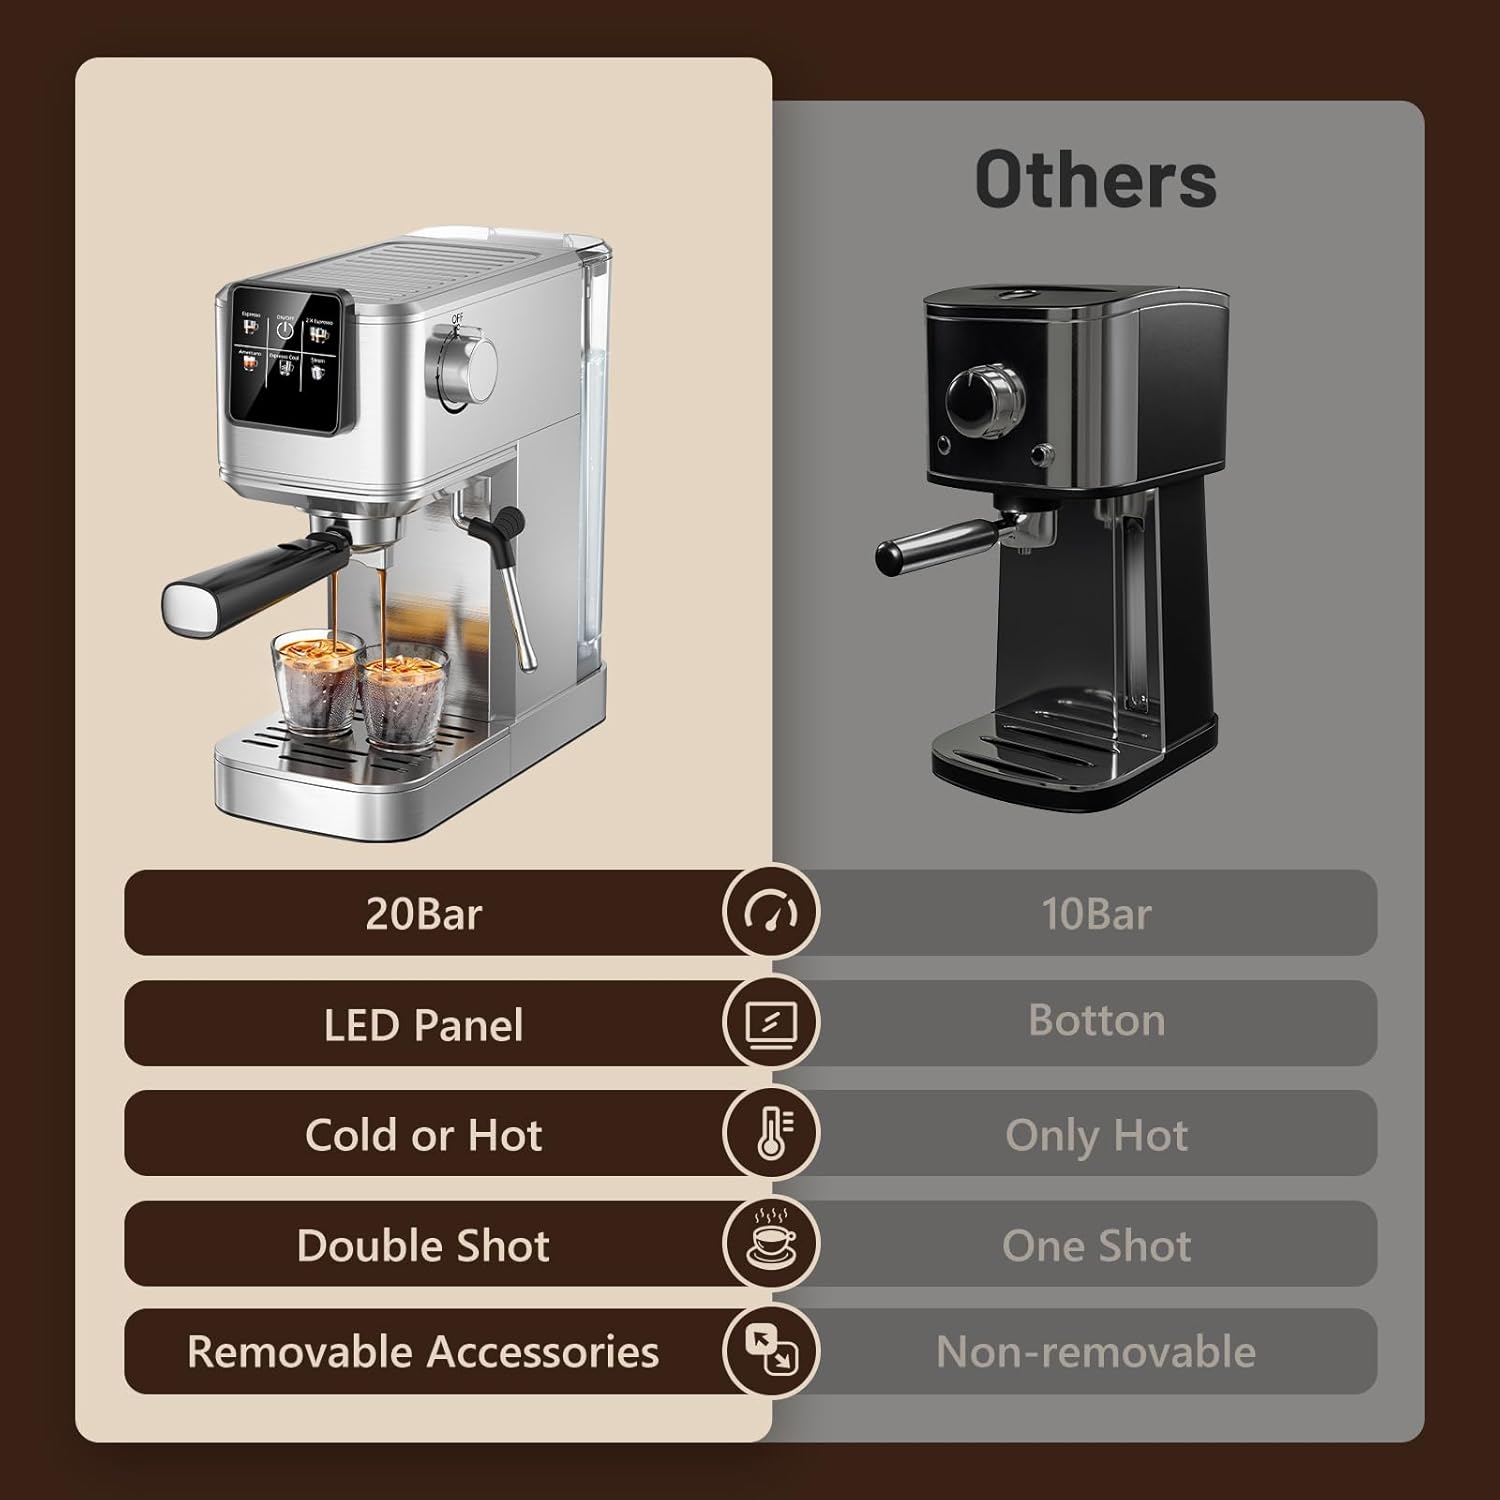
Vaizdas: Feature comparison of the KEENSTAR machine, emphasizing its 20Bar pressure, LED panel, and versatility for hot and cold beverages.

Vaizdas: Dimensions of the KEENSTAR espresso machine, indicating its compact size.
10. Garantija ir palaikymas
For warranty information or technical support, please refer to the contact details provided on the product packaging or visit the official KEENSTAR websvetainėje. Išsaugokite pirkimo įrodymą, jei prireiktų pateikti garantinį ieškinį.