
1. Įvadas
This manual provides detailed instructions for the installation, operation, and maintenance of your STUDIOFINIX Bluetooth 5.4 4-Zone 8-Channel Audio Amplifier Receiver. This amplifier is designed to deliver high-fidelity audio across multiple rooms, offering independent zone control, various input options, and a professional karaoke function. Please read this manual thoroughly before use to ensure proper setup and optimal performance.
2. Saugos instrukcijos
- Maitinimo šaltinis: Naudokite tik pateiktą maitinimo adapterį. Įsitikinkite, kad įtampatage atitinka įrenginyje nurodytus reikalavimus.
- Vėdinimas: Do not block any ventilation openings. Install in a location with adequate airflow to prevent overheating.
- Vanduo ir drėgmė: Saugokite įrenginį nuo lietaus, drėgmės ar lašančių/taškančių skysčių. Laikykite atokiau nuo vandens šaltinių.
- Šiluma: Nestatykite šalia šilumos šaltinių, tokių kaip radiatoriai, šildytuvai, viryklės ar kiti šilumą skleidžiantys prietaisai.
- Valymas: Unplug the unit from the power outlet before cleaning. Use a dry, soft cloth only.
- Aptarnavimas: Nemėginkite patys aptarnauti šio gaminio. Visą techninę priežiūrą patikėkite kvalifikuotam aptarnavimo personalui.
- Garsiakalbio varža: Ensure connected speakers have an impedance of 4-8 ohms. Connecting speakers with lower impedance may damage the ampgyvesnis.
3. Pakuotės turinys
Patikrinkite, ar pakuotėje yra visi toliau išvardyti daiktai:
- STUDIOFINIX Ampkeltuvas x 1
- Maitinimo adapteris x 1
- Black Terminal Connectors x 4
- Naudojimo instrukcija x 1

Figure 3.1: Package Contents. The image displays the amplifier unit, its power adapter, four black terminal connectors, and the user manual.
4. Produktas baigtasview
4.1 Priekinio skydelio įvadas
Priekinis skydelis suteikia prieigą prie pagrindinių valdiklių ir įvesties prievadų, kad būtų patogu valdyti.

Figure 4.1: Front Panel Layout. Key controls include the Volume/Power ON/OFF knob, MIC VOL knob, MIC input, AUX input, USB port, TF Card slot, and Bass/Treble adjustment knobs.
- VOLUME/PWR ON/OFF: Controls the master volume and powers the unit on/off.
- MIC VOL: Reguliuoja prijungto mikrofono garsumą.
- MIC įvestis: 3.5 mm lizdas mikrofonui prijungti.
- AUX įvestis: 3.5mm jack for auxiliary audio devices.
- USB prievadas: Garso įrašams leisti files iš USB atmintinės.
- TF kortelės lizdas: Garso įrašams leisti files from a TF (MicroSD) card.
- BASAS / TREBLAS: Reguliuoja garso išvesties žemo ir aukšto dažnio atsaką.
4.2 Viršutinio skydelio įvadas
The top panel features controls for mode selection, playback, and echo effects for karaoke.

Figure 4.2: Top Panel Layout. This view highlights the MODE button, playback controls (Fast Retreat/Previous Song, Play/Pause, Fast Forward/Next Song), and the ECHO button for microphone effects.
- MODE: Switches between input sources (Bluetooth, Optical, AUX, LINE IN, USB, TF Card).
- Atkūrimo valdikliai: Buttons for previous track, play/pause, and next track when using USB/TF card or Bluetooth.
- ECHO: Activates and adjusts the echo effect for the microphone input.
- Zone Control Buttons (1, 2, 3, 4): Independently turn on or off each of the four audio zones.
4.3 Back Panel Introduction
The back panel contains the main speaker outputs and additional wired input options.

Figure 4.3: Back Panel Layout. This image shows the DC IN port, speaker output terminals for Zones 1-4 (supporting 8 speakers), Optical input, and stereo RCA Line In (R/L) inputs.
- DC in: Power input port for the provided power adapter.
- Speaker Outputs (ZONE 1-4): Connect up to 8 speakers (2 per zone) with 4-8 ohm impedance. Red terminals are positive (+), black terminals are negative (-).
- OPTINĖ įvestis: Digital audio input for connecting devices like TVs or game consoles.
- LINE IN (R/L): Stereo RCA inputs for connecting analog audio sources.
5. Sąranka
5.1 Garsiakalbio prijungimas
The amplifier supports up to 8 speakers, divided into 4 independent zones. Ensure your speakers have an impedance of 4-8 ohms.
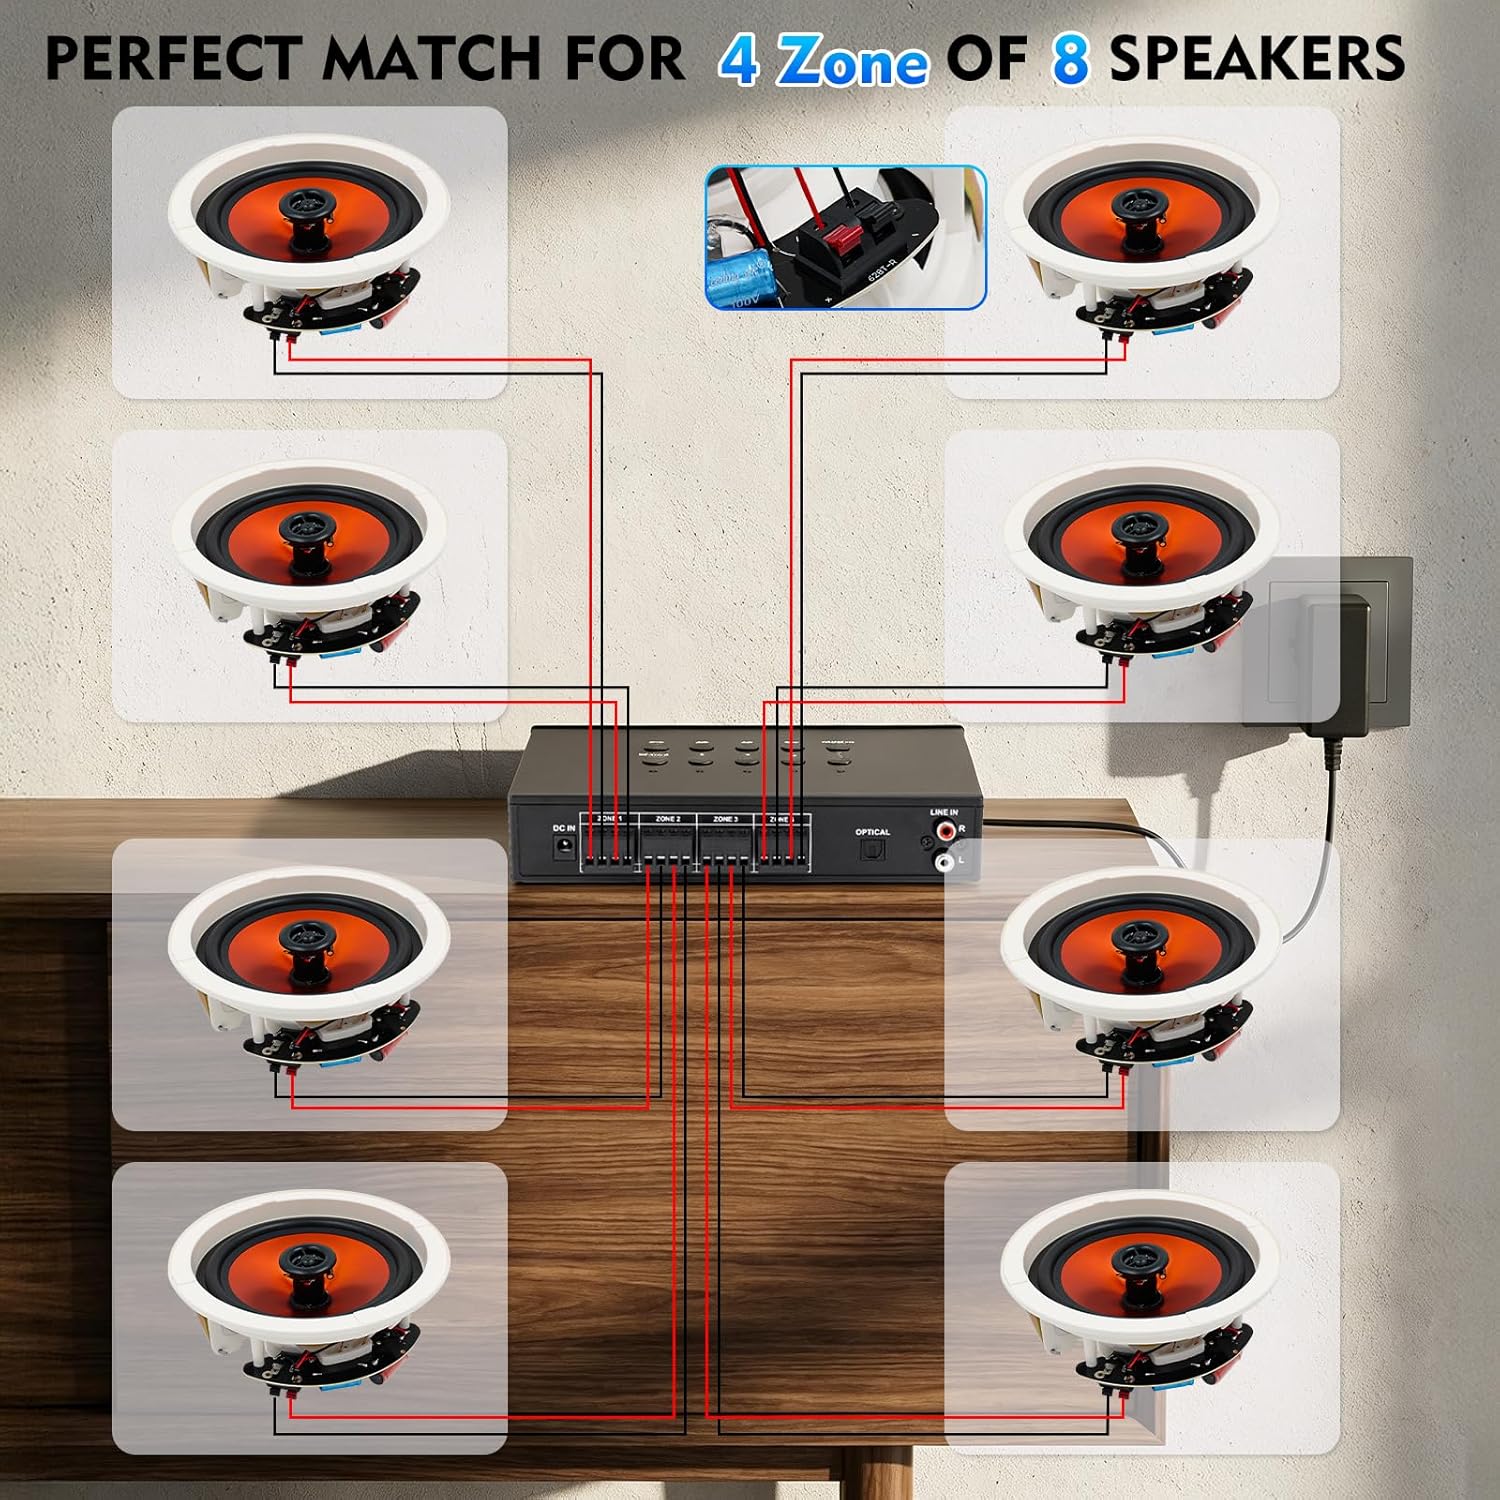
Figure 5.1: Speaker Wiring Diagram. This illustration demonstrates connecting two speakers per zone, with red wires to positive (+) terminals and black wires to negative (-) terminals on the amplifier galinis skydelis.
- Nustatykite teigiamus (+) ir neigiamus (-) savo garsiakalbių gnybtus.
- Connect the positive (+) wire from each speaker to the corresponding red (+) terminal on the amplifier for the desired zone.
- Connect the negative (-) wire from each speaker to the corresponding black (-) terminal on the amplifier for the desired zone.
- Repeat for all speakers across the 4 zones. Ensure all connections are secure.
5.2 Maitinimo jungtis
After connecting all speakers and audio sources, connect the power adapter.
- Insert the DC plug of the power adapter into the 'DC IN' port on the back of the ampgyvesnis.
- Prijunkite maitinimo adapterį į tinkamą sieninį lizdą.
6. Naudojimo instrukcijos
6.1 Įjungimas / išjungimas ir garsumo valdymas
- Norėdami įjungti amplifier, rotate the VOLUME/PWR ON/OFF rankenėlę pagal laikrodžio rodyklę, kol ekranas užsidegs.
- Norėdami išjungti, sukite rankenėlę prieš laikrodžio rodyklę, kol ji spragtelės.
- Adjust the master volume by rotating the VOLUME/PWR ON/OFF rankenėlė.
6.2 Įvesties šaltinio pasirinkimas
Paspauskite REŽIMAS button on the top panel to cycle through available input sources: Bluetooth, Optical, AUX, LINE IN, USB, and TF Card.
6.3 Bluetooth poravimas
Norėdami prijungti Bluetooth įrenginį:

Figure 6.1: Bluetooth Connectivity. The image shows a smartphone successfully paired with the amplifier, indicating stable Bluetooth 5.4 connection for wireless audio streaming.
- Pasirinkite „Bluetooth“ režimą naudodami REŽIMAS button. The display will show "BT" or a similar indicator.
- Išmaniajame telefone, planšetiniame kompiuteryje ar kitame įrenginyje su „Bluetooth“ ryšiu įjunkite „Bluetooth“ ir ieškokite galimų įrenginių.
- Select "STUDIOFINIX" or a similar name from the list to pair.
- Susiejus, galite belaidžiu būdu transliuoti garsą į ampgyvesnis.
6.4 Wired Input Operation
The amplifier supports various wired audio sources:

Figure 6.2: Multiple External Audio Sources. This graphic illustrates the diverse input options available, including Microphone, Bluetooth, USB, AUX, and TF Card, allowing connection of various external devices.
- Optinė įvestis: Connect a digital audio cable from your source (e.g., TV, game console) to the OPTICAL port on the back panel. Select Optical mode using the REŽIMAS mygtuką.
- AUX įvestis: Connect a 3.5mm audio cable from your device to the AUX port on the front panel. Select AUX mode.
- EILUTĖ: Connect RCA cables from your analog audio source (e.g., CD player) to the LINE IN (R/L) ports on the back panel. Select LINE IN mode.
- USB/TF kortelė: Insert a USB drive or TF card into the respective slot on the front panel. The amplifier will automatically switch to USB or TF mode and begin playback. Use the playback controls on the top panel to manage tracks.
6.5 Karaoke funkcija
Enjoy karaoke with the built-in microphone input and echo effect.

Figure 6.3: Karaoke Ready. This image depicts individuals enjoying a karaoke session, highlighting the amplifier's capability to connect a microphone for vocal performances.
- Prijunkite mikrofoną prie MIC įvestis priekiniame skydelyje.
- Sureguliuokite mikrofono garsumą naudodami MIC VOL rankenėlė.
- Paspauskite ECHO button on the top panel to activate and adjust the echo effect for your vocals.
6.6 Nepriklausoma zonos kontrolė
The amplifier allows you to independently control the power for each of the four speaker zones.

Figure 6.4: 4-Zone Independent Control. This visual demonstrates how the amplifier can manage audio in four separate areas, allowing users to turn zones on or off as needed for multi-room audio customization.
- Naudokite skirtą ZONE 1, ZONE 2, ZONE 3, ZONE 4 buttons on the top panel to toggle each zone on or off.
- Note that while zones can be independently turned on/off, the overall volume, bass, and treble settings apply to all active zones simultaneously.
6.7 Žemų ir aukštų dažnių reguliavimas
Adjust the audio's tonal characteristics using the BASS ir TREBLE knobs on the front panel to suit your preference.
7. Priežiūra
- Valymas: Disconnect the power before cleaning. Use a soft, dry cloth to wipe the exterior of the unit. Do not use liquid cleaners or aerosol sprays.
- Saugykla: Jei įrenginį ilgesnį laiką sandėliuosite, atjunkite jį nuo elektros tinklo ir laikykite vėsioje, sausoje vietoje, apsaugotoje nuo tiesioginių saulės spindulių.
- Vėdinimas: Regularly check that ventilation openings are clear of dust and debris.
8. Problemų sprendimas
| Problema | Galima priežastis | Sprendimas |
|---|---|---|
| Nėra galios | Power adapter not connected; Power outlet not working; Unit is off. | Ensure power adapter is securely connected and plugged into a live outlet. Turn the VOLUME/PWR ON/OFF knob clockwise. |
| Iš garsiakalbių nėra garso | Incorrect input source selected; Speaker wires loose or incorrectly connected; Volume too low; Specific zone turned off. | Press MODE to select the correct input. Check speaker wire connections (positive/negative). Increase master volume. Ensure the relevant zone button is ON. |
| Bluetooth neprisijungia | Not in Bluetooth mode; Device too far; Device already connected to another ampgyvesnis. | Select Bluetooth mode. Move device closer to the ampAtjunkite nuo kitų „Bluetooth“ įrenginių ir bandykite susieti dar kartą. |
| Mikrofonas neveikia | Microphone not plugged in; MIC VOL too low. | Ensure microphone is securely plugged into the MIC input. Increase the MIC VOL knob. |
| USB/TF kortelė neveikia | Neteisingas režimas; Nesuderinama file formatas; Sugadinta laikmena. | Select USB or TF mode. Ensure audio files are in a supported format (e.g., MP3). Try a different USB drive or TF card. |
9. Specifikacijos
| Funkcija | Specifikacija |
|---|---|
| Prekės ženklas | STUDIOFINIX |
| Modelio numeris | ST-AMP-8PBT-BK-US |
| Kanalų skaičius | 8 |
| Išėjimo vattage | 480 vatų (iš viso) |
| Bluetooth versija | 5.4 |
| Garsiakalbio varža | 4-8 omai |
| Įvesties parinktys | Optical, AUX, LINE IN, USB, TF Card, MIC, Bluetooth |
| Dažnio atsakas | ±2dB@20-20kHz |
| Signalo ir triukšmo santykis | 85 dB |
| Matmenys (I x P x A) | 195mm x 40mm x 140mm (Approx.) |
10. Informacija apie garantiją
This STUDIOFINIX ampkeltuvas ateina su a 1 metų ribota garantija from the date of purchase. This warranty covers manufacturing defects in materials and workmanship under normal use. It does not cover damage caused by misuse, accident, unauthorized modification, or improper installation. Please retain your proof of purchase for warranty claims.
11. Pagalba klientams
For technical assistance, warranty claims, or general inquiries, please contact STUDIOFINIX customer support through the retailer's platform or visit the official STUDIOFINIX websvetainė kontaktinei informacijai.
Palaikymas internetu: www.studiofinix.com