
1. Įvadas
This manual provides essential information for the safe and efficient operation, assembly, and maintenance of your Geemax Electric Tricycle, model DDSLC002. Please read this manual thoroughly before using the tricycle to ensure proper function and to prevent injury or damage.
The Geemax Electric Tricycle is designed for adult use, featuring 20-inch by 4.0-inch fat tires, a 36V 350W motor, and a 13Ah lithium battery. It is suitable for various terrains including urban roads, beaches, and light snow.

Figure 1.1: Geemax Electric Tricycle DDSLC002
This image shows the Geemax Electric Tricycle, model DDSLC002, in white. It features large 20-inch fat tires, a comfortable seat with a backrest, and a spacious rear cargo basket. The design highlights its robust construction suitable for various terrains.

Figure 1.2: Versatile Terrain Capability
This image demonstrates the tricycle's adaptability to various environments, showcasing it on a paved road, a sandy beach, a snowy path, and a grassy field, emphasizing its fat tire design for multi-terrain use.
2. Saugos informacija
Your safety is paramount. Adhere to all warnings and instructions in this manual.
- Važiuodami visada dėvėkite šalmą ir atitinkamą apsaugos įrangą.
- Prieš kiekvieną važiavimą įsitikinkite, kad visi komponentai yra tvirtai pritvirtinti.
- Nevairuokite triračio apsvaigę nuo alkoholio ar narkotikų.
- Laikykitės visų vietinių eismo įstatymų ir taisyklių.
- Avoid riding in adverse weather conditions, such as heavy rain or ice, unless the tricycle is specifically designed and equipped for such conditions.
- The maximum load capacity for this tricycle is 350 lbs (158 kg). Do not exceed this limit.
- Keep hands and feet away from moving parts during operation.
- Regularly inspect brakes, tires, and battery for wear and damage.
3. Pakuotės turinys
Upon unpacking, verify that all components are present and undamaged. If any parts are missing or damaged, contact customer support immediately.
- Geemax Electric Tricycle (partially assembled)
- 36V 13Ah ličio baterija
- Akumuliatoriaus įkroviklis
- Rear Storage Basket
- Surinkimo įrankiai
- Vartotojo vadovas
4. Komponento identifikavimas
Familiarize yourself with the various parts of your Geemax Electric Tricycle using the diagram below.
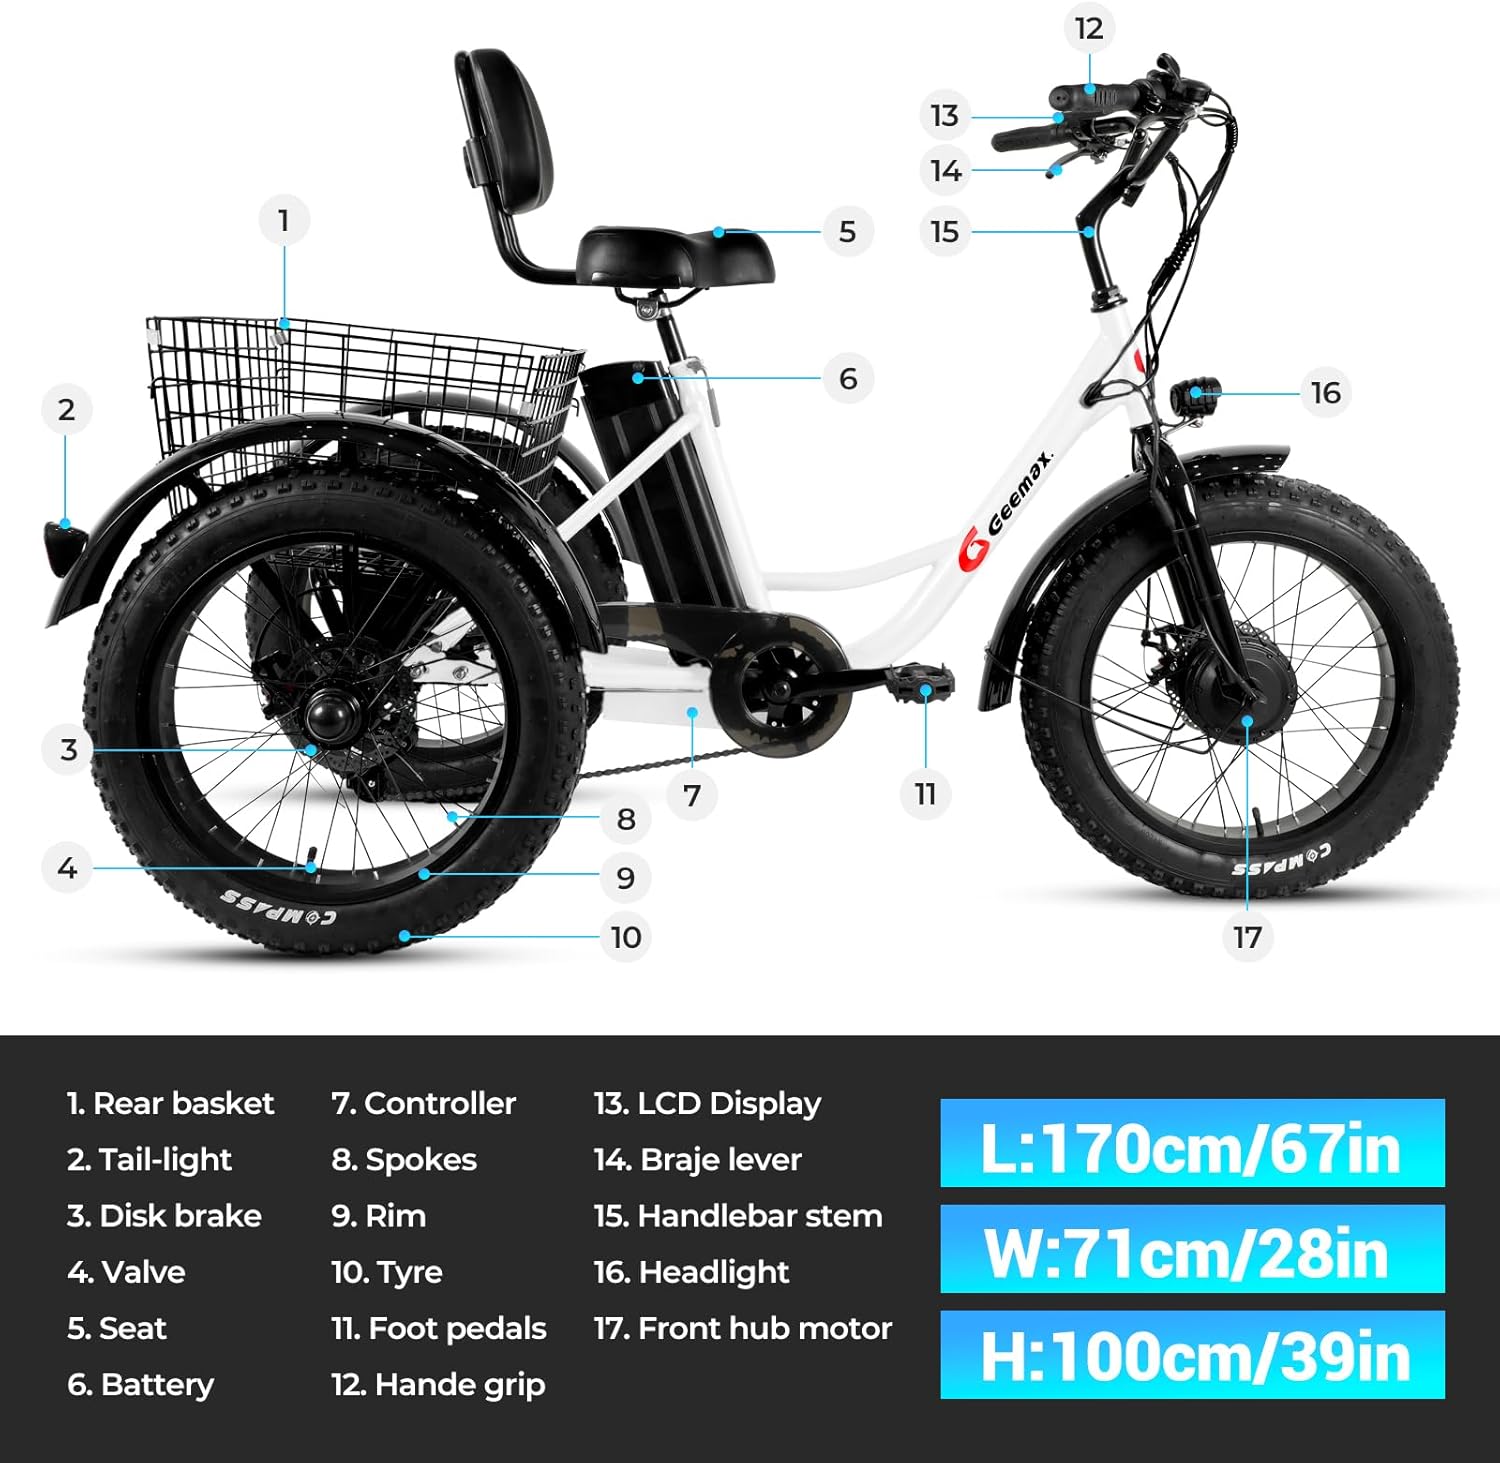
Figure 4.1: Tricycle Component Diagram
This image displays a detailed diagram of the Geemax Electric Tricycle, highlighting its key components with numbered labels for easy identification. The diagram includes the rear basket, tail-light, disk brake, valve, seat, battery, controller, spokes, rim, tire, foot pedals, handle grip, LCD display, brake lever, handlebar stem, headlight, and front hub motor. Dimensions are also provided: Length 170cm/67in, Width 71cm/28in, Height 100cm/39in.
- Galinis krepšelis
- Užpakalinis žibintas
- Diskinis stabdys
- Vožtuvas
- Sėdynės
- Baterija
- Valdiklis
- Stipinai
- Ratlankis
- Padanga
- Pėdų pedalai
- Rankenos rankena
- LCD ekranas
- Stabdžių svirtis
- Vairo kotas
- Priekinis žibintas
- Priekinės stebulės variklis
5. Sąranka ir surinkimas
The Geemax Electric Tricycle arrives approximately 50% assembled. Follow these steps for final assembly.
5.1 Išpakavimas
- Atsargiai išimkite visus komponentus iš pakuotės.
- Place all parts on a clean, flat surface.
- Verify all parts are present against the package contents list.
5.2 Vairo montavimas
- Loosen the bolts on the handlebar stem.
- Insert the handlebar into the stem, ensuring it is centered and aligned.
- Tvirtai priveržkite varžtus.
5.3 Seat and Backrest Adjustment
Adjust the seat height and backrest for optimal comfort and riding posture.

Figure 5.1: Adjustable Seat and Backrest
This image illustrates the adjustable mechanism for the tricycle's seat and backrest, allowing riders to customize their seating position for comfort and ergonomics.
- Loosen the quick-release lever or bolt for the seat post.
- Adjust the seat to a comfortable height where your feet can touch the ground.
- Securely tighten the quick-release lever or bolt.
- Adjust the backrest angle for lumbar support.
5.4 Rear Basket Attachment
Attach the rear basket to the designated mounting points on the tricycle frame.

Figure 5.2: Rear Storage Basket
This image shows the spacious rear basket of the tricycle, demonstrating its capacity by being filled with various groceries, highlighting its utility for carrying items.
- Align the basket with the mounting holes on the rear frame.
- Use the provided bolts and nuts to secure the basket firmly.
- Ensure the basket is stable and does not wobble.
5.5 Headlight and Taillight Installation
Install the headlight and taillight for improved visibility and safety.

Figure 5.3: Front Headlight
This image focuses on the tricycle's bright LED headlight, demonstrating its illumination capability for nighttime riding or low-light conditions.
- Mount the headlight to the front of the tricycle, typically on the handlebars or front fork.
- Mount the taillight to the rear of the tricycle, usually on the rear fender or basket.
- Connect the lights to the tricycle's electrical system as per the wiring instructions (refer to detailed wiring diagram if provided separately).
5.6 Galutinės patikros
- Ensure all bolts and fasteners are tightened.
- Patikrinkite padangų slėgį.
- Patikrinkite stabdžių veikimą.
- Verify the battery is fully charged and properly installed.
6. Informacija apie akumuliatorių
The Geemax Electric Tricycle is powered by a 36V 13Ah Lithium Battery, UL Certified for safety.

Figure 6.1: 36V 13Ah Lithium Battery
This image displays the 36V 13Ah lithium battery pack, highlighting its internal cell structure and UL certification, indicating its safety and quality standards. The battery provides an electric range of 28-35 miles and an assist range of 35-45 miles.
6.1 Akumuliatoriaus įkrovimas
- Prijunkite įkroviklį prie standartinio sieninio lizdo.
- Connect the charger output to the battery charging port.
- Įkroviklio indikatoriaus lemputė rodys įkrovimo būseną (pvz., raudona, kai kraunama, žalia, kai visiškai įkrauta).
- Neperkraukite akumuliatoriaus. Atjunkite įkroviklį, kai įkrovimas bus baigtas.
- Charging time typically ranges from 4-6 hours for a full charge.
6.2 Akumuliatoriaus įdėjimas ir išėmimas
- To install: Slide the battery into its designated slot on the tricycle frame until it clicks securely into place. Ensure the battery is locked to prevent theft.
- To remove: Unlock the battery with the provided key, then slide it out of the frame.
7. Naudojimo instrukcijos
7.1 Įjungimas / išjungimas
- To power on: Press and hold the power button on the LCD display.
- To power off: Press and hold the power button again.
7.2 LCD ekrano funkcijos
LCD ekrane pateikiama realiuoju laiku informacija apie jūsų važiavimą.

7.1 pav.: LCD ekrano sąsaja
This image shows the multi-function LCD display (S866 model) mounted on the handlebars. It clearly indicates current speed, battery level, distance covered, and the selected pedal assist level (0-5). The display also features power and mode buttons.
- Greitis: Rodo dabartinį važiavimo greitį.
- Baterijos lygis: Rodo likusį akumuliatoriaus įkrovą.
- Atstumas: Shows trip distance or total odometer reading.
- Pedalo pagalbos lygis: Displays the current assist level (0-5).
7.3 Riding Modes and Speed Assist
Your tricycle offers three riding modes and five levels of pedal assist.

Figure 7.2: Speed Assist Controls
This close-up image shows the LCD display and the control buttons (+, -, power) on the handlebar, used to adjust the pedal assist level from 1 to 5, and to power the system on or off.
- Electric Tricycle Mode (e-trike): Provides full motor power without pedaling.
- Assisted Tricycle Mode: The motor provides assistance as you pedal. Use the '+' and '-' buttons on the display to adjust the assist level from 1 (minimal assistance) to 5 (maximum assistance).
- Įprastas triračio režimas: The motor is off, and you pedal manually like a traditional tricycle.
7.4 Stabdžių sistema
The tricycle is equipped with disc brakes for reliable stopping power.

Figure 7.3: Disc Brake System
Šis paveikslėlis pateikia stambų planą view of the disc brake system on the tricycle's wheel, showing the rotor and caliper mechanism, which ensures effective and responsive braking.
- Squeeze the brake levers on the handlebars to engage the brakes.
- Apply both front and rear brakes simultaneously for balanced stopping.
- Venkite staigaus, stipraus stabdymo, ypač važiuojant dideliu greičiu arba ant slidžių paviršių.
8. Priežiūra
Reguliarus triračio techninis aptarnavimas užtikrina jo ilgaamžiškumą ir saugų veikimą.
8.1 Valymas
- Nuvalykite rėmą reklamaamp šluoste. Venkite naudoti aukšto slėgio plovimo įrenginius tiesiai ant elektrinių komponentų.
- Clean the chain and lubricate it regularly.
8.2 Padangų priežiūra
- Maintain recommended tire pressure (refer to tire sidewall for specifications).
- Prieš kiekvieną važiavimą patikrinkite padangas, ar jos nenusidėvėjusios, nepradūrusios ar nepažeistos.
- The 4-inch wide fat tires provide excellent traction across various terrains.
8.3 Stabdžių patikra
- Check brake pads for wear and replace them if necessary.
- Įsitikinkite, kad stabdžių svirtys reaguoja jautriai, o trosai nėra nutrūkę.
8.4 Akumuliatoriaus priežiūra
- Nenaudojamą akumuliatorių laikykite vėsioje, sausoje vietoje.
- Charge the battery at least once every two months, even if not used, to maintain its health.
- Venkite dažnai visiškai iškrauti akumuliatorių.
9. Problemų sprendimas
| Problema | Galima priežastis | Sprendimas |
|---|---|---|
| Tricycle does not power on | Battery not charged or improperly installed; loose electrical connection. | Ensure battery is fully charged and securely seated. Check all visible connections. |
| Variklis nepadeda | Pedal assist level set to 0; brake levers engaged; motor or controller issue. | Increase pedal assist level on LCD. Release brake levers. If problem persists, contact support. |
| Stabdžiai jaučiasi silpni | Worn brake pads; loose brake cables; air in hydraulic system (if applicable). | Inspect and replace brake pads. Adjust brake cable tension. Consult a professional for hydraulic brake issues. |
| Neįprasti garsai važiavimo metu | Loose components; dry chain; tire rubbing. | Check all fasteners. Lubricate chain. Inspect for tire rubbing against frame or fenders. |
10. Specifikacijos
Išsamios „Geemax“ elektrinio triračio DDSLC002 techninės specifikacijos.

Figure 10.1: Rider Height and Load Capacity
This image illustrates the recommended rider height range of 5'2" to 6'4" and the maximum load capacity of 350 lbs for the Geemax Electric Tricycle. It also shows the adjustable seat height from 30.5 inches to 38.5 inches.

Figure 10.2: Tricycle Dimensions
This image provides the overall dimensions of the tricycle: Length 170cm (67in), Height 100cm (39in), and Width 71cm (28in). It also reiterates the recommended rider height and maximum load capacity.
| Funkcija | Specifikacija |
|---|---|
| Modelio pavadinimas | DDSLC002 |
| Dviračio tipas | Elektrinis triratis |
| Amžiaus diapazonas | Suaugęs |
| Variklis | 36V 350W Brushless High-Speed Motor |
| Baterija | 36 V 13 Ah ličio baterija (UL sertifikuota) |
| Maksimalus greitis | Iki 20 mylių per valandą (32 km/h) |
| Diapazonas (pagalbinis režimas) | Iki 40 mylių (64 km) |
| Atstumas (elektrinis režimas) | Iki 28 mylių (45 km) |
| Padangos | 20" x 4.0" Puncture-Resistant Fat Tires |
| Rėmo medžiaga | Carbon Steel / Alloy Steel |
| Stabdžių stilius | Diskiniai stabdžiai |
| Pakabos tipas | Kietas |
| Greičių skaičius | 20 (implied by product data, likely referring to gear combinations or assist levels) |
| Ypatinga funkcija | LCD ekranas |
| Įtraukti komponentai | Krepšelis |
| Maksimali apkrova | 350 svarai (158 kg) |
| Rekomenduojamas motociklininko ūgis | 175 cm–188 cm ūgio |
| UPC | 760762256946 |
11. Garantija ir palaikymas
11.1 Informacija apie garantiją
The Geemax Electric Tricycle DDSLC002 comes with a One Year Warranty from the date of purchase. This warranty covers manufacturing defects in materials and workmanship. It does not cover damage due to misuse, accidents, normal wear and tear, or unauthorized modifications.
11.2 Pagalba klientams
For technical assistance, warranty claims, or replacement parts, please contact Geemax customer support. Refer to your purchase documentation for specific contact details or visit the official Geemax websvetainę.