
1. Įvadas
1.1 Produktas baigtasview
The Hikvision DS-7108HGHI-M1/T is an 8-channel Turbo HD DVR designed for reliable surveillance recording in various environments. This digital video recorder supports 1080p Lite recording, providing clear video footage. It incorporates H.265 Pro+ compression technology for efficient storage and video quality. Features include Motion Detection 2.0 for intelligent event identification, 2-way audio support for communication, and HDMI/VGA output options for display connectivity. Remote viewing is available via the Hik-Connect application.
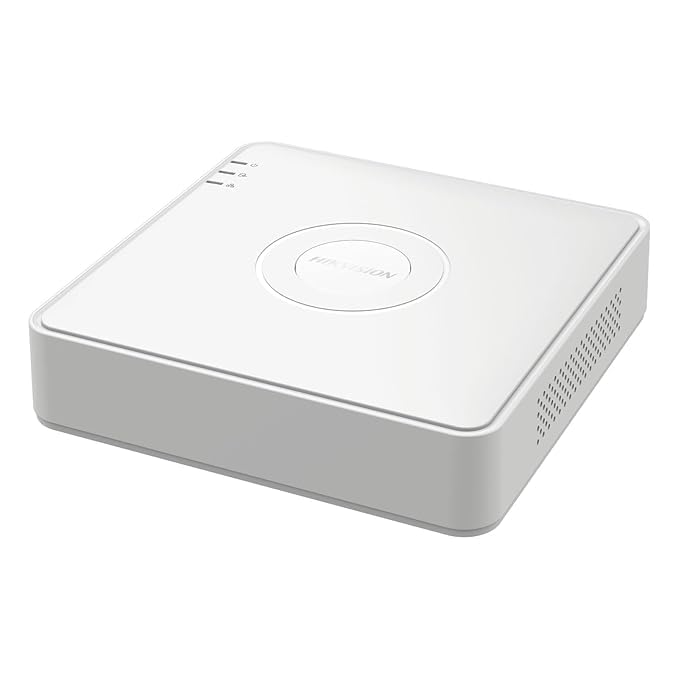
1 paveikslas: viršuje view of the Hikvision DS-7108HGHI-M1/T DVR. This image displays the device's compact white casing with the Hikvision brand logo centrally located. Indicator lights for power, hard drive activity, and network status are visible on the left side of the top panel.
1.2 Pagrindinės savybės
- 8-Channel Turbo HD DVR: Supports up to 8 analog cameras with 1080p Lite recording resolution.
- Išplėstinis suspaudimas: Utilizes H.265 Pro+ video compression for reduced bandwidth and storage while maintaining video quality.
- Two-Way Audio Support: Enables real-time communication through connected cameras via built-in audio input and output.
- Judesio aptikimas 2.0: Intelligent motion detection technology for improved accuracy and reduced false alarms.
- Lankstus ryšys: Equipped with HDMI and VGA outputs, a network port for remote viewing via Hik-Connect, and USB ports for data backup.
1.3 Pakuotės turinys
Patikrinkite, ar pakuotėje yra visi reikalingi daiktai:
- 1 x 4 Channel DVR Recorder (Note: Product title indicates 8-channel, but package content lists 4-channel. Please verify actual product received.)
- 2 x 2MP ColorVu Dome Cameras
- 2 x 2MP ColorVu Bullet Cameras
- 1 x 1TB Surveillance Hard Disk Drive
- 1 x 4 Channel SMPS Power Supply
- 8 x BNC Connectors
- 4 x DC Power Connectors
- 1x HDMI laidas
- 1 x USB pelė
- 1 x Power Adapter for DVR
- 1 x Cable Roll (90 Metres)
- 6 x montavimo varžtai
- Montavimo priedai
2. Sąranka
2.1 Fizinis įrengimas
Before connecting, ensure the DVR is placed on a stable, flat surface with adequate ventilation. Avoid direct sunlight, heat sources, and areas with high humidity or dust.
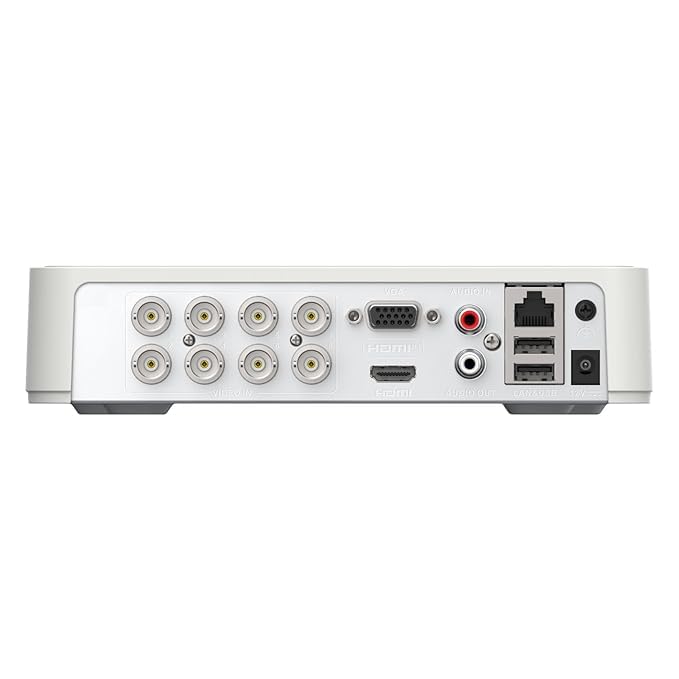
Figure 2: Rear panel of the Hikvision DS-7108HGHI-M1/T DVR. This image illustrates the various connectivity ports available on the back of the device, including multiple BNC connectors for camera inputs, VGA and HDMI outputs for display, audio input and output jacks, an Ethernet port for network connection, USB ports for peripherals, and the DC power input.
2.2 DVR prijungimas
- Prijungti kameras: Attach your analog cameras to the BNC video input ports on the rear panel (refer to Figure 2).
- Prijungti monitorių: Prijunkite monitorių prie DVR naudodami HDMI arba VGA išvesties prievadą.
- Prijunkite tinklą: Nuotoliniam viewing and network access, connect an Ethernet cable from the DVR's LAN port to your router or network switch.
- Prijunkite USB įrenginius: Plug the included USB mouse into one of the USB ports for navigation. Additional USB ports can be used for external storage for backup.
- Prijunkite garsą (pasirinktinai): If using cameras with audio or an external microphone, connect to the Audio In port. Connect speakers to the Audio Out port for two-way audio communication.
- Prijunkite maitinimą: Connect the provided power adapter to the DVR's power input and then to a power outlet.
2.3 Pradinis įjungimas ir konfigūravimas
After connecting all necessary cables, power on the DVR. The system will boot up, and you will be guided through an initial setup wizard on the connected monitor. Follow the on-screen prompts to set up basic parameters such as language, date/time, network settings, and administrator password. It is crucial to set a strong password for security.
3. Naudojimo instrukcijos
3.1 Tiesiogiai View
Once the DVR is powered on and cameras are connected, the live view of all connected cameras will be displayed on the monitor. You can switch between single-camera view, kelių kamerų tinklelis view, and sequence display using the on-screen controls or the USB mouse.
3.2 Įrašymas
DVR palaiko įvairius įrašymo režimus:
- Nepertraukiamas įrašymas: Įrašai visą parą.
- Suplanuotas įrašymas: Įrašai per nustatytą laikotarpį.
- Judesio suaktyvinamas įrašymas: Įrašo tik aptikus judesį.
- Renginio įrašas: Records based on other events like alarm input.
Configure recording schedules and parameters through the DVR's menu system. The H.265 Pro+ compression technology optimizes storage space while maintaining video quality.
3.3 Atkūrimas
Norėdami iš naujoview įrašytas footage:
- Access the 'Playback' menu from the main interface.
- Pasirinkite norimą (-as) kamerą (-as) ir datos / laiko diapazoną.
- Use the timeline to navigate through recordings. Playback controls (play, pause, fast forward, rewind) are available.
3.4 Nuotolinis Viewing via Hik-Connect
The Hik-Connect application allows remote access to your DVR from a smartphone or computer. To set up:
- Ensure the DVR is connected to the internet.
- Download and install the Hik-Connect app on your mobile device.
- Create a Hik-Connect account and add your DVR by scanning the QR code or manually entering the serial number.
- Follow the app's instructions to view live feeds, play back recordings, and receive notifications remotely.
3.5 Judesio aptikimas 2.0
Motion Detection 2.0 is an advanced feature that intelligently identifies movement, reducing false alarms caused by environmental factors. Configure motion detection zones and sensitivity settings in the DVR's menu. When motion is detected, the DVR can trigger recording, send notifications, or activate alarms.
3.6 Dvipusis garsas
If your cameras support audio and are connected to the DVR's audio input/output, you can use the two-way audio feature. This allows you to listen to audio from the camera's location and speak through a connected speaker, enabling interactive communication.
4. Priežiūra
4.1 Bendroji priežiūra
- Valymas: Regularly clean the DVR's exterior with a soft, dry cloth. Do not use liquid or aerosol cleaners.
- Vėdinimas: Ensure the DVR's ventilation openings are clear and not obstructed to prevent overheating.
- Firmware atnaujinimai: Periodiškai tikrinkite gamintojo websvetainę, kurioje rasite programinės įrangos atnaujinimus, kad būtų užtikrintas optimalus našumas ir saugumas.
4.2 Saugojimo valdymas
- Kietojo disko sveikata: Monitor the health status of the internal hard drive through the DVR's system information menu.
- Duomenų atsarginė kopija: Reguliariai kurkite svarbių įrašų atsargines kopijas išoriniame USB diske arba tinklo saugykloje, kad išvengtumėte duomenų praradimo.
- Perrašymo režimas: Configure the DVR to overwrite older recordings when the hard drive is full, or set it to stop recording.
5. Problemų sprendimas
5.1 Bendrosios problemos ir sprendimai
- Nėra vaizdo rodymo:
- Check power connections to the DVR and monitor.
- Verify HDMI/VGA cable connections.
- Įsitikinkite, kad monitoriuje pasirinktas teisingas įvesties šaltinis.
- Nėra kameros vaizdo:
- Patikrinkite kameros maitinimo šaltinį.
- Verify BNC cable connections between camera and DVR.
- Ensure camera is compatible with the DVR's technology (e.g., TVI, CVI, AHD, CVBS).
- Nuotolinis Viewneveikia:
- Confirm the DVR is connected to the internet (check network cable and router status).
- Verify network settings on the DVR.
- Ensure the Hik-Connect app is correctly configured and the DVR is added.
- Nėra įrašo:
- Check if the hard drive is installed and initialized.
- Patikrinkite įrašymo tvarkaraščius ir nustatymus.
- Check hard drive health status.
6. Specifikacijos
6.1 Techninės specifikacijos
| Funkcija | Detalė |
|---|---|
| Modelio numeris | DS-7108HGHI-M1/T |
| Prekės ženklas | HIKONECT (Manufacturer: Hikvision) |
| Kanalų skaičius | 8 |
| Ryšio technologija | Ethernet, HDMI, USB, VGA |
| Suderinami įrenginiai | Fotoaparatas |
| Gaminio matmenys (I x P x A) | 12L x 14W x 5H centimetrai |
| Prekės svoris | 750 gramų |
| Elemento tipo pavadinimas | DVR |
7. Garantija ir palaikymas
7.1 Informacija apie garantiją
Šis produktas tiekiamas su a 2 metų gamintojo garantija. Please retain your proof of purchase for warranty claims. The warranty covers defects in materials and workmanship under normal use. It does not cover damage caused by misuse, accidents, unauthorized modifications, or improper installation.
7.2 Pagalba klientams
For technical assistance, troubleshooting, or warranty inquiries, please contact your retailer or the manufacturer's customer support. Refer to the contact information provided with your purchase or visit the official Hikvision webpalaikymo išteklių svetainė.


