
1. Įvadas
The Next Cine800S GoogleTV Projector is designed to provide a versatile and immersive home entertainment experience. This manual offers essential information for the safe and efficient setup, operation, and maintenance of your projector. Please read this manual thoroughly before using the device.
2. Saugos informacija
- Maitinimas: Use only the specified power adapter. Ensure the power cord is not damaged or pinched.
- Vėdinimas: Neužblokuokite ventiliacijos angų. Palikite pakankamai vietos aplink projektorių tinkamam oro cirkuliavimui ir neperkaitimui.
- Vieta: Projektorių pastatykite ant stabilaus, lygaus paviršiaus. Venkite jo statyti tiesioginiuose saulės spinduliuose, šalia šilumos šaltinių arba aplinkoje, kurioje yra daug dulkių.
- Valymas: Prieš valydami atjunkite maitinimą. Naudokite minkštą, sausą šluostę. Nenaudokite skystų ar aerozolinių valiklių.
- Objektyvo priežiūra: Avoid touching the projector lens directly. Use a soft, lint-free cloth specifically designed for optical lenses if cleaning is necessary.
- Aptarnavimas: Nebandykite patys taisyti projektoriaus. Visus techninės priežiūros darbus patikėkite kvalifikuotiems specialistams.
3. Produktas baigtasview
The Next Cine800S is a Full HD LED projector featuring Google TV. Below are key components and features.

3.1 pav.: priekis view of the Next Cine800S GoogleTV Projector, highlighting its design and key features like 800 ANSI Lumens and Google TV integration.
3.1. Pagrindinės savybės
- Ekrano skiriamoji geba: Full HD 1920x1080, supporting screen sizes from 40 to 200 inches.
- Ryškumas: 800 ANSI Lumens.
- Vaizdo įrašų apdorojimas: Supports 4Kx2K @ 60fps encode/decode.
- Focus & Keystone: Automatic or Manual Focus, Automatic Keystone Correction.
- Operacinė sistema: Google TV with Android 14.
- Srautinio perdavimo paslaugos: Netflix L1, Prime Video, YouTube, Disney+ with L1 DRM Certification.
- Belaidis ryšys: Wi-Fi 802.11 a/b/g/n/ac (2.4G & 5G) and Bluetooth 5.0.
- Atmintis: 2GB LPDDR4 RAM / 8GB eMMC Storage.
- Garsas: Integrated 12W (4W) Speaker.
- Optinė sistema: Dust-Sealed Optical Mechanism.
- Ekrano dubliavimas: Air Screen and Google Cast for iOS & Android devices.
3.2. Prievadai ir jungtys
Identify the various input and output ports on your projector.
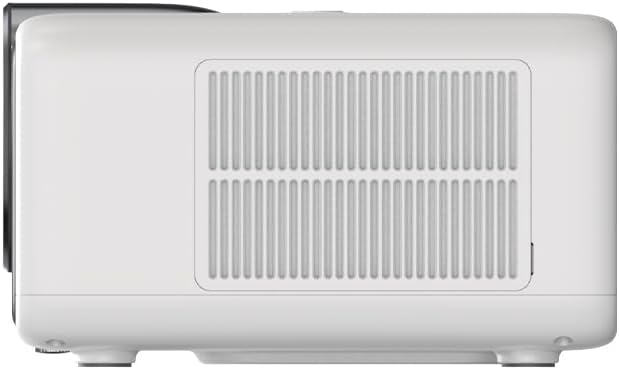
Figure 3.2: Rear panel of the projector, displaying available ports. Note: Actual ports may vary slightly by region or production batch. This model typically includes HDMI, USB, and a 2.5mm Audio Jack.
- HDMI: Connect to external video sources such as Blu-ray players, gaming consoles, or computers.
- USB: Skirta USB atmintinėms prijungti ir medijos atkūrimui files.
- 2.5 mm garso lizdas: Skirta išoriniams garso įrenginiams, pvz., ausinėms ar garsiakalbiams, prijungti.
4. Sąranka
4.1. Išpakavimas ir pradinė apžiūra
- Atsargiai išimkite projektorių ir visus priedus iš pakuotės.
- Check for any signs of damage during transit. If damage is found, contact your retailer immediately.
- Įsitikinkite, kad yra visi išvardyti priedai.
4.2. Projektoriaus išdėstymas
Optimal placement is crucial for the best viewpatirtį.

4.1 pav. Pvzample of projector placement and adjustable screen sizes (40" to 200").
- Atstumas: Position the projector at a suitable distance from the screen or wall to achieve your desired screen size (40 to 200 inches).
- Aukštis: Place the projector on a stable surface or mount it to project the image at the desired height.
- Montavimas: The projector includes a mounting point on its base. Ensure any tripod or mount used is compatible with the projector's screw size and weight. Note that some standard tripod screws may not fit.
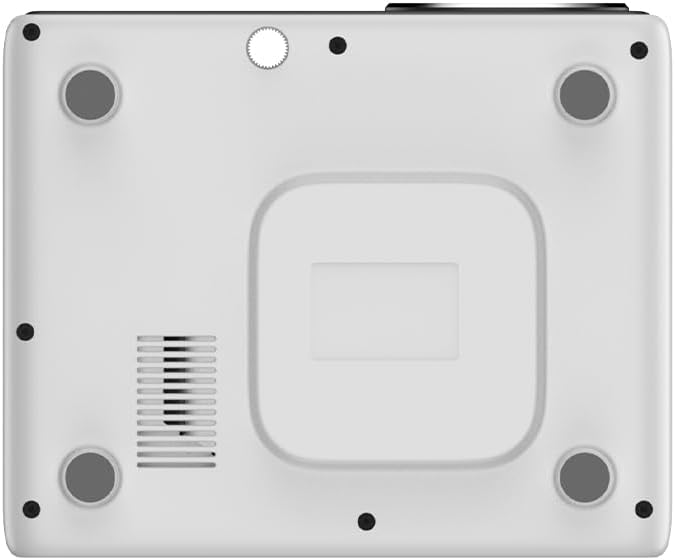
4.2 pav. Apačia view of the projector, indicating the mounting point and ventilation grilles.
4.3. Maitinimo prijungimas
- Prijunkite maitinimo adapterį prie projektoriaus maitinimo įvesties prievado.
- Įkiškite maitinimo adapterį į tinkamą elektros lizdą.
- Paspauskite projektoriaus arba nuotolinio valdymo pulto maitinimo mygtuką, kad jį įjungtumėte.
4.4. Pradinė sąranka ir tinklo prijungimas
- Upon first power-on, the projector will guide you through the initial Google TV setup process.
- Follow the on-screen instructions to select your language, connect to a Wi-Fi network (2.4G or 5G), and log in with your Google account.
- The projector features automatic focus and keystone correction. If the image is not perfectly clear or rectangular, you can access manual adjustment options in the settings menu.
5. Naudojimo instrukcijos
5.1. „Google TV“ naršymas
The projector runs on Google TV, providing a user-friendly interface for accessing content.

Figure 5.1: The Google TV interface on the Next Cine800S Projector, showing recommended content and installed applications.
- Use the remote control to navigate through menus, select apps, and control playback.
- The home screen provides personalized recommendations and quick access to your favorite streaming services.
5.2. Srautinio perdavimo programos
Access popular streaming platforms directly from your projector.

Figure 5.2: Supported streaming applications and Google Play Store access.
- Pre-installed apps include Netflix, Prime Video, YouTube, and Disney+.
- Atsisiųskite papildomų programų iš „Google Play“ parduotuvės.
- Ensure you are logged into your respective service accounts to access content.
5.3. Išorinių įrenginių prijungimas
- HDMI: Connect your device to an HDMI port. The projector will automatically detect the input or you can manually select it from the input source menu.
- USB: Insert a USB drive into the USB port. The media player application will typically launch automatically, allowing you to browse and play supported media files (JPG, PNG, BMP, JPEG, MP3, M4A, MP2, WAV, FLAC, MP4, MOV, TS, DAT, F4V, 3GP).
5.4. Ekrano atspindėjimas
The projector supports Air Screen and Google Cast for mirroring content from your iOS or Android devices.
- Įsitikinkite, kad jūsų mobilusis įrenginys ir projektorius prijungti prie to paties „Wi-Fi“ tinklo.
- On your mobile device, open the screen mirroring function (e.g., 'Screen Cast', 'Smart View', 'AirPlay').
- Pasirinkite projektorių iš galimų įrenginių sąrašo.
6. Priežiūra
Reguliarus techninis aptarnavimas užtikrina optimalų veikimą ir pailgina projektoriaus tarnavimo laiką.
6.1. Objektyvo valymas

Figure 6.1: Close-up of the projector lens, which requires careful cleaning.
- Use a soft, lint-free cloth or a lens cleaning brush to gently remove dust from the lens surface.
- For stubborn smudges, use a specialized lens cleaning solution applied to a microfiber cloth, not directly to the lens.
- Avoid abrasive materials or excessive force, which can scratch the lens.
6.2. Cleaning Ventilation Ports
- Periodically check the ventilation grilles for dust accumulation.
- Use a soft brush or a vacuum cleaner with a brush attachment to gently clean the grilles.
- Nekiškite jokių daiktų į ventiliacijos angas.
6.3. Programinės įrangos atnaujinimai
- Ensure your projector is connected to the internet.
- Navigate to the system settings to check for and install available software updates. Updates can improve performance and add new features.
7. Problemų sprendimas
Šiame skyriuje aptariamos dažniausiai pasitaikančios problemos, su kuriomis galite susidurti naudodami projektoriumi.
| Problema | Galima priežastis | Sprendimas |
|---|---|---|
| Nėra galios | Atjungtas maitinimo laidas, problema su elektros lizdu | Patikrinkite maitinimo laido jungtį. Išbandykite kitą maitinimo lizdą. |
| Nėra vaizdo | Input source not selected, device not connected, lens cap on | Ensure input source is correctly selected. Check HDMI/USB connections. Remove lens cap. |
| Vaizdas neryškus | Fokusas nepakoreguotas | Adjust focus manually using the projector's focus ring or through the settings menu if automatic focus is not sufficient. |
| Image is distorted/trapezoidal | Keystone not adjusted, projector not perpendicular to screen | The projector has automatic keystone correction. If the image is still distorted, access the manual keystone correction settings to fine-tune the image. |
| Nėra garso arba prasta garso kokybė | Volume too low, external audio device not connected, speaker issue | Increase volume. Check external audio connections if used. If internal speaker sound is distorted at low volumes, consider connecting external speakers via the 2.5mm audio jack or Bluetooth. |
| Wi-Fi ryšio problemos | Neteisingas slaptažodis, maršrutizatoriaus problemos, signalo trukdžiai | Verify Wi-Fi password. Restart router. Ensure projector is within Wi-Fi range. |
| Nuotolinio valdymo pultas neveikia | Batteries low/dead, IR sensor blocked | Pakeiskite baterijas. Įsitikinkite, kad tarp nuotolinio valdymo pulto ir projektoriaus IR jutiklio nėra jokių kliūčių. |
8. Specifikacijos
Detailed technical specifications for the Next Cine800S GoogleTV Projector.
| Funkcija | Specifikacija |
|---|---|
| Modelis | Cine800S |
| Ekrano technologija | LED projektorius |
| Gimtoji raiška | „Full HD“ 1920 x 1080 raiška |
| Ryškumas | 800 ANSI liumenai |
| Projekcijos dydis | 40" — 200" |
| Vaizdo įrašų dekodavimas | 4Kx2K @ 60fps |
| Fokusas | Automatinis arba rankinis |
| Keystone Korekcija | Automatinis |
| Operacinė sistema | Google TV, Android 14 |
| DRM Certification | Netflix L1, Prime Video, YouTube, Disney+ L1 |
| Wi-Fi | 802.11 a/b/g/n/ac (2.4G & 5G) |
| Bluetooth | 5.0 |
| RAM | 2 GB LPDDR4 |
| Vidinė saugykla | 8 GB eMMC |
| Garsiakalbio išvestis | 12 W (4 W) |
| Uostai | HDMI, 2.5mm Audio Jack, USB |
| Palaikomi medijos formatai | JPG, PNG, BMP, JPEG, MP3, M4A, MP2, WAV, FLAC, MP4, MOV, TS, DAT, F4V, 3GP, FAT, NTFS |
| Optinis mechanizmas | Dust-Sealed System |
| Ekrano veidrodis | Air Screen, Google Cast (iOS & Android) |
9. Garantija ir palaikymas
For warranty information, please refer to the documentation provided with your purchase or visit the official Next website. For technical support, product inquiries, or service requests, please contact Next customer service through their official channels.
Kreipdamiesi į palaikymo tarnybą, laikykite po ranka pirkimo kvitą ir produkto serijos numerį.