
aigo Luna A275
Aigo Luna A275 Mini-Tower Gaming PC Case User Manual
Model: Luna A275 (AC-A275-B-BR1)
1. Įvadas
The Aigo Luna A275 is a compact mini-tower PC case designed for users seeking a powerful system in a reduced footprint. It features a modern design with a tempered glass side panel and includes three pre-installed Rainbow fans for efficient cooling and aesthetic lighting. This manual provides essential information for the setup, operation, maintenance, and troubleshooting of your Aigo Luna A275 PC case.
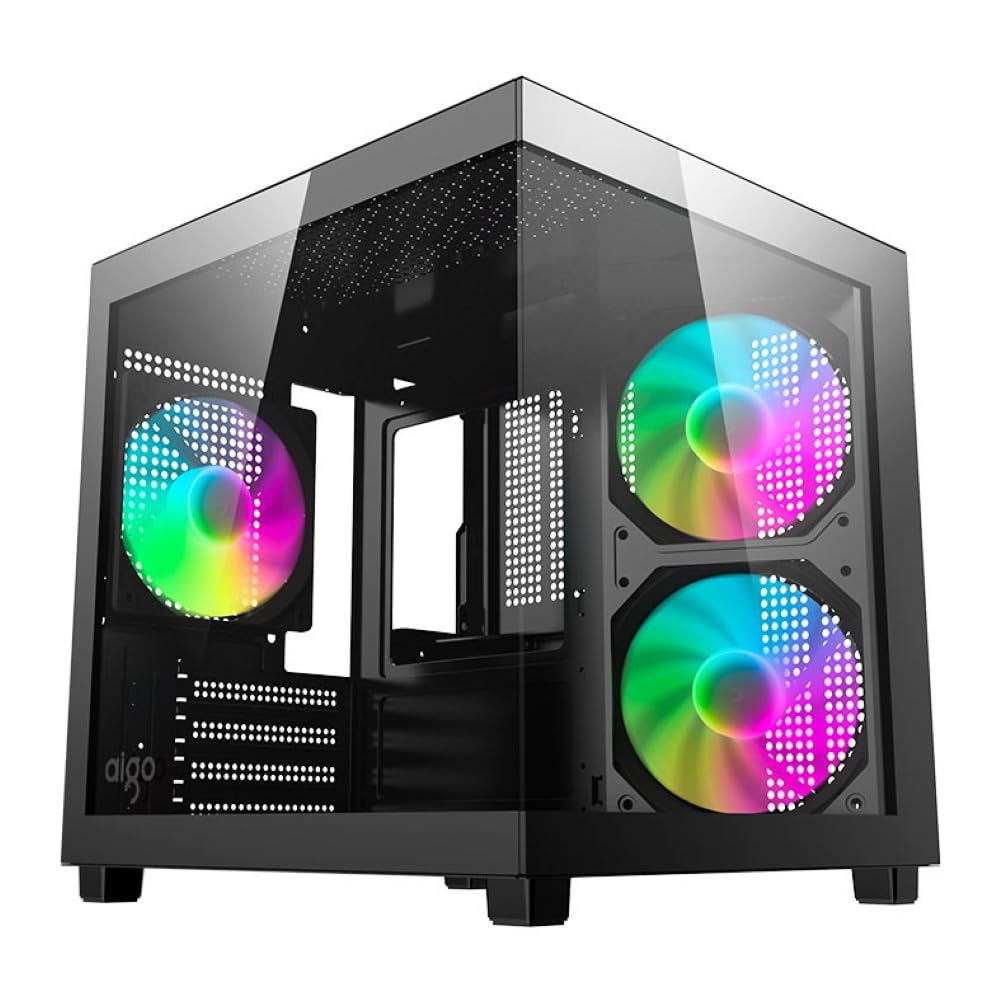
1.1 vaizdas: priekis view of the Aigo Luna A275 Mini-Tower Gaming PC Case, showcasing its compact design and illuminated Rainbow fans.
2. Pagrindinės savybės
- Pre-installed Rainbow Fans: Includes 3 pre-installed Rainbow fans for enhanced airflow and aesthetic lighting without additional accessories.
- Grūdinto stiklo šoninė panelė: A tempered glass side panel allows for clear viewing of internal components and enhances the system's aesthetics.
- Compact Mini-Tower Design: Optimizes desk space while maintaining compatibility with essential PC components.
- Pagrindinės plokštės suderinamumas: Supports Micro-ATX and Mini-ITX motherboards, offering flexibility for various hardware configurations.
- GPU palaikymas: Accommodates graphics cards up to 290 mm in length, suitable for gaming and high-performance applications.
- CPU aušintuvo atstumas: Supports CPU coolers up to 155 mm in height, providing options for effective cooling.
- Skysčio aušinimo palaikymas: Compatible with water coolers up to 240 mm, allowing for advanced liquid cooling solutions.
- Saugojimo parinktys: Dedicated space for 1 x 3.5" HDD and 2 x 2.5" SSDs, balancing loading speed and storage capacity.
- Priekinis įvesties / išvesties skydelis: Equipped with 1 x USB 3.0, 2 x USB 2.0, and HD audio connections for convenient peripheral access.
- Optimized Internal Structure: Designed for easy assembly and organized component management, contributing to a clean and functional interior.
3. Sąranka ir diegimas
Prieš pradėdami diegimą, įsitikinkite, kad turite visus reikalingus komponentus ir įrankius. Konkrečias diegimo instrukcijas rasite savo pagrindinės plokštės ir komponentų vadovuose.
3.1 Bylos parengimas
- Padėkite dėklą ant stabilaus, lygaus paviršiaus.
- Carefully remove the tempered glass side panel by unscrewing the thumb screws and gently sliding it off. Set it aside on a soft, non-abrasive surface to prevent scratches.
- Remove the rear side panel to access the cable management area.

3.1 paveikslėlis: Interjeras view of the Aigo Luna A275 case with the side panel removed, showing the internal layout and fan placement.
3.2 Komponentų diegimas
- Pagrindinė plokštė: Install the I/O shield into the rear opening of the case. Secure the motherboard to the standoffs using appropriate screws. Ensure all standoffs align with the motherboard's screw holes.
- Maitinimo blokas (PSU): Install the PSU into its designated compartment, typically at the bottom rear of the case. Secure it with screws from the rear.
- Saugojimo diskai:
- For 3.5" HDDs: Mount the drive into the 3.5" drive bay.
- For 2.5" SSDs: Mount the drives into the 2.5" SSD mounts.
- Vaizdo plokštė (GPU): Remove the necessary expansion slot covers. Insert the GPU into the PCIe slot on the motherboard and secure it with screws.
- Cooling (Optional): If installing additional fans or a liquid cooler, mount them in the designated locations (top, side, bottom, rear) as per the case specifications.

3.2 pav.: Vidinis view of the Aigo Luna A275 case, illustrating potential component placement such as motherboard, GPU, and fans.
3.3 Kabelių valdymas
Route all power and data cables through the cutouts in the motherboard tray to the rear side of the case. Use cable ties or Velcro straps to bundle and secure cables, ensuring optimal airflow and a clean appearance.
3.4 Priekinio skydelio kabelių prijungimas
Prijunkite priekinio skydelio laidus (USB 3.0, USB 2.0, HD garso, maitinimo jungiklio, atstatymo jungiklio, maitinimo šviesos diodo, HDD šviesos diodo) prie atitinkamų pagrindinės plokštės jungčių. Tikslias jungčių vietas rasite pagrindinės plokštės vadove.
4. Operacija
Once all components are installed and cables connected, replace the side panels. Connect your monitor, keyboard, mouse, and power cable to the system.
- Maitinimas: Press the power button located on the front I/O panel. The system should boot, and the Rainbow fans will illuminate.
- Priekinio skydelio prievadai: Use the USB 3.0, USB 2.0, and audio jacks on the front panel for convenient access to peripherals and audio devices.
- Ventiliatoriaus veikimas: The pre-installed Rainbow fans operate automatically to provide airflow. Their illumination is static Rainbow.
5. Priežiūra
Reguliarus techninis aptarnavimas padeda užtikrinti optimalų kompiuterio komponentų veikimą ir ilgaamžiškumą.
- Dulkių filtrai: Periodically check and clean any removable dust filters (if present) to maintain good airflow and prevent dust buildup inside the case. Use compressed air or a soft brush.
- Išorinis valymas: Išorinius paviršius nuvalykite minkšta, damp šluoste. Venkite abrazyvinių valiklių ar tirpiklių. Grūdinto stiklo plokštei valyti naudokite stiklo valiklį ir mikropluošto šluostę.
- Vidinės dulkės: Every few months, open the case and use compressed air to remove dust from internal components, especially heatsinks and fan blades. Ensure the system is powered off and unplugged before cleaning.
6. Problemų sprendimas
Jei kyla problemų, apsvarstykite šiuos pagrindinius trikčių šalinimo veiksmus:
- Nėra galios:
- Įsitikinkite, kad maitinimo laidas yra tvirtai prijungtas prie maitinimo bloko ir sieninio lizdo.
- Check if the PSU's power switch is in the "ON" position.
- Patikrinkite, ar priekinio skydelio maitinimo jungiklio kabelis tinkamai prijungtas prie pagrindinės plokštės.
- Nėra ekrano:
- Confirm that the monitor is connected to the graphics card (not the motherboard's integrated graphics, unless intended).
- Įstatykite vaizdo plokštę į PCIe lizdą.
- Check RAM modules are properly seated.
- Fans Not Spinning/Lighting:
- Ensure fan power connectors (e.g., 4-Pin MOLEX) are securely connected to the power supply.
- Patikrinkite, ar nėra kliūčių, trukdančių suktis ventiliatoriui.
- Perkaitimas:
- Verify that all case fans are spinning correctly and oriented for proper airflow.
- Clean any dust buildup from fans and heatsinks.
- Ensure adequate space around the case for ventilation.
7. Techninės specifikacijos
| Funkcija | Specifikacija |
|---|---|
| Modelis | Luna A275 (AC-A275-B-BR1) |
| Atvejo tipas | Mini bokštas |
| Pagrindinės plokštės suderinamumas | „Micro-ATX“, „Mini-ITX“ |
| Plieno storis | 0.45 mm SPCC |
| Drive Bays | 1 x 3.5 colio kietieji diskai, 2 x 2.5 colio SSD |
| Išplėtimo lizdai | 4 lizdai |
| Maksimalus GPU ilgis | 290 mm |
| Maksimalus procesoriaus aušintuvo aukštis | 155 mm |
| PSU palaikymas | Max 140 mm length |
| Supported Water Cooler | Viršus: 240 mm |
| Palaikomi gerbėjai | Top: 2 x 120 mm, Side: 2 x 120 mm, Bottom: 2 x 120 mm, Rear: 1 x 120 mm |
| Priekinės įvesties / išvesties prievadai | 2 x USB 2.0, 1 x USB 3.0, HD Audio, Power, Reset |
| Šoninis skydelis | Grūdintas stiklas |
| Matmenys (I x P x A) | 300 x 275 x 298 mm |
| Iš anksto įdiegti ventiliatoriai | 3 x 120mm Rainbow Fans |
| Ventiliatoriaus greitis | 1000 ± 10 % aps./min |
| Ventiliatoriaus triukšmo lygis | 18 dBA (maks.) |
| Ventiliatoriaus oro srautas | 40 CFM |
| Ventiliatoriaus jungtis | 4-Pin MOLEX |
8. Garantija ir palaikymas
This Aigo Luna A275 PC case comes with a 12 mėnesių garantija nuo įsigijimo datos. Ši garantija taikoma gamybos defektams ir medžiagų defektams, atsiradusiems įprasto naudojimo metu.
For warranty claims or technical support, please contact your retailer or the official Aigo support channels. Keep your proof of purchase for warranty validation.
Garantija netaikoma žalai, atsiradusiai dėl netinkamo įrengimo, netinkamo naudojimo, neleistinų modifikacijų, nelaimingų atsitikimų ar stichinių nelaimių.
Ask a question about this manual
Ask about setup, troubleshooting, compatibility, parts, safety, or missing instructions. Manuals+ will review the question and use this page’s manual context to help answer it.