1. Įvadas
Thank you for choosing the VEVOR 155A 3-in-1 TIG Welder. This multifunctional unit is designed for HF TIG welding, ARC (MMA) welding, and a specialized cleaning mode, making it suitable for a wide range of metals including stainless steel, iron, mild steel, copper, and nickel. This manual provides essential information for safe operation, setup, maintenance, and troubleshooting to ensure optimal performance and longevity of your welding machine.

2. Saugos informacija
Naudodami suvirinimo įrangą, visada teikite pirmenybę saugai. Nesilaikant saugos nurodymų, galite sunkiai susižaloti ar net mirti.
- Elektros šokas: Suvirinimo srovė gali sukelti mirtiną elektros smūgį. Užtikrinkite tinkamą įžeminimą ir izoliaciją. Niekada nelieskite įtampos tiekiančių elektros dalių.
- Dūmai ir dujos: Suvirinimo metu išsiskiria dūmai ir dujos, kurios gali būti pavojingos sveikatai. Dirbkite gerai vėdinamoje patalpoje arba naudokite dūmų ištraukiklį.
- Lanko spinduliai: Lanko spinduliai gali nudeginti akis ir odą. Visada dėvėkite suvirinimo šalmą su tinkamu atspalviu, apsauginius akinius ir apsauginius drabužius.
- Gaisras ir sprogimas: Suvirinimo kibirkštys gali sukelti gaisrą arba sprogimą. Laikykite degias medžiagas atokiau nuo suvirinimo zonos. Turėkite po ranka gesintuvą.
- Nudegimai: Hot metal and sparks can cause severe burns. Wear protective gloves, long sleeves, and other appropriate personal protective equipment (PPE).
- Triukšmas: High noise levels can damage hearing. Wear ear protection.
3. Produktas baigtasview
3.1. Pakuotės turinys
- 1 x VEVOR 155A 3-in-1 TIG Welder (Model VV-TW-155A)
- 1 x 12FT/3.66 m QQ150 Welding Gun
- 1 x 6.56 pėd./2 m žemės paviršiusamp
- 1 x 5.58 pėd. / 1.7 m maitinimo kabelis
- 1 x 9.84 pėd./3 m dujų vamzdis
- 2 x žarna Clamps
3.2. Valdymo skydelis

- Dabartinis ekranas: Digital display showing the welding current.
- Priešgasinis ir dujų uždelsimas: Controls the pre-flow and post-flow of shielding gas.
- Laboursaving Modes (2T/4T): Toggle between 2T (Spot Welding) and 4T (Continuous Welding) modes.
- Žibintuvėlio jungiklis: Connection point for the welding torch.
- Teigiamas terminalas: Išvesties gnybtas teigiamam prijungimui.
- TIG degiklio jungtis: Dedicated connection for the TIG torch.
- Neigiamas terminalas: Išvesties gnybtas neigiamam prijungimui.
- Perkaitimo lemputė: Indicator for overheating.
- Režimų jungiklis: Selector for TIG, MMA (ARC), and Clean modes.
- Srovės rankenėlė: Adjusts the welding current (10A to 155A).
3.3. Galinis skydelis
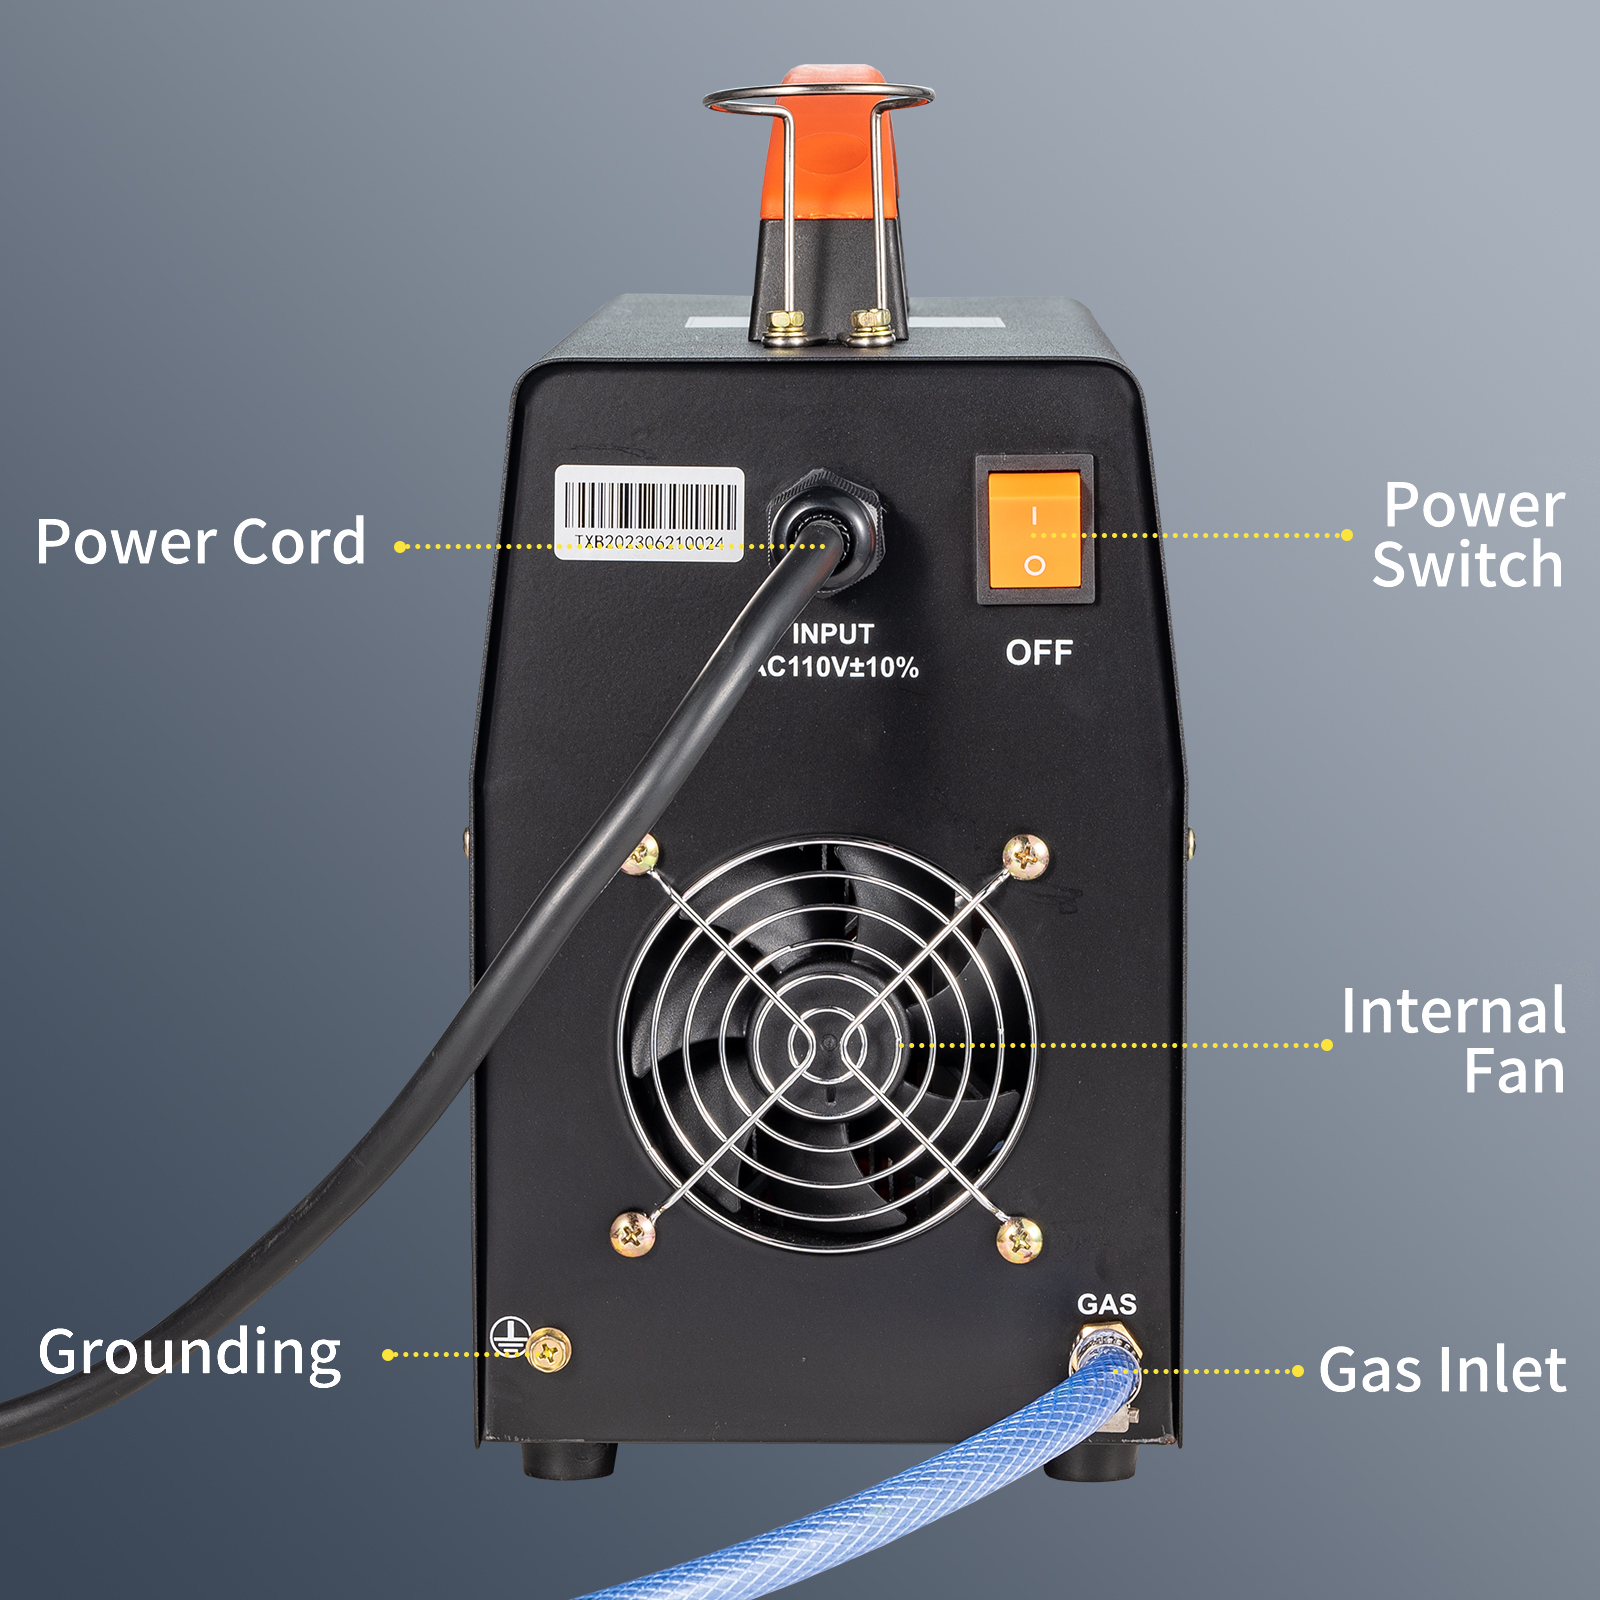
- Maitinimo laidas: Main power input connection.
- Maitinimo jungiklis: ON/OFF switch for the unit.
- Vidinis ventiliatorius: Aušinimo ventiliatorius šilumos išsklaidymui.
- Įžeminimas: Įžeminimo terminalas saugumui.
- Dujų įvadas: Connection point for shielding gas supply.
4. Sąranka
4.1. Elektrinis sujungimas
- Įsitikinkite, kad maitinimo jungiklis galiniame skydelyje yra padėtyje „OFF“ (išjungta).
- Connect the provided power cable to the power input on the rear panel.
- Plug the power cable into a suitable AC110V±10%(50/60Hz) power outlet. Ensure the outlet is properly grounded.
- Connect the grounding terminal on the rear panel to a reliable earth ground.
4.2. Gas Connection (for TIG Welding)
- Attach one end of the provided gas pipe to the Gas Inlet on the rear panel. Secure it with a hose clamp.
- Connect the other end of the gas pipe to your shielding gas regulator (not included) on your gas cylinder (e.g., Argon). Secure it with the second hose clamp.
- Ensure all gas connections are tight to prevent leaks.
4.3. Degiklis ir įžeminimasamp Ryšys

- TIG suvirinimui:
- Connect the QQ150 Welding Gun to the TIG Torch Connection on the front panel.
- Prijunkite įžeminimo Clamp to the Positive Terminal.
- Lankinio (MMA) suvirinimo atveju:
- Prijunkite elektrodo laikiklį (nepridedamas) prie teigiamo poliaus.
- Prijunkite įžeminimo Clamp prie neigiamo poliaus.
- Švariam režimui:
- Prijunkite valymo šepetėlį (nepridedamas) prie teigiamo poliaus.
- Prijunkite įžeminimo Clamp prie neigiamo poliaus.
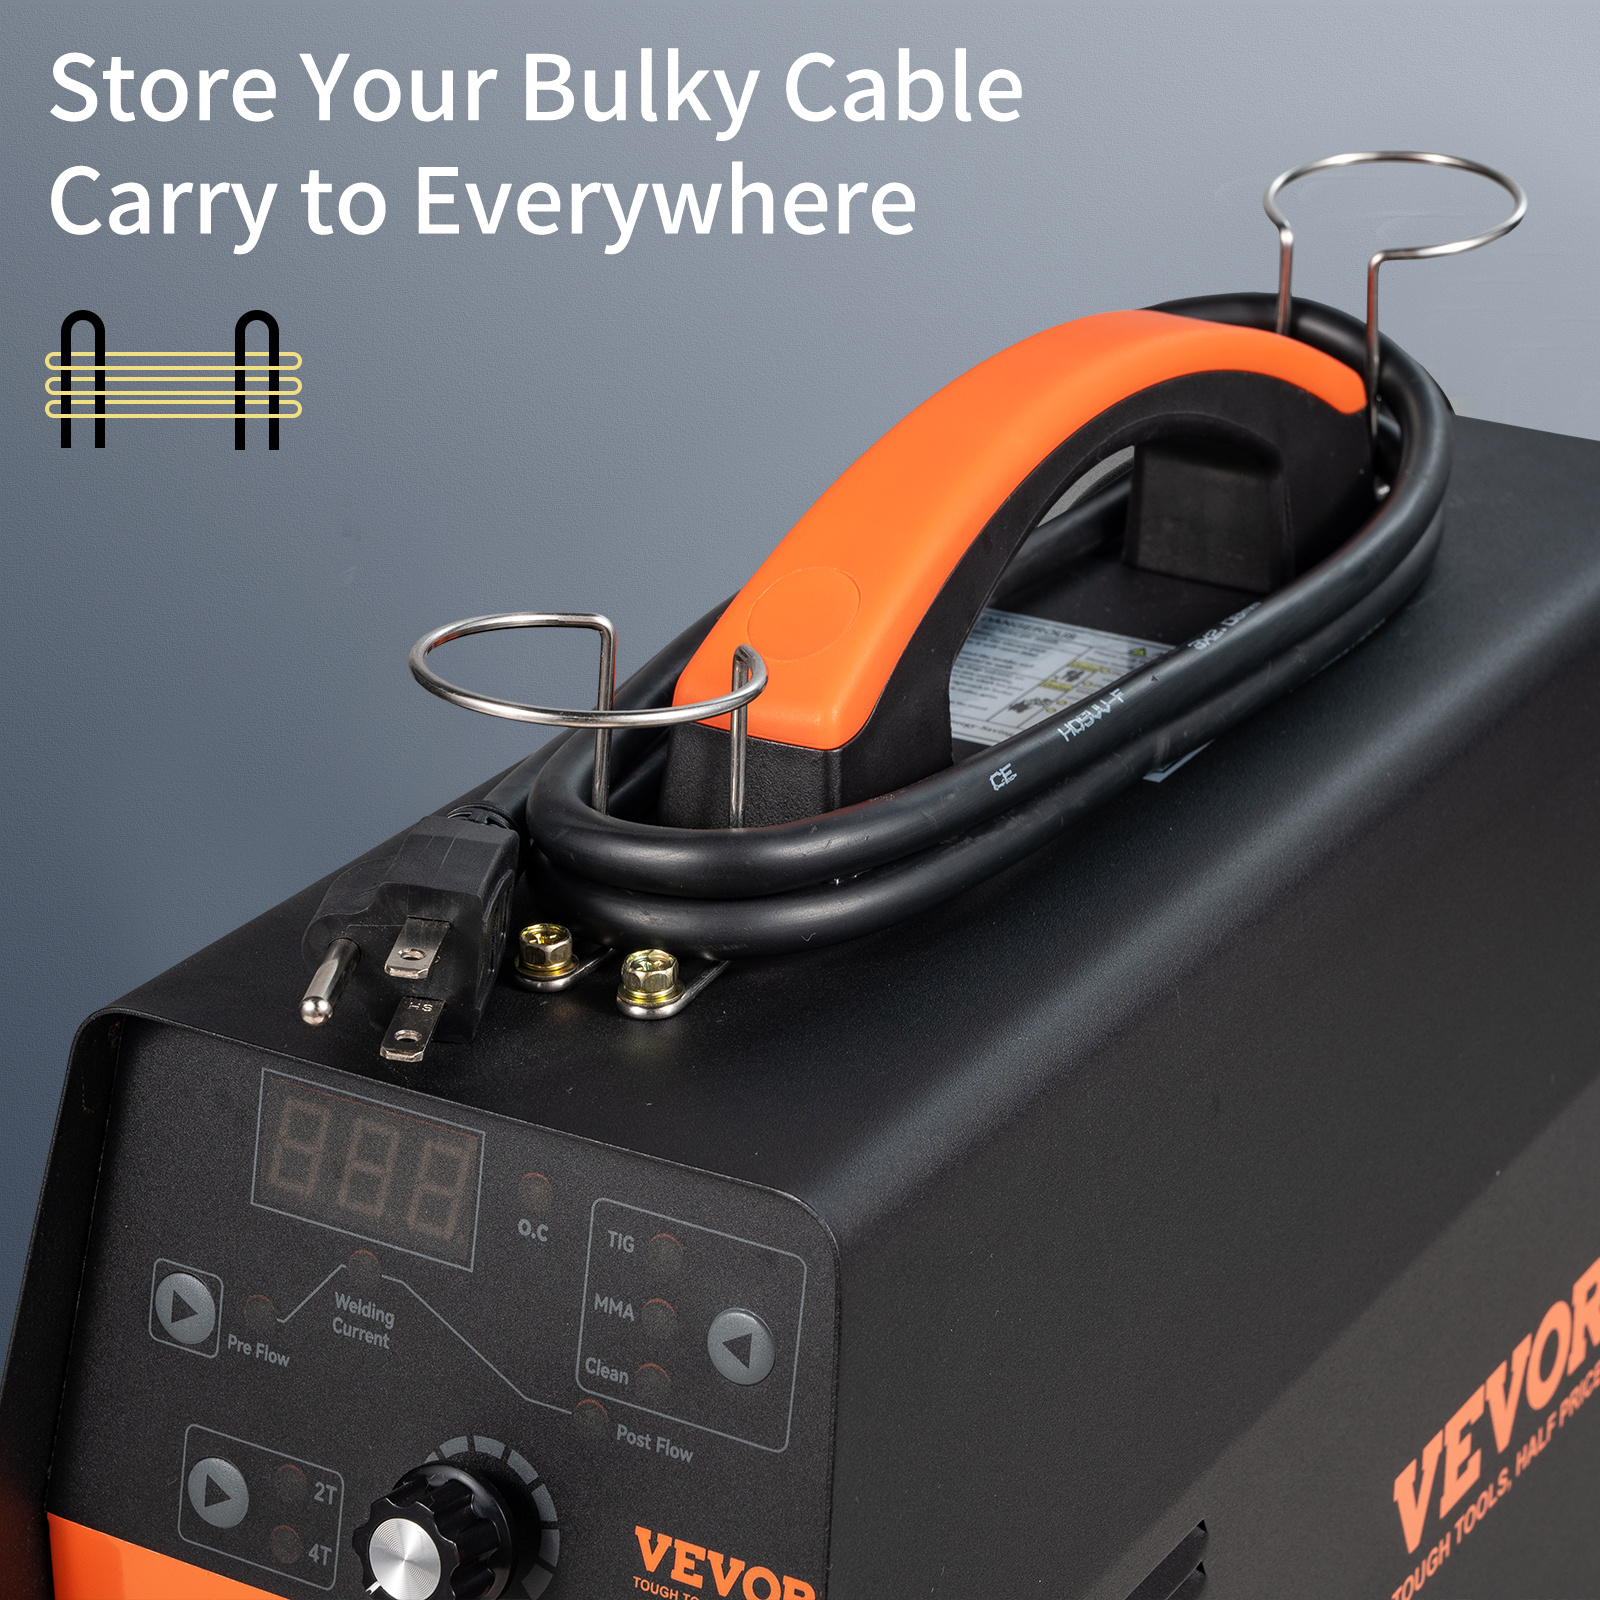
4.4. Kabelių valdymas

Utilize the integrated cable holders on top of the unit to neatly store bulky cables, the welding gun, and the power cable when not in use or during transport.
5. Naudojimo instrukcijos
5.1. Maitinimo įjungimas/išjungimas
- To power on, flip the Power Switch on the rear panel to the 'ON' position. The digital display will illuminate.
- To power off, flip the Power Switch to the 'OFF' position.
5.2. Režimo pasirinkimas
Use the Modes Switch on the front panel to select your desired operation mode:
- TIG: For Gas Tungsten Arc Welding.
- MMA (ARC): For Shielded Metal Arc Welding.
- Išvalyti: For post-welding cleaning processes.
5.3. Srovės reguliavimas
Rotate the Current Knob on the front panel to adjust the welding current from 10A to 155A. The selected current will be shown on the Current Display.
5.4. 2T/4T Mode (TIG Welding)

The 2T/4T switch allows for different torch trigger functionalities:
- 2T (taškinis suvirinimas): Press and hold the torch trigger to weld; release to stop. Suitable for short welds, tack welding, and thin plate welding.
- 4T (nuolatinis suvirinimas): Press and release the torch trigger to start welding; press and release again to stop. Ideal for prolonged welding projects, reducing finger fatigue.
5.5. Pre Gas & Gas Delay (TIG Welding)
Adjust the Pre Gas and Post Gas settings to ensure proper shielding gas flow before and after the arc. This prevents oxidation of the weld pool and ensures clean, high-quality welds.
5.6. Welding Techniques and Materials

- Tinkami metalai: Nerūdijantis plienas, geležis, mažaanglis plienas, varis, nikelis.
- Maksimalus suvirinimo storis: 0.1 colio / 3 mm.
- Rekomenduojami TIG suvirinimo strypai: 1/16 colio (1.6 mm), 3/32 colio (2.4 mm).
- Recommended MMA Welding Rods: E6010 (3/32"-2.4 mm), E6011 (3/32"-2.4 mm), E6013 (1/16"-1.6 mm, 3/32"-2.4 mm), E7014 (3/32"-2.4 mm), and E7018 (3/32"-2.4 mm).

6. Priežiūra
6.1. Aušinimo sistema

The unit features a professionally crafted cooling fan (4500 RPM) and a unique air channel design to enhance heat dissipation. Regularly inspect the internal fan and air vents for dust and debris. Clean as necessary using compressed air to ensure optimal airflow and prevent overheating.
6.2. Bendras valymas
Keep the welder clean and free from dust, dirt, and moisture. The unit is designed to be dustproof and waterproof to a certain extent, but regular cleaning will prolong its lifespan.
6.3. Kabelių ir jungčių patikra
Periodically check all cables, connections, and the welding torch for wear, damage, or loose connections. Replace any damaged components immediately.

Inspect the TIG torch head components (collet, collet body, ceramic nozzle, tungsten electrode) for wear and replace them as needed to maintain welding quality.
7. Problemų sprendimas
| Problema | Galima priežastis | Sprendimas |
|---|---|---|
| Suvirinimo aparatas neįsijungia | Nėra maitinimo šaltinio; Išjungtas maitinimo jungiklis; Sugedęs maitinimo laidas | Patikrinkite maitinimo lizdą ir grandinės pertraukiklį; Įsitikinkite, kad maitinimo jungiklis yra ĮJUNGTAS; Patikrinkite ir pakeiskite maitinimo laidą, jei jis pažeistas. |
| Įjungta perkaitimo lemputė | Unit is overheating due to prolonged use or blocked vents | Allow the unit to cool down; Ensure cooling fan and vents are clear of obstructions. |
| Poor arc start or unstable arc (TIG/MMA) | Incorrect current setting; Contaminated electrode/tungsten; Poor ground connection; Insufficient gas flow (TIG) | Adjust current; Clean or replace electrode/tungsten; Ensure ground clamp has good contact; Check gas supply and flow rate. |
| Excessive spatter (MMA) | Incorrect current; Improper electrode angle or arc length | Adjust current; Maintain proper electrode angle and arc length. |
| Porous welds (TIG) | Insufficient shielding gas; Gas leaks; Contaminated base metal | Check gas supply and flow; Inspect gas lines for leaks; Clean base metal thoroughly before welding. |
8. Specifikacijos
| Funkcija | Specifikacija |
|---|---|
| Modelis | VV-TW-155A |
| Funkcijos | TIG, ARC (MMA), Clean |
| Išėjimo srovė | 155A |
| Įvesties tomastage | AC110V±10% (50/60Hz) |
| Darbo ciklas | 30% at 104 °F |
| Suitable Metals | Nerūdijantis plienas, geležis, švelnus plienas, varis, nikelis |
| Welding Thickness (Max) | 0.1 colio / 3 mm |
| Izoliacijos laipsnis | F |
| Prekės dydis | 14.6 colio x 5.9 colio x 11.8 colio (37 x 15 x 30 cm) |
| Prekės svoris | 14 svarai (6.35 kg) |
| Sertifikavimas | CE |
9. Vartotojo patarimai
- For beginners, start with lower current settings and practice on scrap metal to get a feel for the machine and different welding modes.
- Always ensure your workpiece is clean and free of rust, paint, or oil for the best welding results and to prevent contamination.
- When using TIG, maintain a consistent arc length and torch angle for smooth, uniform beads.
- The 4T mode is particularly useful for longer welds, as it allows you to release the trigger after initiating the arc, reducing hand strain.
10. Garantija ir palaikymas
For warranty information, technical support, or service inquiries, please contact VEVOR customer service through their official channels. Keep your purchase receipt and product model number (VV-TW-155A) handy for faster assistance.


